|
Classic
Airframes' 1/48
scale
B-57B Canberra
by Phil Hale
|
 |
|
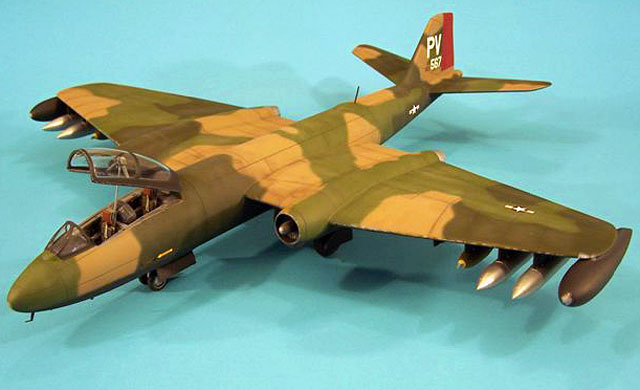
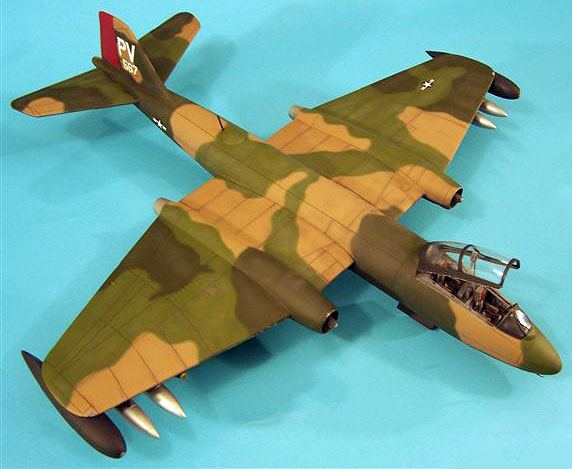
B-57B
Canberra
|

Classic
Airframes' 1/48
scale B-57B
Canberra is
available online
from Squadron
For a
detailed
examination of
the contents of
Classic
Airframes' 1/48
scale Canberra,
see the in-box
review elsewhere
on HyperScale.
Man, I thought I
would never see
an injection
molded 1/48th
scale model of a
B-57B in my life
time. There was
a nice vacuum
form kit
produced many
years ago and
the
Italeri/Testors
kits in 1/72
scale. Now,
1/48th scale jet
modelers will be
able to fill in
the some of the
holes in their
collections.
Okay, lets get
right down to
brass tacks
here. This is
basically a new
kit.
You get new
front and rear
fuselage halves
and new wings as
well. You also
get a new
armament tree
that also has
new parts for
the canopy and
the cockpit. You
get a new canopy
and windscreen
as well. I
advise extreme
caution when
working with the
main portion of
the new canopy.
It is thick and
looks sturdy but
it cracked while
I was polishing
mine. If you
have the
capability, you
might want to
consider vacuum
forming a
replacement.
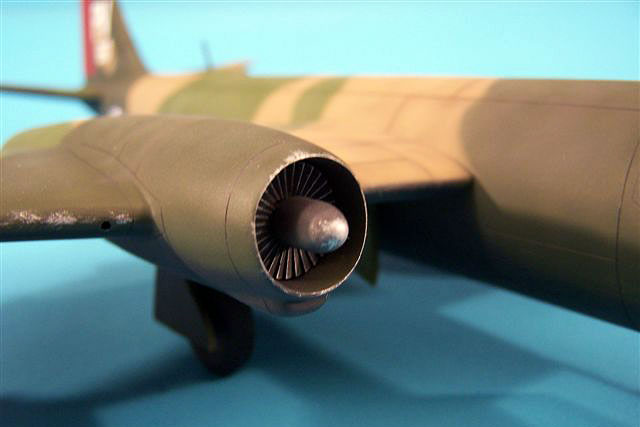
On the Canberra
Mk2 and the
T.17, the engine
nacelle fronts
were separate
pieces and it
took some time
to test fit and
blend them into
the wings. You
won’t have to
worry about that
part on the
B-57B. You’ll
still need to
fill and sand
the inside of
the engine
fronts to
eliminate the
seam but that
won’t take long.
The armament
tree gives you
four napalm
tanks without
fins and four Mk
117 750 lbs
bombs.
You also get the
wing pylons and
sway braces. The
wing tanks
appear to be
bigger and I’ve
heard that this
was a problem
with the other
Canberra kits.
Fuselage:
I advise putting
the forward and
rear fuselage
halves together
first. Make sure
that you get
them lined up
correctly
otherwise you
will have
problems later.
You’ll need to
put plenty of
weight in the
nose for it to
sit properly on
the nose gear.
The instruction
sheet recommends
6 oz. Or 170
grams. When you
think you’re got
enough in, put
some more in
just be on the
safe side.
I recommend
putting the
cockpit and the
wheel well in
place and then
fill in around
it with the
weight. I glued
the cockpit
coaming in the
right fuselage
side first and
let it dry good.
Then when the
cockpit was
ready, I glued
it to the
underside of the
coaming. When
that was dry, I
positioned the
wheel well under
the cockpit.
Make sure that
you line up the
wheel well as
this will
adversely affect
the alignment of
the nose gear.
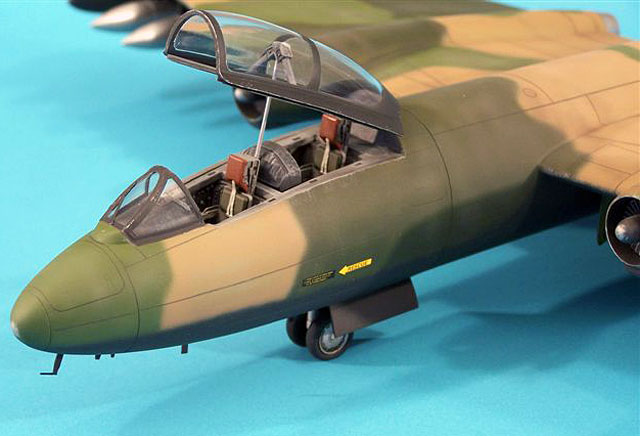
You’ll need to
modify the nose
gear as it sets
too high. I took
about an 1/8th
of an inch off
of mine and it
still sits a
little too high.
The instructions
say to cut the
drag links off
the nose gear
and you will
need to do this
as well. I cut
the retraction
arm from my nose
gear and cut an
1/8th of an inch
from the
attachment pin.
I then drilled a
hole in the nose
gear and put a
piece of brass
rod for a new
attachment pin.
Wings:
I replaced parts
29 and 30 with
longer pieces of
plastic rod. I
wanted to make
sure that the
wings had some
extra support.
Make sure you
eliminate all of
the ejector pins
to make sure
that the main
wheel wells fit
properly in the
wings. My wings
fit really well
on the top but
had a gap on the
underside. This
was easily
filled with
super glue.
You’ll need to
locate and drill
out the inboard
cannon ports. I
super glued my
wing tip lights
in place and
then sanded them
into shape.
I did replace
most of the
antennas and the
pitot tube with
scratch built
parts. I also
replaced the
windshield
wiper. You’ll
need to check
you references
for the antenna
fit as it
changed during
the operational
life.
Decals:
The decals are
some of the best
on the market.
You get four
schemes: one
Vietnam Camo,
one natural
metal, one gray
and orange Air
National Guard,
and an overall
gloss black
scheme.
They are all
colorful and you
my have a hard
time deciding
which one to do.
In conclusion,
this is a very
good kit and
with a little
bit of time and
patience can
produce an
outstanding
model of a
B-57B.
One thing, they
are hard to come
by so don’t sit
the fence on
this one. They
are going fast
and may not
return. I had a
hard time
getting my two
so I would not
wait too long.
Wait too long
and you may have
to get one on
Ebay – and you
know what
that could
mean.
Click the
thumbnails below
to view larger
images:
[../../photogallery/photo00000027/real.htm]
Model, Images &
Text Copyright
©
2007 by
Phil Hale
|
 Home
| What's New |
Features |
Gallery |
Reviews |
Reference |
Forum |
Home
| What's New |
Features |
Gallery |
Reviews |
Reference |
Forum |