|
Scratch built 1/32 scale
Belyayev DB-LK
by Frank Mitchell
|
 |
|
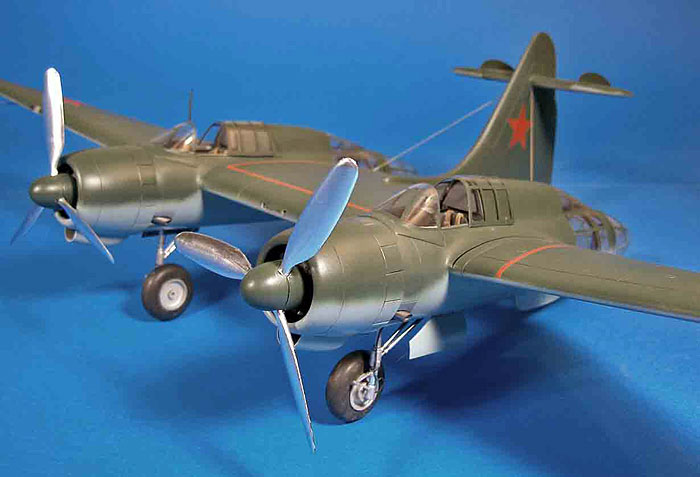
Belyayev DB-LK |

Tamiya's
1/48 scale P-47D Thunderbolt
is available online from
Squadron
This airplane is one of those that most folks, if
they have heard of it at all, just assume it was another weird Russian
airplane and let it go at that. However, if one thinks of it as a unique
flying wing possessing some ahead-of-its-time innovations, then it
becomes more interesting. Besides, with my tendency towards “unique”
airplanes, it was a natural modeling subject.
First, some history:
The Belyayev DB-LK (Long Range Bomber - Flying
Wing) was designed for tactical support duties in the late 1930’s.
It was a fairly large aircraft, having a wing span of nearly 71 feet,
and was termed a “semi-tailless layout” with a marked forward sweep on
the outer wings and a backward sweep at the tips. In common with the
Burnellis of the same time period (and the much later P-82), there were
two fuselages, each containing a 950hp M-87B radial engine. Although
the prototype had provision for two pilots, the production version was
intended to have a pilot and a gunner in the left fuselage and a
navigator and a gunner/radio operator in the right. Full military
equipment was never fitted.
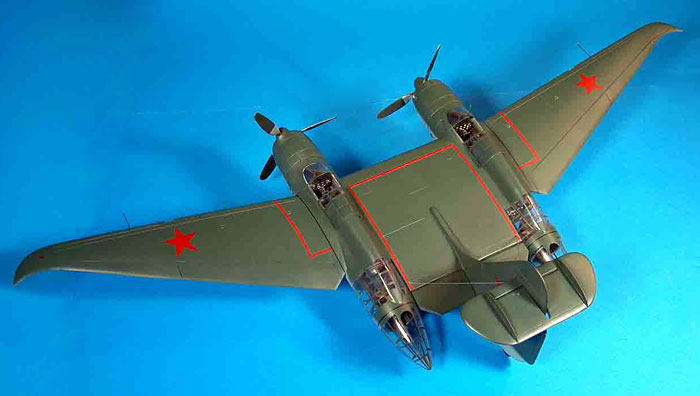
For its day, the DB-LK was designed to carry a
fairly impressive armament. The tail section of each fuselage ended in a
revolving machine gun turret which rotated around the longitudinal axis
of the gondolas. Obviously, the extensive glazing gave the gunners an
excellent view, but there was a potential for interference of fire
between the rear guns. The aircraft also had twin machine guns mounted
in the leading edge of the center section. The aircraft had four bomb
bays in the center section, and one behind each main gear well. Each bay
could carry a 2,205-pound bomb load. The tall fin carried a high-mounted
small stabilizer, a much larger elevator, and the tail wheel.
The one-and-only prototype was delivered in April
1940, and made over a hundred flights during which the pilots reported
no difference in handling between the DB-LK and aircraft of
conventional design. As with most new and somewhat radical prototypes,
there were a couple of mishaps, but on the whole, even though it was
underpowered and of unconventional appearance, the DB-LK appeared to be
a practical bomber with outstanding flight performance. The test pilots
did have some complaints, probably the most serious being a high landing
speed and terrible visibility from the cockpits. In common with most
prototypes, there were a number of changes as testing proceeded, one of
the more unusual being the conversion of the rear of the center section
into an additional elevator.
The aircraft was not put into production, probably
because the war situation for the Soviet Union in 1940 was not very
conducive to the development of radical new aircraft, particularly when
its production would decrease manufacture of proven types.
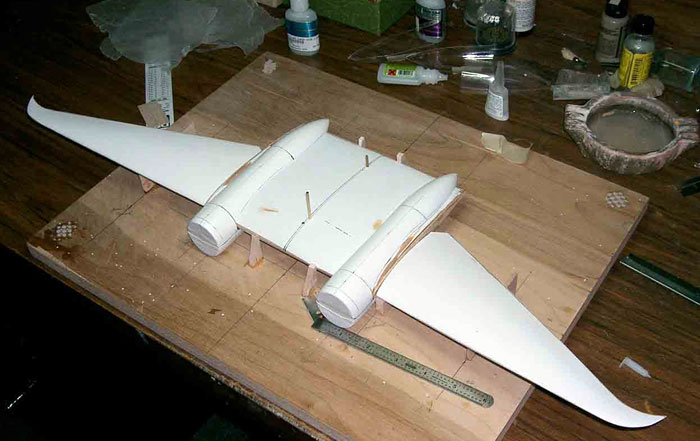
The model was approached in my usual way, but the
configuration caused a few problems along the way, e.g., the extensive
areas of glazing, the length of the thin wing sections, finding the
right sequence of building, etc.
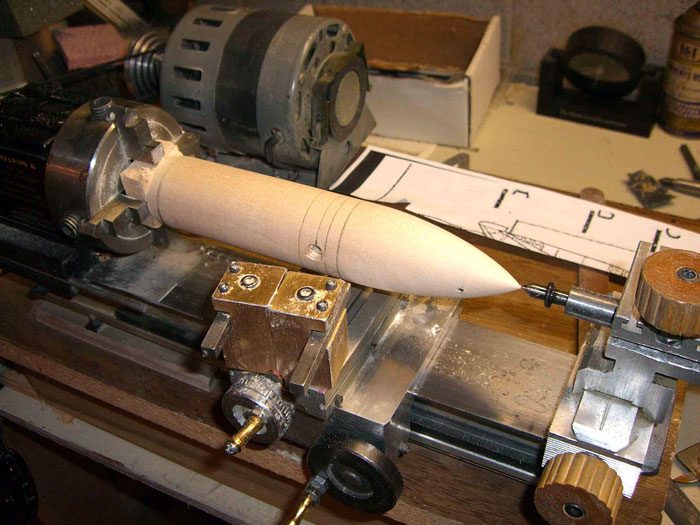
The first step was to carve and prepare the molds.
The outer wings were made in one piece from basswood instead of my usual
balsa because of their very thin section. The harder wood made it
easier. In addition, after the thin vacuum-formed styrene skins were
epoxied in place, the tips ended up being (relatively) sturdy. The wing
was cut apart at a later stage.
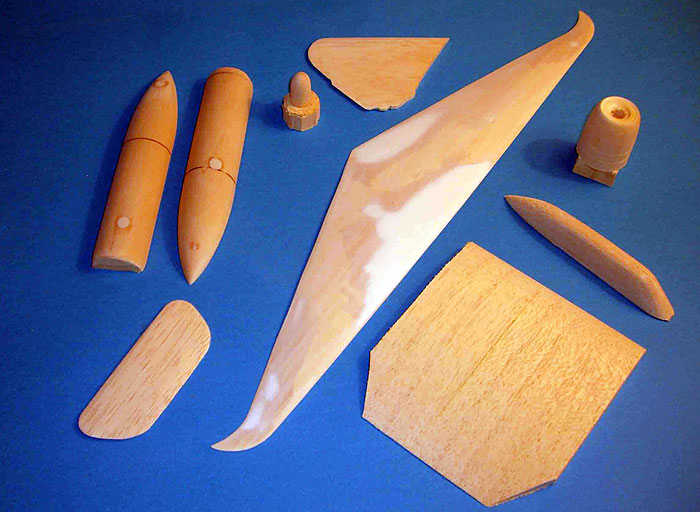
Single molds were made for the fuselages, canopies,
cowlings and center section, but there was a bit of extra care given to
the finish of the fuselage mold due to the extent of the
transparencies.. The fuselages were also molded with a horizontal seam
since that seemed to make more sense, given the unique layout.
All the parts were vacuum-formed, but most of the
clear parts were heat-and-smashed using clear vinyl. For the fuselages,
that was done by vacuum-forming the forward portions of the fuselages,
and heat-and-smashing the rear parts. Since all the fuselage portions
came off the same mold, getting them to match was (somewhat) easier.
The styrene skins were epoxied to the balsa molds
(both fuselages and the centersection) and the whole thing was squared
up. Then a building board was cut, the lower fuselage sections were
keyed to the base, and the center section jigged in place over them.
Click the
thumbnails below to view larger images:
[../../photogallery/photo00024761/real.htm]
With the center section securely jigged, the upper
fuselage sections could be fitted, the wings jigged in place, the holes
for the cockpits cut, cockpit fairings matched to the fuselage top
sections, vertical tail/stabilizers/elevators fitted, etc. All these
steps meant cutting away bits of the center section, but also allowed
considerable work to be done without having to glue things in place.
After avoiding it as long as possible, I finally
got to a point where dealing with the interior became unavoidable. The
vinyl clear sections are not terribly easy to work with, but if some
care is taken, one can match them, glue them together, and even polish
them to the point that a coat of Future will return their clarity.
Obviously, I tried to place seams so that they would lie underneath
canopy frames or some other part of the aircraft.

Click the
thumbnails below to view larger images:
[../../photogallery/photo00004887/real.htm]
Since there is (obviously) not a whole lot of
detailed information on this aircraft, a fair amount of the interior is
an educated guess. The small number of available photos gave a few
clues, as did the written material that could be found, but for the most
part, it was simply trying to figure out what makes sense, given the
prototype status of the airplane, the intended crew and their functions,
etc. One thing I did know was there is a fair amount of space to fill
with “stuff”.
The main gear was made from brass and aluminum
tubing, and for once, I lucked out and found a set of wheels that fit
and even looked (sort of) correct. They came from a long-departed Revell
32nd Typhoon. The tail wheel came from the scrap box.
The engines sat well back in the cowlings, so I
could not see spending a lot of dollars on aftermarket engines.
Therefore, I dug through the scrap box and found two cylinder banks from
an old Revell Corsair (at least I think that what they were). They were
sized to fit in the cowlings, and a couple of props were found in the
scrap box (maybe a Revell Me-110?) that could be modified. I hate to
make scratch props. The spinners were vacuum-formed from a wooden
master, and cut apart on the propeller centerline.
After the fuselages and wing center section were
(finally) glued together, there began the dreaded period of scribing,
sanding, priming sanding, etc, ad nauseum. During all this, the
clear portions were covered with tape.
 Once the prep work was finished,
the tape was removed, and the tedious job of masking all the clear
panels was undertaken. This exercise took up about 7 – 8 hours. I chose
to do that before adding the vertical tail and wing, since I can’t
imagine trying to manipulate this thing for masking when it is fully
assembled. Once the prep work was finished,
the tape was removed, and the tedious job of masking all the clear
panels was undertaken. This exercise took up about 7 – 8 hours. I chose
to do that before adding the vertical tail and wing, since I can’t
imagine trying to manipulate this thing for masking when it is fully
assembled.
After that was complete, all the clear areas were sprayed the interior
color after which the vertical tail and wings were attached, trying to
use as little filling as possible which, in turn, meant less chance for
messing up the masking.
Paint was Gunze, and since all I could determine from the photos was
light and dark, I chose typical Russian green and blue/green.
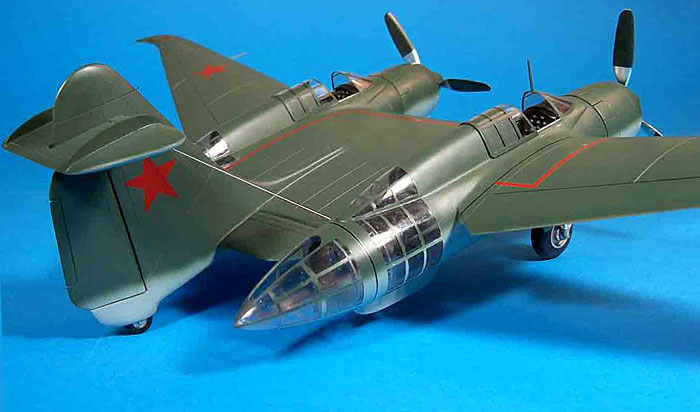
The stars were painted on using a computer-drawn
mask made by a good friend (stars are hard to draw accurately). The red
wing walk areas were done with decal strips, and were the only markings,
numbers, etc. that could be seen in the photos, even with all kinds of
manipulations. I am not even entirely sure about the stars, but all that
green needed breaking up somehow. The only overcoat was a light mist of
thinned Testor’s Flat.
Bottom line was that this was an interesting build.
It also proved, once again, that initial thoughts
about a subject can change significantly as one builds the various parts
and comes to understand why the designers did some of things they did.
Click the
thumbnails below to view larger images:
[../../photogallery/photo00013194/real.htm]
Model, Images and Text Copyright © 2007
by Frank Mitchell
Page Created 19 March, 2007
Last Updated
24 December, 2007
Back to
HyperScale Main Page |
 Home
| What's New |
Features |
Gallery |
Reviews |
Reference |
Forum |
Home
| What's New |
Features |
Gallery |
Reviews |
Reference |
Forum |