|
Classic
Airframes' 1/48
scale
Fiat CR.42/AS
by Floyd S.
Werner Jr.
|
 |
|
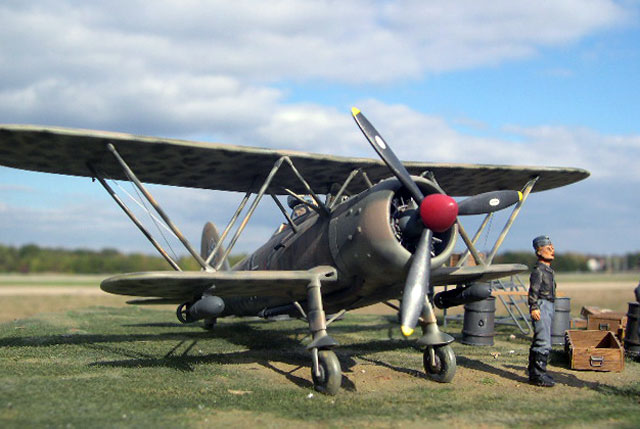
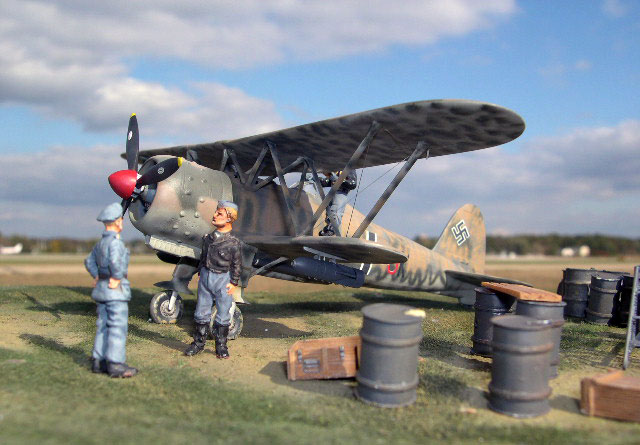
Fiat
CR.42/AS |

Classic
Airframes' 1/48
scale Fiat
CR.42/AS is
available online
from Squadron
Background
Hot on the
heels of the
Cr.32’s success
in the Spanish
Civil War, the
Italians were
under the
impression that
the biplane, had
a place in
future warfare
thanks to its
superior
maneuverability.
History shows
they were wrong
- well sort of.
Even so
development
commenced on the
CR.42, the last
Italian biplane
of the war.
The very aspects
that made the
biplane
vulnerable, such
as slow speed
and open
cockpits were
the things that
made it ideal
for some jobs.
The Luftwaffe
took an interest
in the CR.42
following
experience with
Soviet night
nuisance
bombers. The
Luftwaffe saw
the CR.42 as the
immediate fix
for a night
attack aircraft
for use against
partisans in the
Balkans. This
little biplane
held the line
until the Stuka
could take over
the unenviable
job of low level
night bombing.
Flying with
Nacht Schlacht
Gruppe 9 (NSGr
9), the CR.42
was equipped
with flame
dampening
exhausts,
disruptive paint
and two bombs.
It distinguished
itself in combat
and was known
for its strength
and ability to
take punishment.
Following
Italian
capitulation,
other CR.42s
were inherited
by the Luftwaffe
and used in
training
schools.
The Model
This kit is
for experienced
modelers. This
is not the kit
for you if this
is your first
biplane or first
limited run kit.
The kit is a
low-pressure
limited run
injection
plastic kit
molded in light
gray. The panel
lines are nicely
engraved. The
kit has some
wonderful resin
parts for the
engine, some
cockpit parts
and the
exhausts.
There are two
frets of photo
etch, some of
which are
colored, which
display the
appropriate use
of the medium.
If it is
supposed to be
flat it is on
the PE sheet, if
it is suppose to
be round it will
be resin.
There is a clear
canopy included.
The decal sheet
has markings for
four aircraft.
The instructions
are broken down
into a small
booklet with an
errata sheet.
The instructions
were from the
initial release
of the kit and
the errata sheet
covers the new
moldings. You
have to be
careful and
study both
sheets, and
sometimes the
differences
aren’t readily
apparent, but
nothing too
difficult. One
other thing is a
photo of the
built up
unpainted
cockpit, which
is very useful.
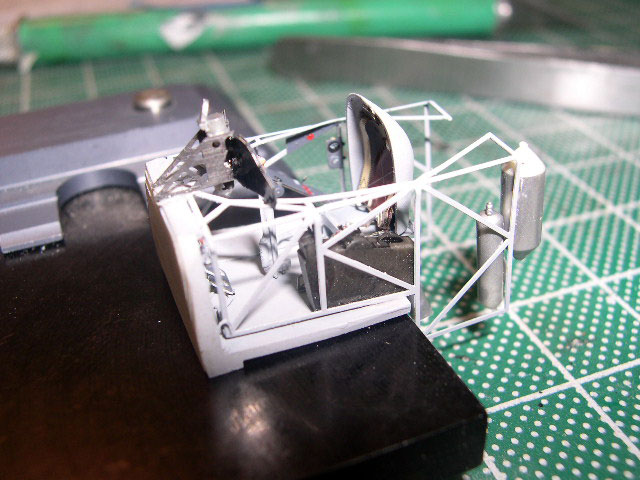
The cockpit and
fuselage
The photo
etch instrument
panels are a
three-piece
affair. Tough
for the pilot to
see but for the
modeler the
prepainted panel
is very nice and
easy to work
with. I attached
them with CA and
when everything
was set I added
a drop of Future
to the lenses.
This did two
things it gave a
glass look to
the instruments
but it also help
attach the two
panels together.
There is a lot
of bending that
has to take
place in the
cockpit. A Hold
& Fold is an
essential tool.
The cage that
enclosed the
cockpit is very
delicate. The
cockpit is
painted a light
gray.
The seatbelt
system can only
be described in
S&M terms. What
were the
Italians
thinking?
Time to add the
whole assembly
to the fuselage
halves. Guess
what? Yup it is
a limited run
kit so the
fragile cockpit
cage did not
fit. Time to
break out the
Dremel tool. I
thinned the
cockpit
sidewalls and
floor until they
were slightly
translucent.
There is plenty
of plastic to
work with. The
only drawback
with this fix is
that the detail
that was on the
sidewalls is
gone. I used
some tape to
replace the
formers. Once
painted they
look fine and
besides they are
pretty well
hidden in the
small opening.
If you didn’t
replace them I’m
not sure you
would notice.
The fuselage
halves fit just
fine now.
The lower wing
and tail
The lower
wing is a
one-piece
affair. This
attaches without
any big trouble,
except for the
front. I ended
up having to
fill the front,
but now that it
is done, you
really didn’t
need to do it,
as the engine
cowling will
cover the area.
The fit of the
wing is fine. A
little filler
here and there
but nothing
objectionable.
The horizontal
tails have no
locating pins. I
drilled out some
holes to attach
the tails to the
fuselage for
strength. Very
little filler
was needed to
smooth things
out.
Engine
The engine is
a beautiful work
of resin
engineering. The
cylinders are
separate from
the crankcase. I
painted the
crankcase
neutral gray and
the cylinders
were flat black
and dry brushed
with Model
Master Aluminum.
The photo etch
rocker arms are
added to the
front of the
engine.
Everything was
given a wash of
black and set
aside.
The engine
cowling is a
two-piece
affair. You have
to be very
careful when you
remove them from
the sprue. There
are bumps on the
mating surface
that need to be
carefully
cleaned up. If
you were careful
there is only a
little bit of
filler that is
needed. Check
your references
as to which
spinner you
need.
Attach the
engine to the
fuselage through
the hole. This
has a very
positive
mounting.
Struts
When you
remove the
struts from the
sprue make sure
you label them.
This will become
very important.
Attach them with
liquid glue or
tube glue. A
little filler
will be needed
at the
attachment
points, but
again nothing
exceptional. A
technique to
attach the
struts is tape
the upper wing
to the bench
then use Playdoh
to level the
aircraft over
the upper wing.
Attach the
struts to the
bottom wing with
tube glue and
let gravity help
you in aligning
the struts to
the upper wing.
I worked inside
to out. I’m sure
there are other
techniques out
there, but as
this was a
learning
experience I was
open to
suggestions.
You’ll need to
do some cutting
for the tropical
filter, if your
aircraft
requires it like
mine. I left off
the exhausts
until after
painting the
bottom.
The landing gear
of my aircraft
had the fairing
that covers the
wheels and
landing gear
struts cutoff.
Unfortunately,
the cut is not
on a panel line.
The resin struts
will go have to
be put on after
the cut has been
made. I tried to
cut them the
same but I’m not
sure I was
entirely
successful. I
think it looks
good though. I
did have an
issue that the
wheels were
FLAT. No, not
bulged, flat. I
elected to just
live with it,
but could have
added plastic to
get a more round
tire. Attaching
the struts
seemed pretty
straight
forward, but
that was not the
case. Once
attached to the
model the struts
caused the kit
to be canted to
the one side. I
corrected this
by cutting the
strut right at
the join and
sanded until it
was even. This
looked really
good, which
surprised me.
After washing
the model with
Dawn dish
detergent I
primed the
aircraft with
Tamiya Primer.
As usual I did
have some
cleanup to do,
but eventually
it was time to
add paint. I
preshaded the
model with Flat
Black, but to be
honest it was a
wasted step, as
the camouflage
would obliterate
the effect on
the top and
bottom.
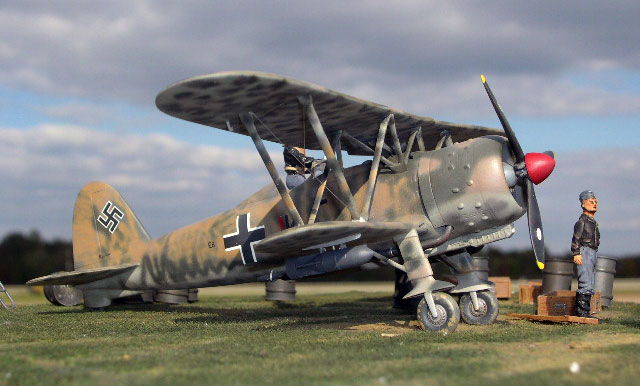
This aircraft
has many
interpretations
of its paint
scheme. I didn’t
like a single
one of them.
After reading
“Ghost Bombers”
I found out that
NSGr 9 painted
their aircraft
in an over spray
of RLM 79. They
kept this
practice up even
after switching
to the Stuka and
continued it
until the end of
the war. I
painted the
bottom of the
aircraft Italian
light grey,
Classic
Airframes
suggests RLM 76.
I disagree, but
no one can prove
either of us
wrong. After
that dried, I
painted the
lizard scheme on
top which is
Italian Dark
Green (Verda
Mimetico 3) with
spots of a sand
color (Gialio
Mimetico 3). I
used Polly-S for
my Italian
colors.
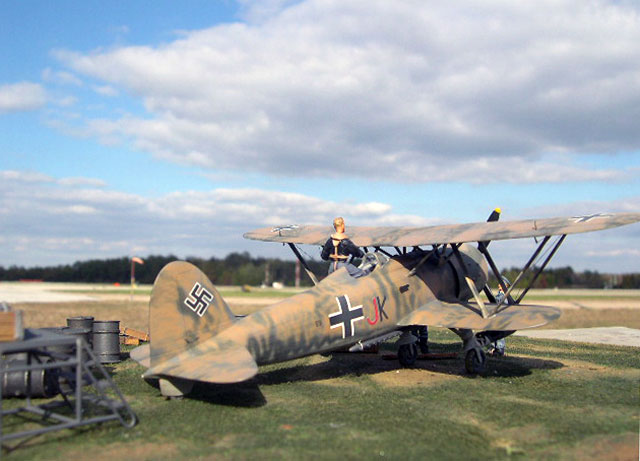
Once the basic
Italian
camouflage was
done it was time
to add a German
touch to it. I
added some
hard-edged
patterns in a
Gunze mixed RLM
75 on the whole
airframe. The
bottom had small
patches and the
fuselage and top
of the wings had
larger ones.
Classic
Airframes has
only the bottom
of the wings
camouflaged but
this didn’t make
sense to me so I
camouflaged the
entire bottom.
The other color
on the bottom
seemed very
stark in
contrast to the
RLM 75 so I
elected to use
Gunze RLM 70.
Again the bottom
had small
patches and the
top and fuselage
had larger
patches. Also
there were
squiggle lines
to aid the
transition of
the camouflage
from the light
bottom to the
top.
After looking at
the picture I
determined that
the upper
surface was
extensively over
sprayed with the
exception of the
engine cowling,
which may have
been a
replacement.
Using Gunze RLM
79, I proceeded
to curl my toes
and over sprayed
all my nice
paint job. This
was an exercise
in airbrush
control. I
applied the
color in a
random pattern.
When it was done
I was not happy
especially with
the upper wing.
I ended up
repainting the
upper wing back
to the Italian
standard then
the RLM 75 and
70. Then I
repainted the
RLM 79. The 79
flowed really
well so I
reapplied the 79
over the
fuselage as
well. Now I was
happy.
A coat of Tamiya
Clear from a
spray can
prepared the
model for the
decals.
The decals were
perfect. They
were in
register, opaque
and very thin.
They also
responded well
with Micro Sol
and Set.
Sealed with
another coat of
Tamiya Clear and
then a coat of
Model Master
Flat the model
looked really
good and abused.
Top Wing
and
Final
Assembly
|
As this is only
my second
biplane ever I
was a little
nervous about
that upper wing.
I contacted some
friends who
build
world-class
biplanes and got
their thoughts
on how to do it.
They recommended
two methods. One
was to flip the
aircraft over
and attach the
wing. The other
was to use
Playdoh to align
the wings. I
ended up
flipping the
aircraft over. I
recommend that
you fill the
holes for the
struts in the
upper wing and
then just center
it yourself. The
top wing was
attached to the
struts with
liquid glue. Had
I been smarter I
would have used
tube glue. I
wish I could say
that it went
together with no
flaws but that
was not the
case. Most of
the struts fit
well but two of
the outer struts
did not fit at
all. I ended up
having to break
off the two
offending struts
and extended
them with
plastic and
superglue. After
reattaching them
the rest of the
wing went
together ok. I
had to sand the
attachment
points and that
meant touching
up the upper
wing camouflage
on the bottom,
but it was not
too hard.
The exhausts
were painted
Model Master
Magnesium and
then dry brushed
with Model
Master Burnt
Metal at the
front and the
bend. Then some
pastels were
added for color.
The exhausts
were added with
superglue.
Other small
parts were added
and the brace
wires of .005
wire were
attached with
white glue.
Thank goodness
there were only
four wires. Some
small pieces of
photo etch were
added to the
wings and
everything was
done.
This was my
first Classic
Airframes kit
and only my
second biplane
ever so it can
be done. I
learned a lot
while building
it. It is for an
experienced
modeler, but not
too difficult
for someone who
wants to stretch
their skills. On
the down side I
could only think
of two things,
having to thin
the inside of
the fuselage and
the struts not
fitting (I may
be at fault
here). On the
plus side, is an
interesting
multimedia
aircraft with
great markings,
exceptional
looking cockpit.
There were times
I was frustrated
but it was more
with myself than
with the kit.
The kit was very
nicely done.
I will build
another Classic
Airframes
biplane in the
future, maybe
the He-51, and
that is about as
good an
endorsement as I
can offer any
kit. If you are
looking for a
rewarding
challenge this
kit is just what
you are looking
for to expand
your skills.
Highly
Recommended.
Thanks to
Classic
Airframes for
the review copy.
-
Ghost
Bombers: The
Moonlight
War of NSG
9, Nick
Beale,
Classic
Publications,
2001, ISBN
1-903223-15-6
-
Fiat CR
32/CR 42 in
action,
George Punka,
Squadron/Signal
Publications,
2000, ISBN
0-89747-411-2
-
Fiat CR 42,
Ali D’Italia
#1, La
Bancarella
Aeronautica,
1995
-
Model
Airplane
International
Issue #2
September
2005
-
Sky Model
Issue #3
Quarterly
Volume II
Click the
thumbnails below
to view larger
images:
[../../photogallery/photo00001683/real.htm]
Model, Images &
Text Copyright
©
2007 by Floyd S.
Werner Jr.
Page Created 22 January, 2007
Last Updated
24 December, 2007
Back to
HyperScale Main Page |
 Home
| What's New |
Features |
Gallery |
Reviews |
Reference |
Forum |
Home
| What's New |
Features |
Gallery |
Reviews |
Reference |
Forum |