|
Fujimi's
1/48
scale
D3A1 Val
by
Bill Cronk
|
 |
|
D3A1
Val |

Fujimi's
1/48 scale D3A1
Val is available online from Squadron
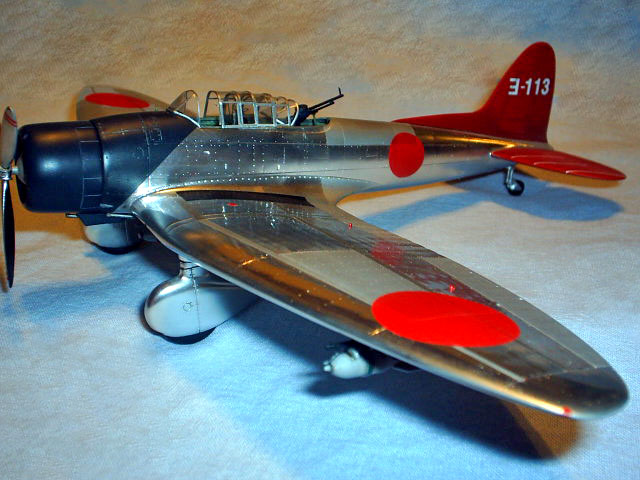
This is my 1/48
Fujimi D3A1.
This kit is very
good but showing
its age as far
as interior
details. The kit
has been around
for years and
costs a fraction
of what the
Hasegawa kit
costs.
The fit on these
kits is very
good and require
very little if
any putty. I
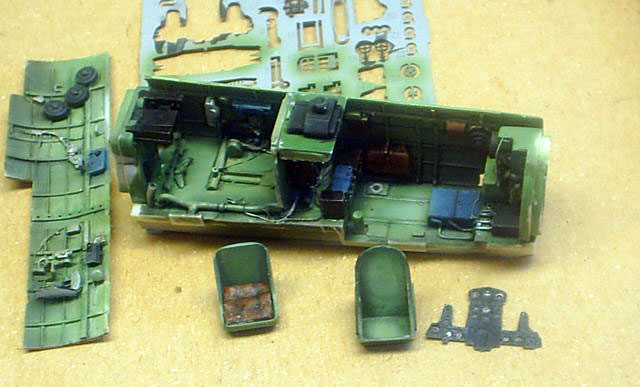
used the CMK
interior set
from Squadron
along with the
Squadron canopy,
which fits very
well.
The CMK set
states it is for
the Hasegawa kit
but, with a
little power
tooling it will
fit like a glove
inside the
Fujimi kit.
I painted the
cockpit with
Testor's acrylic
and Tamiya
rattle can
primer for the
resin. I gave
the inside a
slightly used
appearance
making sure to
go from light to
dark giving it
depth.
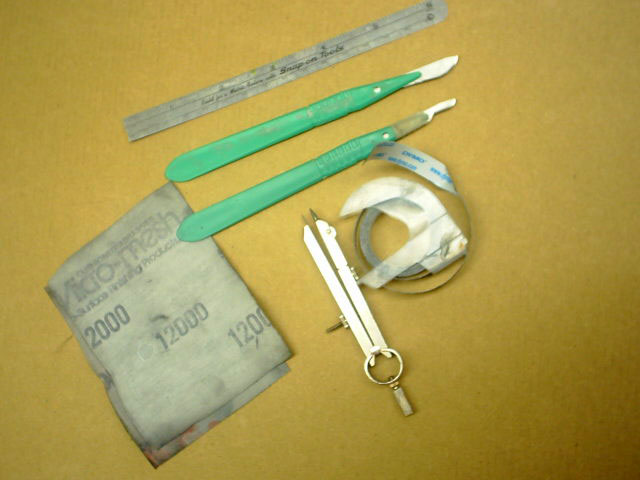
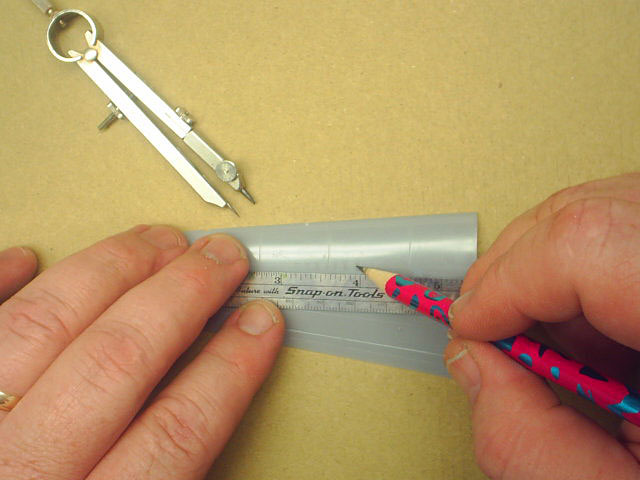
To make the
rippled skin I
use a simple
tech. I use a
#10 blade,Dymo
tape,compass,fine&medium
sanding sticks
and polishing
set found at
Mico Mark (a
must).
Without going
into great
detail, this is
how I make my
rippled skin:
First, square up
all you rivet
lines to be
scraped with
your compass
using the panel
lines as a
reference.
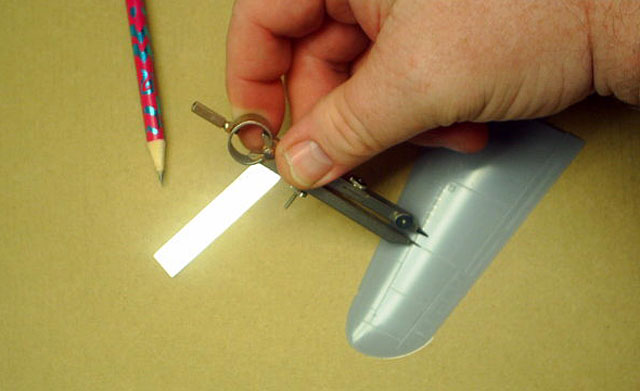
Then take your
Dymo tape lay it
down on the line
and scrape it
about 3-5 times
lightly with you
blade.
When finished
scraping, take
your Squadron
sanding stick
(Medium) and
sand down inside
the troughs you
have made. When
finished with
that start using
finer sanding
grits until the
plastic is
scratch free.

Now that that is
done and you
decide to use
rivets, I would
get a rivet
making device
and PRACTICE
with it or I
would use a
simple pin and
make my rivets
one at a time
MAKE SURE THEY
ARE STRAIGHT or
it will mess up
the whole
effect.
This was my
first serious
natural metal
paint job and my
first time to
use Alclad. I
can tell you
this Alclad is
the best. I used
the Alclad clear
coat (which is
very good!!)
just make sure
you spray it on
nice and slow
and even, same
goes for the
silver. I love
this Alclad
because I made a
lot of mistakes
and had to re
sand and polish
about a dozen
places. Alclad
is very
forgiving.
I would suggest
if masking over
it to use low
stick tapes or
my favorite,
frisket film. I
used frisket to
paint the the
red tail section
and the
Hinomaru's I
wanted it all to
match. I love
this early paint
scheme on the
Val and plan to
do a Kate soon
in the same
scheme. I also
used frisket to
mask off the
different panels
for shading
effects. The
tail codes and
drift indicators
where all made
with dry
transfers from
woodlands
scenics. I used
a light spray of
Testor's Dull
Coat on the tail
and wing
markings.
The canopy rails
were made using
a vinyl auto
striping tape
that works
great. I use a
very sharp sprue
cutter when
cutting the tape
in order to hide
any seams where
the two ends
meat. This tape
conforms to
compound curves
and sticks very
well.
To finish off
the canopy and
to aid in making
the canopy
frames look
scale I dip the
canopy in
future.
Click the
thumbnails below
to view larger
images:
[../../photogallery/photo00003379/real.htm]
Model, Images &
Text Copyright
©
2007 by Bill
Cronk
Page Created 22
May, 2007
Last Updated
24 December, 2007
Back to
HyperScale Main Page |
 Home
| What's New |
Features |
Gallery |
Reviews |
Reference |
Forum |
Home
| What's New |
Features |
Gallery |
Reviews |
Reference |
Forum |