|
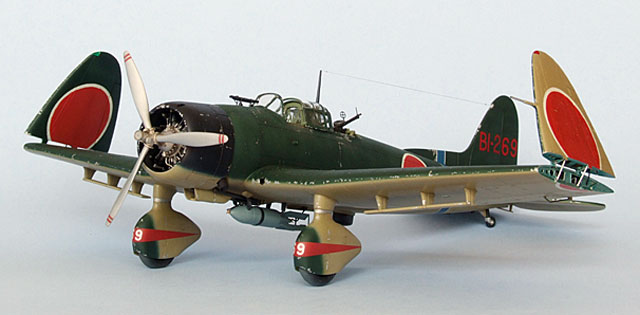
Hasegawa's 1/48 scale
Aichi D3A1 Val
by
Bruce Salmon
|
 |
|
Aichi D3A1 Val
Battle of Midway |

HyperScale is proudly supported by
Squadron
I always like my models to have different schemes than what most
people select (e.g. whatever’s in the box) but without having to buy
aftermarket decals. Normally I mix ‘n’ match what comes in the box to
create something plausible and such is the case with my Val. I used
photos I found on the internet and the kit decals to create an aircraft
from the carrier Soryu at the Battle of Midway, 4th June 1942. I try to
do this combobulating in a logical fashion so that I can have excuses to
hand if anyone tries to pull me up on the accuracy of something.
…Anyway, I dare you to prove anything wrong with my paint scheme as
there are few photos available and all the aircraft are sitting on the
bottom of the Pacific Ocean.
Aftermarket Products Used:
Engine and Cowl
Initially I was going to “go to town” on the engine seeing as how the
cowl is so open and you can see a lot of it. However, when my Engines
‘n’ Things (48134) resin Mitsubishi Kinsei 14 cyl. HA-33, HA-112 1280hp
engine turned up I was surprised at how crap it was (just a bad moulding
of reconstituted kit parts) - Yuck! Having said this I’ll still buy this
brand because they are cheap and you can still use their products in
mostly hidden dark areas such as for replicating the back of the engine
when you want to have the cowl flaps open. The kit engine would have to
do and admittedly after attaching the PE harness then painting and
drybrushing actually looks pretty good. The cowl was then assembled,
cowl flaps thinned and the inside painted. The engine and cowl were left
off the model until final assembly.
Cockpit / Fuselage
The cockpit was given the Eduard PE treatment and some extra wiring
in suitable places. I couldn’t find any good photos of the interior of a
Val so had to trust that Hasegawa and Eduard knew what they were doing.
It was then painted (using my own concoction) and weathered with a wash
of raw umber and then some drybrushing. There is something not quite
right with the rear seat and it looks as though only a very small child
could have ever sat in it. Perhaps the gunner was only allowed to sit on
one arse cheek. The rudder was also cut off and repositioned (make sure
if you do this that you match it to the rudder pedal positions!)
Wings
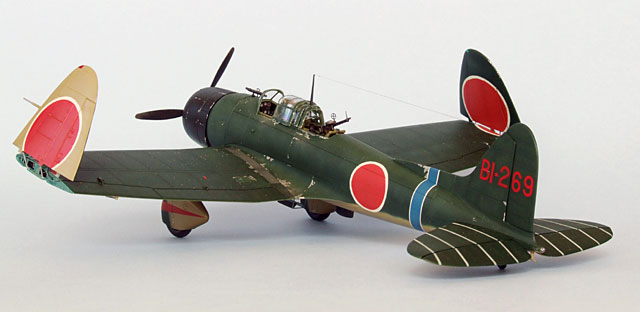
I decided that my model would have folded wings, as it would have
done on the carrier deck just before its next flight… to oblivion.
Before assembly the wing tips were cut off and the resin plug from the
CMK wing-fold set test fitted. The hinges of the wing tips are flimsy
and certainly won’t support the piece when glued in place so I had to
scratchbuild some extra bracing. Once I was happy with the fit the wings
were glued up. Next I attached the dive brake stubs and the fixed
undercarriage boots (I cut some internal bits so that I could fit the
wheels later).
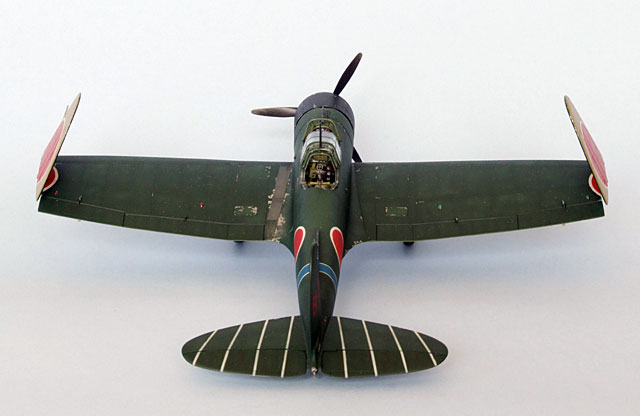
The outer wing tip portion is solid resin and I added nav lights to
them with clear sprue, sanded to shape and polished them. They were set
aside to be painted and then added at final assembly. The wings were
then attached to the fuselage and so too the tailplanes, which also had
their elevators cut out and repositioned. Seam lines were bogged and
sanded along with some rescribing where necessary.
Sundry Stuff
The kit canopy was used as it fit in the “open” position well; only
the edges were thinned with a blade to scale thickness. Model Master
Ultra-bright Krome Foil was used to mask it, ready for painting. This is
not an easy task as sometimes the framework does not have very good
definition; also the foil tears easily and it can be hard to remove.
Initially I used the Eduard canopy masks but these are next to useless
(especially on curved surfaces) as they are too thick to bend easily and
half their glue stays on the backing paper.
The holes in the exhaust pipes were also dremelled deeper and the
bomb was detailed. The PE Bomb fins are an Eduard engineering disaster!
You have to cut right through all the plastic and use lots of
filler/super glue to fill the big gaps – what a mission! …still it had
to be done.
The wheels, dive brakes, propeller etc were all painted and set aside
for final assembly.
Paint
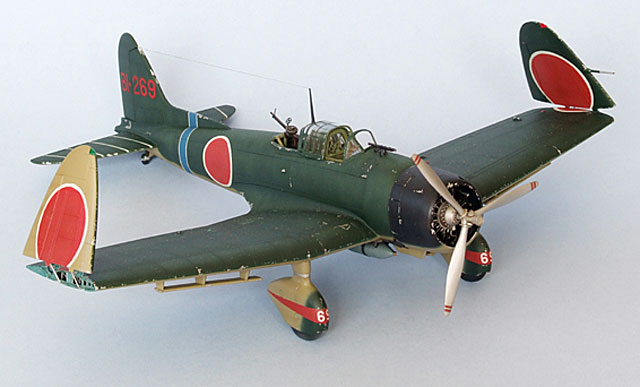
First on was the Ame-Iro (basically khaki) for the undersurfaces. I
post-shaded this slightly with subtly lighter mixes. Then the upper
surfaces were sprayed JN Green straight without lightening it. This was
p-shaded as well lightening with white and a bit of Humbrol 226 Interior
Green. P-shading on the fuselage was done in an up and down motion (not
in the direction of airflow) as aircraft sit on the ground far longer
than they are ever in the air. The Hinomarus, fuselage stripe and
walkways were all masked with Tamiya tape and sprayed. For the Hinomarus
I cut circles in wide Tamiya tape using a plastic school circle
template. Then I deftly manoeuvred a pointy X-Acto blade, held in my
fingers, around the circumference; it can take a few goes to get it
perfect. The outer white was done first then the inner red.
My own paint mixes (all enamel) for the project is as follows:
-
Interior: 7 parts Tamiya XF71
Japanese Interior Green / 1 part Humbrol 226 Interior Green / 1 part
Tamiya XF62 Olive Drab
-
Ame-Iro: 1 – Tamiya XF64 Red Brown /
8 – Tamiya XF12 JN Grey / 5 – Tamiya XF49 Khaki / 7 – Tamiya XF2
White / 1 – Humbrol 154 Insignia Yellow
-
Upper Green: Tamiya XF11 JN Green
(straight)
-
Cowling: 1 – Tamiya X2 Royal Blue / 2
– Tamiya XF1 Black
-
Hinomaru: 5 – Humbrol 153 Insignia
Red / 1 – Humbrol 113 Rust
-
Carrier Stripes: 4 – Tamiya XF8 Blue
/ 1 – Tamiya XF2 White
-
Walkways: 2 – Tamiya XF63 German Grey
/ 1 – Humbrol 110 Natural Wood
-
Exhaust pipes: 2 – Tamiya XF2 Black /
1 – Humbrol 113 Rust
Decals
Once the paint was dry I sprayed commercial grade Wattyl Estapol
polyurethane high performance interior clear house varnish (gloss) on
the places where the decals would go. This local product dries fast,
doesn’t yellow and cures as hard as hell. The only decals used on this
model are the numbers on the tail and U/C boots. I’d used up all my 2s
on my Kate but managed to get some more from a kind member of j-aircraft.com.
I used 2-3 applications of Gunze Mr. Mark Softer to get them to snuggle
down.
Weathering
Once I was satisfied with the work I sprayed the entire model with
Estapol satin, ready for an oil wash. I use Winsor & Newton Artisan
water mixable oil colours. I mix mine in “BAR’S BUGS” car window washer
concentrate, straight out of the bottle (no dilution). First up is a
light general overall wash for the entire model using raw umber. I apply
this to one section at a time with a wide soft brush. Darker mixes
(black is added) are applied to areas that would naturally be more dirty
and oily.
Paint chipping comes next and for that I use Tamiya XF16 Flat Aluminium
applied with a tiny brush. Finally I spray a top coat of Estapol matt or
mix this with gloss or satin to achieve different lustres (apparently
the Ame-Iro paint was a gloss). Then I do some drybrushing of raw umber
around the engine and other areas such as aileron hinges, where grease
and oil would leak from. A mix of Humbrol 11 Silver and raw umber is
applied to high traffic areas (the oil paint makes it easier to brush
and you can alter the tone of the silver). Last of all is the gun and
exhaust smoke staining done with Tamiya X19 smoke. Since this paint is a
gloss I also spray Estapol matt over it afterwards.
All the small fiddly bits are then glued in place usually in order of
which is least likely to get broken off first. The canopy was attached
with white glue and the seam lines filled with more white glue then
painted with a thin coat of JN green.
The aerial was made from stretched sprue attached with white glue and
then painted black. Lastly came, the wing tips. Like I said earlier
these are very flimsy and because of their weight break off rather
easily if the model gets jostled around too much; I’ve broken them off
twice already. If I was doing it again I would scratch build them using
the tips I’d cut from the kit’s wings.
Overall this is a very good kit and went together easily; I had way
more problems with aftermarket stuff than with the kit. The Val is
certainly an interesting subject to have in any collection.
Model, Images and Text Copyright © 2007
by Bruce Salmon
Page Created 01 July, 2007
Last Updated
24 December, 2007
Back to
HyperScale Main Page
|
 Home
| What's New |
Features |
Gallery |
Reviews |
Reference |
Forum |
Home
| What's New |
Features |
Gallery |
Reviews |
Reference |
Forum |