|
Classic
Airframes' 1/48 scale
F2A-1 Barclay Buffalo
by
John Valo
|
 |
|
Brewster F2A-1 Buffalo
Barclay Scheme |

Classic Airframes' 1/48 scale F2A-1 and Model 239 are
available online from
Squadron
For a detailed examination of the kit
contents,
see
Jim Maas' in-box review here on HyperScale.
I like weird airplanes. I also like modeling challenges. Building
Classic Airframes' excellent Buffalo in the Barclay paint scheme filled
the bill nicely.
The CA F2A-1 is a beautiful kit, featuring typically well-detailed resin
bits and delicately scribed plastic parts. The included photoetch fret
is a nice bonus in this release.
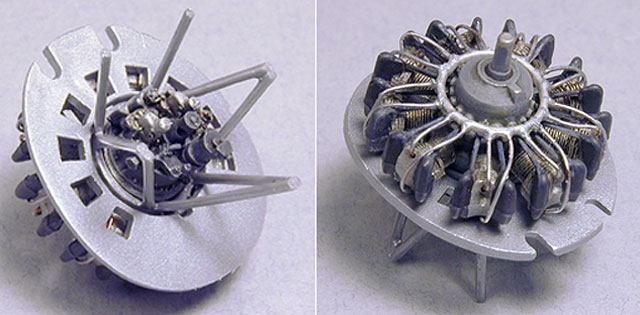
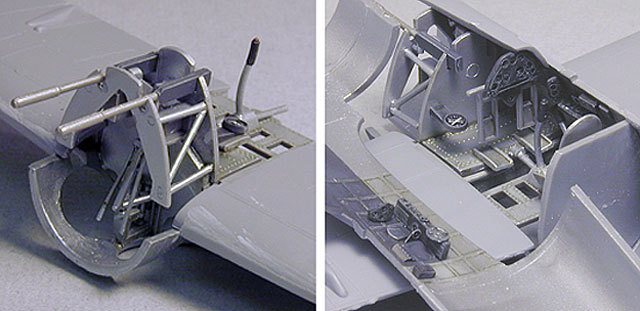
Parts fit is trouble-free and the kit builds quickly. The interior is
well-engineered to provide convincing details inside the open wheel
wells, including a tubular engine mount and rear face of the engine, as
well as various struts, boxes and assorted gizmos to satisfy the
curious. The photoetch and film cockpit parts look great when in place.
The canopy parts are very thin and clear, and look especially nice
when given a coat of Future.
I only had one minor incident during the build, when during an
episode of 'dumb thumbs' I cracked the rear canopy section. I wound up
repairing it, polishing it out and vacuforming a replacement. Despite
this minor setback, I completed the kit to the point of being primed and
ready to paint in short order.
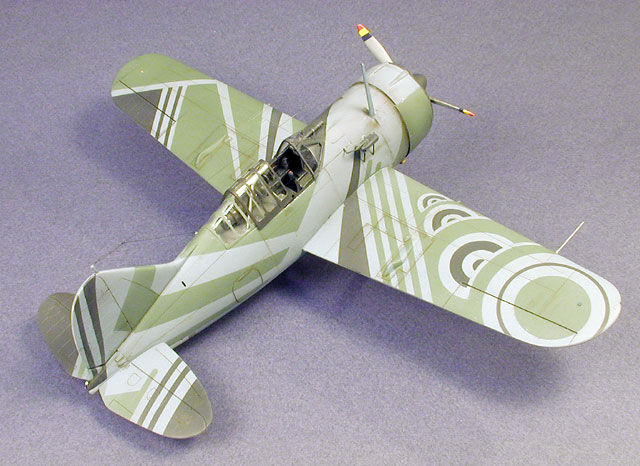
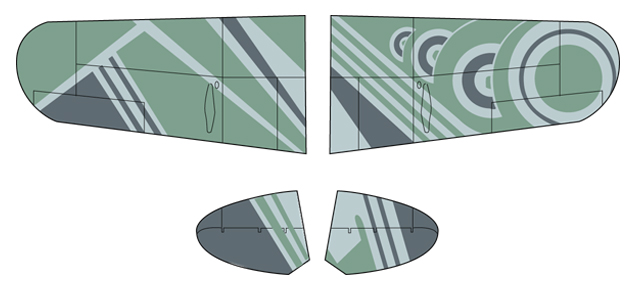
On February 20, 1940, a patent was issued to artist McClelland Barclay
for his disruptive camouflage concept for use on military aircraft. By
using various geometric shapes and contrasting colors, the intent was to
visually alter the shape, perspective and orientation of the aircraft. A
number of Navy aircraft were painted in various permutations of the
camouflage, including at least two F2A-1 Buffalos.
Click the thumbnails below to view larger
images:
[../../photogallery/photo00010461/real.htm]
Colors used in testing have not been conclusively determined, but
various sources state White, Black, Mid-Grey, (Dark) Grey, (Sea) Green,
Blue, Silver Grey and Off-White. As far as can be ascertained, no
particular color combinations were specified.
My primed-and-raring-to-go Buffalo sat forlornly for a while whilst I
contemplated just how to approach the Barclay scheme. This scheme was
already 'locked-in' mentally for me; it was just a matter of finding
references and figuring out how to pull it off. I located some nicely
rendered four-view illustrations as well as photos showing most of the
aircraft. Unfortunately, the photos were of rather poor quality, but
enough to direct me somewhat. This particular scheme has been referred
to as having two upper colors, generally agreed to as Sea Green and Grey
with 'Off-White' undersurfaces. As I studied the photos, I noticed that
there was a good indication of a darker third upper color, most obvious
on the starboard stabilizer and upper wing bullseyes. I also felt that
the artist renderings I had at hand missed some minor details. I elected
to paint the uppersurfaces with the base overall Grey (approximately FS
35189, lightened), then mask and spray the other colors.
 Using
Adobe Illustrator, I made my own drawings of the wings and stabilizers
to fit the kit according to what I thought to be correct patterns and
colors. After printing them out, I taped them to my light table, then
taped a sheet of airbrush frisket over them. I then made all the cuts
with a sharp blade, leaving all the various sections attached to the
frisket backing. I then cut thin strips of removable transparent tape
and applied them to the frisket to hold the sections in relative place.
The entire mask (such as one entire wing) was removed from the backing
and transferred to the model. After removing the tape strips, I had my
masks in proper position to add the other colors; in my interpretation I
used Sea Green (approximately FS 34128, lightened) and Black-grey. All
colors were mixed from PollyScale acrylics. Using
Adobe Illustrator, I made my own drawings of the wings and stabilizers
to fit the kit according to what I thought to be correct patterns and
colors. After printing them out, I taped them to my light table, then
taped a sheet of airbrush frisket over them. I then made all the cuts
with a sharp blade, leaving all the various sections attached to the
frisket backing. I then cut thin strips of removable transparent tape
and applied them to the frisket to hold the sections in relative place.
The entire mask (such as one entire wing) was removed from the backing
and transferred to the model. After removing the tape strips, I had my
masks in proper position to add the other colors; in my interpretation I
used Sea Green (approximately FS 34128, lightened) and Black-grey. All
colors were mixed from PollyScale acrylics.
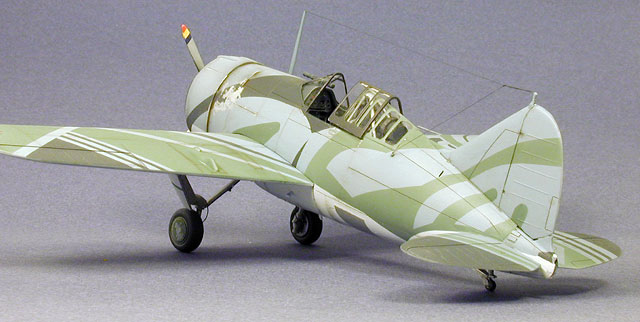
Once I had the wings painted, I realized the fuselage was going to have
to be a freehand masked free-for-all. By using thin strips of frisket
and a lot of repositioning, I was able to get the basic segments
painted, then used these for a reference for the smaller sections of
color.
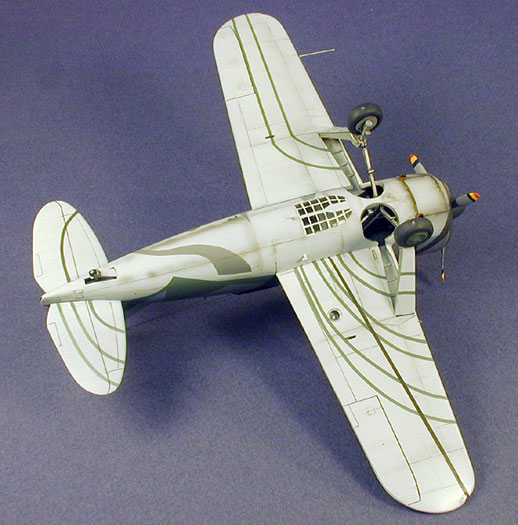
The underside was then painted Off-White. I then masked and sprayed the
rear fuselage underside 'swoosh' (yet another shade!). To make the thin
stripes on the wing undersides, I taped two Xacto blades to both sides
of an appropriately thick piece of scrap styrene to act as a spacer. I
covered the wings in frisket, and cut the stripes freehand. These were
then painted with Sea Green and Black-grey.
I couldn't even try to estimate how long it took to paint the model, but
suffice it to say it was quite a while!
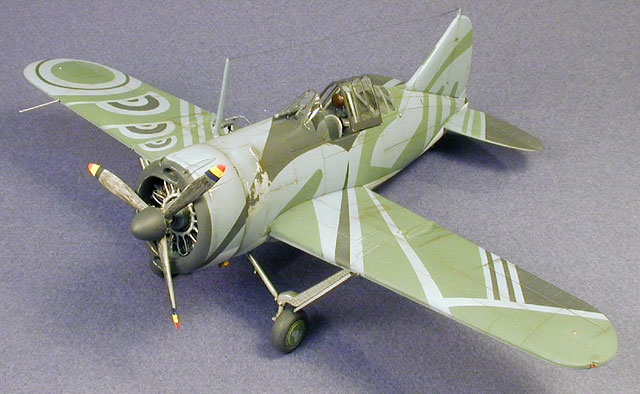
Being that the actual aircraft were painted in distemper colors, they
didn't look pristine by any stretch, showing areas of chipping,
streaking and touch-ups. The forward faces of the propeller blades
appeared to be streaked with Black-Grey, which was fairly consistent
with the other test aircraft.
The externally-mounted gun camera actually comes with the kit, but no
reference is made to it in the instructions, nor are parts provided for
mounting it. I used thin copper wire to make the support struts and
power connection cable.
I must say this project was a challenge, but I am quite satisfied
with the end result. I highly recommend the CA Buffalo kit for 1/48
scale fans - especially if you select a somewhat less time-consuming
camouflage scheme!
A very sincere thanks to Mr. Jim Maas for his assistance on this
project.
Click the thumbnails below to view larger
images:
[../../photogallery/photo00025148/real.htm]
Model, Images and Text Copyright © 2007
by John Valo
Page Created 24 January, 2007
Last Updated
24 December, 2007
Back to
HyperScale Main Page
|
 Home
| What's New |
Features |
Gallery |
Reviews |
Reference |
Forum |
Home
| What's New |
Features |
Gallery |
Reviews |
Reference |
Forum |