|
Tamiya's 1/48 scale
Heinkel He 219 A-7
by
Tory Mucaro
|
 |
|
Heinkel He 219 A-7 |

Tamiya's
1/48 scale Heinkel He 219A-7 is available online from
Squadron
Before I get to the description of how I built and
painted this model, I need to come clean about a couple of things. They
say confession is good for the soul so here goes:
-
I have never been a “fan” of this
particular aircraft. Its not that I have anything against it, to be
honest I never even gave it a second thought. It just wasn’t very
attractive to my taste, that’s all.
-
I prefer to build unusual or even
downright odd subjects. For instance, putting a Hawker Typhoon on
floats, or combining a Mosquito and Spitfire to produce a British
Mistel, or even adding radial engines and folding the wings to a
P-38 to convert it to a Navy torpedo carrying fighter. I guess you
can call them hypothetical, but there always has to be an element of
humor involved.
-
I like working with kits few others
would consider building. Most recently would be my PBJ-1H from the
Matchbox B-25 kit, but in the past I’ve assembled other so called
un-buildable kits including the Hobbytime vac-form 1/48-ish F3H
Demon and Miku resin 1/48 XF8U-1 Flying Pancake.
-
If I can combine building an unusual
subject with an un-buildable kit, even better. I once used an Aurora
1/48 F-4 Phantom to create a paper project F3H-G Spectre.
That being said, I was commissioned to build a
He-219 using a modern, state of the art Tamiya kit. This would be my
equivalent of model building “slumming”. I mean, build a popular subject
using a kit that is actually well engineered and designed to go together
without pounds of body putty and an endless stream of profanities.
You’re kidding me right? The only saving grace on this project would be
incorporating an Aires cockpit and Verlinden engine and gun bay
detailing set into the finished model. I’d heard some good horror
stories about the Verlinden set not fitting well, so I at least had some
hope of a little, what does Bondo call it, voluntary practice bleeding?
So I set out to have a go at this so called “wonder kit”.
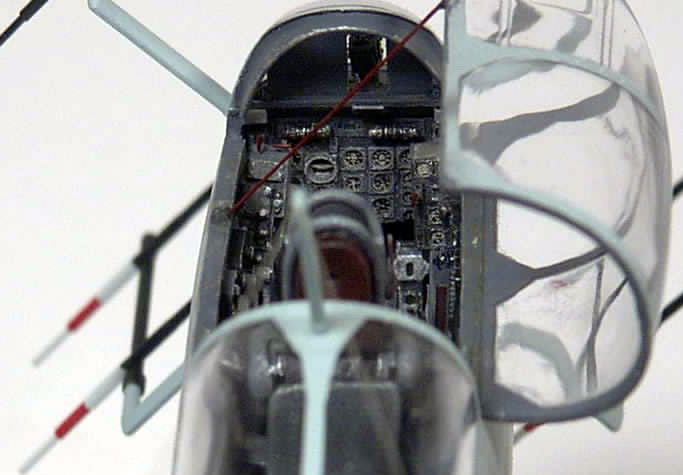
I began with the cockpit. Tamiya, in their infinite
wisdom incorporates a heavy zinc weight into the cockpit/nose gear well.
Unfortunately, if you choose to use the Aires resin cockpit, it means
discarding this wonderful solution to the Uhu’s tail dragging tendency.
I decided that I could maintain the zinc insert and carefully graph the
Aires details to it. This required a lot of grinding, filing, piecing
and cursing to get to work. In other words, all the things that makes
life worth living for someone like me. I finally got the cockpit
installed and painted using most of the Aires set combined with bits and
pieces of the original Tamiya kit parts (I’d be lying if I told you I
remember which ones). Most of the cockpit was painted Polly Scale
Gunship Gray with the usual black wash and light gray dry brushing to
bring up the detail. Other details were picked out using the excellent
reference books that were supplied with the kit from the client.
I then closed up the fuselage halves and moved to
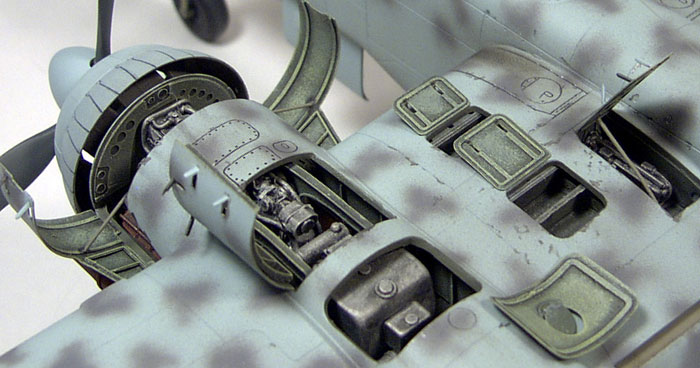
the wings. I decided to do al the opening on one wing and leave the
other untouched. This would allow the viewer to see how the aircraft
looked either way. This required considerable cutting and grinding to
remove the necessary panels to show the engine and gun detail. Once
again, lots of fitting, grinding and cursing to get from point “A” to
point “B”. But, I was surprised to find that the Verlinden parts fitted
exactly as they should. The only caveat was that by opening the gun bay,
one of the wing spars Tamiya provides for extra strength couldn’t be
used. Otherwise, nothing else on the kit was adversely affected by
adding these details. Also, in the Verlinden detail set are some main
gear bulkheads to close off the rear of the well, an apparent oversight
by Tamiya I guess. I painted the engine using various shades of metallic
gray and the internal areas with Polly Scale RLM Gray. They were then
weathered with a Floquil Grimy Black wash and some light gray dry
brushing.
Once all of this was done, I assembled the model
per the instructions, only deviating where it was necessary for ease of
painting and finishing. The one and only mismatch I found on the entire
kit was on the lower to upper nacelle joint on the leading edge of the
wing. And it’s a biggy! It required a lot of filing and sanding, along
with some re-scribing in order to blend it smoothly. But in all fairness
to Tamiya, I think it was a concession to the laws of injection molding
that produced this problem area. Otherwise, everything went together
very nicely in a fashion I am not accustomed to. Very little putty was
required. Once all the major components were assembled and blended it
was time to send this baby to the paint shop.
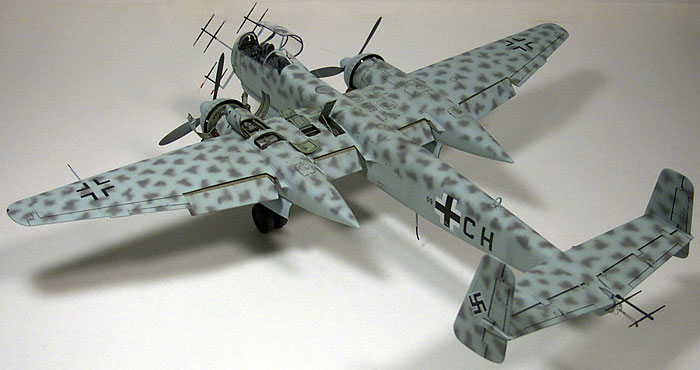
 Since
the surface detail is so fine on this kit, I dispensed with using any
primer and went straight to color. I used Polly Scale RLM 75. The mottle
effect is Model Master RLM 76 airbrushed using my trusty Paasche VL. I
tried to keep the edges soft as my references show this was usually, but
not always the case. Even so, I still think the mottle effect portrayed
by most modelers (myself included) tends to be a little too tight. I
guess the fear of someone thinking you can’t airbrush well overtakes the
need to duplicate what in actuality was a very loose spray pattern. Damn
our egos! Since
the surface detail is so fine on this kit, I dispensed with using any
primer and went straight to color. I used Polly Scale RLM 75. The mottle
effect is Model Master RLM 76 airbrushed using my trusty Paasche VL. I
tried to keep the edges soft as my references show this was usually, but
not always the case. Even so, I still think the mottle effect portrayed
by most modelers (myself included) tends to be a little too tight. I
guess the fear of someone thinking you can’t airbrush well overtakes the
need to duplicate what in actuality was a very loose spray pattern. Damn
our egos!
Once the camo was applied, I coated the entire
model with Polly Scale Clear Gloss. I know a lot of modelers out there
swear by Future for an acrylic gloss coat, but I have not had a lot of
luck and more often than not wind up swearing at Future instead of by
it. However, the Polly Scale product has never let me down.
Once dry, I applied the excellent kit decals which
responded well to the Microscale system. I then went about picking out
specific panel lines with a Grimy Black wash. Note that I choose not to
accent all the panel lines, but only the panels that would have been
removed for routine servicing. I feel this gives the model a more
believeable appearance than simply going over every single panel on the
airframe. Anyhow, once all the detailing was done, the model was given a
coat of Polly Scale Clear Flat, to me the finest flat finish out there.
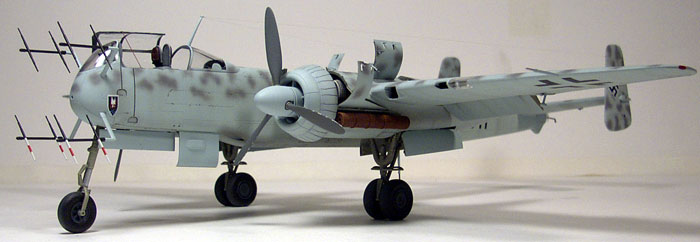
I then did a little additional weathering with my
trusty airbrush and some very thinned Grimy Black as well as some light
application of pastels. Since 219s were some of the most advanced
aircraft flown during WWII, I find it hard to believe that they would
have been allowed to deteriorate the way common fighters like the 109 or
190 did. So I really tried to restrain myself while weathering the
model, again using my photo references of actual aircraft as a guide.
All the remaining details were now added. This
includes the landing gear, canopy, antennas, and all the little photo
etched access doors. The propellers are nicely engineered to press into
little soft plastic grommets so they can be left off until the model is
complete. One of the most tedious parts of the build is attaching the
front antennae array and getting them to all line up from the top, side
and front. No cursing was required here, just some patience and a bit of
luck. The rigging is very fine (.004”) monofilament. The tires were
filed down slightly on the bottom to give the appearance of weight.
The base is from Just Plane Stuff and was painted
with and assortment of colors and types of paint, far too many for me to
list or even remember for that matter. The grassy areas are Woodland
Scenics Blended Turf attached with white glue dabbed on with a small 1
inch disposable house painting brush. As a final touch, the wood
planking was dirtied up with drops of Grimy Black thinned and dribbled
off the end of a brush to represent oil splotches.
Well, after a very long stretch of building odd
stuff and/or difficult kits, I finally built something relatively
conventional from a modern high quality kit. The client was very pleased
with the result, as am I. But I have to admit there is the nagging
feeling that something is missing. That somehow I didn’t “earn” the end
result. That no dues were paid, no “practice bleeding” performed. A
victory yes, but a somewhat hollow one to be sure.
Now, where did I put that Airmodel 1/72 P6M
Seamaster vac-form kit?
Click the thumbnails below to view larger
images:
[../../photogallery/photo00008191/real.htm]
Model, Images and Text Copyright © 2007
by Tory Mucaro
Page Created 25 January, 2007
Last Updated
24 December, 2007
Back to
HyperScale Main Page
|
 Home
| What's New |
Features |
Gallery |
Reviews |
Reference |
Forum |
Home
| What's New |
Features |
Gallery |
Reviews |
Reference |
Forum |