|
Eduard's 1/48 scale
Polikarpov I-16 Type 10
by Fernando Rolandelli
|
 |
|
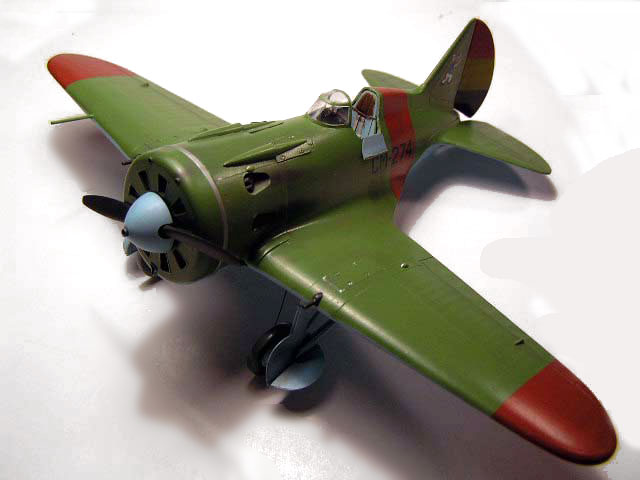
Polikarpov I-16 “Type 10”,
4ª Escuadrilla de Moscas, Aviación Militar Republicana, España,
1938 |

Eduard's 1/48 scale I-16 Type 10 is available from
Squadron.com
Background
In his book on Soviet camouflage and colours, Erik Pilawskii delivers
a veritable elegy to this little tubby fighter, once thought to be just
a copy of the famous Gee-Bee American racers - backwards and
obsolescence as a fighter - and now being reappraised by Western
historians as one of the really meaningful machines of the 1930s.
The Type 10 was developed from the Type 5 as a result of the experience
in Spain, where the first batch was dispatched straight away. The fact
that they were dubbed “Super-Moscas” speaks for itself, the type
restoring parity with the early Jumo-powered 109s, which had proved
slightly superior to the Type 5s. A new wing structure gave more
rigidity and eliminated problems with wing warping (some Type 5s seem to
have been fitted with the new wing also). A more powerful engine (M-25V,
rated at 750 hp) and twice the armament (four 7.62 mm ShKas), with a
proper reflector gunsight (PAK-1) completed the package. Pilawskii fails
to mention the addition of flaps, which are acknowledged in the very
detailed historical section in the kit’s instructions.
Type 10s fought in Spain, in the Far East against the Japanese, and
in the Winter War against Finland, still being the first fighter type in
numerical terms during the early stages of Barbarossa.
The Kit
This is the brand new Eduard no. 8148, which would allow the modeler
to build a Type 10 or a Type 17 from the contents of the box (though all
the examples provided in the decal sheet are Type 10s). Previously, the
only option in the scale was the Hobbycraft kit, in any of it different
incarnations (even under the Academy brand –I seem to remember there was
once a controversy about Academy actually “unlawfully obtaining” the
molds from Hobbycraft) but this kit was plagued with errors and
otherwise providing a “generic” kit from which it was very difficult to
depict any Type properly. Various Airwaves resin conversions addressed
some of the problems but were many times more expensive than the kit
itself. At around than 20 bucks the Eduard kit is not only accurate
enough but “self-contained” as well, including colour photo etched
parts, good decals and precut masks (vinyl material, in my example),
allowing a nice replica to be built out of the box.
Cockpit
The kit presents the modeler with the option of building a “plastic
only” or a “multimedia” cockpit; may be this is a relic of planned
“standard’ and “Profi-Pack” different issues. I chose to use the
wonderful photoetched items, saving the plastic ones to improve a
Hobbycraft kit (in any event they were lost together with my luggage in
one of my shuttles between Nairobi and Buenos Aires, possibly sparing me
much trouble)
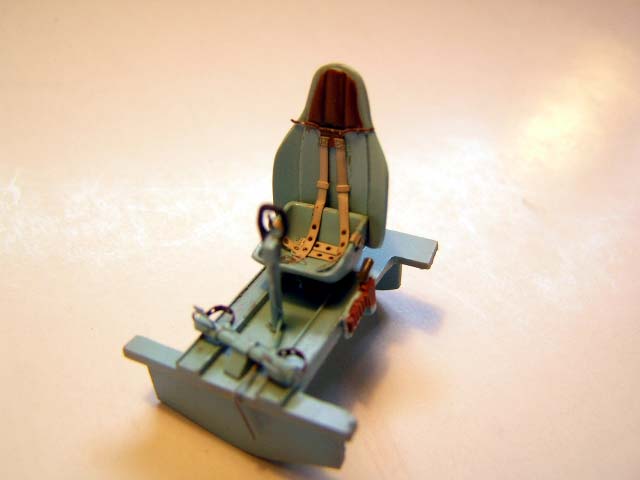
The floor is not correct, as there was no floor as such, so I carved
the sides to leave the footrests only “a la Hurricane”. This left the
bottom of the fuselage visible, which should be rounded instead of
spreading out to the wingroots. I devised a cardboard trapeze to which I
gave a rounded form to mimic the real fuselage bottom (this operation
could be called a floor “a la Spitfire”!)
The crankcase for the undercarriage retraction system seems to be a
bit too low in the sidewall. I added some linkages and cables, and some
sundries such as map cases and the flare pistol. I also opened the side
access door and the coaming lighting holes.
Click the thumbnails below to view larger
images:
[../../photogallery/photo00025339/real.htm]
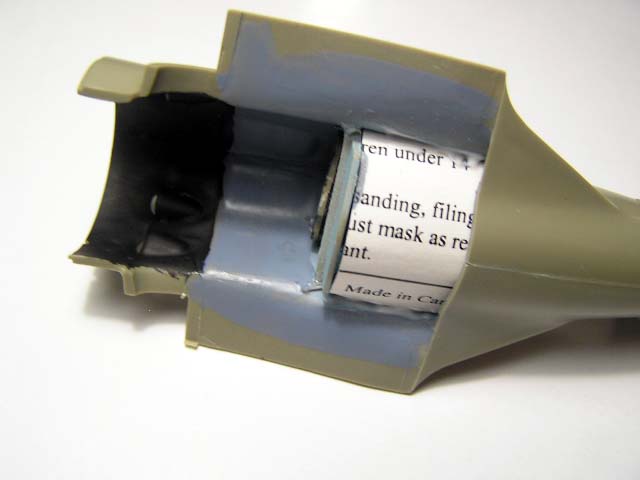
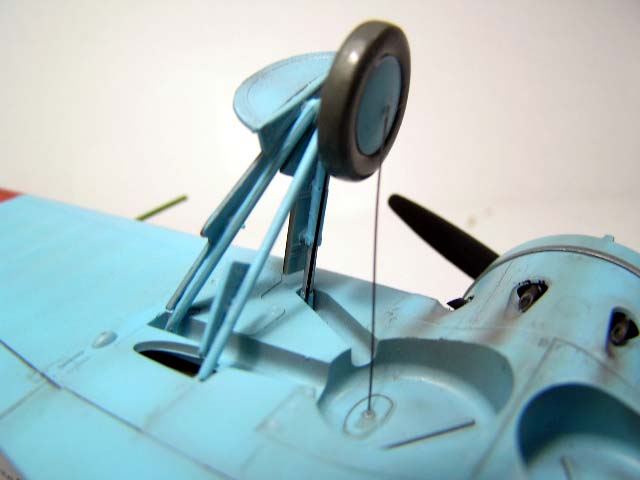
Engine
The engine is perhaps the only disappointing single part in the kit.
It is molded as half cylinders fixed to the firewall. In truth it can
scarcely be seen through the vent doors in the front cowling, but, on
close inspection, what is there is finely molded. I added the pushrods
from stretched sprue and the ignition wires from cable, improving its
look a good deal.
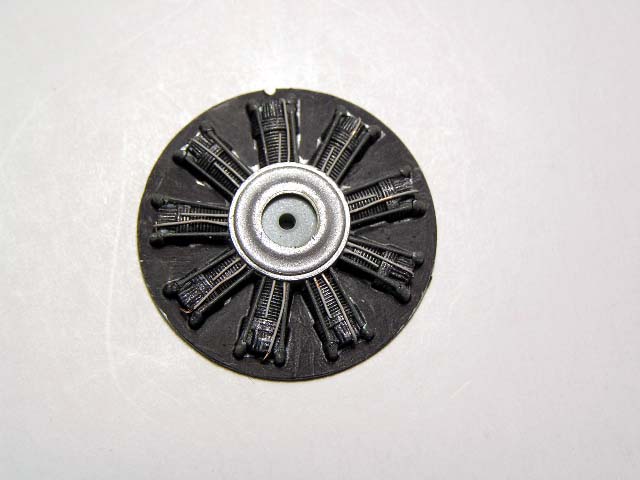
As anticipated however, it disappeared behind the cowling, even with
the vents wide open.
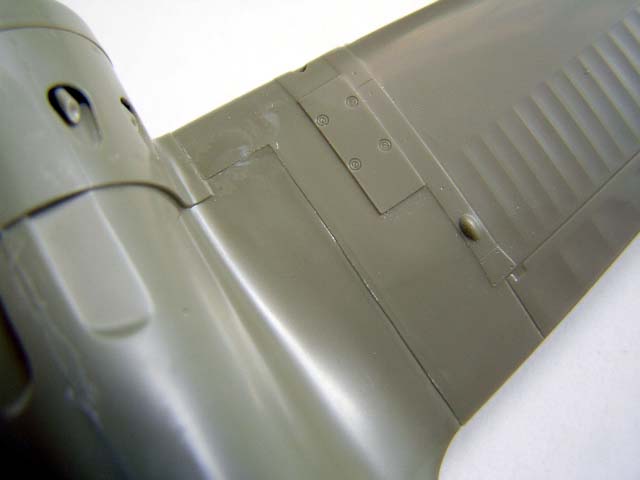
Airframe
What was left was finished very quickly. The cowling makes such a
snug fit that can be left without glue. This allows you to paint
everything and then detach it to glue the exhausts (I never glued it
anyway, and the Steel ring masks any gap).
Click the thumbnails below to view larger
images:
[../../photogallery/photo00030832/real.htm]
I posed the rudder slightly deflected (yes, I checked the pedals).
The windscreen fits perfectly; you could even add it after painting;
although I did not. The undercarriage assembly is quite complex and the
different doors lack a positive fit, be patient.
I added hydraulic lines and the cables for the retraction gear.
Interior
In my opinion, the colour calls for the cockpit in the Eduard instructions are questionable.
Instead, I adhered to one of the “possible finishes” described in the
book by Erik Pilawskii, and painted everything in the cockpit
Undersurface Sky Blue. The bottom of the fuselage was, however, painted
in WUP Wood Aerolak, as it was not technically part of the cockpit. The
insides of the cowling were painted IMUP Metal Primer.
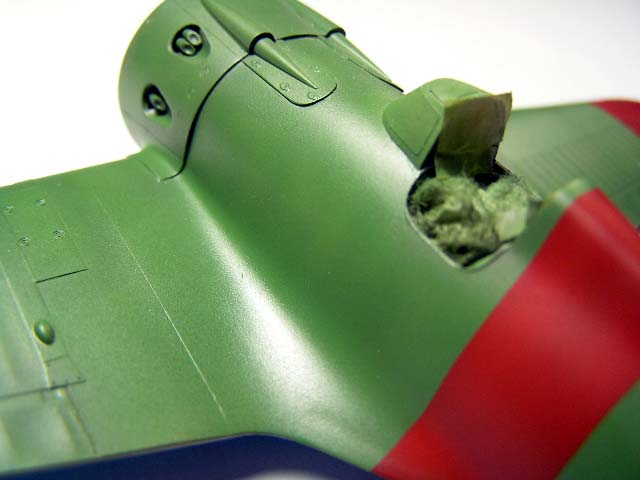
Exterior
Being a standard pre-war Polikarpov, I painted it in the standard
scheme of AII Green and AII Blue. The demarcation in the front of the
cowling was made following some pictures I found. The decal instructions
calls the spinner to be painted Light Gray; I had no indication of such
a Spanish practice and pictures showed a light shade undistinguishable
from the undersurfaces, so I followed the standard Soviet practice and
painted it in AII Blue. The Red Republican markings were painted using a
darkened RLM 23 by Xtracrylix, as was the tricolor on the rudder, mixing
the appropriate colours. Weathering was performed mainly by a heavy
preshading, the transparent nature of WEMM’s paints propitiates this
technique; and pictures I have seen show Republican machines in fairly
good condition.
All the specific colours came from the WEMM’s line; the rest are
mostly Humbrol. The final look is much brighter than what we were used
to see (I remember the colours of choice being usually any RLM 65 and
IJN Dark Green, which render a much duller and darker machine) but
nevertheless makes it instantly stand out in any kit line.
Decals
Eduard’s decals are of aftermarket quality and the examples provided
seem very well researched, (there are four of them, plus another in an
experimental three-tone camouflage, devoid of any marking, of which I
could find no reference in Pilawskii) but such is the masochistic nature
of modelers that I chose to depict a Spanish Republican machine using
some old Superscale sheet. Only the serials and the Popeye emblems were
used, which of course performed flawlessly. I could not pinpoint a
picture of this particular machine; however, many pictures show similar
machines and I have seen a profile of this one (but we have learned not
to trust these).
This is a superb kit and I cannot do enough justice to it. It was
also probably one of my quickest builds ever in my “adult phase of
modeling” (three weeks, if it matters). The Spanish Civil War is one of
the most interesting local wars of the ‘30s, and only now is becoming
“well served” in model kit terms. Besides, the I-16 is undoubtedly one
of the most significant warplanes of the period and it was a real shame
(another one…) that no decent kit of it was available in quarter scale.
- “Soviet Air Force Colours, 1941-1945”, Erik Pilawskii, Classic Colour
Publications.
- “Polikarpov Fighters In Action”, Squadron Signal Publications
- “The Spanish Civil War”, Osprey Publications.
Click the thumbnails below to view larger
images:
[../../photogallery/photo00025518/real.htm]
Model, Images and Text
Copyright © 2007 by Fernando Rolandelli
Page Created 09 May, 2007
Last Updated
24 December, 2007
Back to
HyperScale Main Page |
 Home
| What's New |
Features |
Gallery |
Reviews |
Reference |
Forum |
Home
| What's New |
Features |
Gallery |
Reviews |
Reference |
Forum |