|
Airfix's 1/48 scale
Supermarine Spitfire
Mk.I
by Brett Green
|
 |
|
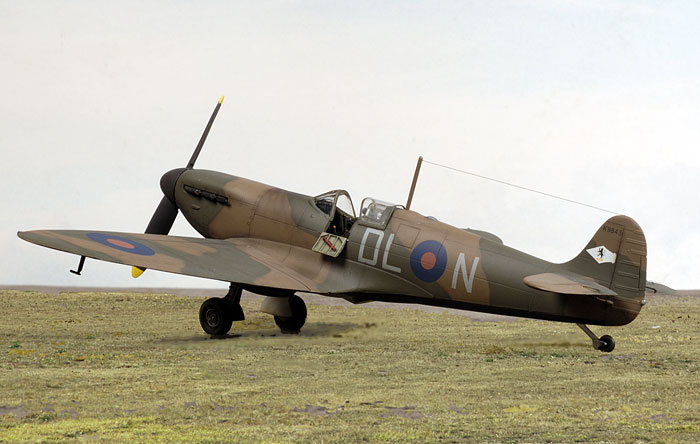
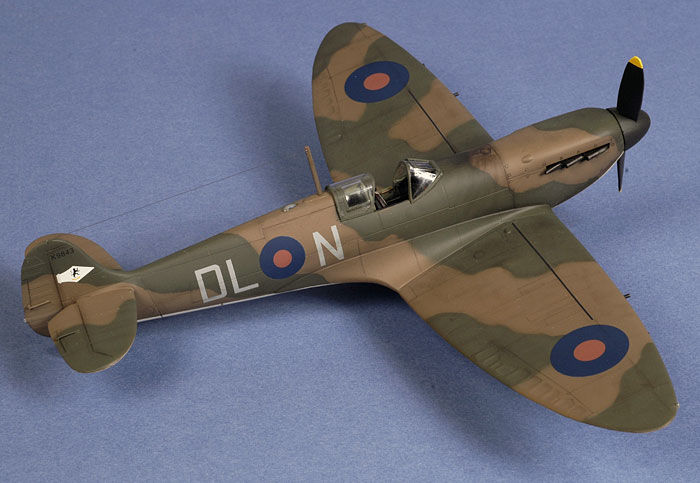
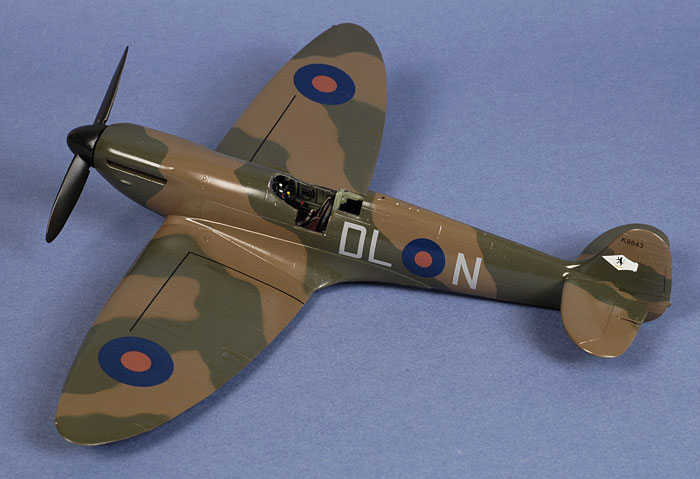
Supermarine Spitfire Mk.I (early)
serial number K9843, 54 Sqn. RAF, Hornchurch England, early summer
1939 |

Airfix's 1/48 scale Spitfire I will be available online
from
Squadron
Airfix's 1/48 scale Spitfire I in the Box

Airfix has released an almost all-new kit with
their 1/48 scale Spitfire Mk.I.
New parts include the entire fuselage,
an all-new wing, and the specific details relating to early Merlin
Spitfires.
The surface of the plastic parts is smooth and
consistent. The wing is specific to the Mk.I / Mk.II with eight machine
gun armament.
Surface detail is by way of very fine and crisply
recessed panel lines combined with fabric texture for the control
surfaces. The panel lines look terrific - at least the equal of what we
are now seeing from Revell of Germany.
Airfix has persisted with separate flaps. Keep in mind,
though, that the flaps were either full up or full down, and it was rare
to see flaps down when the Spitfire was parked.
A Watts two-bladed propeller plus two styles of three
bladed prop - de Havilland and Rotol units - are supplied, permitting
the modeller to build any Spitfire from an early Mk.I to a Mk.II. The
flat canopy and early-style oil cooler housing are provided for the
early Mk.I, whilst Mk.II specifics such as the Coffman starter bulge are
also offered in the kit. Four spoke and five spoke main wheels are
included. Five spoke wheels were typical for the Mk.I through Mk.V.
A more detailed in-box review, including images of the
parts, may be found
by following this link.
Wings and Flaps
Instead of commencing with the cockpit, I decided to
start with the flaps. Airfix has provided these as separate parts but it
was rare to see the flaps dropped when the aircraft was parked. I
therefore decided to close the flaps. I figured the easiest way to do this
was before I joined the wing halves.
The main flaps were tacked to the hinge line on the wing using four
small spots of super glue. With the flaps in the correct position, I
secured the join using liquid glue.
The smaller inboard flaps were slightly undersized, which
would not have been noticeable when dropped but which left gaps if posed
shut. Rather than spend a lot of time filling and sanding in this tricky
recessed area, I cut two new pieces of the correct size from scrap
plastic.
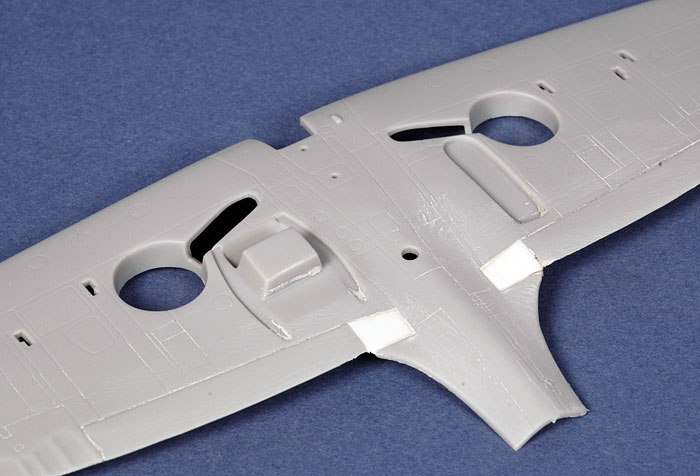
Trailing edges on this wing are thinner than the earlier
Airfix Spitfire Mk.IX (in fact, the whole wing is thinner), but they are
still not exactly razor sharp. When the glue on the flaps had set, I
used a coarse Mastercaster sanding stick to thin down the inside of the
trailing edges on both the upper and lower wing halves.
When the wing halves were joined this gave a much improved appearance to
the trailing edges. The top and bottom wing halves fitted very well.
However, there were still a few inconsistencies at the trailing edges. I
therefore ran a bead of thick super glue along the trailing edge of the
wings, applied Zap-a-Gap to accelerate the setting process, then sanded
the top and bottom of the trailing edges to achieve a consistent
thickness. This also had the benefit of toning down the fabric detail on
the ailerons, but it also eliminated some panel detail which will have
to be rescribed later.
The wing leading edge was also sanded to smooth the curve between the
main part of the wing and the wing tips.
Click the thumbnails below to view larger
images:
[../../photogallery/photo00005585/real.htm]
Cockpit
Having finished the wings, I could now turn my attention
to the cockpit.
This Mk.I cockpit is almost identical to the cockpit in the 1970s
vintage Airfix Spitfire Vb, but that does not mean it is bad. Sidewall
structure is deep, and the "bottomless" floor is correctly depicted. The
instrument panel is a bit overstated with its raised bezels, but the
whole cockpit is a great starting point.
The first task was to cut out the moulded-shut pilot's
entry door. A separate door is supplied, so I did not have to be too
careful! I found out after I finished the model that the crow bar was
not installed on the entry door of these early Spitfires, so this should
be carved off.
I decided to use just a few after-market parts to enhance the front
office. I had a Cutting Edge resin seat spare, and I also recently
received the Eduard Zoom colour photo-etched set for the Airfix Spitfire
IX.
First though, the cockpit parts were painted, starting with an overall
pre-shading coat of flat black.
Early Spitfire Mk.I cockpits were apparently finished in Eau-de-nil or
possibly a brighter shade of apple green. Having restored an old house
in the late 1980s and recalling that Eau-de-nil was a prominent shade
used inside buildings around the turn of the century, I consulted some
of my books on Victorian and Federation house colours (yes, I really do
have such books). I was surprised to find a British Standard 381C colour
chart in one of them. This chart noted Eau-de-nil as colour 216 in the
BS 381C standard, displaying a hue that seemed slightly brighter and
deeper than Duck Egg Green. There did seem to be variation in the
application of Eau-de-nil though, with some interpretations being paler
and more neutral. The brighter apple green shade may have been something
like BS 381C 280 Verdisgris Green. Another surprise in this same book
was that BS 381C 283 Aircraft Grey Green* was called out as a
detailing colour inside late Victorian era houses, although the
process-printed sample in the book looked too dark and too brown.
At this stage I was far more confused than when I
started so, as this was intended to be a quick build, I decided to stick
with Xtracrylix Aircraft Grey Green, which was fairly close to some of
the Eau-de-nil interpretations anyway.
Xtracrylix XA1010 Aircraft Grey Green was sprayed in several very light
coats at an angle to retain a subtle presence of the black in shadow
areas. Basic shapes such as quadrants, the seat backrest cushion and
control wheels were painted black with a paint brush, and knobs and
handles were pre-painted white using the tip of a toothpick.
The edges of structural details now received a wash of Raw Umber and
Black, mixed together and heavily thinned with Odorless Thinners.
The instrument panel for the Mk.IX differed from the Mk.I in a number
of details, but the Eduard Color-Etch panel was beautifully detailed and no less
accurate than the simplified Airfix part. The layers of the panel were
glued using Micro Krsytal Kleer, providing a strong enough bond for
these lightweight parts yet still permitting adjustment while the glue
dries.
The pilot's seat was sprayed Tamiya XF-10 Flat Brown
representing the bakelite material of these early seats. The paint
retained a glossy sheen appropriate for this plasticky material. I also
lightly polished the black cushion with my fingertip for a semi-gloss
finish.
Unfortunately, after the model was finished I was told
that the bakelite seat was not introduced until 14 February, 1940, so
the kit seat should actually be finished in the interior colour (thanks
Modeldad!).
The Eduard set includes a harness. The Spitfire Mk.I should be
fitted with a Sutton Harness, immediately distinguishable due to its
large holes, but I did not have any. I therefore used the mid-war
version supplied in the Eduard set. I won't tell anyone if you don't...
I also added a few simple scratch built items - cine-camera footage
connector from fine wire, plus trim wheel and radio remote controller
from punched plastic discs. Four Reheat placard decals were also used in
strategic positions.
A few streaks and some general grime was added by spraying fine lines of
the ubiquitous thinned red-brown mix vertically along the cockpit
sidewalls.
A coat of Polly Scale Flat Clear was sprayed onto the sidewalls, and the
cockpit was complete.
Click the thumbnails below to view larger
images:
[../../photogallery/photo00013838/real.htm]
* The colour is actually labeled Aircraft Grey Green in the book
even though the first aircraft was yet to fly in these late
Victorian years!
Airframe Construction
Construction proceeded quite fast from this point.
The inside surfaces of the rudder and fin were sanded to
deliver a thinner trailing edge. The trailing edges of the
single-piece horizontal tailplanes were also sanded thin. The fuselage
halves were joined with no gaps or steps. The rear cockpit bulkhead and
the instrument panel were then installed. They almost clicked into place
with a perfectly precise fit, but they were not glued in place yet.
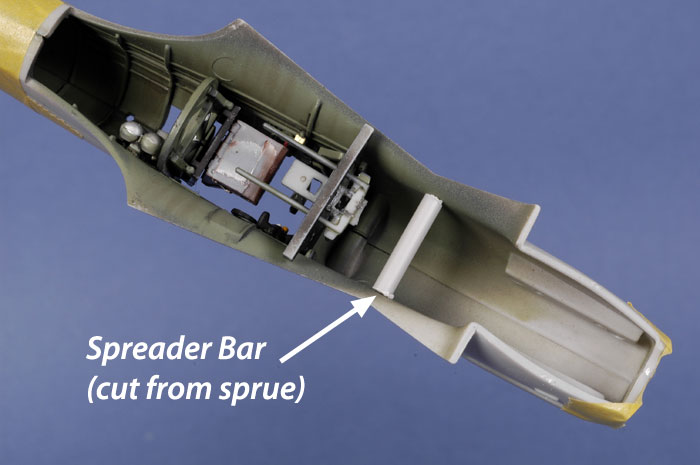
The next round of test fitting suggested that there
might be a gap between the wing and the fuselage at the wing root. The
solution was to spread the fuselage. I had not glued the the instrument
panel and the rear cockpit bulkhead to the fuselage halves in
anticipation of this problem. This offered the flexibility to insert a
length of sprue as a fuselage spreader. With the spreader bar installed,
the panel and bulkhead were now permanently secured with an application
of Tamiya Extra Thin Liquid Cement.
A little trimming around the bottom edges of the wing root was needed
before mating the assembled wing with the fuselage.
Click the thumbnails below to view larger
images:
[../../photogallery/photo00029349/real.htm]
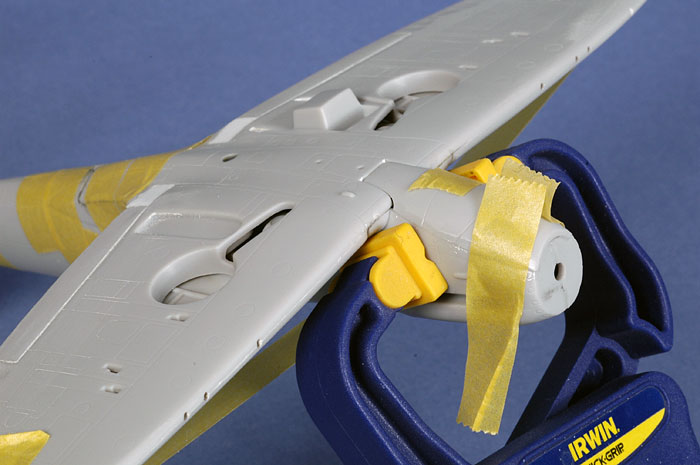
The wing was secured with Tamiya Extra Thin Liquid Cement. The dihedral was set with tape stretched
from wing tip to wing tip.
The result was a near perfect fit in all the most important places.
The lower cowl piece was now installed. Fit was a bit
tricky. I had to trim the rear corners slightly, and the part was
slightly too narrow to meet the sides of the main nose. I therefore
taped and clamped the nose to match the width of the lower cowl part.
This did not work perfectly, but it did limit the
misalignment to a small step between the parts on the port side only.
This step was later eliminated by sanding.
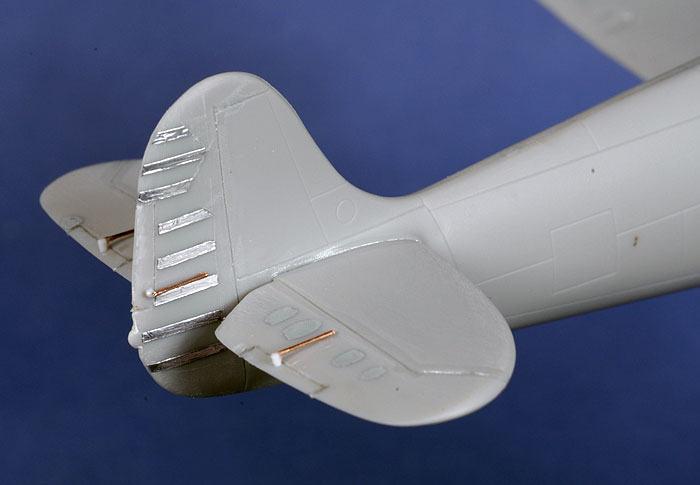
Even after interior thinning, the rudder still looked a bit thick at the
trailing edge. I sanded the exterior of the rudder, which finally
achieved the effect I was looking for. All the vigorous sanding also
eliminated the fabric detail. This was not too much of a problem, as
this detail was marginally overdone. As an experiment, I stuck short,
narrow lengths of self-adhesive Bare Metal Foil to the rudder
representing fabric tape.
The trim actuators were a bit blobby as moulded to the
control surfaces, so I sliced them off and replaced them with fine
copper wire and plastic rod.
The trim tabs and control surface hinge lines were also
rescribed.
Click the thumbnails below to view larger
images:
[../../photogallery/photo00029110/real.htm]
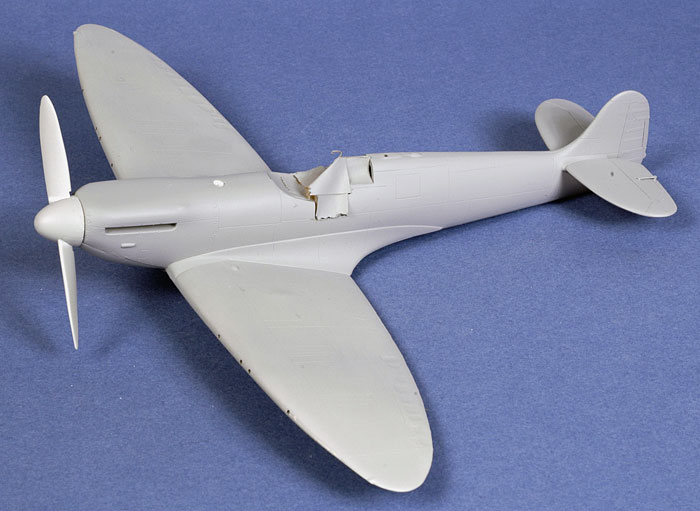
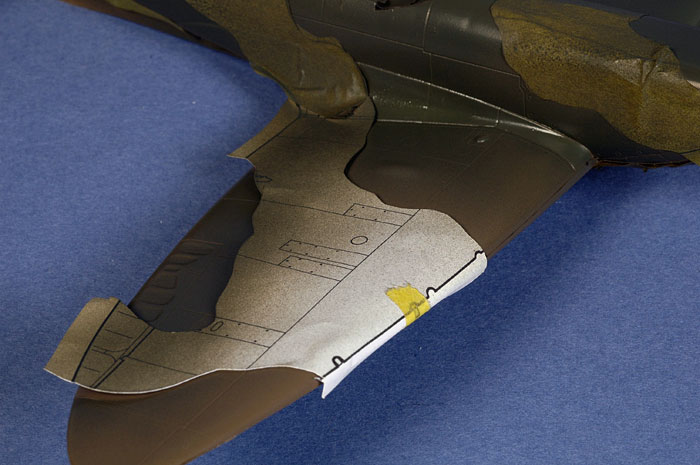
With the basic airframe complete, only minimal filling
was required. This included some gaps along the front of the wing roots
and at the rear join between the wing and the bottom of the fuselage. A
small step at the centre of the leading edge also needed attention.
Milliput epoxy putty was used to deal with these issues.
I was a bit overenthusiastic when thinning the outboard
wing leading edge and removed too much plastic. Once again, Milliput
came to the rescue. I filled the dent to restore the line of the lower
leading edge.
With the wing and fuselage now complete, I noticed that
there was a bit of a pregnant bulge between the wings along the line of
the lower fuselage. All my drawings and photos suggest that this should
be a smooth line with a very shallow curve leading from the rear
fuselage to area between the wings. I assume that this small bump was an
unintended consequence of depicting the gull wing effect. Fortunately,
it will be a simple matter to sand the bump smooth (and next time
I will).
Airfix's clear parts are reasonably accurate, but they
are thick. The centre canopy section would not have a hope of
sitting down convincingly on the spine when posed open, so I sourced an
early canopy from Falcon's vac-form set no. 51, Spitfire Special. The
vacform windscreen did
not fit but the sliding section sat down perfectly over the fuselage
spine.
The shape of the kit's windscreen looked a bit
ambiguous, as if armoured glass was fitted. I slightly rounded off the
front corners of the windscreen to counter this effect.
My model was destined to wear the markings of Spitfire
Mk.I serial number K9843 of 54 Sqn. RAF based at Hornchurch during the
early summer of 1939.
First, I primed the entire airframe with Tamiya
Grey Primer straight from the can. I like the Tamiya primer, being fast
drying and a good way to quickly check for any persistent gaps or other
surface imperfections before the final colours are applied.

The Testor Aztek A470 airbrush fitted with the "Fine"
tan tip was used for all remaining painting.
The white and black lower wings were masked and
sprayed using Tamiya acrylics.
I used Xtracrylix for the camouflage colours. I thinned
these paints with no more than 10% Windex. This resulted in smooth
spraying through my Aztek airbrush and a hard, glossy finish to the
paint job.
After masking the lower surfaces and the bottom of the
tailplanes, the upper surfaces and fuselage sides were sprayed
Xtracrylix XA1002 RAF Dark Earth BS 450. This is a rich and authentic
interpretation of the WWII colour.
When the upper surfaces were coated with Dark Earth, the
hard-edged camouflage pattern was masked using a combination of Tamiya's
wide masking tape and sections of Tamiya's Spitfire I instructions cut
up and used as masks for the wings. Several fine coats of Xtracrylix XA1001 RAF Dark Green BS 241was misted over the surface to ensure that there was no
build up of paint along the demarcation lines.
Click the thumbnails below to view larger
images:
[../../photogallery/photo00005510/real.htm]
Following removal of the masks, a coat of Polly Scale
Gloss was applied in preparation for decals.
Markings were sourced from Iliad Design's sheet #48003,
"Pre-War Spitfires". The decal film was very thin, colour saturation
excellent and they sucked down perfectly into the panel lines with the
assistance of Micro Set and Micro Sol. The wing walk decals were sourced from the Airfix decal sheet. These
also performed well, with good colour saturation
and minimal silvering.
With the decals in place, the airframe received a light
coat of Polly Scale Flat and was then subtly shaded with a thin mix of Flat Black
and Red Brown. This was sprayed along control surface hinge lines,
selected panels, in a few random spots and streaks and along the
demarcation line between the Dark Earth and Dark Green. This slightly
reduces the harshness of the sharply masked demarcation. I also
carefully applied this mix in streaks and stains around and below the
filler point in front of the windscreen.
A finishing coat of Polly Scale Flat sealed the decals
and the paint job.
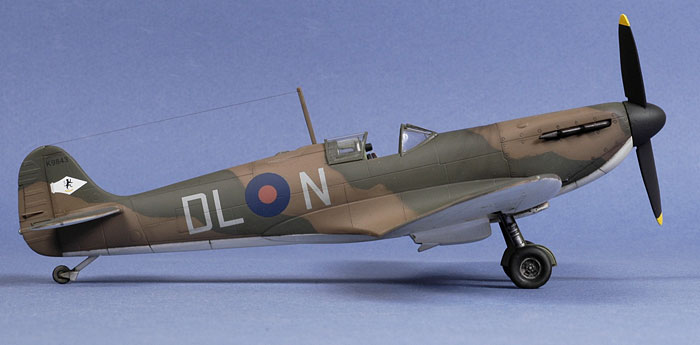
Before painting, oleo scissors (from an old Reheat photo-etched set) and
hydraulic lines (from fine wire) were added to the undercarriage legs.
The undercarriage, wheels, canopy, parts, exhausts and propeller were painted and installed without incident. The
wheels and the bottom of the gear doors were weathered with Tamiya
pastels.
Finishing touches included antenna wire from invisible mending thread,
machine gun barrel stubs from fine brass rod, and lenses
for the navigation lights from small blobs of Araldite clear two-part
epoxy cement.
The machine gun protrusions were configured according to a large photo
of an early Spitfire Mk.I flightline on page 20 or the Alfred Price
book, "Spitfire - A Complete Fighting History" (1991 edition), although
Murphy's Law intervened and the outboard starboard gun has fallen into
the wing.
In common with my earlier Spitfire models, I could not resist adding a
splash of colour to the pilot's entry door by painting the crow bar red,
even though I knew this was a post-war embellishment. My sins were
double this time, as the crow bar was not introduced until the Spitfire
Mk.V!
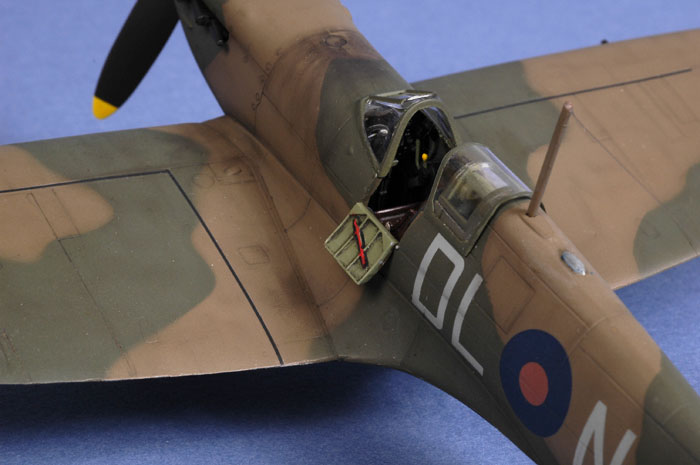
A ring gunsight appropriate for this early Spitfire was sourced from an
old Reheat photo-etched set and installed in the cockpit before the
canopy was secured with Micro Krystal Kleer.
Airfix's new 1/48 scale Spitfire Mk.I
is an accurate model with restrained surface detail and the option to
build either an early Mk.I, a Battle of Britain Mk.I or a Mk.II. The
main problem with the kit, the thick windscreen and canopy, can easily
be replaced with vacform parts or even more easily ignored.
I started this model last weekend and
finished it on Thursday, spending around 15-20 hours on the project. I
thoroughly enjoyed the build, but I would do a few things differently
next time with the benefit of hindsight. These include:
-
painting the interior one of the early colours (eau-de-nil or apple
green)
-
sourcing a Sutton Harness for the pilot's seat
-
painting the seat the same colour as the interior (the bakelite
material was first introduced on 14 February, 1940)
-
carving the crowbar off the pilot's entry door
-
sanding the "lump" off the lower fuselage between the wings
-
sand
off the moulded-on spine navigation light and fabricate a clear
piece (or form one from clear epoxy)
-
adding
the small "T" shaped aerial wire anchor on the top of the rudder
Some modellers may ask why they should buy this kit instead of Tamiya's
1/48 Spitfire Mk.I. On one hand, Tamiya's is certainly easier to build
and the clear parts are thinner. On the other hand, the Airfix kit
boasts a more accurate outline, especially the plan form of the wing;
has finer surface detail; and is the only option available for a very
early Spitfire with two-bladed Watts propeller and the flat canopy.
At around £10.99, it represents pretty good value too.
If you want to build an early Spitfire Mk.I, it is no contest - buy the
Airfix kit. Your decision for a late Mk.I will depend on your personal
preference for either accuracy and surface finesse (in which case you'll
probably choose Airfix), or ease of construction (Tamiya).
This model can be considered the final product of the "old Airfix", but
the improvements found in this kit auger well for future releases. I
look forward to seeing the first offering fully developed under Airfix's
new stewardship.
Welcome back, Airfix!
Thanks to
Hannants for the sample
kit.
Click on the thumbnails
below to view larger images:
[../../photogallery/photo00008198/real.htm]
Model,
Images & Text Copyright © 2007 by
Brett Green
Page Created 02 August, 2007
Last Updated
24 December, 2007
Back to
HyperScale Main Page |
 Home
| What's New |
Features |
Gallery |
Reviews |
Reference |
Forum |
Home
| What's New |
Features |
Gallery |
Reviews |
Reference |
Forum |