|
Eduard's 1/48
scale
Yakovlev Yak-3
by Roger Fabrocini
|
 |
|
Yakovlev Yak-3 |

Eduard's 1/48 scale Yak-3 Weekend Edition
is available online from Squadron for less than $12.00
This is Eduard's Weekend Edition 1/48 scale Yak-3 (kit
#8455). I used the kit supplied markings for a Yak-3 of GIAP, Poland,
1945.
:
I believe Eduard markets these Weekend Edition kits as
cheaper to purchase and quicker to build alternatives to their orange
range and limited edition kits which both include Photo-Etched parts and
more marking options.
I was able to turn mine into a 8 day build by including
the following detail:
-
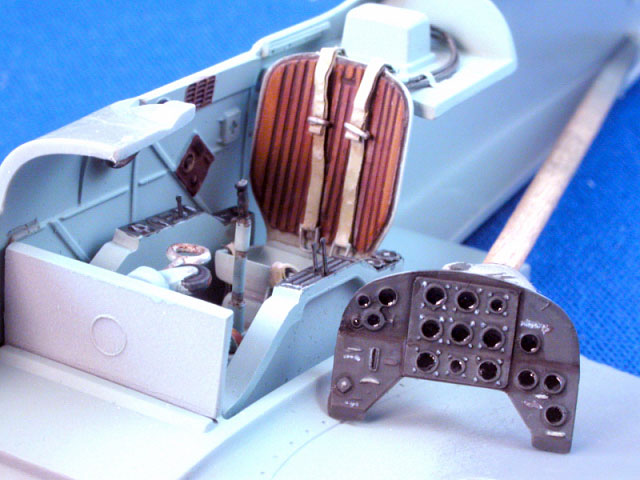
Detail added to the
cockpit with spare P.E. levers, wheels, etc., and wire.
-
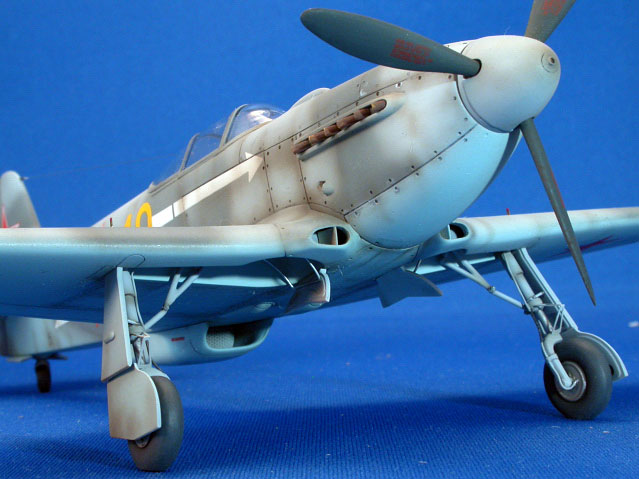
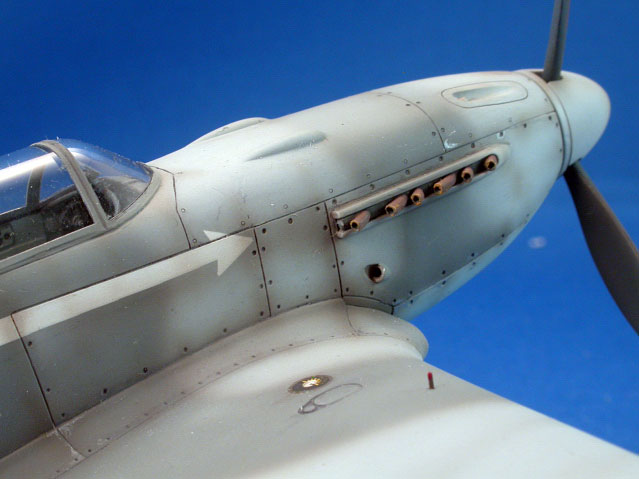
Blast tubes for the cowl
mounted MGs out of stainless steel tubing
-
Detail added to the main
landing gear using spare P.E. parts, lead wire for the brake lines
and GrantLine bolts.
-
Exhausts and 20mm blast
tube drilled out.
-
Wing root intake
splitter plates made out of .10" card stock.
-
Trim tabs replaced with
ones made out of .10" card stock.
-
I replaced my lost kit
gunsight with a Quickboost resin US N3-c gunsight (it seemed
simularly simple).
-
Pitot tube replaced with
a length of stainless steel tubing.
-
Gear position indicators
made out of spare P.E. fret.
Construction was very simple, though there are a few
areas to watch for.
The wing trailing edges are thick, but I found replacing the trim tabs
helped give them the illusion of being thinner.
The rear edge of part #28 (upper engine cowling), where it meets the
fuselage, is not an existing panel line and needs to be filled.
Lining up the rear fuselage during assembly puts the horizontal
stabilizers on different plans. I honestly had no solution for that and
left mine as is.
In my infinite wisdom, I read reviews of the kit after I compelted mine.
In one review it was noted that the main gear is molded in the full
extended position. The reviewer suggested removing 1 mm from the oleo
strut. Again, i left mine as is. The gear doors are in reality two piece
affairs, not one as are molded in the kit, so i cut mine apart.
The real Yak-3s antenna wire passed through the rear
cockpit glazing so i drilled a small hole in it the rear of the kit
glazing and used .002" Dai-Riki monofilament for the radio aerial.
Painting,
Markings and Weathering
|
I originally pulled the Yak-3 out of my stash to try a
different painting technique. I was very impressed by a recent first
time poster on Plastic Pixs, Luís Montalvo, and his style of painting.
He stated he used Vallejo acrylics, first airbrushing then hand brushing
the highlights and shadows. It is basically using filters, very, very
thin washes, to achieve depth, tone and hue variations in the finish, a
painting technique employed by figure painters. Though I resorted back
to using my airbrush I learned a lot from my "experiment" and will try
it again.
My primary source of reference was Soviet Air Force Fighter Colours
1941-1945 by Erik Pilawskii (Classic Publications) and his excellent
website "Modeling the aircraft of the VVS 1917-1950".
http://vvs.hobbyvista.com/
I used Mr. Pilawskii's FS# recommendations as a starting point to mix my
own equivalents using Vallejo acrylics. For the lower surface's blue
AMT-7 (FS#[2]5550) i mixed #973 light sea grey, #907 pale greyblue and a
drop of #961 sky blue (for vividness). For the uppersurface's greys
AMT-11 (FS#[2]6300) i used #990 light grey and for Dark Grey, AMT-12
(FS#[2]6081) i used #866 Grey Green. All colors were mottled using
lightened shades of the base colors. The uppersurfaces were over sprayed
with a very thin mix of #900 French Mirage Blue and white. Tamiya TS-13
clear, decanted from the rattle can and sprayed using my airbrush, was
used for a gloss coat before and after decals. Humbrol Matt cote was
used for the final flat finish. Exhausts were first painted black then i
created a weathered effect using Andrea acrylics Dark leather, Wood and
earth.
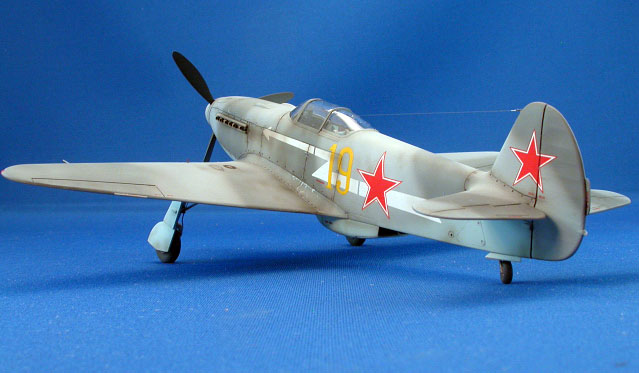
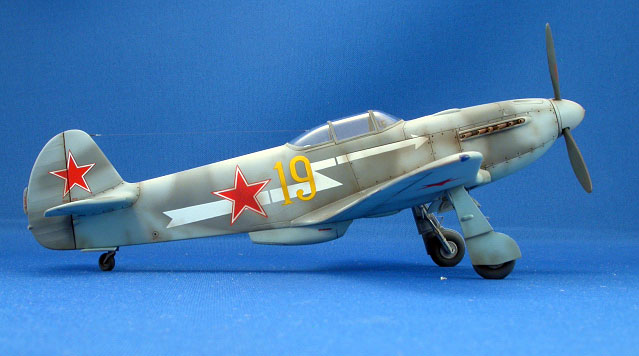
The kit supplied decals are by AviPrint. I have found their performance
second to none. If the subject Eduard/AviPrint chose to represent is the
same one profiled in Mr. Pilawskii's book on page 198 and painted on 193
then there may be a discrepancy in what the actual color of the number
19 is, yellow as AviPrint depicts or white, outlined in red, as Mr.
Pilawskii suggests. I imagine they could be two different aircraft,
though they appear very similar.
Weathering was achieved using artist oil washes and post shading with a
thin mix of Tamiya Red-brown and Black.
8 days, about 20 working hours, constitutes a pretty
fast build for me. I used this kit as a "break" from more detailed
projects and as a test subject for a painting "experiment". It served
admirably in both rolls being a fast, trouble free build clothed in an
attractive paint scheme.
The kit’s only downside is the possibly inaccurate markings.
If anyone has more information on this matter i would appreciate hearing
from you.
As always, thank you all for your indulgence.
Click the
thumbnails below to view larger images:
[../../photogallery/photo00030843/real.htm]
Model,
Images & Text Copyright © 2007 by
Roger Fabrocini
Page Created 14 March, 2007
Last Updated
24 December, 2007
Back to
HyperScale Main Page |
 Home
| What's New |
Features |
Gallery |
Reviews |
Reference |
Forum |
Home
| What's New |
Features |
Gallery |
Reviews |
Reference |
Forum |