|
Neomega's 1/48 scale
Yak-52
by
Tony Horton
|
 |
|
Yakovlev Yak-52 |

HyperScale is proudly supported by
Squadron
Background
Almost every general aviation airfield in this country can boast
about having a YAK in residence! My local airfield at White Waltham even
has a specialist maintenance facility for Yaks.
The Yak-52 was mainly used by Eastern Bloc countries for training and
utility duties and was used by many of the old Warsaw Pact Air Forces.
Since the collapse of the Soviet Union, there has been a lifting of
restrictions within these countries. It did not take long for ex-Soviet
aircraft to become available to private individuals.
Neomega's 1/48 scale Yak-52
Neomega is well known for their detail cockpit set and have a good
reputation on there fit and easy of use. So when I saw their latest
release for a whole resin kit at scale model world last year I just had
to have one.
Upon opening the box once I had got the kit home I was not
disappointed with the level of detail and the quality of the parts in
the kit. Not having built a resin kit before but I have dealt with lots
of resin detail sets it was going to be steady as we go.
First, all the parts received a good wash with a little soapy water
to remove the mould release agents, then all the moulding blocks had to
be removed from the kit parts and some care has to be taken here as the
parts are very delicate as can be seen by this picture in that one of
the seats broke on me and had to be glued back using a little cyro glue
and accelerator.
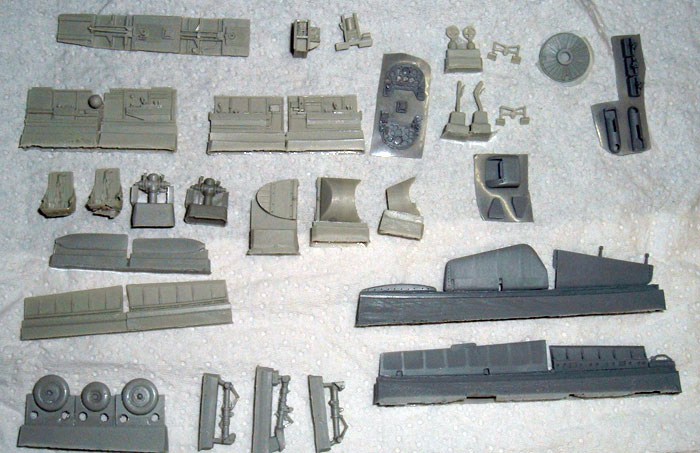
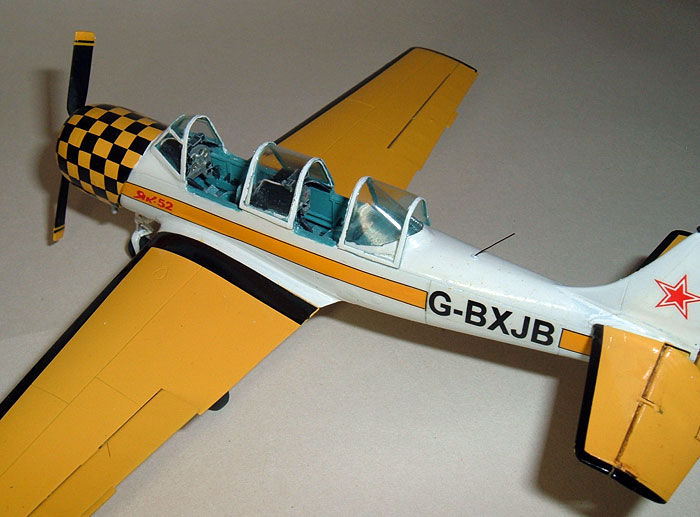
The level of detail in the two cockpits was exceptional and up to
Neomega’s normal standards which are high anyway. The fit of the cockpit
parts were good and fitted where the instructions said they should go,
but careful dry fitting and a planed sequence of how your going to fit
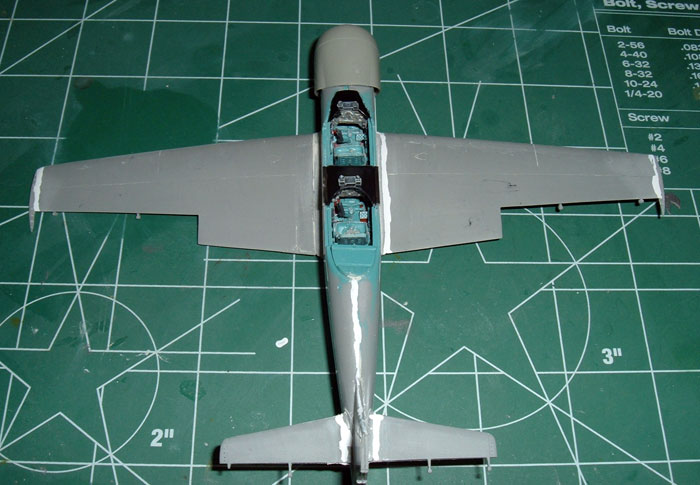
them is essential. Once the two halves were dry it was time to spray the
inside of the fuselage, this I did with xtracolour enamel paints. As all
Soviet aircraft were painted inside in that unique shade of blue I
decided to paint this kit the same.
Most of the older Yaks when they come to this country and are placed on
the U.K register they go through a through maintenance check and the
interiors are repainted in a more subtle western colour so careful check
of references are required here. I used the Soviet colour as it is such
an unusual colour for aircraft interiors and if it is not exactly
correct then I make apologies for this. The instrument panels are very
good but they don’t have any instrument dials on them so these were
added using decals from the Reheat range.
The wings are one piece mouldings and so are the tail planes. All the
flying control surfaces are separate so that they can be placed in a
deflected angle if one wished to. When Yaks are at rest the elevator
tends to apply Newton’s theory of gravity. Once all the wings and tail
planes were dry there was very little filling to be done that’s how good
this kit is. I just went over the joints with some typewriter correction
fluid to make sure of good joints.
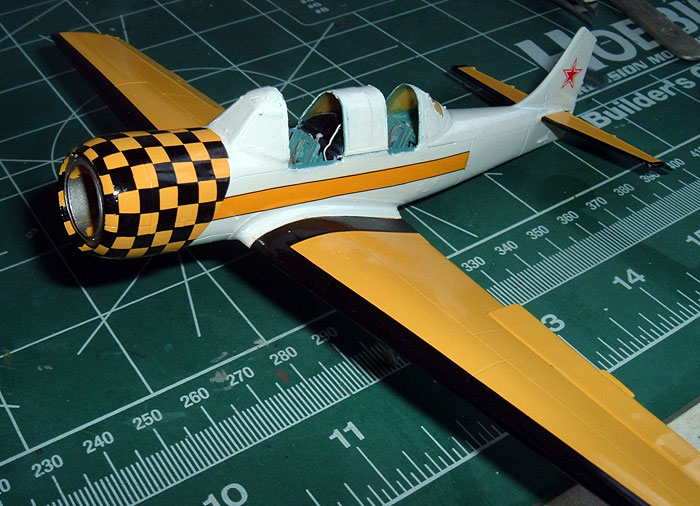
The next part of the kit to be tackled is the engine cowl which has a
large moulding block cast . This has to be carefully removed without
damaging the cowl itself. This I did by drilling chain holes around the
moulding block and removing the excess. Then I drilled more holes
through the centre of the cowl and removed the excess this way. It was
just a case of cleaning up the centre with a power tool and taking all
the precautions of wearing some form of face protection to avoid all the
dust that this generated as resin dust can be carcinogenic.
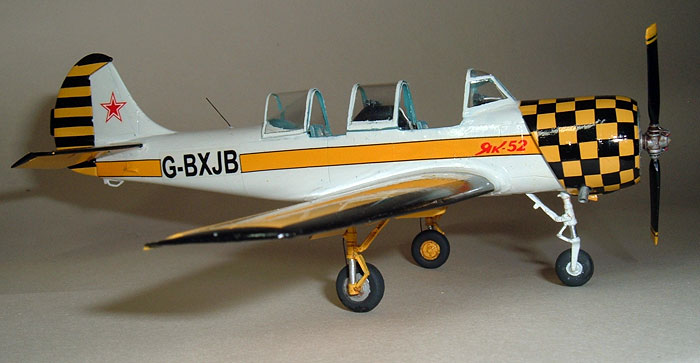
Now that the airframe was complete it was time to do the colour
scheme. The three options supplied in the kit are for two Soviet
aircraft and one U.K registered. But my choice was for a machine which I
saw at the Rougham air show back in august 2006. so I started spraying
the white and used xtracolour acrylic white which worked really well
onto an un-primed surface. Then I sprayed the yellow which again came
from the acrylics range from xrtacolour. After all the masking was
removed me had an airframe that now needed the black trim to be added.
I decided to make the black trim out of decals so I looked through my
spares decal box for all the black decals I could find. These were
applied and then left to dry before sealing those with a coat of
Johnson’s clear floor polish. The checks on the cowl were then measured
and an appropriate number of decal squares were cut out and then applied
over a period of several hours, this was a painstaking effort but
produce the right results. The rudder was similarly done by painting the
yellow and then making black decal stripes. The cheat line was made
using yellow decals and bordering with black and all these came from
xtradecals range (what would we do without Hannants these days). As for
the registrations I had to print my own decal for these as I could not
find appropriate decals anywhere.
Printing decals is not as daunting as it may sound all you need is the
right decal paper and software on your pc. It also helps if you have a
club member who prints his own decals and you can tap into their
knowledge, which I have at my own club (model clubs are the best way to
improve your modelling skills as you can tap into vast array of
knowledge and techniques).
After finishing all the decals it was time to turn to the undercarriage
and this is where it started to get a little messy!
The only bad point that I could find with this kit was the instruction
in that they are printed on A4 sheet and show basic line drawings for
all the stages. Another sheet shows the three options and this is
printed in colour with description of the aircraft and the colours to
use.
The construction diagrams are not to clear as to regards the
undercarriage legs and supports so I ended up shaving to much of the
base of the legs only realising afterwards that too much had been taken
and that I then needed to make some supports from plastic card. After
carefully remaking the base supports and then spraying the legs the same
colour everything turned out fine in the end. This could have been
avoided with a little more careful research on my part and not to get to
complacent when things go well on a project.
There is no engine detail on this kit and you really don’t need it cause
the Yaks have this large fan in the front of the engine which hides all
what is behind it and the space behind is great for placing lots of
weight in to stop this becoming a tail sitter. What you do get in the
kit is two propeller hubs (one of which is a spare as this is the most
delicate part of the kit) and if you do get to see a Yak close up one of
the things that you look at is the complex nature of the constant speed
unit on the prop and how different it is to say a American constant
speed unit. Neomega has done an excellent job on producing a very
detailed unit.
It was on to the final stages of this project and all the last decals
were placed on the model. The only two decals that I used from the ones
supplied were the Russian stars and the Yak52 symbols and both of these
went on very well and had no adverse reaction to Micro-sol setting
solution. The model now received a coat of Johnson’s clear to protect it
from adverse handling.
The canopy was then place in the open position this I had to cut into
pieces as the one supplied is a solid unit and if you want to display
the model with a open cockpit you have to be brave and cut up the only
canopy that Neomega supply in the kit (so be careful).
In conclusion I must say it’s like a breath of fresh air for a kit
manufacturer to produce a kit in this scale that does not have guns or
bombs on as I feel that we have far too few civil aircraft kits.
Neomega has also done an exceptional job with this model in that the
mouldings are superb and the fit of this resin kit is as good as some
smaller injection moulding companies’ offerings. The only down side, and
I am nit picking here, is the instructions but even an average modeller
with a little research can produce an excellent model.
Well done Neomega. Let’s see some more as I cant wait but till then
there are many more Yaks to be built!
Model, Images and Text Copyright © 2007
by Tony Horton
Page Created 04 July, 2007
Last Updated
24 December, 2007
Back to
HyperScale Main Page
|
 Home
| What's New |
Features |
Gallery |
Reviews |
Reference |
Forum |
Home
| What's New |
Features |
Gallery |
Reviews |
Reference |
Forum |