|
Messerschmitt Bf
109 F-2/4
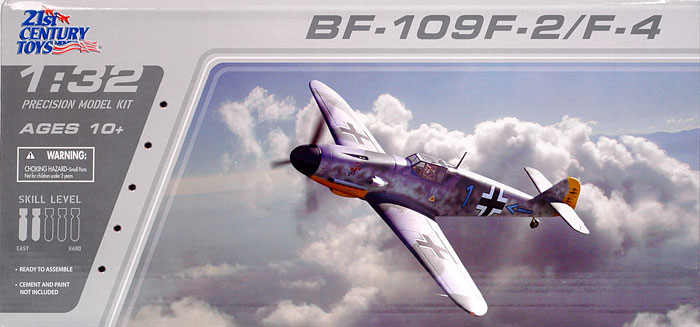
21st Century
Toys, 1/32 scale
S u m m a r y
|
|
Catalogue Number: |
21st
Century Toys kit number 22103 - Messerschmitt Bf
109 F-2/F-4 |
|
Scale: |
1/32 |
|
Contents and Media: |
69 parts
in grey styrene; 5 parts in clear styrene;
markings for three aircraft. |
|
Price: |
around
USD$10.99 |
| Review
Type: |
FirstLook |
|
Advantages: |
New
tooling; generally accurate outline; small parts
breakdown and simple construction for new
modellers; nice details and options; superb
pilot figure; excellent decal sheet; low price;
will accept most after-market accessories for
1/32 scale Bf 109s. |
|
Disadvantages: |
Does not
represent a standard Bf 109 F-2/F-4 straight
from the box (more like a G-2 or F-4/Z - see
text); some soft or missing detail (e.g. no
radiator faces, mass balance horns);
construction method will leave large circles to
be filled and sanded; thick clear parts with
intrusive attachment points |
|
Recommendation: |
Recommended for new modellers and those on a
budget. |
Reviewed by Brett Green

HyperScale is proudly
supported by Squadron.com
21st Century Toys has been making a name for itself in
the collector's market with their large-scale, pre-assembled
and painted aircraft and military models. Now, 21st Century
Toys has expanded into plastic construction kits.
The first batch of 1/32 scale kits includes a
Messerschmitt Bf 109 F-2/F-4.
We have been waiting for a Friedrich variant of
the Messerschmitt Bf 109 in 1/32 scale for a long time.
Revell's 1/32 scale Bf 109 F from the 1960s displayed some
fatal accuracy issues, and Hasegawa seems to be in no rush
to expand their excellent 1/32 scale Bf 109 family.
So do we finally have a decent 1/32 scale Messerschmitt
Bf 109 F?
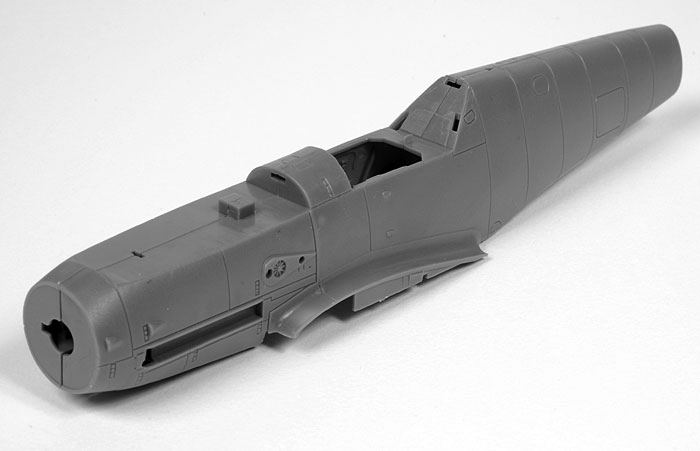
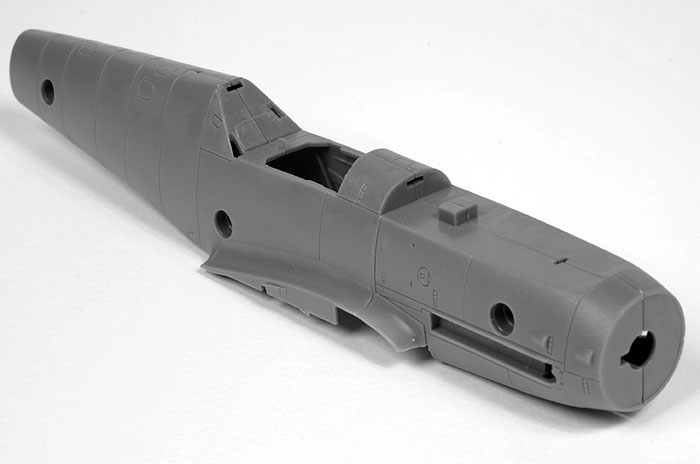
Underneath the striking box art, 21st Century Toys' 1/32
scale Bf 109 comprises 69 parts in grey plastic and five
parts in clear, plus eight metal screws. The grey plastic
appears to be regular hard polystyrene, and responds
normally to model cements. Parts are not attached to sprues.
Instead, they are packed in small groups of loose parts in
separate plastic bags.
Click the
thumbnails below to view larger images:
[photogallery/photo00023245/real.htm]
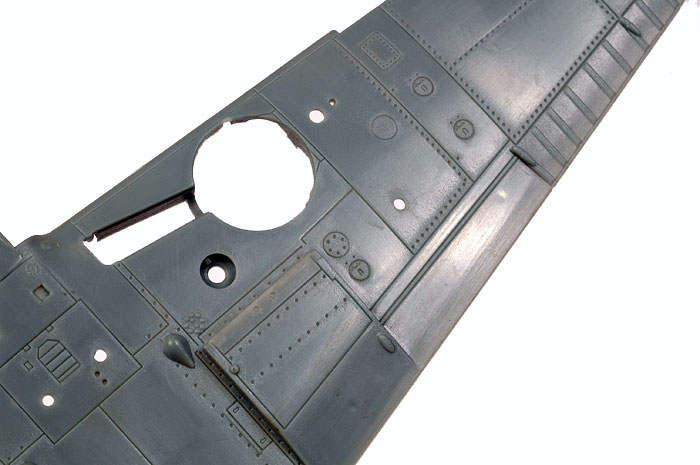
Surface detail is by way of recessed panel lines and a
small number of rivet lines (on the lower wings only), plus
raised fabric detail. The surface detail - both recessed and
fabric - is noticeably heavier than Hasegawa's 109s, but not
as exaggerated as some mainstream releases of late. Surface
texture is very much a matter of taste, but I will probably
at least be sanding down the raised detail on the control
surfaces.
The general outline of the kit is quite accurate. I
compared the wings and fuselage to Hasegawa's Bf 109
G-4/Trop kit, and they conformed extremely closely in terms
of size and profile. The wing chord and span is between 1
and 2mm shorter on the 21st Century kit. The most noticeable
difference was the profile of the rudder. The 21st Century
version was a little flatter at the top and very slightly
narrower in chord. I think the shape of the Hasegawa rudder
is more accurate.
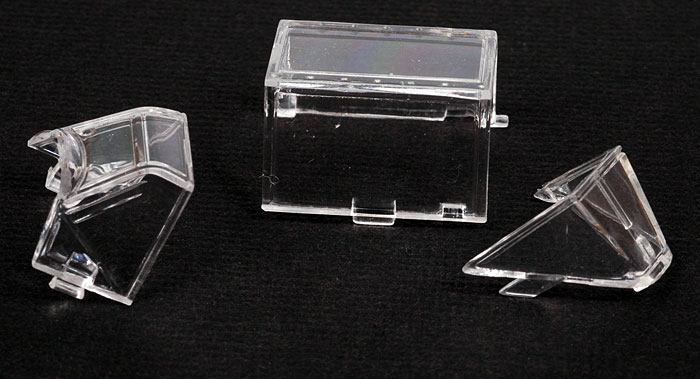
The clear parts are quite clear, but they are thick and
location points do intrude beyond the frames into the clear
parts of the canopy. Clear wing tip navigation lights are
included.
Some details are nicely done, including the narrow main
wheels with the "cast" wheel spokes moulded separately from
the rear of the hub, and gear legs with hydraulic lines
moulded on. I think the gun trough insert looks better than
the Hasegawa part included in their Bf 109 G-4/Trop kit too.
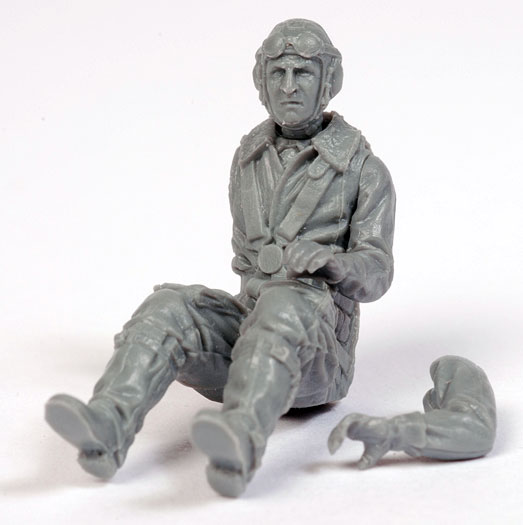
The seated pilot is one of the finest figures I have ever
seen supplied with a aircraft model kit. He is made up of a
body, two poseable arms and a separate head. Unfortunately,
my sample has two left arms (I know how he feels sometimes).
On the other hand, a number of items have been simplified
or omitted. These include missing radiator and oil cooler
faces, no separate balance horns for the ailerons and solid
fuselage intake scoops.
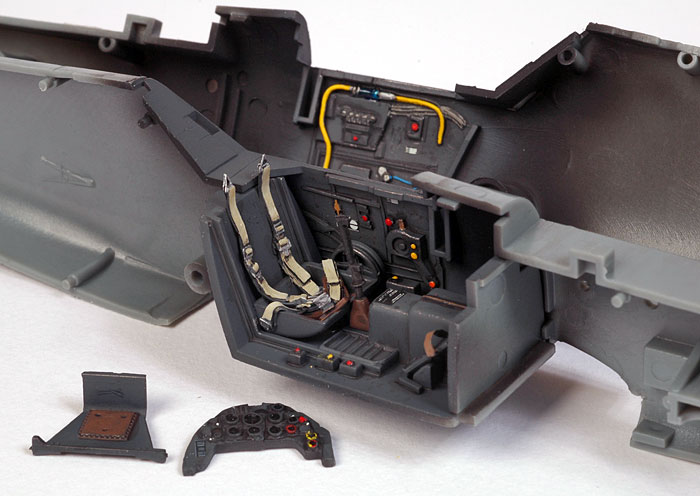
In the box, the cockpit looks a bit basic. However, the
front office looks good when carefully painted. The photo
below shows my cockpit painted and ready for assembly. The
only additions to the cockpit are a flexible resin harness,
a length of fuse wire to complete the fuel line on the
starboard sidewall (the front part in front of the
inspection tube is not moulded to the sidewall), and lead
foil for the rudder toe straps. I also used a few placard
decals from MDC and Reheat.
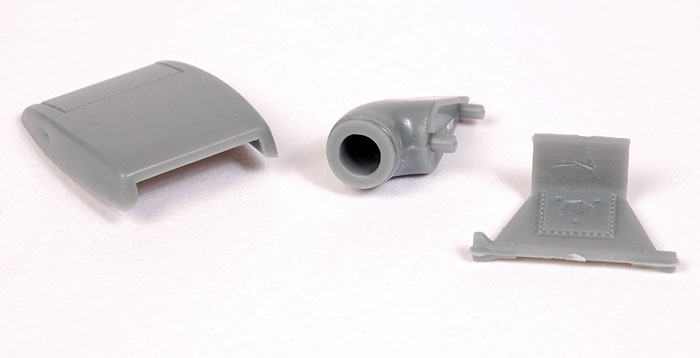
Options and features include movable leading edge slats,
retractable landing gear and opening canopy; ETC rack; 300
litre drop tank; 250kg bomb; tropical air filter (one piece
and cleverly moulded open); underwing 20mm cannon gondolas
and a DF loop.
Markings are supplied for three aircraft:
-
Bf 109 F-4/B of JG 2,
France, early 1942
-
Bf 109 F-2 of 7./JG 54,
Eastern Front, Autumn 1941
-
Bf 109 F-4 of 9./JG 3,
near Stalingrad, June 1942
The decals are a real highlight - thinly printed, crisp
and plenty of tiny detail extending to the smallest
stencils. The red was slightly out of register on my sample,
but this only effected one emblem.
Kit Engineering
I assume that, in addition to its current guise as a
construction kit, this mould will also be used as the basis
for a pre-built and painted static display model. That being
the case, kit engineering has been optimised for ease of
mass production by unskilled labour. The good news is that
it should be easy for new modellers to build too.
The first thing you will notice when you open the box are
a number of large holes in one fuselage side and on the
bottom of the wing. These are holes for the screws that hold
the main fuselage and wing assemblies together. Plastic
plugs are supplied to fill these holes, but many modellers
will also want to fill and sand the circles.
The workable slats are simply designed to be trapped
between the top and bottom wing halves. - no complications
there. The retracting landing gear is just as simple. It is
secured by a single part screwed into place.
The tail unit is a separate assembly from fuselage panel
K and aft. This suggests that we will see at least a Bf 109
G-14 and/or a tall tail G-6. The tail halves and the
propeller assembly are installed before the fuselage halves
are joined.
There are lots and lots of locating pins - some big and
some small. Even without the screws the fuselage stays quite
snugly in place without glue.
The cockpit floor, rear bulkhead and instrument panel
will slip into the assembled fuselage halves from below.
After that, the wing is offered up to the fuselage,
screwed in place and the final details fitted.
This should be a very fast build.
Many modellers will be thrilled with the low price of the
kit, perfectly happy with the contents in the box, and build
the model per instructions. Others will be interested in the
finer details of the actual variants that can be faithfully
portrayed from the included parts.
The following analysis of the kit contents may be of
interest to the second category of modeller. What variant
can we accurately build straight from the box?
The fuselage halves include engraved detail for various
filler and access hatches. Similar to Hasegawa's Bf 109
family, some of these will have to be filled depending on
the variant being built. Importantly, these hatches do not
include the unique Bf 109 F fuel filler under the port-side
canopy. Also, the nose features four small intakes which
were not introduced until the Bf 109 G series (in this case
the intakes are in-line, not staggered per the Hasegawa
kit). The tail wheel well is covered over in the kit,
whereas this should be open for the Bf 109 F and even the
early G series.
Moving to the wings, the wheel well openings are round
per the F series, and the upper wing panel lines are also
appropriate for the Bf 109 F, but the small panel for the
underwing FuG16ZY Morane antenna mast (not introduced until
the G-6) is also present.
The real devil is in the detail. The propeller blades,
oil cooler housing and supercharger intake are all later
than a standard Bf 109 F-2/F-4. This style of deeper oil
cooler and larger supercharger intake were first installed
on the Bf 109 F-4/Trop and F-4/Z, but are more typically
associated with the DB605A-powered Bf 109 G series (G-1,
G-2, G-3, G-4, G-5. G-6, G-14). The broad propeller blades
as supplied in the kit were only seen on the F-4/Z and
F-4/Z/Trop. By the way, the size and shape of the
supercharger intake is reasonable, but the opening is
squared off and too small due to the thickness of the
plastic. If you are not planning to install the tropical
filter, I recommend thinning the opening from inside.
The spoked narrow main wheels are correct for the Bf 109
F and the Bf 109 G-2 / G-4(early). The tail wheel is the
smaller style (290mm x 110mm) seen on the Bf 109 F and G-2.
This was replaced with a larger tail wheel (350mm x 135mm)
on a fixed strut from the G-3 onward.
So far, we have some attributes of a very late F and
others of the early Bf 109 G series.
The canopy adds to the confusion. Although the windscreen
has frame lines moulded onto the bottom quarter windows
(which were only applicable to the F series), the heavy
windscreen framing and absence of opening forward quarter
window is much more like a Bf 109 G. The canopy centre
section does not have the centre frame, so looks like a Bf
109 F.
So, 21st Century Toys does not include all the parts to
build a completely accurate Bf 109 F-2 or F-4 standard
variant straight from the box. However, there are a number
of other choices for finishing the kit.
These are my suggestions:
Bf 109 F-4/Z or F-4/Z/Trop
If you want to build your model as an F-4/Z or
F-4/Z/Trop, you will need to do the following:
-
Check your references and
fill access panels and filler hatches not appropriate to
the Bf 109 F.
-
Scribe in fuel filler
port under port-side canopy
-
Slice off the two small
intakes on both sides of the nose
-
Open up the tail wheel
well opening using the panel lines as a guide (the tail
wheel leg can still be installed after this operation)
-
Check your references to
see if your subject had the starboard side windscreen
bottom quarter window covered (fairly typical for late
Fs)
-
Paint only the outer
frame of the windscreen to represent the thinner framing
(or, if you are very brave, sand the detail off, polish
and rescribe new lines. But only if you are very
brave).
-
Scribe a vertical line in
the centre of each centre canopy panel (represents the
break for the sliding windows). and on the sides of the
windscreen (for the inward-opening quarter windows)
Bf 109 G-2 / G-2/Trop
The least amount of work for reasonable accuracy straight
from the box is to finish the model as a Bf 109 G-2. If you
want to build your model as an early Bf 109 G, you will need
to do the following:
-
Check your references and
fill access panels and filler hatches not appropriate to
the Bf 109 G-2. Some of the G-specific hatches are
missing or in the wrong locations too, so while you have
your filler and scriber handy it may be worth
repositioning these (most notably the fuel filler hatch
on the port-side spine).
-
Cut open the tail wheel
well opening using the panel lines as a guide (the tail
wheel leg can still be installed after this operation)
-
Square off the outboard
profile of the main wheel well openings.
-
Add a chordwise panel
line to the top of each wing (check references).
-
Either sand off or
preferably fill the lower quarter windows on the kit
windscreen.
-
Add a vertical panel line
to each of the three clear panels on the opening canopy
section.
-
Add FuG25 mast to the
bottom of the fuselage from fine rod or wire.
Bf 109 G-4 (early)
You could build the kit as an early Bf 109 G-4, but you
will need to source a larger tail wheel. The steps are the
same as for the G-2, plus the following:
-
Check whether your
subject had open or faired-over tail wheel well. Some
very early G-4s may have been open. If required,
open up the tail wheel well using the panel lines as a
guide (the tail wheel leg can still be installed after
this operation)
-
If you are building an
early G-4 with the faired over tail wheel well, you
will need to replace the tail wheel with a larger item
and add a canvas boot (from Milliput or similar). Note
that later G-4s had the wider main wheels of the G-6,
and the bulge on top of the wings so is probably out of
the scope of this project.
-
Move the antenna wire
lead-in position aft (just forward of fuselage station
K). The antenna mast may be shorter on some aircraft.
Common Modifications
In all of the above cases there are a few other
modifications required. These common changes are:
-
Fill and sand the join
line between the gun cowl insert and the main engine
cowl. There was no panel line in this location.
-
Fill and sand the
triangular hole for the DF loop on the fuselage spine
-
Fill and sand the four
holes in the bottom of the wings for the gondolas.
-
Fill the lines for the
small Morane mast mounting panel under the wing.
-
Scribe in small engine
primer hatch and auxiliary power unit access hatch on
the starboard fuselage.
-
Drill or scribe jacking
points on both sides of fuselage panel K.
We often speak of scale aircraft modelling
as if it is one hobby. In fact, there are as many different
interpretations of the hobby as there are modellers.
In my opinion, there is no single "correct"
goal, whether it be accuracy, artistic attractiveness, or
something as simple as finishing a model that looks vaguely
like the intended subject aircraft. If the individual
modeller is satisfied with their result, that is enough.
There has been much discussion recently
about factors that will bring about the death of our hobby.
The long list of these fatal influences includes Mike
Grant's "smoke ring" decals, Spitfire fuselage lengths, the
rise of die-cast collectibles, video games and the emphasis
of surface detail on particular kits. Without doubt, 21st
Century Toys' new inexpensive kit line will be added to this
Doomsday list.
Even so, I believe that this model will be
appreciated by an assortment of people for different
reasons.
My seven year old son loves the recent
series of 1/72 scale Hobby Boss aircraft kits. We have sat
down and built a few together. It won't be long before he is
building these simple kits himself. I can see a time in a
few years where he would be delighted to be able to buy 21st
Centurys' 1/32 scale Bf 109 with his own pocket money, and
build it in one afternoon. Thinking back 36 years to myself
at 10 years old, that scenario sounds kind of familiar.
Similarly, for modellers coming back into
the hobby after college and family, these kits will
represent a way to create a nice model with basic skills,
and encourage our new recruit to try something more
ambitious next time.
Even the more experienced modeller might
feel jaded sometimes. This kit could represent a refreshing
sorbet between heavier courses. Or if someone prefers
painting to construction, this artist might use 21st
Century's Bf 109 as a plastic palette for their penchant.
There is no doubt that, in a side-by-side
comparison to Hasegawa's 1/32 scale Bf 109 (G-4 in this
case), the Hasegawa kit is clearly superior in terms of
surface finesse, detail and finish. Despite this, there is
an important place for the 21st Century kit for less
experienced modellers and, with a sticker price of around
USD$11.00, modellers on a budget.
As noted in the analysis above, the kit
contents are somewhat confused, almost certainly as a result
of an attempt to extract the maximum number of variants from
a single set of moulds. In my opinion, this model best
represents a Messerschmitt Bf 109 G-2, although a little
extra work (mainly scribing and filling) will result in a Bf
109 F-4/Trop or F-4/Z. Of course, many people will not be
concerned with the depth of an oil cooler or the location of
a panel, and will just build the kit straight from the box.
21st Century Toys' 1/32 scale Messerschmitt
Bf 109 F will be ideal as an entry-level large-scale kit, or
a "slammer" to test your painting skills, or a low-cost
alternative if finances are tight.
It is nice to have the option.
Thanks to 21st Century Toys for the sample.
Review Text and Images Copyright © 2007 by
Brett Green
Page Created 07 February, 2007
Last updated 31 December, 2007
Back to HyperScale Main Page
|
 Home
| What's New |
Features |
Gallery |
Reviews |
Reference |
Forum |
Home
| What's New |
Features |
Gallery |
Reviews |
Reference |
Forum |