|
Focke-Wulf Fw 190 A-6

Eduard, 1/48 scale
S
u m m a r y
|
| Catalogue Number: |
Eduard Kit No. 8171 - Focke-Wulf Fw
190 A-6 |
| Scale: |
1/48 |
| Contents and Media: |
163 parts in olive coloured plastic;
8 parts in clear; colour photo-etched fret; masking sheet; markings for four aircraft. |
| Price: |
USD$39.95 plus shipping
available online from Eduard |
| Review Type: |
FirstLook |
| Advantages: |
Beautifully detailed including full
engine and gun bays; superbly restrained surface
featuring crisp panel lines and very fine lines of recessed rivets where
appropriate; engineered without plugs/inserts; wing cannon access hatch
not split along wing root join; plenty of ordnance options including
drop tank, bomb, W.Gr.21 mortars (rockets); long centreline rack for A-7 and
later; includes colour photo-etched parts for harness and
instrument panel, and masks for wheels and canopies; clever design of
clear parts with separate sliding sections for open and closed canopies; attractive marking options; very high quality
plastic; narrow sprue attachments; excellent instructions and packaging;
plenty of spare parts! |
| Disadvantages: |
|
| Recommendation: |
Highly Recommended |
Reviewed by Brett Green

Eduard's 1/48 scale Focke-Wulf Fw 190 A-6 will
be available online from Squadron.com
Back in October 2006, Eduard released the best Würger
model in any scale with their 1/48 scale Focke-Wulf Fw 190 A-8. Since
then they have added the Fw 190 A-5 and A-8/R2 to their range.
The latest Eduard Würger is the Focke-Wulf
Fw 190 A-6.
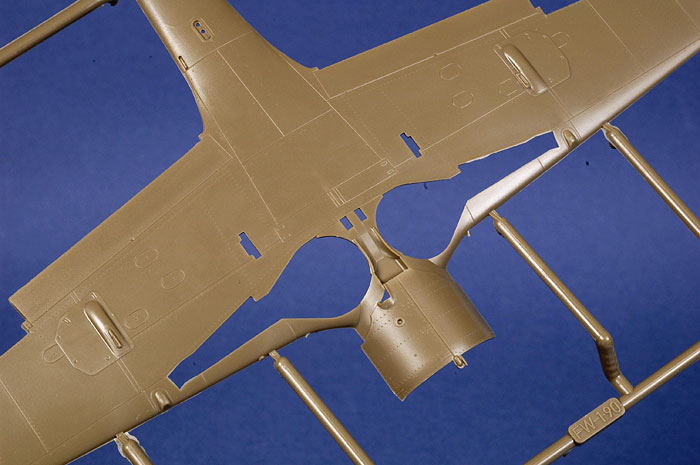
The A-6 differed from the A-5 mainly in the
outboard wing armament, being upgraded to the MG 151 20mm cannon. Eduard
has supplied two all-new lower wings for this release, ensuring an
accurate Fw 190 A-6 without the aggravation and extra work of filling
and sanding redundant panel lines or ill-fitting access hatch inserts.
Both wings feature the outboard MG 151s, with one wing adding shell
ejector chutes for the cowl guns.
Eduard's new 1/48 scale Focke-Wulf Fw 190 A-6
comprises 163 parts in olive coloured plastic; 8 parts in clear; a
colour photo-etched fret; masking sheet; and a colourful decal sheet
with markings for four aircraft..
Click
the thumbnails below to view larger images:
[../../../photogallery/photo00027527/real.htm]
The kit is state of the art in terms of quality of
injection moulded parts, detail and markings.
Eduard's packaging is very modeller-friendly. Sprues are packed,
singly or in pairs, in resealable bags with each pair of sprues
interlocked to prevent scuffing.
The styrene parts are attached to their sprues via fine connectors.
Moulding quality is superb. I could not find a single sink mark or
ejector pin anywhere that will be visible on the finished model, even in
problematic areas such as the inside of cowlings, undercarriage covers
and the gear bay. Small locating pins are moulded to parts as required.
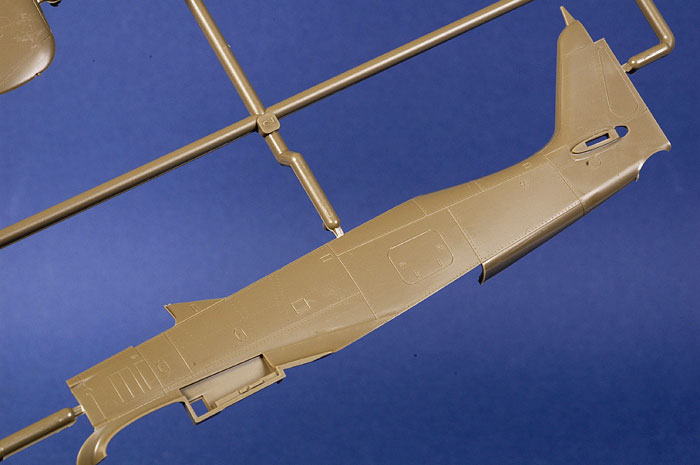
Surface detail is excellent. Panel lines are consistent and finely
engraved. Very subtle lines of rivets are also present in logical
locations (on the cowl, along panel line etc). Rivets are a matter of
personal taste, but the finely rendered detail looks terrific to my eye.
Please note that, for the close-up photographs on this page, I have
turned the parts to reflect the light and highlight the rivets. When
viewed under normal light they are very restrained.
Attention to detail is equally impressive. For example, in every Focke-Wulf Fw 190 kit produced to date, the access hatch for the inboard
wing cannon has a big seam line running in line with the wing root. This
is usually tricky to eliminate. Eduard's kit addresses this challenge
with separate hatches. Not only does this avoid the seam line, but
Eduard also provides gun bay interior detail to permit the hatch to be
posed open. The cowl gun bay is comprehensively detailed too.
Eduard also supplies a
well-detailed BMW 801 engine including mounts and firewall detail. A
plastic template is supplied to ensure correct alignment of the snaking
exhaust pipes.
The main undercarriage offers four wheel choices, with treaded or slick tyres
in either the early style (with large lightening holes) or the later
plain hub (all unweighted).
Optional tail gear is supplied - either a single
piece (wheel and leg moulded together), or a separate wheel and
two-piece strut.
The rudder and ailerons are moulded as separate parts, so they may be
posed to taste. Elevators are fixed in the neutral position, but it will
be an easy matter to cut these off and reposition if desired.
Cowl flaps are moulded shut, but photo-etched parts are supplied if
the modeler wishes to pose them open.
Ordnance options include a 300 litre drop tank, a bomb and two
W.Gr.21 mortars (rockets).
The kit is necessarily complex due to the high level of detail, but
it is pleasing to see that Eduard has chosen not to further complicate
construction with plugs and inserts for different versions. For example,
the wings are supplied as pure A-6 wings, with bulges and ejector ports moulded in place
and without the oval access hatch introduced for the A-8. This will make for a cleaner build with less filler
and frustration.
Clear parts emphasize Eduard's innovation. On the real Würger, the canopy was somewhat flexible.
This flexibility was further enhanced with a short hinge on the top.
This was necessary because the canopy rails tapered inwards back along
the fuselage, requiring the front bottom corners of the canopy to pinch
inward when opening (ie, the width was narrower when the canopy was
open). This attribute has been conveniently ignored by all Fw 190 models
to date - an open canopy would simply overhang the sides of the canopy
deck. Eduard, however, has supplied a closed (wide) and open (narrow)
version for each canopy style. Clever stuff.
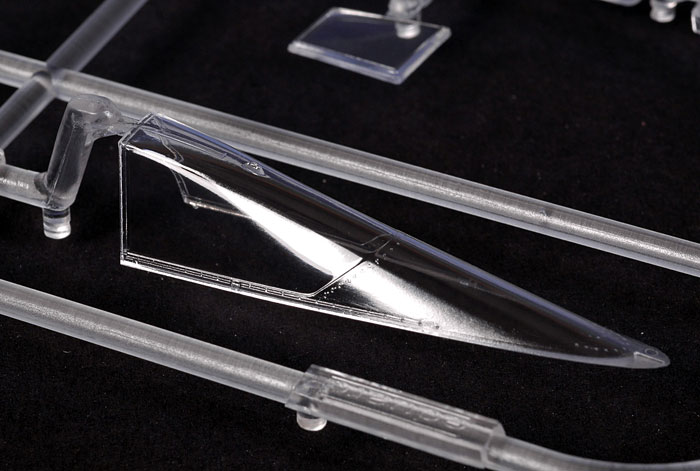
A "blown" canopy is supplied too, but it is not used for
this version. More goodies for the spares box!
The colour photo-etched fret, as always, adds gorgeous, intricate detail.
Far from resting on their laurels however, Eduard seems to have further
refined the detail on this fret compared to their earlier releases. This
is especially noticeable on the instrument panel and side consoles.
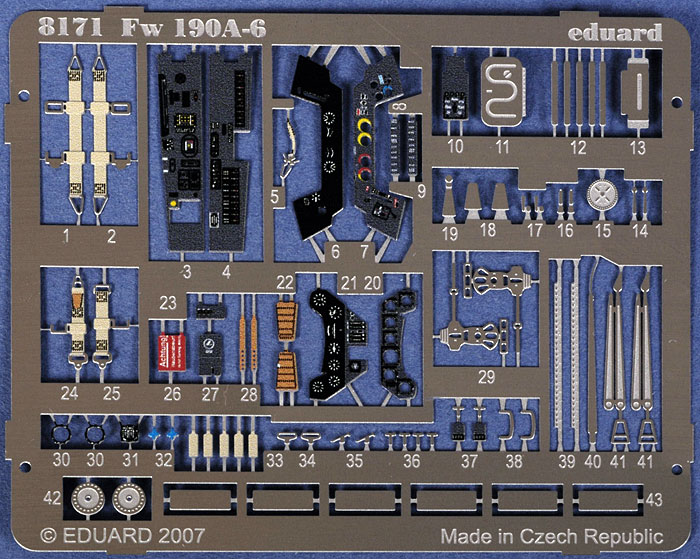
Another nice touch is the inclusion of canopy and wheel
masks in Eduard's new, thin flexible yellow masking material.
Instructions are supplied in an A-4 size, stapled colour 16 page booklet,
with a detailed history on the front page followed by a parts list and
ten pages of construction steps and four pages of full-colour marking
guides, each with a four-view illustration.
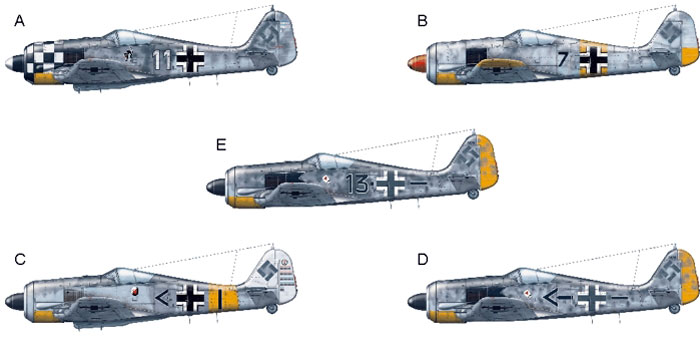
Markings are provided for four colourful aircraft:
-
Georg Schott, 1./JG 1
Netherlands Summer 1943. This aircraft features JG 1's black and
white chequered nose.
-
Hans Dortenmann, 2./JG
54 in Russia, February 1944. This aircraft features a winter
whitewash and a red spinner with a very narrow black spiral.
-
Toni Hackl, III/JG 11,
Oldenburg Germany, March 1944. This Wurger is finished in similar
markings to Hackl's Bf 109 G-5 which he flew during the same period
- white fin and rudder, the broad yellow RV band of JG 11 and a
personal emblem under both sides of the canopy.
-
Josef Priller, JG 26,
France 1943. Curiously, although it is mentioned nowhere in the
instructions, a fifth scheme is included on the decal sheet for
Priller's Fw 190 A-5, "Black 13".
Decals look to be very
thin and of high quality.
Click
the thumbnails below to view larger images:
Construction Tips from Eduard
As a result of test-building several kits, Eduard has
pointed out several areas requiring special attention during assembly.
These include the following:
-
Check the position of
the completed cockpit interior to the fuselage halves. Especially
the back (upper) part of the cockpit tub must be aligned exactly
with line on the fuselage halves. Also the weapon bay must be
carefully positioned.
-
Another important point
is the wing spar (part I16) installation. In this step (page 5 of
the instructions), first glue part K20 into the wing, and then add
part I16. This sequence will guarantee that the wing spar will be
exactly vertical to the wing bottom. This is crucial for wheel well
assembly and the whole wing geometry.
-
Another sensitive point
is the engine mount installation. In this point, find the exact
position of the part K18 on the reverse (inside of the fuselage)
side of the part H12 (wheel well). K18 fits exactly to the notch in
the H12. If you glue K18 carefully to the given position, the engine
block will easily assume the correct position when it is glued to
the engine mount.
-
The locating holes for
the main wheels are quite large. This is because the wheel fits to
the axle at an angle. Use the instruction picture (page 10) to
determine the exact angle of the wheel to the undercarriage leg.
-
While we are talking
about the undercarriage, when you will assembly the K7 (u/c leg) to
the H1 (u/c cover), the location pins on the leg will give you exact
position of the hatch (H1) to the leg. This is similar to the
assembly of the u/c to the wing – glue the leg to the fine locating
position in the wheel well, and immediately add J30/J37 to the
position in the wheel well and on the u/c leg (there is a fine
location pin on the leg which fits to the small hole on the end of
the tow bar). It will give you exact position of the undercarriage
to the wing. This is a different system compared to other
manufacturers' kits, but it delivers surprisingly good result.
Eduard's Focke-Wulf Fw 190 A-6 is every bit as good as their initial
A-5, A-8 and A-8/R2 Würger releases. It is a magnificent kit,
spectacularly detailed and beautifully presented. If all of this detail
is not enough for you, Eduard has released some additional colour
photo-etched detail sets to further enhance the cockpit (with placards)
and engine bay.
In the box, Eduard's are best Würgers available in any scale.
If all this is not enough for you, there are already plenty of
after-market options to further super-detail areas including the engine
bay and cockpit.
Keep in mind, though, that this kit will not fall together
by itself, so you will be advised to allocate plenty of time and treat
it with the respect that it deserves. If you have already assembled a
few kits, however, you should not have any trouble finishing this
wonderful Würger.
Highly Recommended.
Thanks to Eduard for the sample
Review Text Copyright © 2007 by
Brett Green
Page Created 19 July, 2007
Last updated 24 December, 2007
Back to HyperScale Main Page
Back to Reviews Page
|
 Home
| What's New |
Features |
Gallery |
Reviews |
Reference |
Forum |
Home
| What's New |
Features |
Gallery |
Reviews |
Reference |
Forum |