|
Hasegawa's 1/48 scale A-4E
Brown Tiger Skyhawk
by David W. Aungst

|
A-4E Skyhawk |

Hasegawa's 1/48 scale A-4E Skyhawk is available online from Squadron.com
Background
I made the statement in an earlier A-4E Aggressor posting that this aircraft would be my next aggressor Skyhawk project. I then had the opportunity to impose upon TwoBobs decals to have them include this aircraft in the group of Skyhawk aggressors they released in July of 2001. This aircraft was included on the TwoBobs decal sheet 48-018. With their decals in hand, I was ready to build.
Unfortunately, the TwoBobs decals were not everything I had hoped for. The colors of the decals were off and several of the decals were oversized to the point of not fitting where they were supposed to go. In disappointment, I put the model away on top of my paint booth where it sat waiting for the last six years.
I recently started a "one man group build" of A-4 Skyhawks. I decided that this tiger Skyhawk had waited long enough and added it into the mix of other 1/48th scale Hasegawa Skyhawks that I was building. To fix the decal issues, I used some different decals, and then I custom printed a few more decals.
The Kit
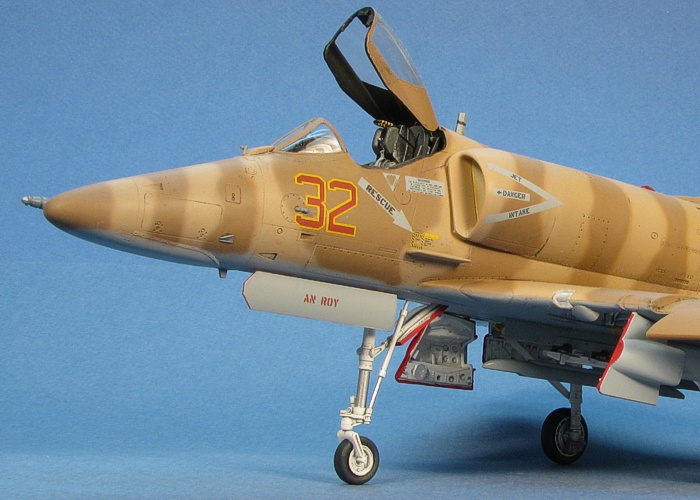
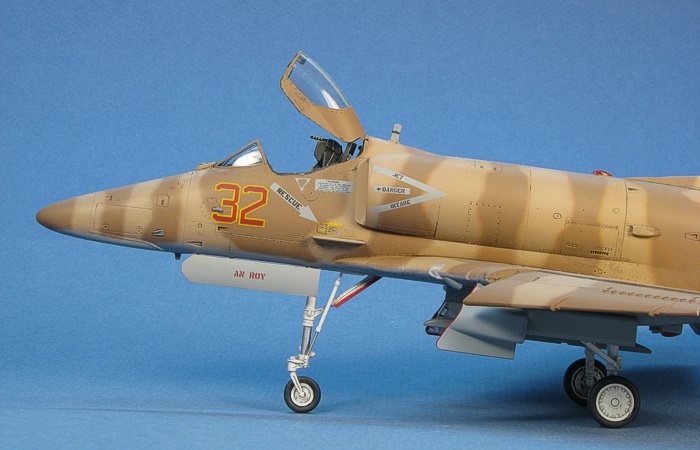
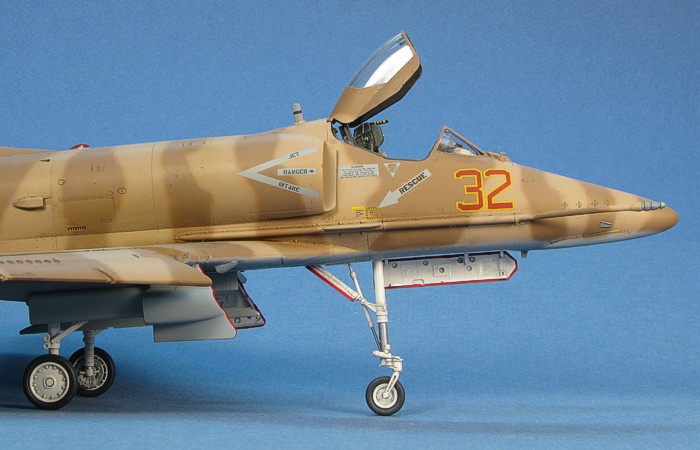
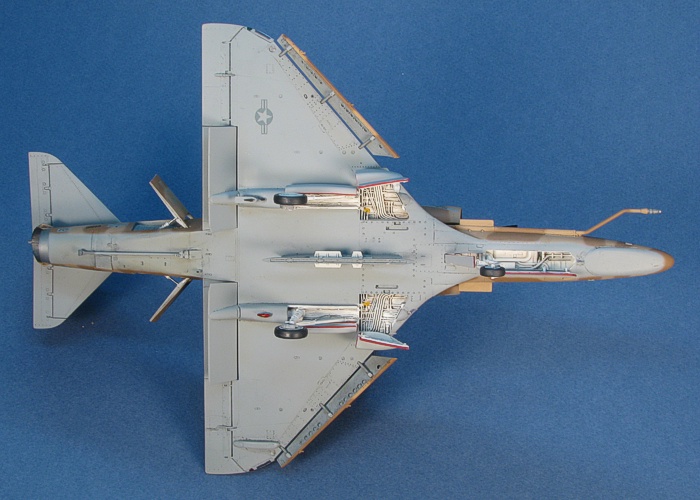
There is nothing to say about the kit that I did not say already in previous postings. Read my previous postings to hear all the great things about this kit. The only change I made to the kit was to substitute a Cutting Edge ejection seat in place of the rather simple looking kit ejection seat. The swapping of the ejection seat definitely improves the overall look of the cockpit.
All the rest of the changes to the kit amount to parts swapping with the already provided pieces in the box. See my MiG Skyhawk posting for a full description of these changes.
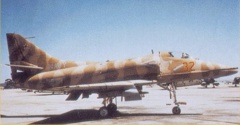
I found multiple pictures of this aircraft in two different Osprey books. One is a Superbase book titled Fallon (see References). The cover of this book is a picture of this aircraft (see below). The other book is Navy Attack (see References).
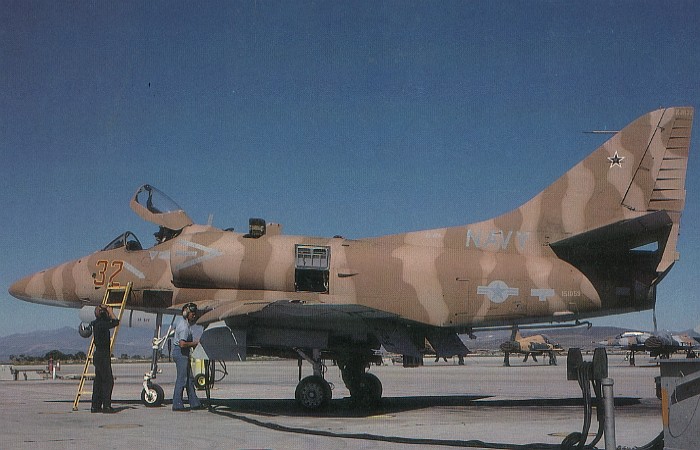
Unfortunately, in all of these pictures, only the left side of the aircraft was shown. Also, the wing and tail tops were visible only by what colors were present on their edges.
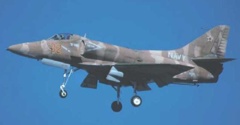
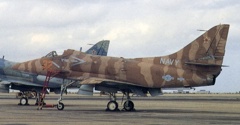
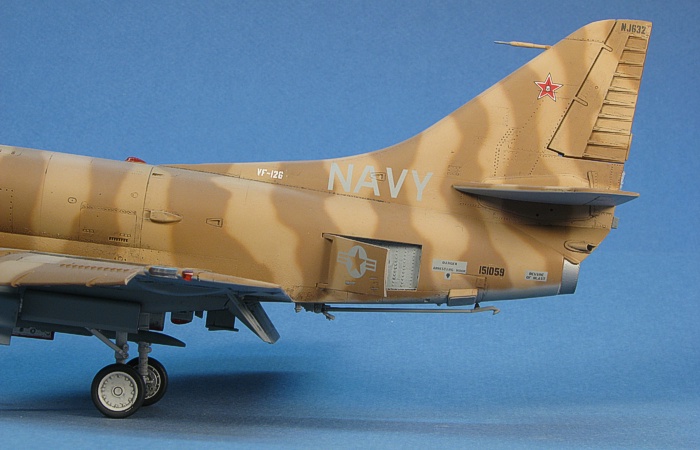
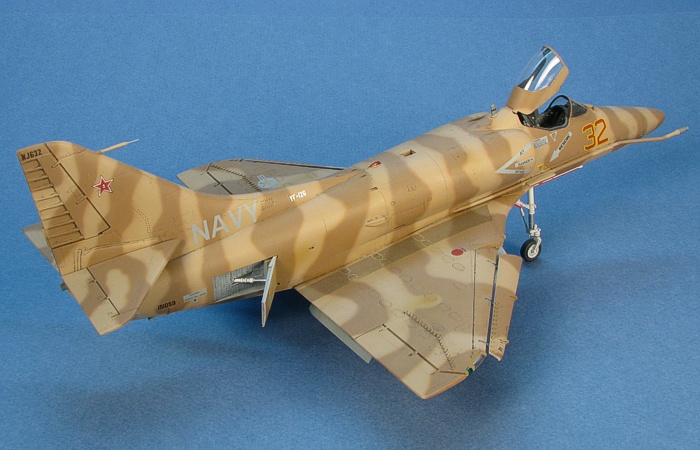
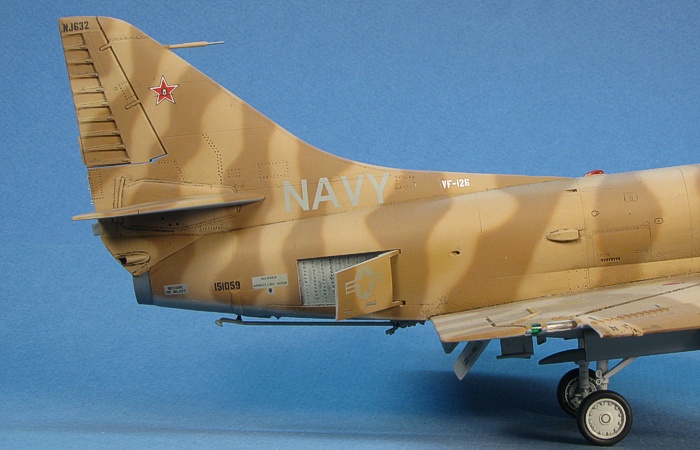
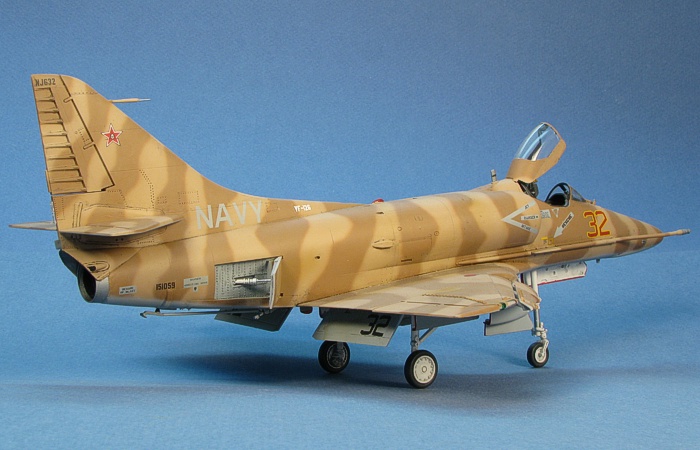
In an earlier reference posting where I outlined several A-4E Aggressor aircraft camouflages, I made a plea for information from anyone that had information on the right side of this aircraft. I got one response that provided a rather grainy color picture of the right side. Then, the new Naval Fighters book on the Douglas A-4E/F Skyhawk in US Navy Service (see References) was released. An additional black-and-white picture of the right side of this aircraft exists in this book. Over the years, different web sites have had images of this aircraft, also. The Skyhawk Association has had a few images posted on this aircaft. Note, some of the images on the Skyhawk Association show the aircraft from 1991, after it was repainted with darker brown colors. My model and these images are from the 1989 time frame.
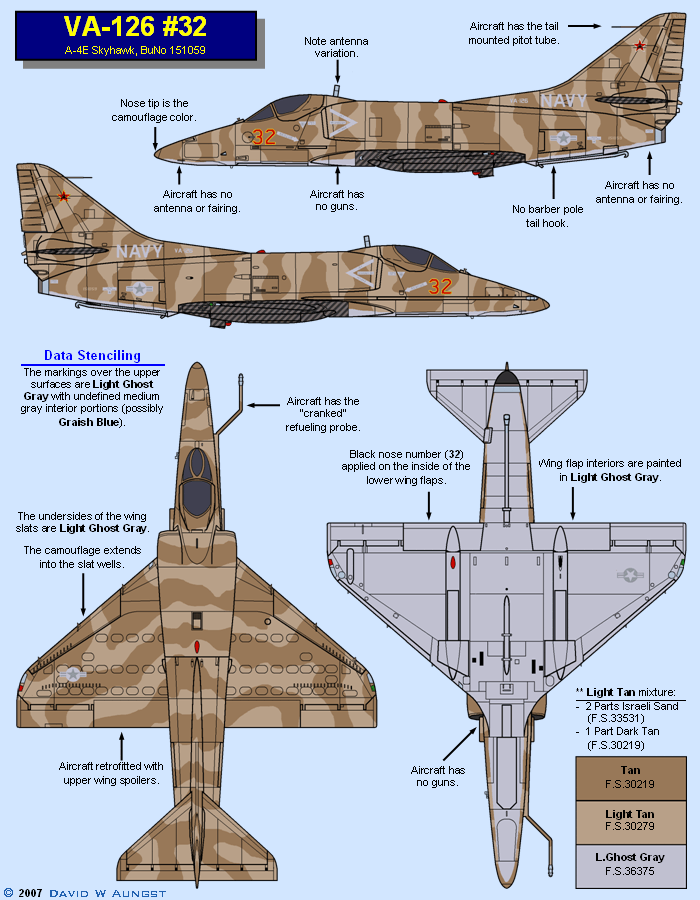
With all these new reference sources, I was able to map the right side camouflage. I still did not have much on the wing and tail tops, but enough of these was visible in the pictures to guess at the pattern. The diagram included here is updated to show the corrected camouflage pattern of this aircraft (corrected from the diagram I provided in the earlier reference posting).
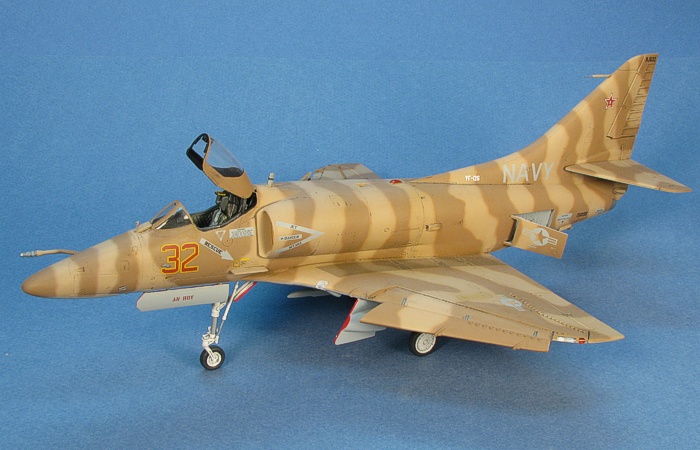
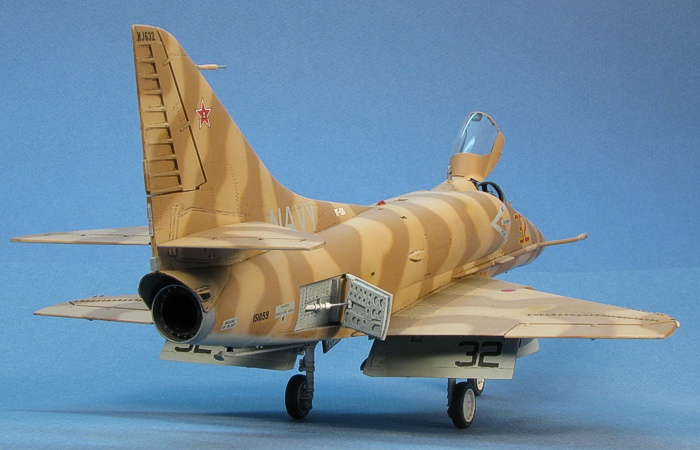
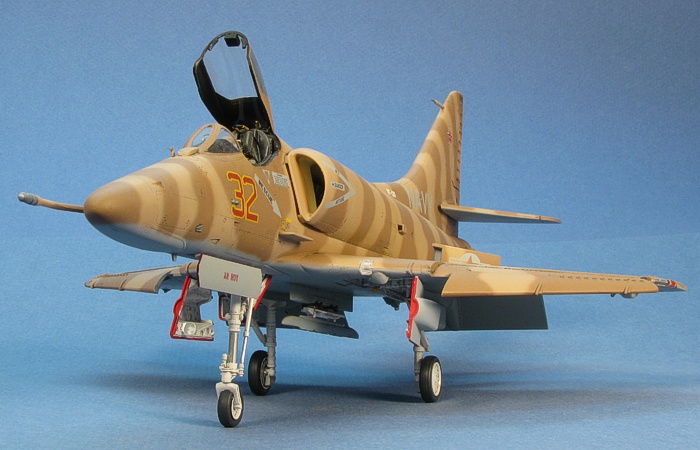
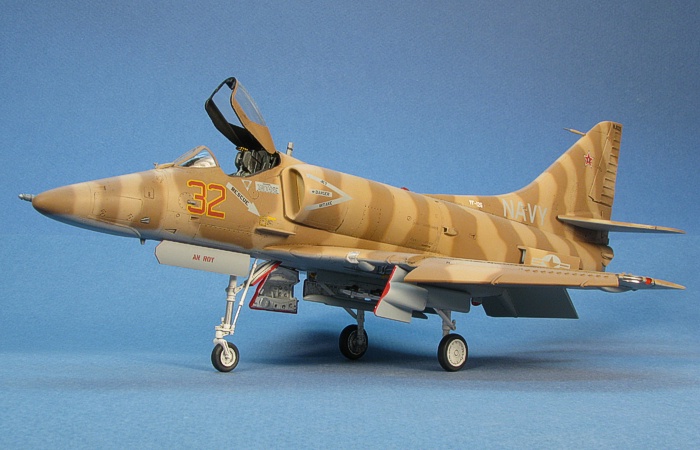
After some extended study of the available pictures, I came to the conclusion that the camouflage colors are Dark Tan (F.S.30219) and Dark Sand (F.S.30279) with Light Ghost Gray (F.S.36375) on the bottom. As the Dark Sand color is not readily available, I needed to make a custom mix for this color. I started with Israeli Sand (F.S.33531) and mixed in some Dark Tan (F.S.30219) in a 2:1 ratio (two parts Sand to one part Tan) to achieve the color. The camouflage pattern forms a fairly regular tiger stripe design. I free-handed the camouflage pattern using my Badger 150-IL air brush.
I started off using the TwoBobs decals for this model (sheet 48-018). The TwoBobs instructions have some issues in the camouflage pattern and colors for this scheme. While I was assisting TwoBobs with research, I sent them two different camouflage diagrams for this aircraft. The first diagram was an early version where I still did not know the proper pattern for the right fuselage. I sent them a second, updated version after getting a picture of the right side and better judging the colors. In the confusion, TwoBobs accidentally used the earlier version to create their instructions. There are a few issues caused by this.
The instructions state that the lighter tan color is Israeli Sand (F.S.33531). I amended this color as I note above to Dark Sand (F.S.30279) in my second version of the diagram.
 The instructions state that the bottom side color is L.Gray (F.S.36495). I am mended this color as I note above to Light Ghost Gray (F.S.36375) in my second version of the diagram. The instructions state that the bottom side color is L.Gray (F.S.36495). I am mended this color as I note above to Light Ghost Gray (F.S.36375) in my second version of the diagram.
The right side camouflage in the instructions is the original "guess" I made in my first diagram. The camouflage diagram included in this posting is the updated and corrected pattern using the right side photograph I received.
Most inprortantly to me, the decals themselves are printed in the whong colors because of this diagram mix up. The majority of the markings should be L.Ghost Gray (F.S.36375), not L.Gray (F.S.36495) as printed. The two sand markings on the tail should be Dark Sand (F.S.30279), not Israeli Sand (F.S.33531) as printed.
After working out the painting of the model, I could not wait to apply some decals. What a disappointment! Besides the color issues mentioned above, there a number of size and proportion issues with the markings. In general, several of the markings are just too large. Some will not even fit in the locations that they go without surgery to cut them down to size. After helping TwoBobs to do the research on this aircraft, it was very disappointing to find these issues.
So disappointed was I that I stopped applying the TwoBobs decals and removed most of the decals that were already on the model. The only decals I left on the model were the VA-126 badges on either side of the tail, the modex numbers on the nose/flaps, and the crew chief's name on the nose wheel well door. In this state it is how the model sat for six long years on top of my paint booth.
I decided while building my "one man group build" of Skyhawks that this one had sat on top of my paint booth for long enough. If I could not get the exact markings to make it 100% right, I could at least get most of the markings from another decal sheet and just "fudge" the troublesome markings. TwoBobs recently released another A-4 Aggressor decal sheet with A-4Fs and A-4Ms on the sheet (stock#48-132). On this sheet were decals in a color fairly close to L.Ghost Gray. I decided I could use these to provide most of the decals for my tiger Skyhawk. So, this is what I did.
Using my ALPS printer, I created the troublesome decals that TwoBobs got wrong on the original release decals in simple black and white -- the BuNo, tail code/modex number. and the "VF-126" titles.
So, no, it is not 100% accurate for the VF-126 brown tiger aggressor I wanted to build. But, hey, it is off the top of my paint booth and sitting completed on my display shelves, now. Hardly anyone other than me even realizes it is not 100% right markings. I doubt I would have ever gotten the decals in the colors I needed, anyway. I am happy to have the model finished.
For weathering, I used my typical style of thinned down enamel paint washes and air brush shading. I finished the weathering with some dry brushing to pop out the surface details. For a more complete discussion of what I do to weather my models, see my posting on "Weathering Aircraft".
Final Assembly
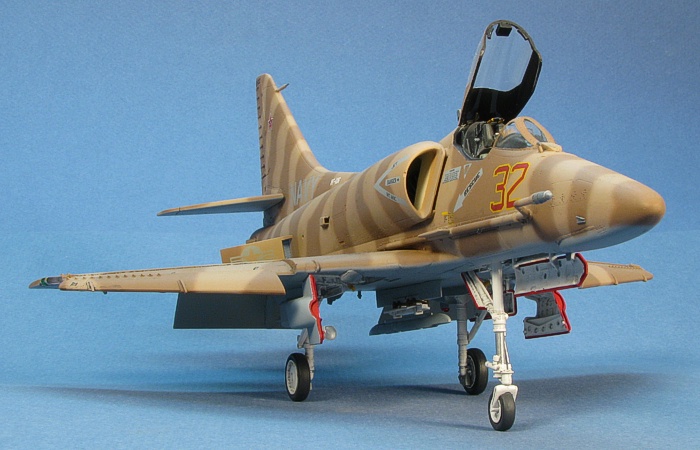
One of the things I have grown to dislike in building the Hasegawa Skyhawk kits are the navigation and position lights. As separate clear pieces, they look really nice on the model, but they are a pain in the butt to attach and paint. I start by painting the model silver in all the places the lights go. This makes the lights look bright when viewed on the completed model. Then, I attach the lights. Once attached, I get out the clear Tamiya paints and paint the red and green (I actually use blue) navigation lights and beacons. It is not overly difficult work, but I hate dealing with the Tamiya jars. Painting the frames on the wing tip lights is also a pain in the butt, but they look really nice when done.
Following the attachment of the lights and weathering, I plugged in the landing gear and attached the wheel well doors. I really hate doing the red edges on the wheel well doors of US Navy aircraft, but I have developed a system that works for me (a 10/0 paint brush and nerves of steel). I added the red edges on the doors, then attached them.
With the model sitting on its landing gear, I unmasked the canopy, slipped in the already painted ejection seat, and attached the canopy in the open position. Then, I declared the project complete.
What can I say? This is a terrific kit. Decal issues tarnished and delayed the building of this particular model for a while, but I still enjoyed the project in the end and am quite satisfied with the finished model.
"Skyhawk fever" is starting to subside with me, but you can still expect to see more Skyhawks from me in the future (whenever I am looking for a quick "painting project"). With all the terrific decals from Eagle Strike, Cutting Edge, SuperScale, Gekko Graphics, Victory Productions, Afterburner Decals, Fightertwon Decals, and more, I have lots and lots of Skyhawks left to build, and Hasegawa has many more kits that they will be releasing. Life is good...
References
Douglas A-4E/F Skyhawk in US Navy Service, Naval Fighters volume 51
by Steve Ginter. Ginter Publishing, copyright 2001.
Navy Attack, Aerospace Series
by Rene J Francillon and Peter B Lewis. Osprey Publishing Limited, copyright 1990.
Superbase 8: Fallon, Superbase Series
by Tony Holmes. Osprey Publishing Limited, copyright 1989.
Project Statistics
Completion Date: |
24 March, 2008 |
Total Building Time: |
43.8 |
Research: |
1.2 |
Construction: |
9.3 |
Painting: |
21.7 |
Decals / Markings: |
11.3 |
Extra Detailing / Conversion: |
0.3 |
Model,
Text Copyright © 2008 by David W. Aungst
Page Created 16 October, 2008
Last Updated 16 October, 2008
Back to HyperScale
Main Page |
 Home
| What's New |
Features |
Gallery |
Reviews |
Reference |
Forum |
Search
Home
| What's New |
Features |
Gallery |
Reviews |
Reference |
Forum |
Search