|
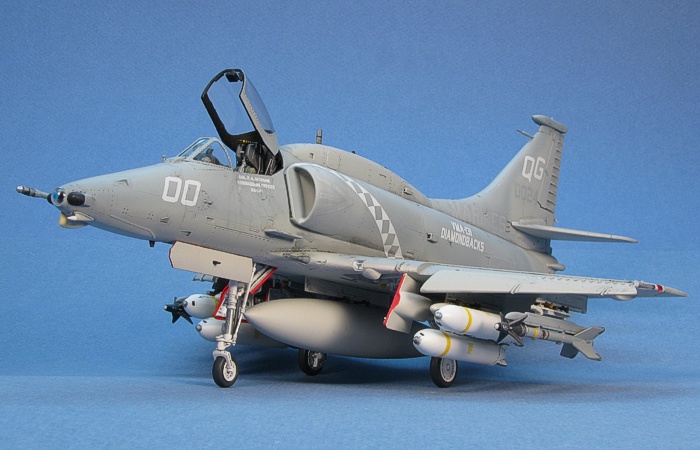
Hasegawa's 1/48 scale A-4M Skyhawk
Low Viz Scooter
by David W. Aungst
|
A-4M Skyhawk |

Hasegawa's 1/48 scale A-4M Skyhawk is available online from Squadron.com
Background
It is amazing how much a year makes in the looks of an aircraft. This model in this posting shows A-4M BuNo 160024 in the summer of 1993. It was the command aircraft (nose number "00") for VMA-131 painted in the standard low-vis gray camouflage. One year later, this aircraft would be painted in high-vis colors and be the last Skyhawk to fly with VMA-131 before they retired their A-4M aircraft.
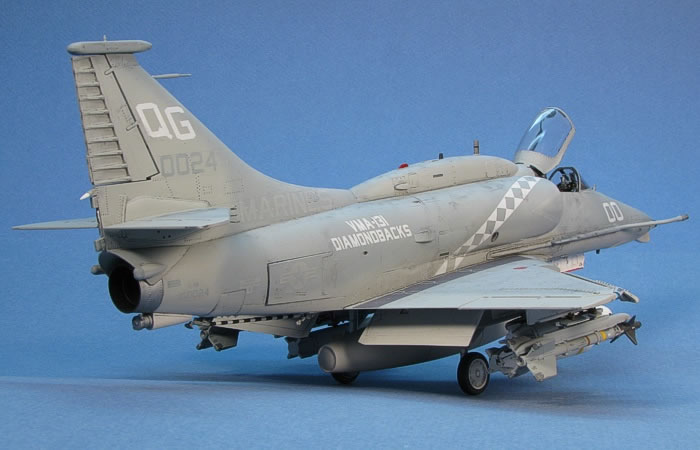
I find these kinds of differences with individual aircraft to be very fascinating. I like to build models of the same physical aircraft at varying points in its career to show how it changed. It made this A-4M a natural for me to want to model in both its low and high visibility versions. This posting pertains to the building of the low-vis version of the aircraft.
The Kit
This is the Hasegawa 1/48th scale A-4M Skyhawk kit, one of the fantastic family od Skyhawk kits released by Hasegawa. You can not really go wrong with any choices in the Hasegawa Skyhawk family of kits.
I was building the kit so I could do the markings. As such, except for the weapons and substituting a Cutting Edge resin ejection seat, I built the kit as it came in the box.
 The whole model is painted in Testors Model Master enamel paints, unless otherwise stated. The whole model is painted in Testors Model Master enamel paints, unless otherwise stated.
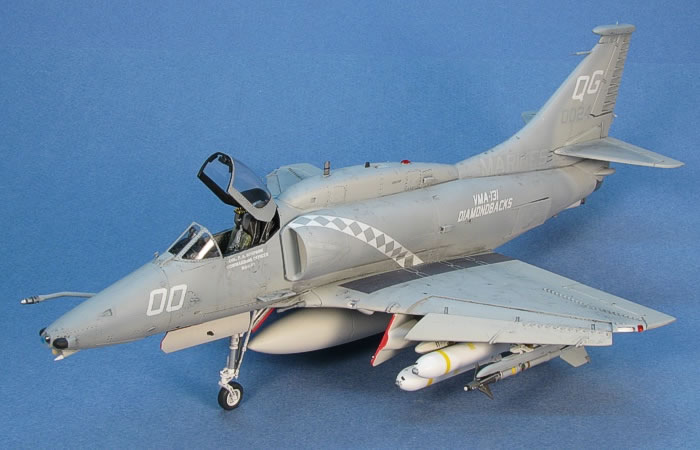
The low-vis camouflage for Skyhawks changed over time. There were a number of early patterns and color mixes used. By the late 1980s, the colors and patterns had boiled down to the one I applied on this model. The top and upper sides of the airframe are D.Ghost Gray (F.S.36320). The lower sides and rear sections of the wings and tails are L.Ghost Gray (F.S.36375). The underside is L.Gray (F.S.36495). Due to heavy weathering and fading, these three colors blended together quite a bit making many Skyhawks look like one dirty gray color.
Markings for low-vis Skyhawks also were up for grabs and shifted based on the specific pattern and colors on the airframe. When things settled down in the late 1980s, the "standard" markings (national insignia, BuNo, rescue, and warning markings) were all positive / negative. They use L.Ghost Gray markings on the D.Ghost Gray areas, and they used D.Ghost Gray markings on the L.Ghost Gray areas. The markings on the underside were L.Ghost Gray.
No decals are made specifically for this aircraft by any decal manufacture. As much as I have attempted to talk a couple of manufactures into it, no takers have surfaced. So, I was left to work it out on my own. TwoBobs released a couple low-vis A-4M sheets a few years ago. I immediately picked up a couple copies, but I was greatly disappointed by their choice of colors for the decals. Instead of L.Ghost Gray, they were printed in a lighter and browner color, closer to L.Gull Gray (36440). Finding this color issue in the TwoBobs decals cancelled my building this model some years back.
I recently undertook a group build of several Hasegawa Skyhawk kits all together at the same time. I decided that this low-vis VMA-131 had to be in the group to go with a high-vis version of the same aircraft. So, I started really investigating the TwoBobs decals, more than I had looked at them be fore dismissing them before. What I found was interesting.
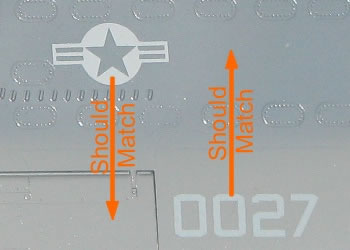
The following images exemplify my research on the decals. The left image shows a section of the decals scanned along with two paint chips for D.Ghost Gray and L.Ghost Gray. Surprisingly, they really are not that far off. The D.Ghost markings appeared to be a near perfect match. The L.Ghost markings are only off a bit, being too light and a little brown-ish. My heart quickened at the thought of really being able to do this. I custom mixed a new L.Ghost Gray color to match the decal and thought I had this thing licked.
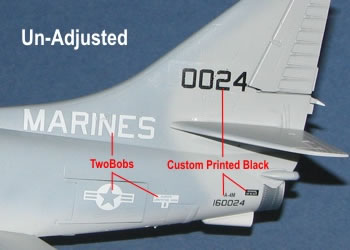
The right image shows some decals applied to my A-4M model using the custom mixed paints. This left me speechless. As near as I can figure, the inks that were used to print the decals were reacting to the water and turning lighter while I was applying the decals to the model. It might be that they look different simply because they are no longer surrounded by light colored decal paper, but the scanned image with the paint chips does not really support this.
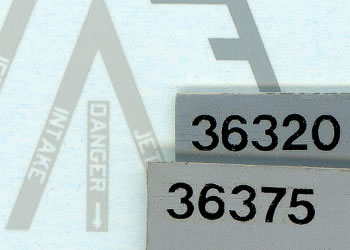
Scanned Decals with Color Chips |
Decals on Model
|
At this point, I was very disappointed and started looking in my reference library to see if there was some other A-4M Skyhawk I could build instead of this low-vis one. But, I really wanted this low-vis VMA-131 aircraft!
I had nothing to lose, really, so I decided to experiment. If things did not work out, I would simply re-paint the model and choose another set of markings.
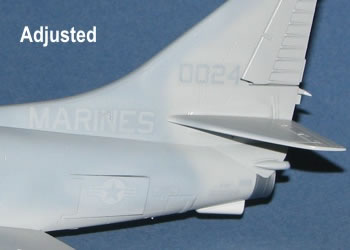
The thought occurred to me that I might mist a light coat of the base paints over the decals and shift there colors over to shades that would work on the model. I printed up new black versions of the markings I needed in D.Ghost Gray and used the TwoBobs decals for the L.Ghost Gray markings. The images below show the "before" and "after" look of the model. I was back in business!
Original Decals |
Color-Shifted Decals
|
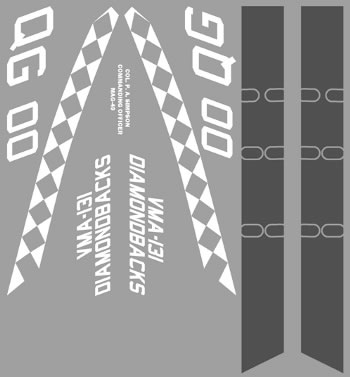 With the "standard" markings all worked out, I turned my attention to the specific unit markings. On the real aircraft, these were painted in a very light gray color, almost white. According to a friend that worked in the unit, the color was not white, but he did not know off hand what exact shade of gray it was. I decided to print my custom decals in white, but instead of printing them with three coats of white (to make them more opaque), I printed them in only one coating of white. This left them somewhat translucent and allowed them to turn a bit gray when applied to over the gray paint of the model. The image to the right shows my custom artwork (reduced in size to save space). With the "standard" markings all worked out, I turned my attention to the specific unit markings. On the real aircraft, these were painted in a very light gray color, almost white. According to a friend that worked in the unit, the color was not white, but he did not know off hand what exact shade of gray it was. I decided to print my custom decals in white, but instead of printing them with three coats of white (to make them more opaque), I printed them in only one coating of white. This left them somewhat translucent and allowed them to turn a bit gray when applied to over the gray paint of the model. The image to the right shows my custom artwork (reduced in size to save space).
Additionally, in the decal artwork, I included a set of wing walkways. The color on the real aircraft was a faded black, so I printed the decals in a non-descript gray color. The walkways have masked-out ovals for the wing fuel cell access points. I did a lot of careful measuring and several test prints before I got the ovals to line up properly with the engraved panel lines of the kit. I was very happy with the look after I got them applied.
I got to have some fun with the weathering. A-4Ms in the USMC got rather dirty and beat up looking. I used my typical style of thinned down enamel paint washes and air brush shading to accomplish most of the effects. I finished the weathering with some dry brushing to pop out the surface details. For a more complete discussion of what I do to weather my models, see my article on "Weathering Aircraft".
Construction Continues
One of the things I have grown to dislike in building the Hasegawa Skyhawk kits are the navigation and position lights. As separate clear pieces, they look really nice on the model, but they are a pain in the butt to attach and paint. I start by painting the model silver in all the places the lights go. This makes the lights look bright when viewed on the completed model. Then, I attach the lights. Once attached, I get out the clear Tamiya paints and paint the red and green (I actually use blue) navigation lights and beacons. It is not overly difficult work, but I hate dealing with the Tamiya jars. Painting the frames on the wing tip lights is also a pain in the butt, but they look really nice when done.
This brought me up to the home stretch. I had a completed airframe, including the weathering. I had a bunch of painted and completed parts and sub-assemblies. See the following picture. All I needed to do was attach everything.

The kit landing gear is nicely detailed and plugs positively into locator holes. Some people have complained about the nose wheel being molded as part of the nose landing gear strut, but with a little car on painting, I find it looks fine. Besides, it is one less ting to worry about with alignment issues. The Monogram nose wheel (on my one and only completed Monogram Skyhawk kit) is always going crooked in the forks on my display shelves.
The weapons load for the model is based on one I saw in use when I was in Arizona on the final Skyhawk deployment with VMA-131. I was in the bombing pit at MCAS Yuma taking pictures and the live white Rockeyes (with yellow stripes) made a good contrast against the gray camouflage paint of the aircraft. The Sidewinders should have been blue practise rounds, but I really wanted to test-drive the new TwoBobs missile decals and created some live Sidewinder missiles instead.
The Rockeyes, triple ejector racks (TERs), and Sidewinder missiles are from the Hasegawa weapons sets. The Sidewinder launch rails and adapters are provided in the Hasegawa Skyhawk kit. I stole a wing fuel tank from a Monogram Skyhawk and bobbed its tail fins to make it into a centerline fuel tank. The Monogram wing tanks better represent a 400 US gallon size tank, which was the preferred Skyhawk centerline tank size in the 1990s. The wing tanks provided in the Hasegawa kit are closer to being a 300 US gallon size, which was more prevalently as a wing tank, not a centerline tank.
Another Skyhawk for my display shelves ... I am getting quite a few of them at this point. Working out the markings and fixing TwoBobs decal colors made for quite a challenge in this project. Knowing how to effectively do the low-vis markings opens the door to doing other low-vis gray subjects, including a couple other Skyhawks I want to build (eventually). For now, it is good to have the least colorful Skyhawk in my collection sitting on the display shelves in the living room.
Project Statistics
Completion Date: |
28 Sepetmber, 2008 |
Total Building Time: |
44.0 |
Research: |
2.0 |
Construction: |
12.7 |
Painting: |
16.8 |
Decals / Markings: |
11.7 |
Extra Detailing / Conversion: |
0.8 |
Model,
Text Copyright © 2008 by David W. Aungst
Page Created 4 November, 2008
Last Updated 4 November, 2008
Back to HyperScale
Main Page |
 Home
| What's New |
Features |
Gallery |
Reviews |
Reference |
Forum |
Search
Home
| What's New |
Features |
Gallery |
Reviews |
Reference |
Forum |
Search