|
Trumpeter's 1/72 scale
F-105D Thunderchief
by
Roger Fabrocini
|
Republic F-105D Thunderchief |

Trumpeter's 1/72 scale F-105D Thunderchief is available online from Squadron.com
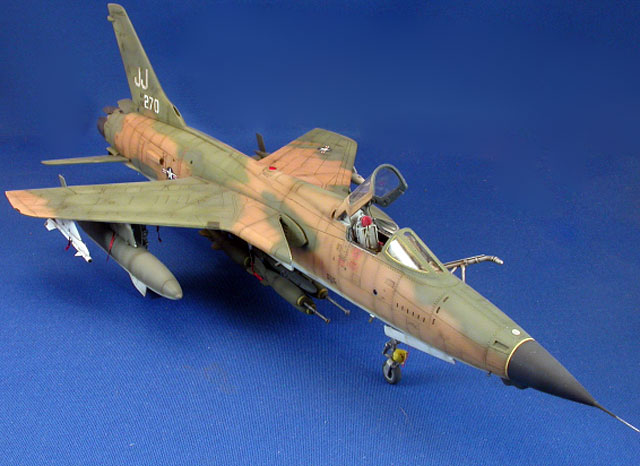
This is Trumpeter’s 1/72 scale F-105D Thunderchief, kit # 01617, done in the markings of 62-4270 of the 34th TFS (JJ), 388th TFW, based in Korat RTAFB, Thailand, 1967-1968.
The “Thud”, as she is affectionately known, epitomizes the U.S. Air Forces’ air war in Vietnam. It flew more strikes into North Vietnam then any other aircraft, against the most lethal and heavily defended targets ever. Loses ultimately totaled over 350 aircraft, almost half the Air Force inventory.
That ultimate sacrifice turned my hobby of plastic modeling into a personal tribute to the crews and maintenance personnel of the F-105.
The Kit
I must admit to a bit of apprehension when Trumpeter announced their plans to release a 1/72 scale F-105. I have wanted to model the Thud in 1/72 scale for some time, but found the old Monogram kit needing more work then I cared to invest in.
I have purchased and built Trumpeter kits before and found them a two edged sword. Popular subjects, generally good overall shape, some well done small detailed parts, but plagued with soft detail at times and covered with rivets the size of scale tennis balls.

I found all past observations of Trumpeter kits to be true of their 72 scale F-105, but the most annoying detail was the randomness of the rivets, as if they had been placed on the airframe just to give it a general appearance of being riveted.
Ultimately I decided that I could over come the kits deficiencies to build a “proper” tribute to the “THUD”.
At the time I am writing this, only one after market accessory has been produced specifically for the Trumpeter F-105, that is Goffy Model’s resin cockpit, though it was released well after I had finished my THUD. So any added details or enhancements would have to be scratch built.
The first order of business was to tone down the kits rivet detail and fix the randomness by adding more rivets in such a way to tie them all together. I used Liquitex Modeling paste to tone the molded rivets down. They would still be noticeable, but not so deep and wide. The Liquitex paste can be removed, when dry, with a moist rag, eliminating the need for sanding. I used a “Rosie the Riveter” tool to produce new rivet lines that connected the kit’s rivets giving the airframe more of a sense of structure.
The instrument panel and side consoles are supplied as decals. I scratch built the instrument panel using Reheat P.E. Modern Instrument bezels and Mike Grant’s Jet instrument decals and scratch built the side consoles out of card stock with small pieces of rod stock for switches, etc.

I detailed the inside of the cockpit canopy with pieces of plastic strip and wire.
The forward instrument cover was replicated with a rolled out piece of fine white Milliput. The kit gun sight was enhanced with plastic strips and lead wire.

The gear bays were detailed with bits of lead wire. I also added brake and electrical lines on the landing gear legs with lead wire, drilled out the landing lights and replaced them with a drop of Testor’s liquid glass maker and added tie-down rings and assorted bolts from Grant-line. I sanded all gear doors down to achieve a more scale appearance.
There are two areas to watch out for during construction. I believe Trumpeter would have you install the exhaust too far recessed into the fuselage. It should extend right to the end where the air brakes meet the fuselage. I added interior rib detail to the inside of the rear fuselage and also added a floor to the para-brake housing. Trumpeter supplies the door as a separate piece and I choose to show it open.
The other area to pay attention to is the mounting of the main landing gear. The gear mounts into a square hole, but the fit is not very positive. I noticed after assembly that the main landing gear door’s lower edge did not look right. My references show that it should be parallel to the ground. At first I thought it was Trumpeter’s fault, I had installed the main gear legs perpendicular to the ground, which I thought to be correct. I see now that they should angle slightly forward. This is not mentioned in the instructions, the fit is vague at best and it is something not easily ascertained from reference photos.

Trumpeter’s two choices of supplied weapons load outs are a mystery. I have seven books on the F-105, plus many other articles and have rarely seen any F-105s, let alone Vietnam era Thuds, loaded as either of the suggested options. They are 1/ centerline fuel tank, fuel tanks on the two inboard wing pylons and AGM-12 Bullpup missiles on the two outside wing pylons and 2: centerline tank, MERs (Multi ejection rack) with four Mk.82 slicks on each of the inboard wing pylons, and again two AGM-12s on the outboard wing pylons.
I choose to load my Thud in what I found from studying hundreds of photos to be one of the most common load-outs, I.E; center line MER with 6 M117, 750 lb. Bombs (2 with fuse extenders), and inboard wing pylons with fuel tanks. I originally mounted 2 ECM pods on the outer wing pylons. After posting photos of my build on Hyperscale’s Century Series Group Build Forum I got a kind response from Ron Petrosky. Ron was stationed at Korat during the climax of the Rolling Thunder bombing campaign, working in the M61 gun shop and remembers recognizing 62-4270 from the art work. Ron stated that he also did the flip charts for incoming pilots on armament and load-outs in use at the time. He remembered that the Thuds had one ALQ87 ECM pod on one outboard station and one AIM-9B sidewinder AIM on the other. The AIM-9Bs were important, he said, because the MiGs were a real problem during that period. So I decided to change my load-out to reflect Ron’s observations.
The MER and six M117s were sourced from Hasegawa 1/72 scale weapons set #1. Many pictures show Thuds with two straps wrapped around the bomb bay doors, I replicated those with plastic strips. I scratch built the centerline pylon using the Monogram kit part as a guide. The ECM pod, AIM-9B and launch rail are also from Hasegawa weapons sets. I enhanced the detail of the Sidewinder with P.E. fins from an old Model Technologies set. (21 pieces alone make up the AIM-9)
Other small details added were “Remove Before Flight” flags made from strips of aluminum foil and .004” SS wire, a P.E. AOA indicator and nose probe from stainless steel tubing and wire.
I did not deviate much from my usual painting practices. I did use a tip from Brett Green again and not only pre-shaded the airframe, but also used the ubiquitous Tamiya Red-Brown/Black mix to draw out the camouflage demarcation lines, reasoning that this would help me keep track of the very confusing (for me, at least) SEA camouflage scheme and also help tighten up the lines. Along with a post shade of the same mix, it worked like a charm.
Primer was Mr. Surfacer 1200. Some of the upper surface panels were high lighted with white Surfacer primer. The lower surfaces received a light coat of Mr. Color lacquer FS 36622, some panels sprayed with a lightened mix of the same. The upper surfaces were painted in order, Mr. Color FS 30219, some panels lightened with FS33531 Sand, the paint thinly applied to let the preshaded show through in spots. Gunze acrylic H320, JASDF Dk. Green, substituted for FS 34102 and Mr. Color FS34079. The greens are thinned and mixed with different shades of green, gray, and yellows to get a worn and faded look.

Markings for 62-4270 come from MicroScale sheet #72-95 (I love it, the instruction sheet says $2.00!) I always loved the weary looking Tiger with the inscription in Latin “NOLI NON LEGITIME CARBOR UNDEM EST” (Don’t let the Bastards wear you down). Classic.
As far as weathering goes, sometimes I do feel that I may have taken this one a little too far. I like to keep it subtle. I use gray for the lower surface panel line wash, a mix of dark green artist oils for the Green upper surfaces and brown for the tan areas. This way I find is less stark then using black or dark brown over the whole airframe. I know it’s a matter of taste, I just think I may have applied the post shade too heavy in spots.
All hand painting, bombs yellow rings, windshield framing, etc., were done with Vallejo acrylics.
Even if you don’t like jets, you’ve got to admit the THUD is one sexy Beast. For all my usual whining, this one posed few problems other then the rivets and landing gear. Ron Petrosky’s approval and input made this build that much more rewarding for the personal connection. I Thank him.
As always, Thanks for the indulgence.
References
Anderton, David Republic F-105 Thunderchief
Osprey Publishing Ltd. ISBN: 0-85045-530-8
Drendel, Lou F-105 Thunderchief in Action
Squadron Signal Publications
Drendel, Lou Century Series in Color, “Fighting Colors”
Squadron/Signal Publications ISBN: 0-89747-097-4
Geer, James The Republic F-105 Thunderchief, Wing and Squadron Histories
Schiffer Publishing Ltd. ISBN: 0-7643-1668-0
Kinsey, Bert F-105 Thunderchief, in Detail and Scale D&S vol. 8
Aero Publishers, inc. ISBN: 0-8168-5020-8
Neubeck, Ken Walk Around F-105 Thunderchief #23
Squadron Signal Publications ISBN: 0-89747-418-X
Scutts, J.C. F-105 Thunderchief
Charles Scribner’s Sons ISBN: 0-684-16983-5
Famous Airplanes of the World, No. 4 1987-5 Republic F-105 Thunderchief
Bunrindo Co., Ltd.
Articles
Davis, Larry “Thuds and Weasels”, the F-105 Thunderchief in SEA 1964-1974
Wings of Fame Volume 18
Aerospace Publishing Ltd. ISSN:1361-2034
Linn, Don F-105 Photo Essay
IPMS USA Quarterly Vol. 17, No. 3, Spring 1982
Model, Images and
Text Copyright © 2008 by Roger Fabrocini
Page Created 5 March, 2008
Last Updated
5 March, 2008
Back to HyperScale
Main Page |
 Home
| What's New |
Features |
Gallery |
Reviews |
Reference |
Forum |
Search
Home
| What's New |
Features |
Gallery |
Reviews |
Reference |
Forum |
Search


