|
Airfix 1/72 scale
Hawker Hurricane Mk.I
by John Wong
|
Hawker Hurricane Mk.I |

Airfix's 1/72 scale Hawker Hurricane Mk.I
is avalable online from Squadron.com for less than $7.00!
One of the key aircraft types in use by the Royal Air Force in the Battle of Britain, the Hawker Hurricane formed the backbone of many squadrons of Fighter Command in that pivotal battle. In commemoration of the 50th anniversary of this battle, many of the modelling shows featured the Battle of Britain as a theme, and it was in this environment that I decided to build the Hurricane model (yes, it has been a while since I built this model).
Given HyperScale's current Airfix Group Build, the time was right for me to finally put the effort into writing up this build that I did 19 years ago.
Choosing to work in my usual preferred 1/72 scale, I wanted to build a replica that would have people believe they were looking at a 1/48, or 1/32 scale model. One of the best Hurricane models on the market back in the late 1980’s was the Airfix kit of the Hurricane Mk. I. Although the kit featured raised line detail, the basic shape of the model was accurate, and overall fit was quite good. Deciding on the level of detail to add was the next step, although a lot of this just sort of “happens”.
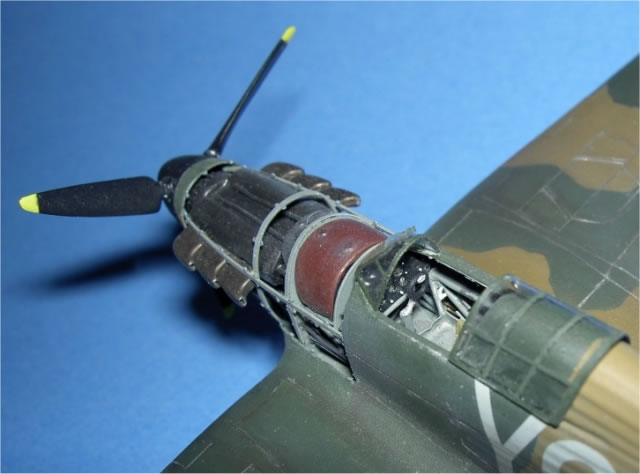
Exposing the Merlin engine would be one of the key features of the model. Detailing the cockpit, and repositioning the control surfaces would all help to add to the character of the model. Construction started with the basic surgery to cut away the cowling panels and thinning down the fuselage walls. Thinning down the fuselage walls was actually a pretty key action, as this affects the subsequent fit of the fuselage framing that was going to be fitted.
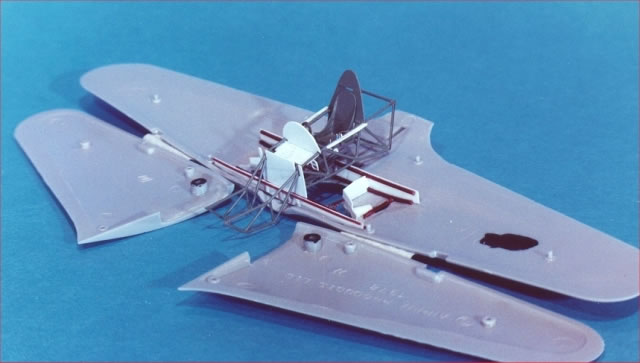
The welded steel tube frame was made up from plastic rod, using good 1/72 drawings as a building plan. Seats, cockpit controls, instrument panel mounts, etc., were added to this frame as per the real aircraft.
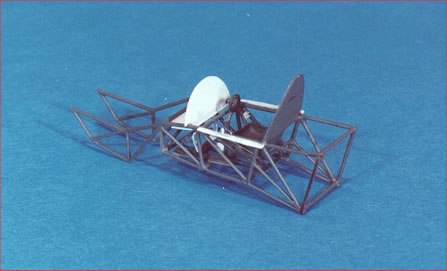
The engine mount was built integrally as part of this fuselage frame to give the structure some strength to support the Merlin engine. The wing spars and centre section structure was built up in the areas where they would be visible as this would form part of the structure to support the fuselage framing, along with being part of the visible detail. Plastic card was used to form the spars and to box out the wheel wells.
The instrument panel was made from plastic card, drilled out to represent the instruments. The instrument casings were added from short lengths of sprue and added on the back side of the panel.
The Merlin engine was made using the basic Allison V1710 engine from the Revell 1/72 P-38 Lightning kit. Some minor reshaping was necessary to shorten the engine block and to build up the supercharger and gear case. Remember that this model was built before the ready availability of the aftermarket resin engine kits. The Aeroclub white metal Merlin became available shortly after I completed the model, but the weight of the white metal item would not have been healthy on the plastic rod engine mount!
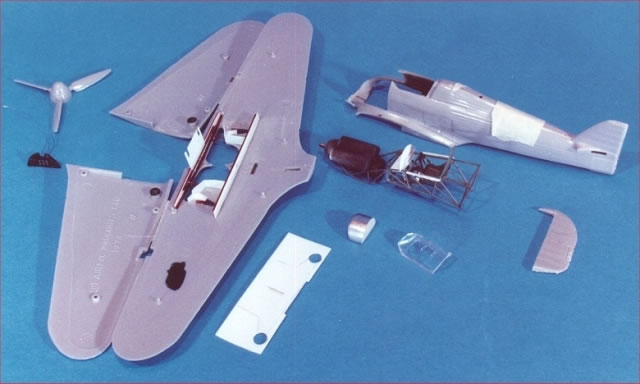
Assembly of the various detail subassemblies was an interesting exercise in itself, as having everything locate properly without the aid of locating pins and tabs was a slow and tedious process. All of the cockpit and main engine details were painted prior to assembly. Small details that could be added after the major assembly stages were added later. This was one of the challenges to this project – to figure out a proper assembly sequence that would allow for the major subassemblies to come together without forgetting something in the process, and also to not add on too much of the fragile details that would be susceptible to damage during the later stages of completion.
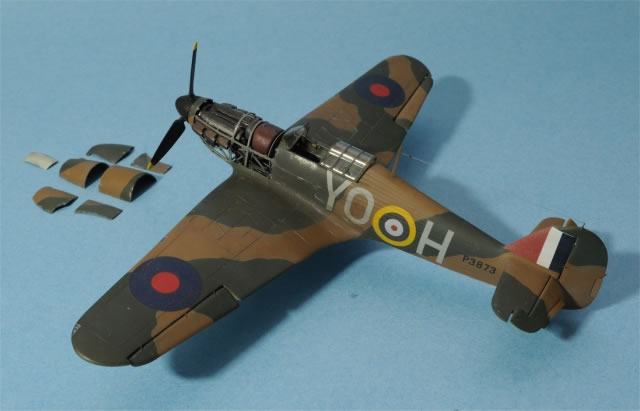
The various control surfaces were cut off and repositioned . Sanity set in and the flaps were left in the up position, as the flaps formed a fairly critical part of the wing lower centre section which was essential for the overall strength of the model. The raised lines were sanded off and the panel lines rescribed.
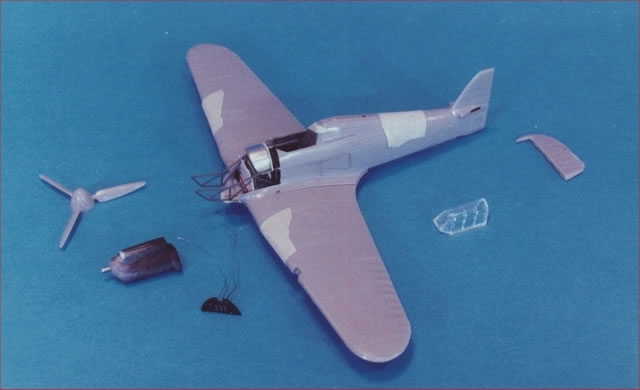
 Following assembly of the main airframe and performing the usual seam and joint clean ups, the model was ready for paint. Battle of Britain camouflage schemes were fairly straightforward, but I wanted to do an airplane with some link to Canada. Following assembly of the main airframe and performing the usual seam and joint clean ups, the model was ready for paint. Battle of Britain camouflage schemes were fairly straightforward, but I wanted to do an airplane with some link to Canada.
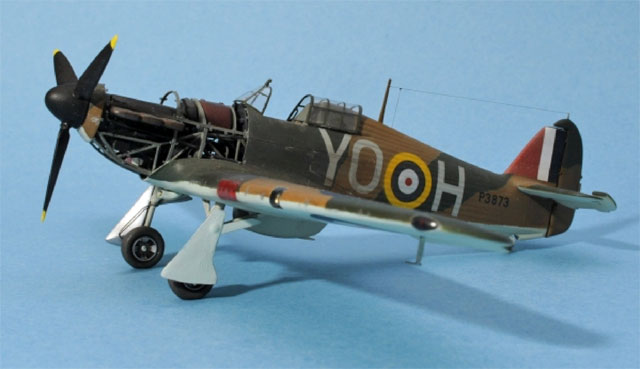
Following some research, I ended up choosing an aircraft of No. 1 Squadron (RCAF) which later became No. 401 Squadron, based at Northolt in August & September, 1940. An aircraft flown by F/L G.R. MacGregor on August 26, 1940 (RAF s/n P3873, coded YO-H) was modeled. MacGregor scored No. 1 Squadron’s first victory in combat when he brought down a Dornier Do-215 on this day.
Testor’s Model Master enamels were used (Dk. Earth; Dk. Green, Sky Type S).
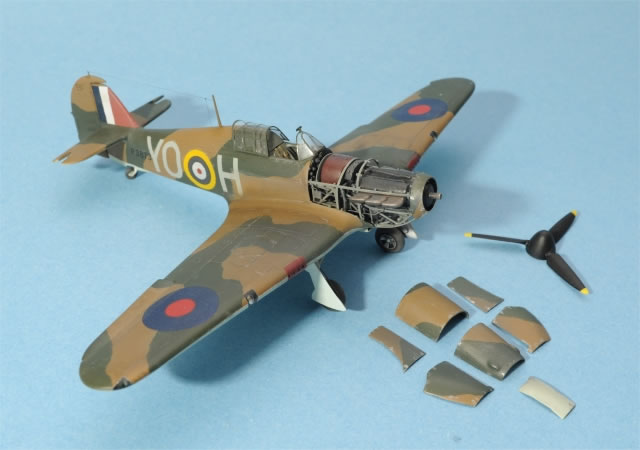
Following the basic painting, the engine was finally added, along with all the extra plumbing details, engine cowling mounting frames, etc. The landing gear legs from the Heller Hurricane kit were used, as these had the best detail of the available 1/72 Hurricane kits. The nice thing about working with these kits was the fairly low cost. Robbing parts from a $5 or $10 dollar kit is much less painful than robbing from a $20 or $30 dollar kit ! Brake lines were added from fine wire, and the tailwheel was glued on in a castored position to add life to the model. A vacuformed canopy replaced the kit canopy, and was installed in the open position to show off the cockpit.
Decals were added from various decal sheets and weathering was kept fairly light in the form of paint chipping and wash on the panel lines. Cowling panels were made by vacuforming over the original nose panels, although these would just be displayed beside the model so fit was not critical.
The finished model is one that holds a treasured spot in my collection, given the amount of work that went into it, and remains one of my absolute favourites.
Model,
Text Copyright © 2008 by John Wong
Page Created 4 December, 2008
Last Updated
4 December, 2008
Back to HyperScale
Main Page |
 Home
| What's New |
Features |
Gallery |
Reviews |
Reference |
Forum |
Search
Home
| What's New |
Features |
Gallery |
Reviews |
Reference |
Forum |
Search