|
Eduard's 1/48 scale
Morane-Saulnier Type N
by
Symon Rankine
|
Morane-Saulnier Type N |

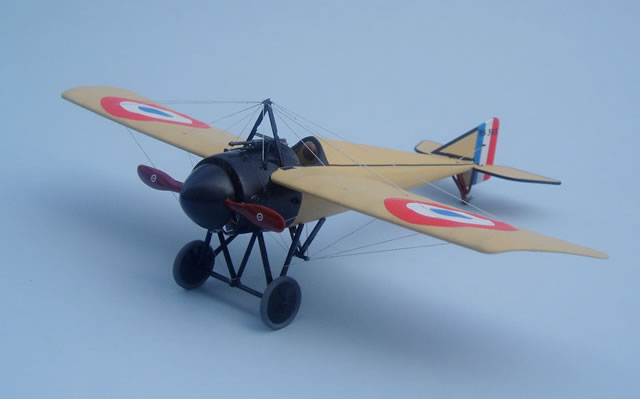
Eduard's 1/48 scale Morane-Saulnier Type N is available online from Squadron.com
Several months ago I received a great video on line from a friend showing some stunning footage of modern French jets in flight. This footage started a discussion with a group of friends I chat with on line about the possibility of a French theme build. Though inspired by the video I decided to go with a subject that was a bit earlier than was depicted, namely Eduard's 1/48 Morane Saulnier type N. There were several reasons for doing so but in the end I wanted to do something I had a hope of finishing in the two weeks I had at home. Besides, the kit was already on my shelf...
Despite the simplicity of this model there were quite a few firsts for me or at least firsts in over twenty years and while it might not be quite like regaining your virginity it was mighty close! First of all was the rigging which I have managed to largely avoid by using photo etch and staying away from that sort of thing. Second was the need to simulate varnished wood and thirdly was the subject itself being a first world war aircraft. in addition this would be the first Eduard kit I would actually build and not just allow to sit in my "to do" pile. My Morane was also the first model of a French airplane I had done in twenty five years and I was eager to get started!
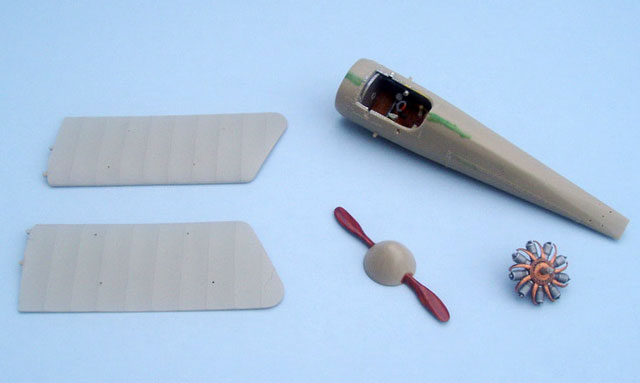
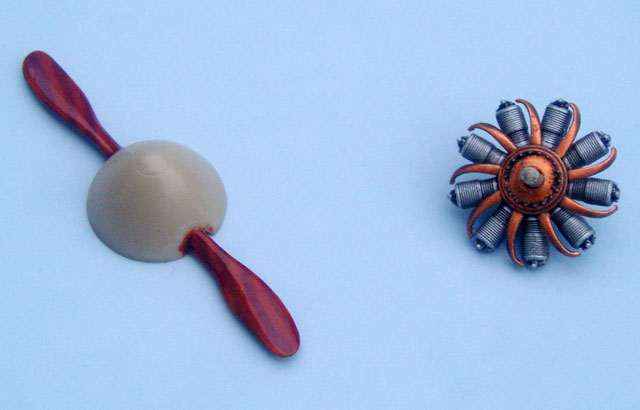
Before I did anything else I first drilled out the holes that would be needed for the rigging later on so as not to have to worry about causing damage to the paint when I got to that stage. The cockpit was simple enough and went together without much fuss and I added some seatbelts from wine foil as it looked quite conspicuous without them. Whether this is accurate or not I can't say as I was on a roll and didn't take the time to do the research. The engine is a simple three part affair that looks very nice when done but I didn't put too much effort into detailing this as I knew this be covered up by the spinner when installed in the cowl. The directions call for the engine to be attached to the firewall before the fuselage is joined but I knew if I did this I would not be able to address the joint in the top of the cowl so I left it out until later. It was added at the end of the build along with the prop with little fuss by clipping the back of the shaft to about half it's original length to give the necessary wiggle room needed to fit it in the cowl.
The propeller was painted "wood" with a technique I read somewhere on Hyperscale by first painting it Polly Scale "mud" and then streaking it with "rust". Once dry it was given a coat of Tamiya "clear" orange for the varnish. Although a friend of mine pointed out that the pattern is a bit "wonky" which I do agree with, I am happy with the result and will use it again but will try to do a better job of simulating the right pattern for the laminations next time.
When the fuselage went together the cockpit was too wide and needed to be filed down a bit at the floor and bulkhead to get a good fit. I got this mostly done but was a little too eager and so ended up having to use some filler on the front top and bottom of the fuselage. What was that advice my father always said about not rushing the job? If I could recall what it was I might not have had to use that filler but I was too busy rushing to remember!
Painting, Markings and Rigging |
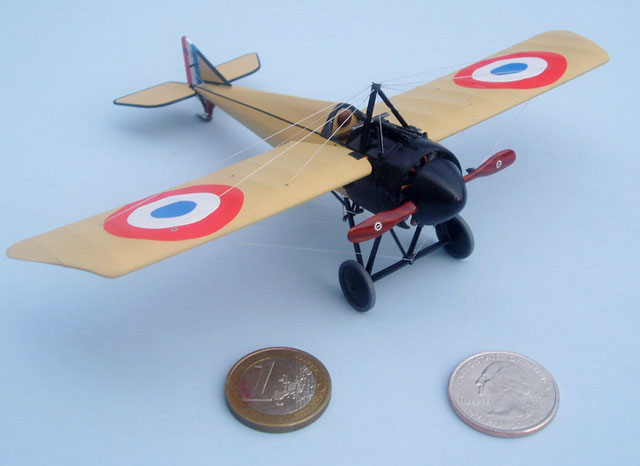
 The main components were painted with a mix of Polly Scale "doped linen" and "rust" to get a color I thought looked right. The model was then masked off and the black components were painted with Polly Scale matt black. Eduard adds a really nice touch in the box by providing the modeler with either decals for the black outline on the tail surfaces or pre cut masks. I elected to use the masks and they worked perfectly. masks were also provided for the wheel hubs and saved me a lot of hassle there too. Nice touch Eduard! Once dry the parts were painted with Polly Scale gloss and the decals were added using Micro Set and Sol which went on easily and looked great when done with no silvering. I decided to use the black decal strips provided in the kit for the lines on the fuselage and while a bit fussy this was the way to go and looked just fine when done. Once dry the black was again masked before a final dusting of Polly Scale dull coat was airbrushed on to the fabric surfaces. The main components were painted with a mix of Polly Scale "doped linen" and "rust" to get a color I thought looked right. The model was then masked off and the black components were painted with Polly Scale matt black. Eduard adds a really nice touch in the box by providing the modeler with either decals for the black outline on the tail surfaces or pre cut masks. I elected to use the masks and they worked perfectly. masks were also provided for the wheel hubs and saved me a lot of hassle there too. Nice touch Eduard! Once dry the parts were painted with Polly Scale gloss and the decals were added using Micro Set and Sol which went on easily and looked great when done with no silvering. I decided to use the black decal strips provided in the kit for the lines on the fuselage and while a bit fussy this was the way to go and looked just fine when done. Once dry the black was again masked before a final dusting of Polly Scale dull coat was airbrushed on to the fabric surfaces.
Once painted I assembled the major components which went well though as a newcomer to WW I subjects I had a bit of a tough time getting the tail straight. After this went the "fiddley" stuff. The machine gun was painted black then dry brushed with a tiny amount of Rub N' Buff silver paste to give it a gun metal look. The structures on the forward part of the fuselage went together just fine but the tail skid was a different matter. When it came time to add the rudder it couldn't even come close to fitting between the struts that brace the tail skid. I spent quite a lot of time scratching my head trying to figure out what I had done wrong before scrapping the whole thing and fabricating it out of K & S brass rod and Evergreen plastic stock.
Last of all was the rigging which I had been dreading but went a lot better than I could have hoped for. I elected to use "invisible thread" from my local craft store as I had heard of others doing this and as it came in clear I thought would look less conspicuous if I missed a bit with the paint. The process went well enough and I had it done in a couple of hours without having to use heat to tighten them up. Once set the wires were painted Testers acrylic silver which covered the clear monofilament nicely. The only trouble I had was again at the tail where I couldn't quite get where the wires to the rudder were supposed to go. As I was running out of time and nerves I drilled a hole through the rudder and added a short bit of K & S brass rod to glue the cables too. It may not be correct but it looks OK to me.
I usually weather my models but I elected to leave my Morane in new condition as I felt this aircraft would be likely to be stored inside and well maintained. Still it was difficult to resist adding some wear and tare so I glued some course hair to the tail skid to simulate a clump of grass and then painted it green. The hair was obtained courtesy of my new puppy Willie.
As a builder of mostly WW II subjects Eduard's Morane Saulnier was a real breath of fresh air and provided me with many opportunities to try techniques I hadn't used in a very long time. Eduard certainly made the process easier with decent engineering, pre cut masks, and excellent decals. Because all the wires come to the same points on the braces things got a bit crowded up there and clipping the excess off was nerve racking as I didn't have a decent pair of sewing scissors at the time. I think experience would have helped here and I hope I will do better next time but I am still far from unhappy with how it all came out. This build has helped me get over my phobia of rigging and while I may not be jumping at the Bristol Fighter any time soon I would happily go for another more simple WW I subject and I have already picked up an Eduard Fokker D VII "weekend edition". My Morane now sits proudly in the display case at my local hobby shop here in Salunga, Pennsylvania where with luck it will not have to wait long before I add another WW I model to sit beside it.
Model and
Text and Images Copyright © 2008 by Symon Rankine
Page Created 29 September, 2008
Last Updated
29 September, 2008
Back to HyperScale
Main Page |
 Home
| What's New |
Features |
Gallery |
Reviews |
Reference |
Forum |
Search
Home
| What's New |
Features |
Gallery |
Reviews |
Reference |
Forum |
Search