Hasegawa's 1/48 scale
Curtiss P-40N-25
by
Bruce Salmon
|
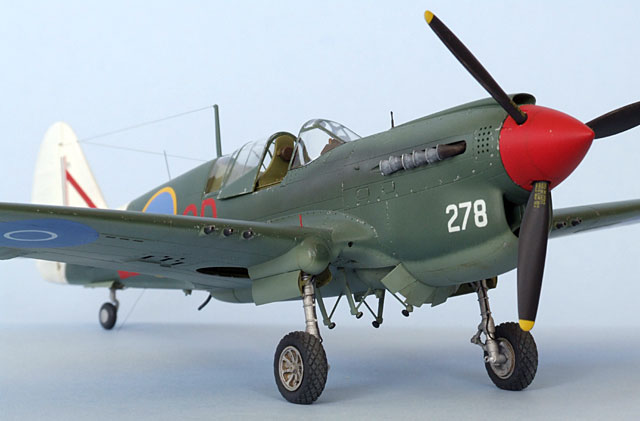
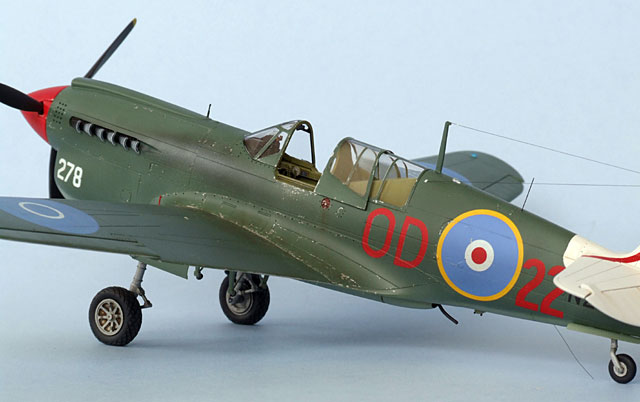
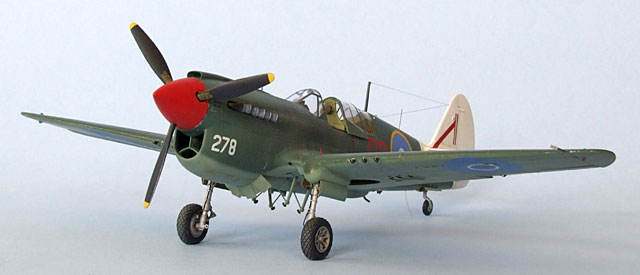
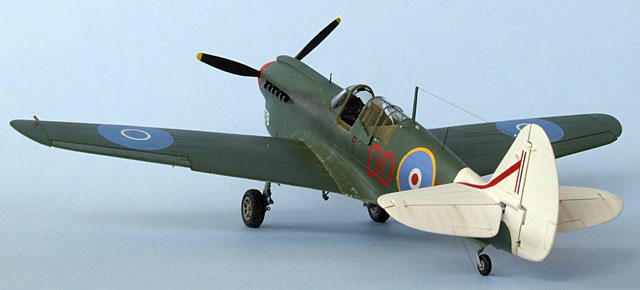
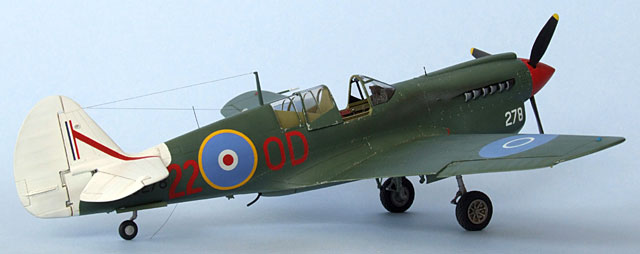
Curtiss P-40N-25
NZ3278 OD-22 4 O.T.U. Ohakea N.Z. late 1944 |

Hasegawa's 1/48 scale P-40N Warhawk is available online from Squadron.com
This project orginally started out as a bit of a kit-bash where I procured P-40E cockpit and canopy bits so I could convert the N-5 et al into an N-1. I intended to build it as RNZAF Kittyhawk “Gloria Lyons” in Olive Drab over Neutral Grey using an Aeromaster decal sheet. Somewhere along the way I changed my mind as I didn’t want a model in a scheme that was too common.
Then the new Ventura decal sheet arrived on the market so I decided to use one of their schemes as the roundel colour would match those on my RNZAF Corsair.
I then changed my mind again (all the while the building continued unabated) this time deciding on an aircraft used in NZ for training pilots and ground crew before they shipped off to the Pacific theatre. My Grandfather was a flight rigger at that time and quite probably learned his trade on this aircraft, among others, so the decision was finally concrete.
Resources
Kit:
- Hasegawa P-40N Warhawk 1/48
Aftermarket Products Used:
- Eduard PE set (49 333) P-40N Warhawk
- Ultracast (48153) Curtiss P-40E-N Flared Exhausts
- Ultracast (48157) Curtiss P-40N wheels diamond tread (27” light weight 8-spoked)
- Ventura Decals (V4885) RNZAF Curtiss P-40N, Pacific Theatre
- Squadron Vac-form canopy (9569) for Mauve P-40N
Wings
I started construction with the wings as they looked to be the fastest bits to crack on with. The gun inserts don’t fit very well and need much bogging, sanding, Mr Surfacering sanding and rescribing. I also cut out the ailerons and repositioned them. Later on I decided that they had too much deflection so I cut them off again then repaired and reattached them. I also sanded down the ribbing of all fabric areas as it is way too sharp and their trailing edges are very thick. I added the Eduard PE to the wheel wells and some other internal ribbing that you might just see if you use your Optivisor and a torch.
Fuselage
Firstly I made the cowling radiator insert and thought that I should probably shim the outer edges so that they actually touch the fuselage sides. Once again you can only see the difference with the Optivisor / torch combo.
Next I glued the empennage insert sides to the forward fuselage sides so that they would line up better. Not really a happening thing – the major problem was that the panel lines were just out of alignment. Fuselage halves were then mated (this method is anti-instructions) and the rear cockpit insert attached. I then sanded down the huge rivets on the insert (and the rudder) then attacked the whole with loads of bog and hours of sanding - ad nauseam. Once it was all smooth I rescribed the panel lines so that they would be straight - easier said than done. On more than one occasion the scriber dug into the old line necessitating a revisit to the whole bogging/sanding rigmarole.
This bogging/sanding episode took up more than two thirds of the build time. You will need to possess an iron gut or have some sort of masochistic tendencies to build this kit other than OOB. Luckily I have both!
Cockpit
This all went together rather easily even though one side is totally replaced by PE components. I thinned down the kit seat instead of using the PE one as the real seat was made from plywood. Once painted and weathered all I needed to do was to push it up into position from underneath… BUT what you really need to do is to glue the instrument panel into place on the fuselage first (cut the tabs off the panel and dremel out their corresponding attachment points on the cockpit sidewalls) otherwise it will sit crooked once everything is jammed in.
Once the cockpit was sorted the wings went on (a bit gappy near the front but it all disappeared with a bit of extra liquid cement) then the horizontal stabilizers (elevators dropped) and rudder.
The prop goes together easily although the rubber bung ended up being a bit loose so the whole thing hung down when attached; this is my first model where the prop is glued in place. On the real aircraft the spinner covers the front part of nose so you shouldn’t see any daylight through the join when viewed side-on
At this stage I added the undercarriage legs as I thought the PE bits I had to add would ping off into the jaws of the carpet monster if I had built them separately. A bit of a waste of time which required extra effort masking them up for painting - another lesson learnt. The tailwheel however, had to be added as I needed to make the dirtbag for it (from tissue paper and white glue).
The bomb/belly tank rack was also added at this stage and tarted up a bit with some wire that was more to scale than the kit parts. I fingered it many times during the painting process and didn’t break a thing.
A pitot tube made from brass tube was superglued on then a final bit of cleaning up, some masking and were off to the paint shop.
Paint
The whole model was initially primed with Mr Surfacer 1200 then the tail painted white. Once dry I masked the tail and sprayed the rest freehand. A “final” bit of masking was also needed for the red fin flash. All the little fiddly bits (gear doors, wheels, canopy etc) were also painted at this time.
All surfaces were post-shaded using that particular colour successively lightened with white then finally an over spray with Humbrol Glosscote where the decals would go.
I didn’t have any colour references for the RNZAF version of foliage green so I made one up that would be different from the more often seen Aussie F.G. and the American Medium Green. I checked the few B&W photos I had to try and get the contrast between this colour and the RNZAF Grey Green about right.
Paints used are as follows (all enamels):
-
Topsides RNZAF Foliage Green:
10 – Xtracolor X391 French WW2 Vert Fonce / 1 – Humbrol H105 Marine Green FS 34097 / 1 – Tamiya X2 Gloss White
-
Undersides RNZAF Grey Green:
10 – Xtracolor X620 Light Green Czech Mig 29 / 1 – Tamiya X2 Gloss White
-
Cockpit Interior:
10 – Humbrol 226 Interior Green / 2 – Tamiya XF2 Flat White
-
Roundels: RNZAF Blue (approximate mix)
4 – Humbrol H25 Matt Blue / 3 – Tamiya XF2 Flat White
-
Spinner and Fin Flash:
Tamiya XF7 Flat Red darkened with a teeny amount of dark blue to give it a more blood red colour so it would match the decals (I needn’t have bothered).
Decals
Once the gloss coat was dry it was time for decals. The Ventura decals went on without a problem and would actually slide around on the surface this time unlike the ones I had used on my Corsair. Unfortunately they were out of register and some of the colours had not printed properly so that you could see the white showing through from underneath giving them a patchy appearance. I couldn’t be bothered removing them as the last time I tried this it ripped up the varnish layer too and necessitated a repaint. This time I decided I would mask the roundels and mix up a RNZAF blue to disguise the patchiness. The masks were cut from post-it notes and worked well although I had to have a second go at it before getting just the right shade of blue.
Weathering
After a coat of satin varnish the model was given an overall wash with Windsor & Newton Artisan water mixable raw umber oil paint mixed in Bars Bugs car window washer detergent. Some panel lines were darkened with further washes with black added. A few oil stains were drybrushed on and some restrained chipping using Tamiya XF16 Flat Aluminium applied with a fine brush. Gun smoke staining was made with Tamiya X19 Smoke using the same for the exhaust stain followed by a very light streak of Humbrol 28 Camouflage Grey.
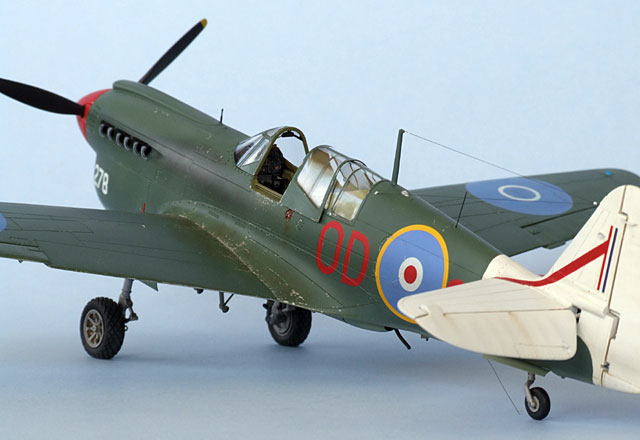
Note how the exhaust stain hooks upwards towards the canopy then down again due to the airflow. The exhaust pipes also had a drybrush of white oil paint on the openings. A matt-ish varnish was then sprayed to finish the job.
The brake lines were glued on and hand painted then the gear doors were attached and their actuating wires added. The canopy was glued on with industrial strength white glue. I unwittingly cut the corners off the vac-form sliding canopy piece not realizing my mistake until late in the build. I had to then reinforce the inside with 10thou card, make new corners then sand it to scale thinness again – sigh. At the time of writing there is no vac-form canopy for this kit. I used one for the old Mauve kit which fits OK but lacks detail and needs modification particularly addition of the framework running along the top.
The prop was then glued in place followed by the Ultracast exhausts (caution these are handed). Next I added all the clear plastic nav lights NB: the kit “landing light” is nasty so you’ll have to replace it with something else. I plonked mine in as I’d had enough of the kit by this stage and just wanted it finished. It’s the only part of the completed model that I cringe over so I will have to drill it out at some stage, most likely breaking all the aerial wires in the process – Gad! Last to go on are the aerials which I made from black stretched sprue and attached with white glue. The insulators are also made from drops of white glue dabbed on with a pin and painted white.
The “aerial” you see near the tailwheel is actually a static discharge wire and the hose coming out the back of the fuselage keel was retrofitted later in the war to feed all the excess engine gook from the front end and vent it in a position where it wouldn’t make so much of a mess to clean up.
After the long and involved process of prep work the question remains – would I build another? Well frankly I guess I don’t have a choice. It certainly is much better than the current competition and considering that I would like to build some of the other P-40 variants I’ll just have to mentally prepare myself for the battle ahead – but maybe just not in the near future.
Cheers to Andy Hosking our local real P-40 builder for all the extra info.
Model, Images and
Text Copyright © 2008 by Bruce Salmon
Page Created 23 October, 2008
Last Updated
23 October, 2008
Back to HyperScale
Main Page |
 Home
| What's New |
Features |
Gallery |
Reviews |
Reference |
Forum |
Search
Home
| What's New |
Features |
Gallery |
Reviews |
Reference |
Forum |
Search