Czech Master Resin's 1/72 scale
Seafire Mk.XV
by Bernie Hengst
|
|
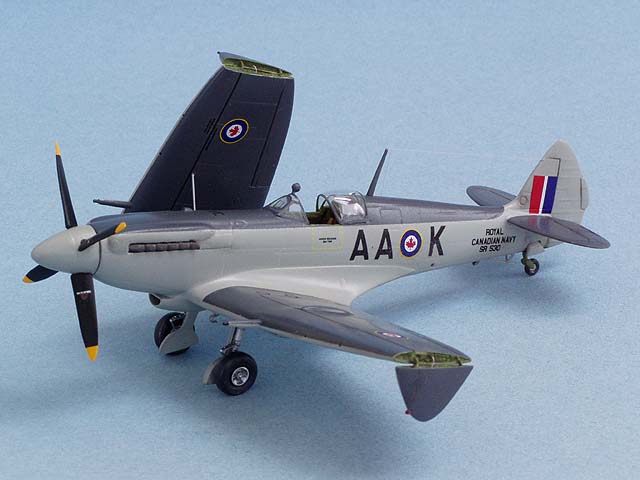
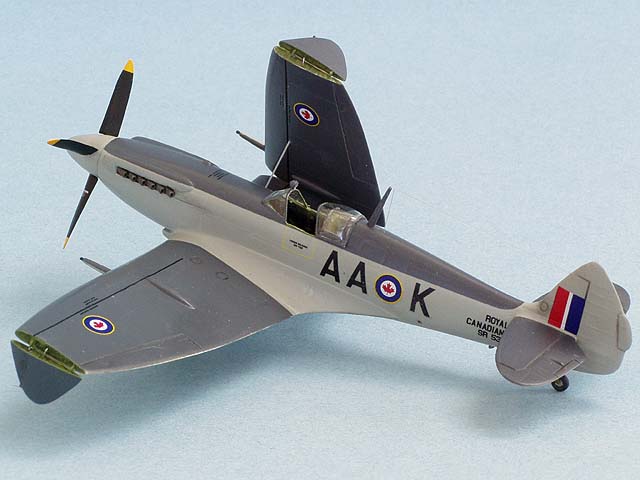
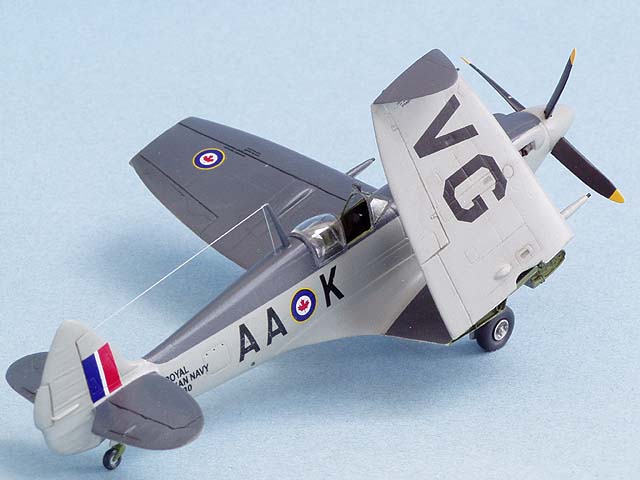
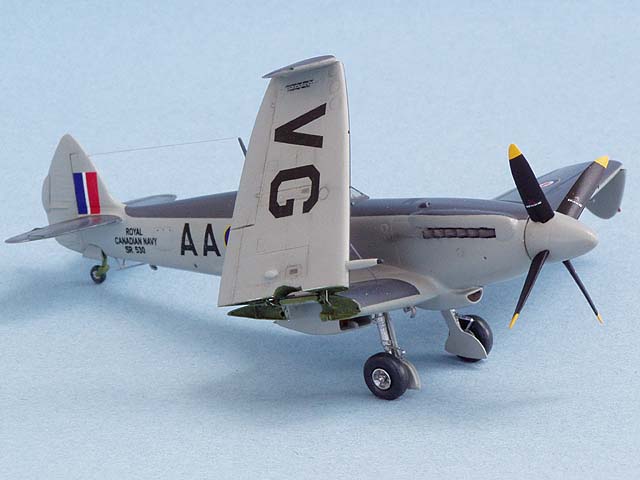
Supermarine Seafire Mk.XV |

Czech Master Resin's Supermarine Seafire XV is available online from Squadron
Here is my CMR Seafire Mk.XV (Mk.15) ‘A’ Frame Hook, item number No.120 & Folding Wings Detailing Set, DS02
After receiving the kit from my friend, Bill Coffman, and studying the instruction sheets and examining the parts I decided to build the model with only one wing folded. This is quite correct as the wings were folded one at a time by hand by the deck crews.
The Seafire Mk.15 kit contains thirty seven resin parts and two clear canopies and the parts are packed in seven plastic bags. Nine resin parts are in the Wing-Fold Detail Set. The parts were cleanly moulded with very few air holes, again sealed in plastic bags.
The instruction sheet for the Seafire Mk.15 consists of two pages of construction sequences, five pages of colour schemes, one page of decaling instruction and two pages of photos and the wing-fold set is covered by one sheet of instructions and one of colour schemes. The decal sheet by MPD, and is beautifully printed.
Using a fine razor saw I cut the parts from the moulding blocks and cleaned them up using fine emery boards and different grades of sand paper. The small parts, when ready cleaned were placed into small Zip-Lock bags or small plastic containers. The wing from the Seafire Mk.15 was placed in the spare parts box.
 The cockpit parts were assembled using Cyanoacrylate. The cockpit parts were assembled using Cyanoacrylate.
The mating surfaces of the fuselage halves were lightly rubbed on sandpaper fixed to a glass pane. The vertical fin and rudder had to be thinned to improve the trailing edge.
The cockpit assembly, the fuselage halves and the centre wing section were sprayed with Model Master RAF Interior Green. When dry the parts received some dry brushing with thinned black paint and lightened RAF Interior Green to add some depth. After dry-fitting and carefully filing of the bulk heads the cockpit assembly was glued to the starboard fuselage and the fuselage sides assembled using Ca. The cockpit door and the ‘A’ frame hook were also installed at this time and all the seam and pinholes that I found were brushed with Mr. Surfacer 500 to find and fill any imperfections.
The next day the filled seams and pinholes were carefully sanded with progressively finer grades of dry and wet paper. The radiators, pre-painted and masked on the inside were added to the lower wings centre section and this part installed and the wing-fuselage seam filled with Mr. Surfacer 500. The carburetor front was added and the seam also faired in with Mr. Surfacer 500. The wing-fuselage joint and the carburetor seam were sanded twelve hours later.
The horizontal stabilizers were added and when the Ca. glue had set Mr. Surfacer 500 was used to fill the seam on the stabilizers.
Both wings had the cannon stubs removed and holes drilled to add the longer guns saved from a Spitfire Mk.22/24 kit. This looked better than gluing the 20 mm cannons supplied with the kit onto the stubs. The machinegun openings were filled with Ca. glue and after sanding re-drilled to make them look uniform.
The port wing was filed and sanded to fit to the centre section and when a good fit was achieved it was glued to the centre section. As the parts of the wing-fold detail set were designed to be installed in the folded position the port lower wing landing gear opening had to be modified with thin plastic sheet to resemble the proper landing gear opening. A good guide for this was the original wing from the Seafire Mk.15 Kit.
As the first job of folding the wings was to lower the wing tips I decided to have both wing tips in the lowered position.
The excellent article by Vic Scheuerman in SAM “Modelling Masterclass” covering 23 volumes was a great help in building my Seafire. It was especially very helpful in detailing the wing tip interiors and the starboard wing-fold by adding small pieces and drilling holes to add later thin wires to represent electrical cables and plumbing.
The canopy, previously brushed on the inside with Future, was cut out, the edges carefully sanded until it fitted properly. As I wanted the canopy displayed open I cut the front and back part off and installed them with white glue and on the next day masked all the canopy parts with Tamiya Tape as well as the cockpit opening.
Short pieces of toothpicks were pushed into the holes for the main and tail landing gears. Because the starboard wing was missing the model did dip to the port wing. So I had to use some lead fishing weights and tape them with masking tape to the top starboard wing stub for spraying the primer. These weights had to be moved from the top to the bottom , depending on what part I was spraying.
All the landing gear doors main and tail were stuck to masking tape fixed to wooden stir sticks, wheels stuck on toothpicks, the tail wheel held by a self-closing pair of tweezers and the main landing gear legs, with the scissor links added, held on the axle stubs by cloths pegs.
A coat of Tamiya White Primer, siphoned from the can, was airbrushed onto the model. This dries very fast and showed a few imperfections on the seams and a few more tiny holes on the fuselage and lower wings. To fill these I used Mr. Base White 1000 and let this dry for twenty four hours. After carefully sanding these spots the complete model was rubbed down with previously used 600 grid dry and wet paper for a very smooth finish.
The propeller was assembled and a cloths peg was used to hold it for painting. The exhausts were drilled out and stuck to masking tape fixed to wooden stir sticks for later paining with Humbrol Rust. The landing gear legs and wheel hubs were sprayed with Tamiya Silver AS-12, siphoned from the can.
I mixed the 501-106 ‘Light Grey’ colour for the lower wings starting with Humbrol 64 Light grey and lightened it until it matched the colour sample in the Canadian “Standard Paint Colors” Part I. This paint was sprayed over the whole model, both wings, landing gear doors and the propeller spinner. After drying for twenty four hours the model was masked and the ‘Dark Grey’ 501-102, for which Humbrol 27 Sea Grey is a very good match, was sprayed onto the upper surfaces of the fuselage, the wings and horizontal stabilizers.
The spinner was masked using Tamiya Tape and Maskol and the propeller tips were sprayed with Insignia Yellow FS 33 538. The next day I masked the propeller tips and sprayed the propeller blades flat black.
After the paint had dried for forty- eight hours the model was polished it with “Mastercasters” ‘Miracle Shiner and Polisher’ before coating the model with Floquil Crystal Cote in preparation for decaling.
The decals settled down with out the use of any decal-setting solution. When dry the model was wiped down with a damp cloth to remove any glue residue fro the decals and sprayed again with a mixture of Floquil Crystal Cote and Floquil Flat Finish, to seal the decals.
The next day the landing gear legs and the tail wheel were installed with Ca. and when the glue had cured the wheels, which had the tires painted with Pactra Hot Rod Primer were added and the landing gear doors fixed next. The deflector for the steel cables in front of the tail wheel was made from three thin pieces of stretched sprue and painted 501-106 Light Grey.
I removed the masks from the canopy and to cockpit opening and installed the seat to which photo etch seatbelts were added.
Using a small piece of plastic card, cut at the correct angle I installed the wing tips to both wings and added small sections of very thin wire. White glue was used to simulate the wing tip lights. These were later painted 501-106 Light Grey. A day later the very tips of these lights coloured with a tiny drop of red on the on the port and green on the starboard wing.
The exhausts were brushed with black and very light brown pastels and added to the fuselage. I made an aerial mast from plastic card, as they were installed on the Canadian Seafire Mk.15s. This was installed and painted Dark Grey. A day later I added stretched sprue for the aerial wire.
The last thing to do now was to install the starboard wing and its stay.
I drilled two holes for the wing stay. The wing was glued with Ca. and the angle, as the glue cured was compared with the drawing on the instruction sheet from the Folding Wing Detail Set. Wires were added to the interior of the fold and the stay was added to the wing using white glue. Using the tiny resin pieces that came with the kit, as a guide, I cut two small squares representing the upper parts of wing skinning, that move as the wing is folded. I painted them Dark Grey and when dry glued them with tiny drops of white glue to the upper wing. The pitot tube was glued to the lower port wing and the hook under the fuselage was painted with steel. As the pictures I have seen from these Seafires Mk.15s showed them always in very pristine and well maintained condition I added only a small amount of exhaust staining to the fuselage sides.
This is a very nice model and not difficult to build.
-
The Supermarine Spitfire, Part 2: Griffin Powered, by Robert Humphreys, SAM Publications.
-
Royal Canadian Navy, Aircraft Finishes and Markings 1944 – 1968, by Patrick Martin.
-
Scale Aircraft Modelling, Seafire Mk.XV Part 1 to 13, Vol.27 to Vol.29 No.8.
Model, Images and Text Copyright © 2008 by Bernie Hengst
Page Created 29 August, 2008
Last Updated
29 August, 2008
Back to
HyperScale Main Page |
 Home
| What's New | Features | Gallery | Reviews | Reference | Resource Guides | Forum |
Home
| What's New | Features | Gallery | Reviews | Reference | Resource Guides | Forum |