Trumpeter + Hobbycraft + Cooper
Frankenfury in 1/48
by
Brett Green
|
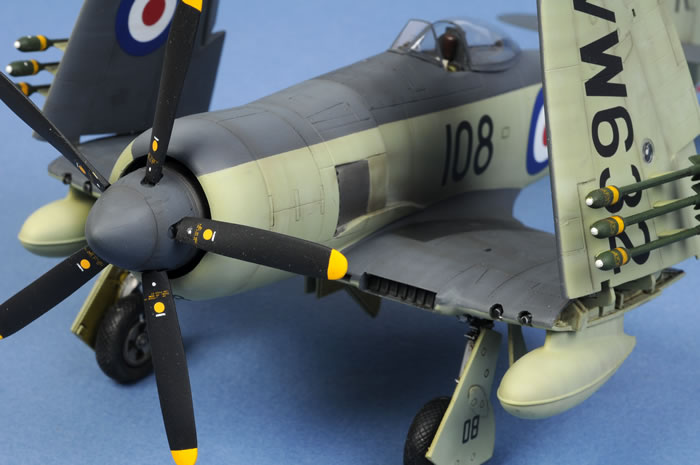
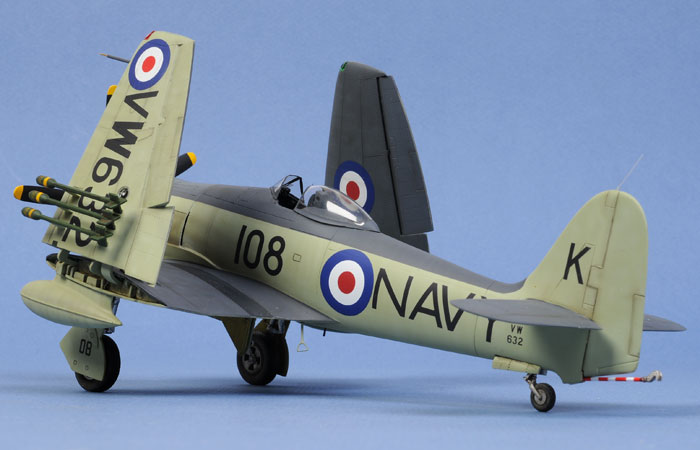
Hawker Sea Fury FB.11
805 Sqn. Royal Australian Navy, HMAS Sydney, 1951 |

Trumpeter's 1/48 scale Sea Fury FB.11 is available online from Squadron.com
Background
It might be argued that the Hawker Sea Fury was the ultimate piston engine fighter.
Too late to see service in the Second World War, the Sea Fury held its own six years later in the skies over Korea against jet-powered adversaries.
The Fury was a thin-winged development of the wartime Hawker Tempest, but by the time this high performance fighter took to the air in September 1944, the Royal Air Force had already recognised that the age of the jet fighter was dawning.
Even so, the Fleet Air Arm still needed a rugged and powerful fighter capable of carrier operations. In the twilight of the piston fighter era, the Sea Fury admirably filled this niche until the introduction of the jet-powered Sea Venom around 1954.
Trumpeter's 1/48 scale Sea Fury FB.11 in the Box
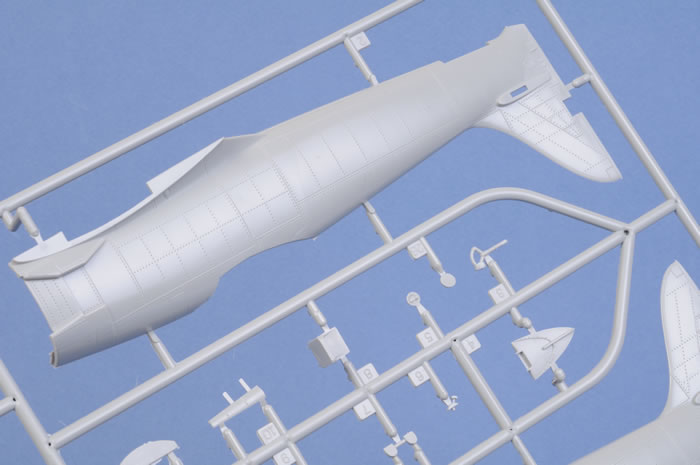
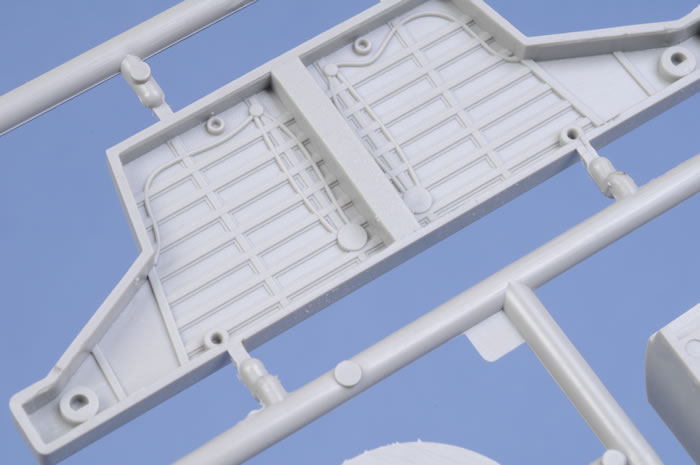
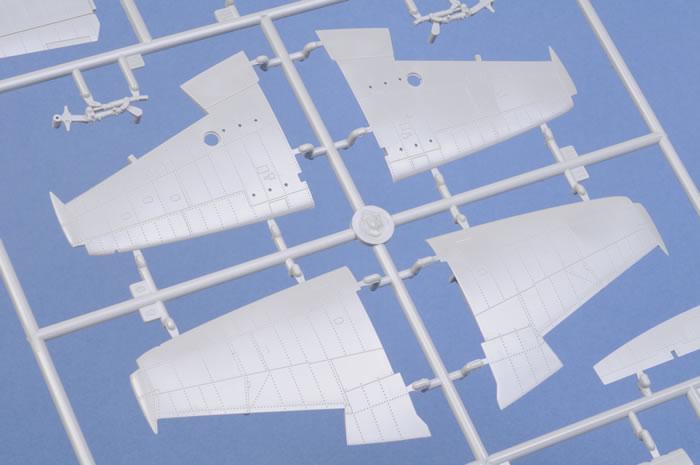
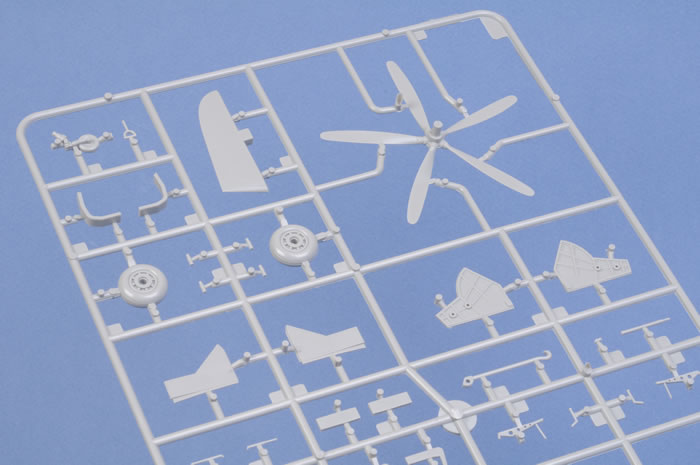
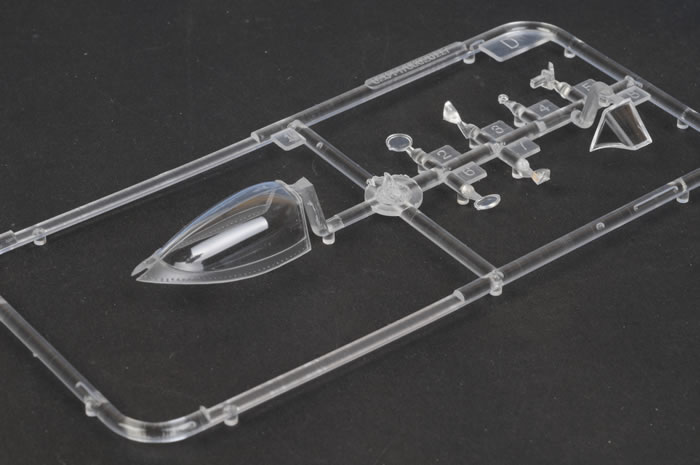
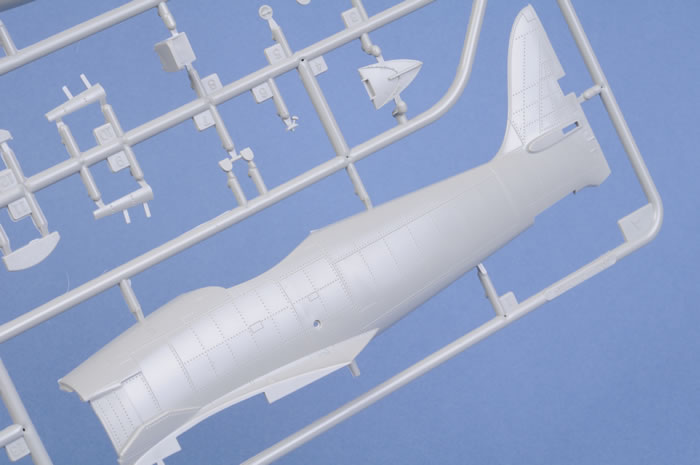
Trumpeter's 1/48 scale Sea Fury FB.11 comprises 92 parts in grey plastic and eight clear parts.
The kit is cleanly moulded with no obvious ejector pins or other imperfections on exterior surfaces,
Surface detail is by way of finely recessed panel lines and rows of crisply recessed rivets. The latter will not be to everyone's taste, especially on the Sea Fury's smooth, flush riveted airframe.
Dimensions of the kit are in agreement with most reference sources, but there are a number of detail accuracy issues.
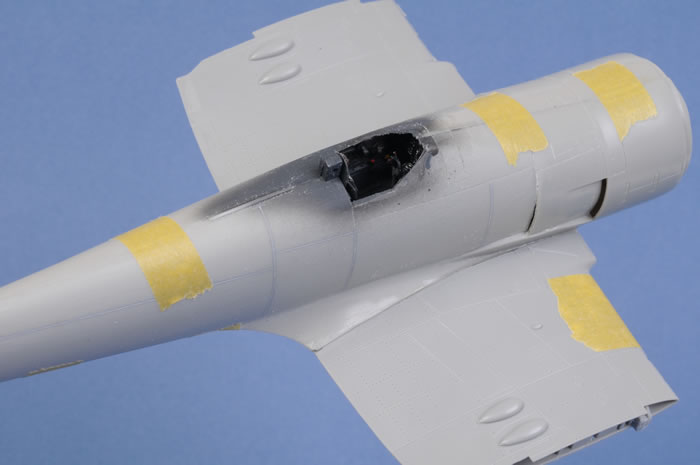
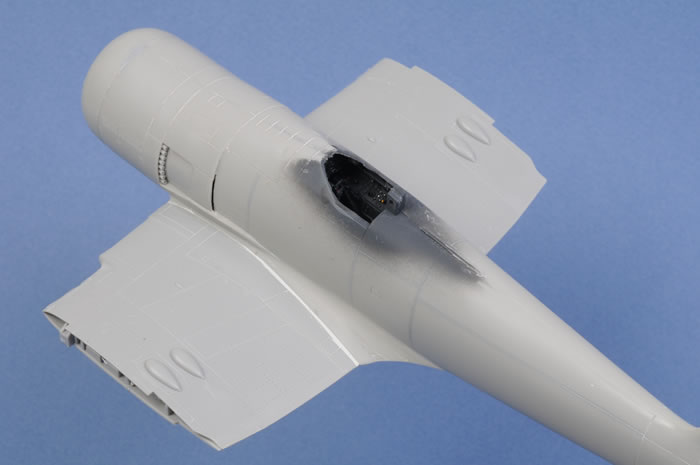
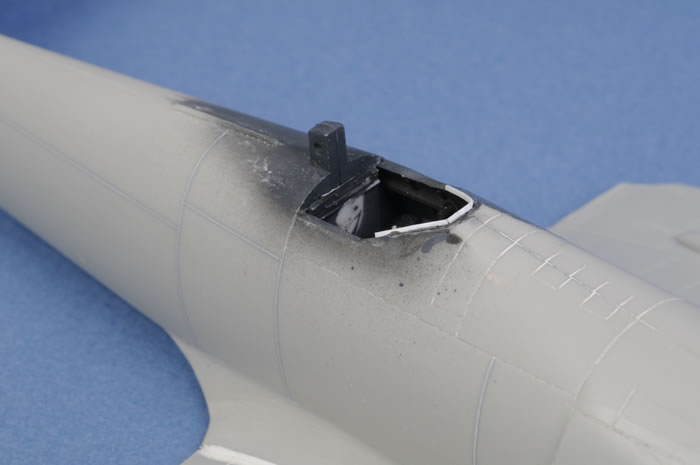
The most prominent is the large cutout in the fuselage spine directly behind the cockpit. This is not present on the real Sea Fury - the spine should continue without any change to contour or depth right up to the rear cockpit bulkhead. The windscreen is not quite right either. The lower sides are heavily curved on the kit, whereas the real Sea Fury windscreen was almost straight.
The exhaust panels appear to be the correct height (Hobbycraft's are too short), and the hollowed out exhaust stacks are a nice touch but the "eyebrow" above and the lip below are exaggerated.
The forward cowl looks odd - the curve toward the spinner seems to start too early and the fuselage opening appears overly sharp giving the area a slightly pinched look. The spinner itself is too pointy, but Trumpeter did get the offset oval openings for the propeller blade right.
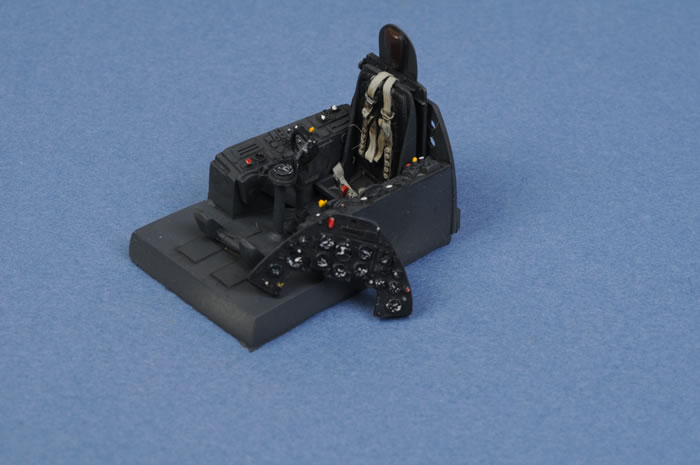
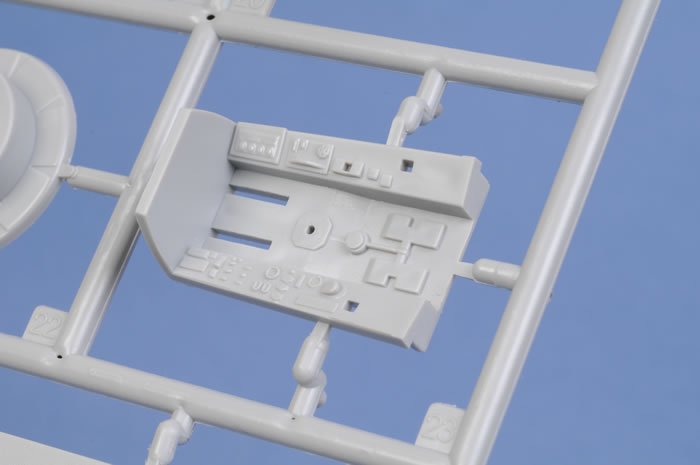
The cockpit is shallow. Detail in the front office is basic and bears only a passing resemblance to the real thing. This is especially true of the seat and the control column.
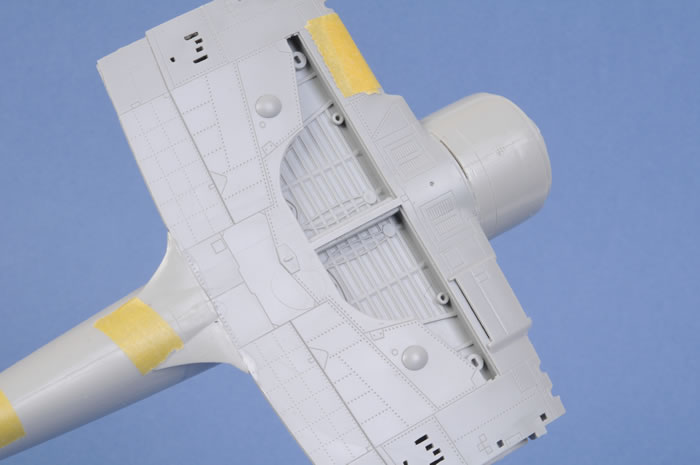
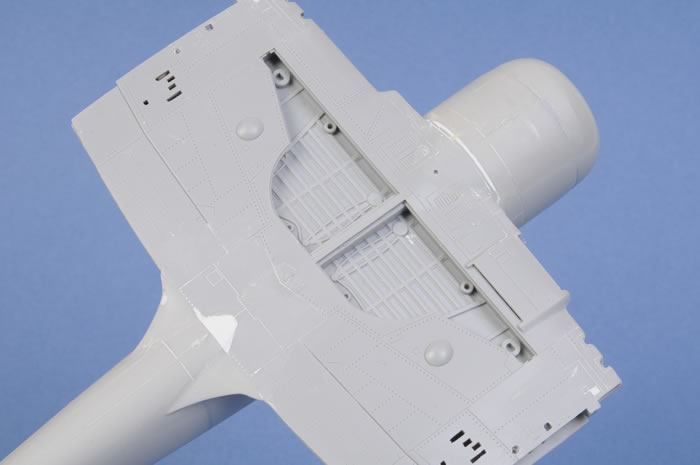
The wings are generally very good, with structurally detailed wheel wells. The outer wing panels are separate and may be depicted flat or folded. Wingtip navigation lights and landing lights are supplied as separate clear parts. Ailerons are also separate. This is very useful, as the ailerons were deflected outward when the wings were folded. The openings for the cannon in the wing leading edges are offset ovals as moulded. These should be reshaped to circular openings.
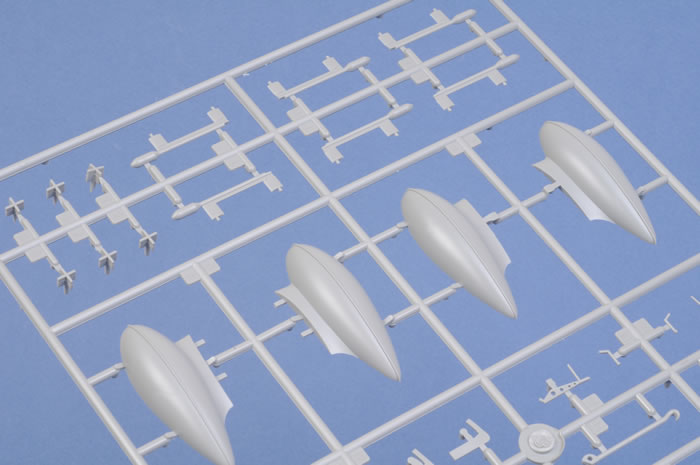
Ordnance includes two big ferry tanks and six rockets moulded to rails. The ferry tanks were rarely fitted - smaller 90 gallon drop tanks were more typical. The rockets are nicely detailed and fit perfectly in their wing locating holes, but they do not include any openings in the rear of the rocket tubes. In fact, the tubes taper off altogether just behind the front of the fins.
The main landing gear legs are short by around 3mm. Perhaps this is supposed to represent extreme compression under the weight of full ferry tanks. Detail on the wheel hubs is poor, and the radial tread pattern is not typical for the type.
As soon as I received Trumpeter’s 1/48 scale Sea Fury, I considered possible solutions to address some of the shortcomings.
The first idea that came to mind was using either Cooper Details’ or Cutting Edge’s multi-media upgrade sets. These were designed for the Hobbycraft Sea Fury, but they address most of the weak points of Trumpeter’s kits too.
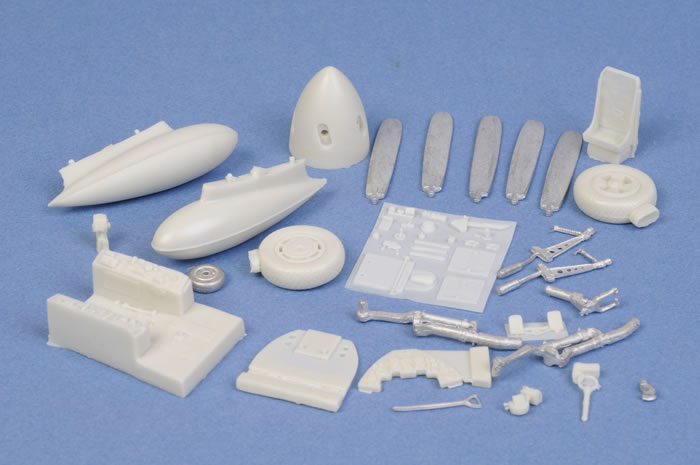
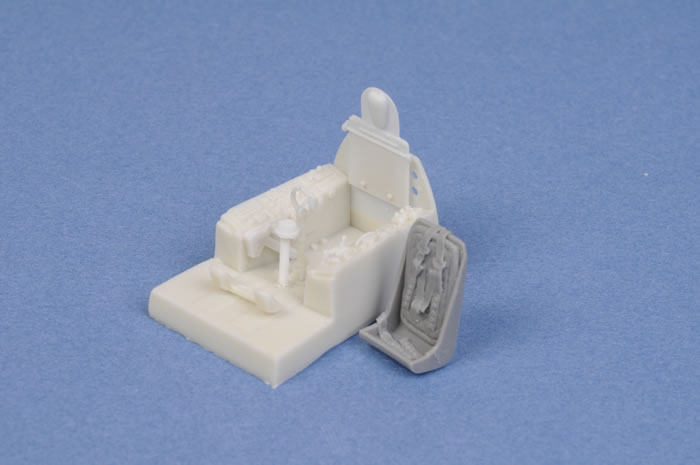
The Cooper Details set includes an entirely new cockpit, propellers, spinner, wheels and 90 gallon drop tanks in resin; plus a vacform canopy and white metal undercarriage parts for the main and tail gear.
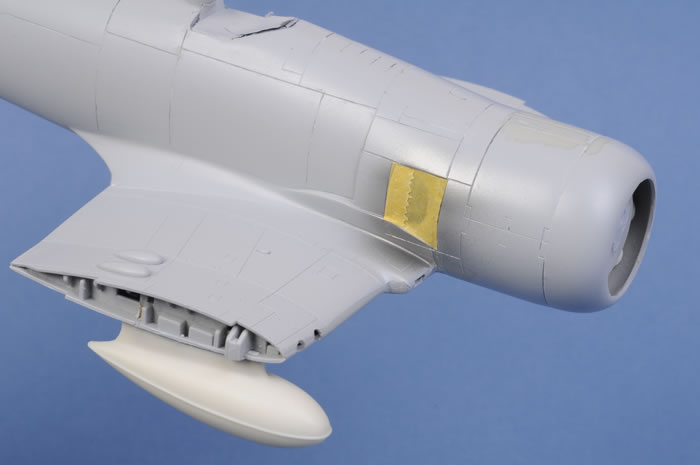
The biggest challenge would be to adapt Cooper Details' resin spinner to the Trumpeter engine cowling, which is arranged quite differently to Hobbycraft’s engineering. Some surgery would be required. The large scallop behind the cockpit on Trumpeter’s fuselage spine would have to be filled, shaped and sanded too; and the rivets needed filling and smoothing.
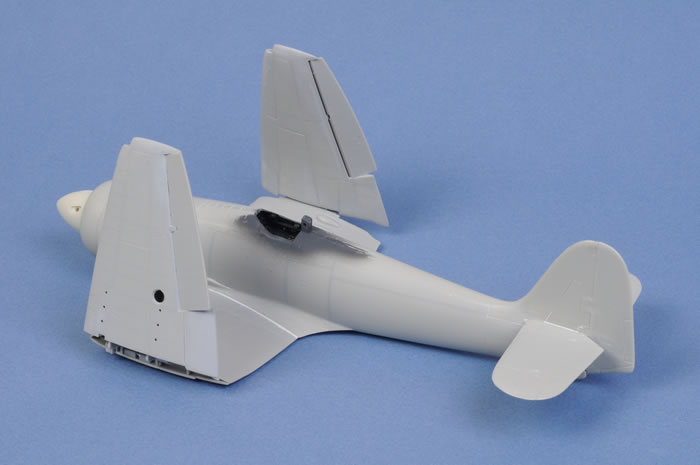
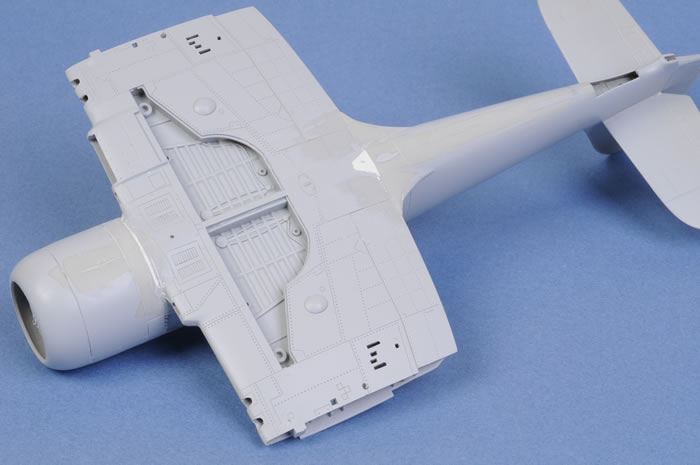
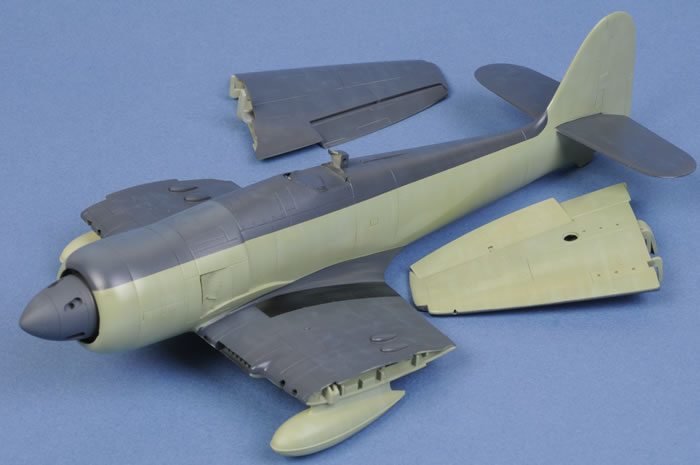
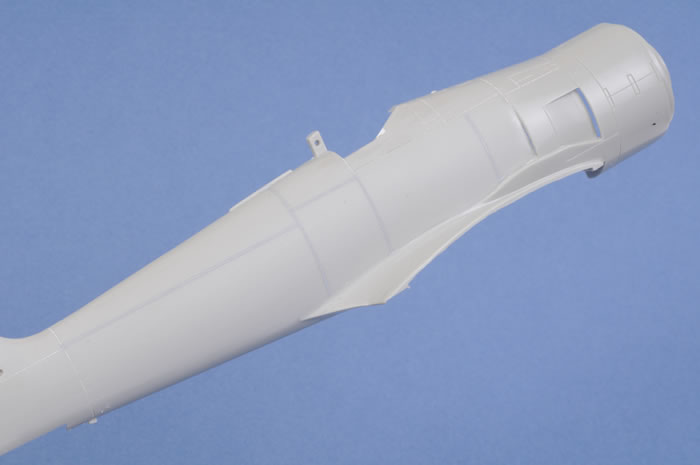
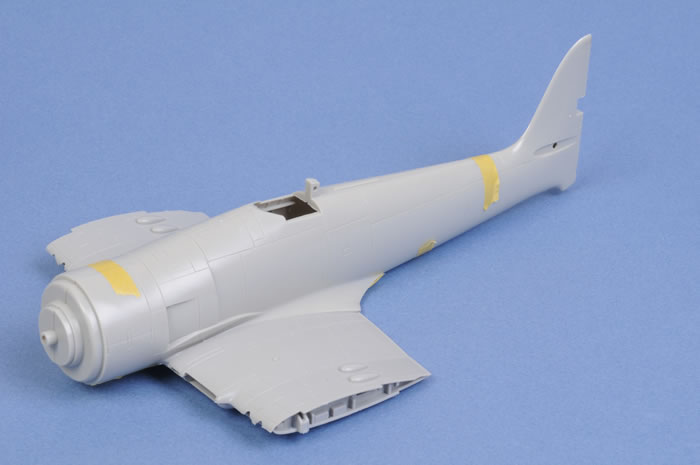
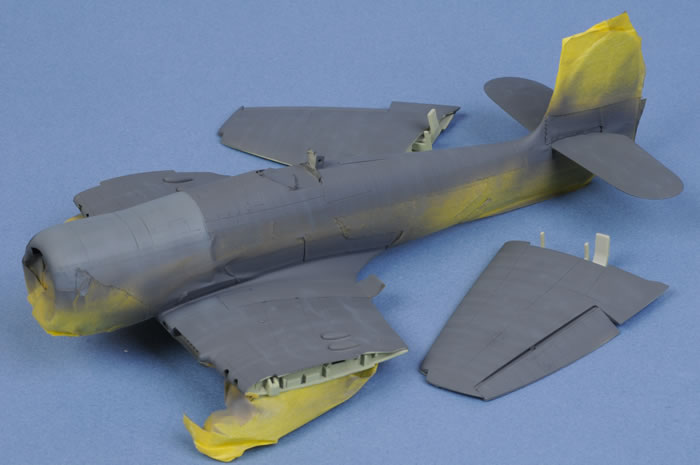
At this point I wondered if it might be easier to fit the Hobbycraft fuselage to Trumpeter’s very nice wing.
Test fitting showed that only minor trimming and filling would be needed to mate these major sub-assemblies, and I thought it would be less work than preparing Trumpeter’s fuselage.
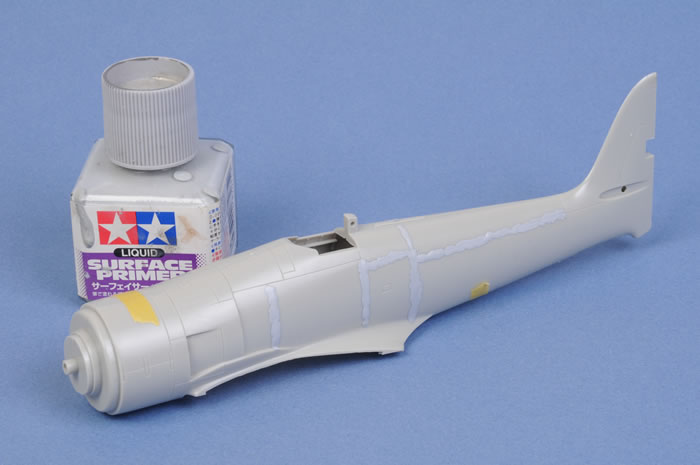
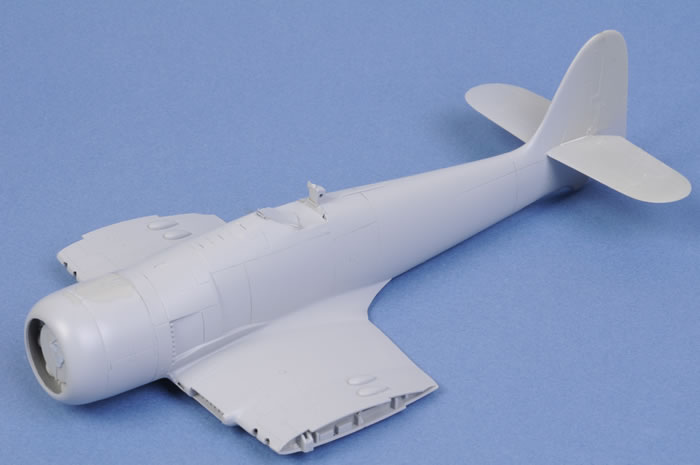
The biggest problem with the basic Hobbycraft fuselage is the wide, soft panel lines. I brushed a thick coat of Tamiya Surfacer over the lines on the rear fuselage, and a thinner coat of Gunze Mr. Surfacer 1000 onto the cowl panels and forward fuselage lines, as these were visible on the real aircraft. Once thoroughly dry, the various Surfacers were sanded down to deliver a much subtler rendition of panel lines – far more appropriate for the flush riveted Sea Fury.
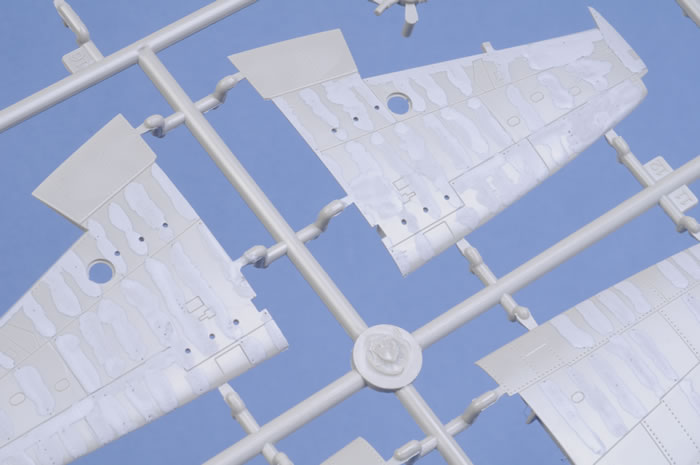
Trumpeter’s outer wing panels received similar treatment. Two coats of Tamiya Surfacer, with sanding in between coats and afterward, were required to eliminate most of the prominent rivet detail. The structural rivet detail on the inner wing panels was left intact as I thought it looked appropriately busy around the various access hatches and panels.
With the large parts prepared, I started building Cooper Details beautiful resin cockpit. Although this set was released quite some time ago, the detail remains state-of-the-art. I did replace the seat with the Cutting Edge Typhoon seat though, as Cooper’s seat was not fitted with harness straps. The Cutting Edge seat has the harness straps and quilted backrest cast in place. I had to shave off the harness aattachment points on the outside of the seat to squeeze it into the cockpit though.
The Cooper Detail cockpit is the correct depth, is accurate and very busy. It even includes a delicate three-part mount for the master compass in front of the control column. I decided that I might not quite be up to this task, and the compass’ tripod mount would be largely hidden in the dark recesses of the black cockpit, so I simply glued the compass to the top of a length of plastic rod.
Some of Cooper Details' smaller cockpit parts are cast onto a thin wafer of resin. The resin was carefully sanded, freeing the tiny detail parts, which were then glued to the fuselage sidewalls. I also glued a wedge of scrap plastic to the cockpit sill, smoothing the line from the windscreen to the canopy rails.
I painted the cockpit Dark Grey – representing scale black – and picked out the details with a fine brush and Tamiya acrylic paint. I initially painted the quilted backrest black, but eventually repainted it in a shade of medium green to add a little colour to the otherwise dark front office.
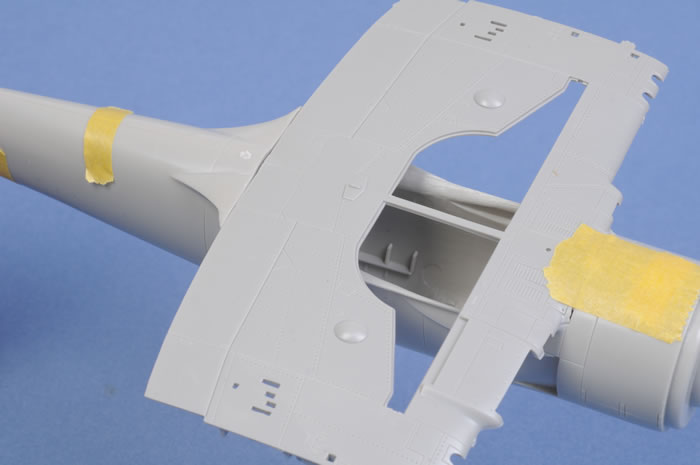
The fuselage halves were joined and the cockpit tub fed up through the wing opening into the assembled fuselage. Fit was perfect.
Now it was time to mate the Trumpeter wings to Hobbycraft’s fuselage. The inside upper wing panels were first glued to the lower centre wing section. When this assembly was offered to the fuselage, a few points interfered with fit along the wing root. These were carefully trimmed with a hobby knife and smoothed with a sanding stick. The process was repeated several times until a good fit was achieved.
A few minor gaps remained at the wing root and underneath the fuselage where the wing meets the engine cowling. Also, the bulge where the fuselage meets the centre of the wing needed to be built up. Milliput was used for both of these jobs. The outline of the bulge was cut from a piece of stout cardboard, which was taped to the bottom of the wing and used as a template.
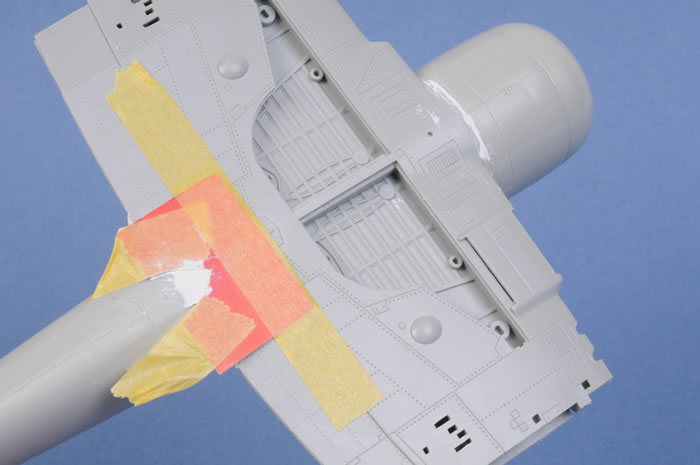
Once the Milliput has set, the wing roots and lower wing joins were thoroughly sanded for a nice, smooth seamless join.
Cooper Details supplies a vacform canopy that is better in shape than either Trumpeter’s or Hobbycraft’s. The clear vacform part was packed with Blu Tack prior to being cut off its backing sheet. This improves rigidity while cutting, and also makes it easier to see the cutting line.
A narrow ridge of .010” x .020” plastic strip was carefully glued to the front of the windscreen sill. This ridge was helpful as a positive mounting point for the vacform windscreen.
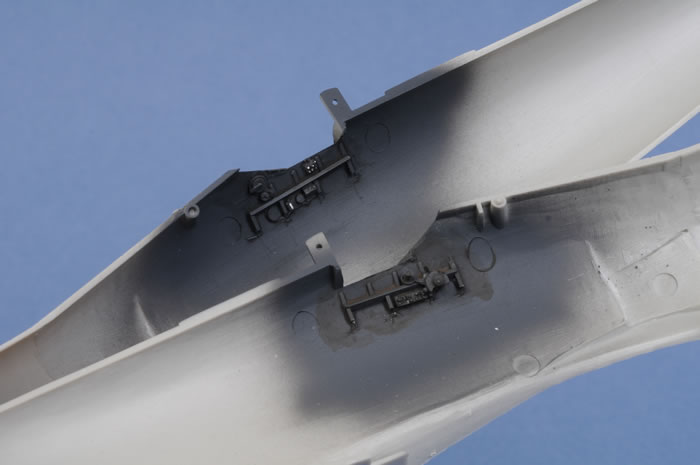
I realised that, in my earlier excitement, I had forgotten to install the exhaust stubs from the inside of the fuselage. I decided to adapt Trumpeter’s exhausts, which are much nicer than Hobbycraft’s items and are also drilled out. The backing plastic was sliced off and the top stack cut away to allow the exhausts to fit in the shorter Hobbycraft opening.
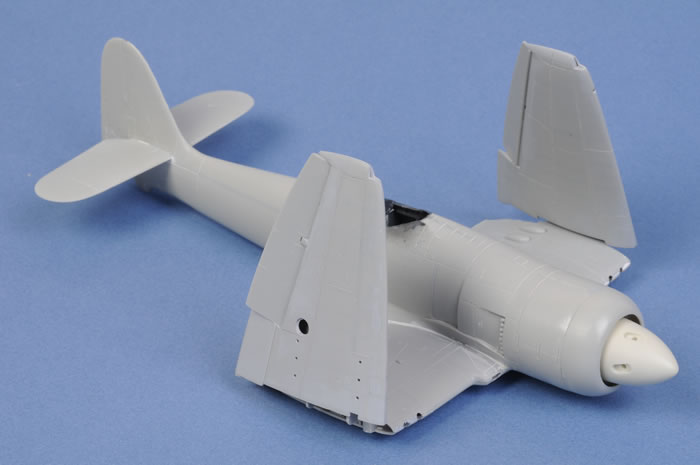
The balance of construction was fast and trouble free.
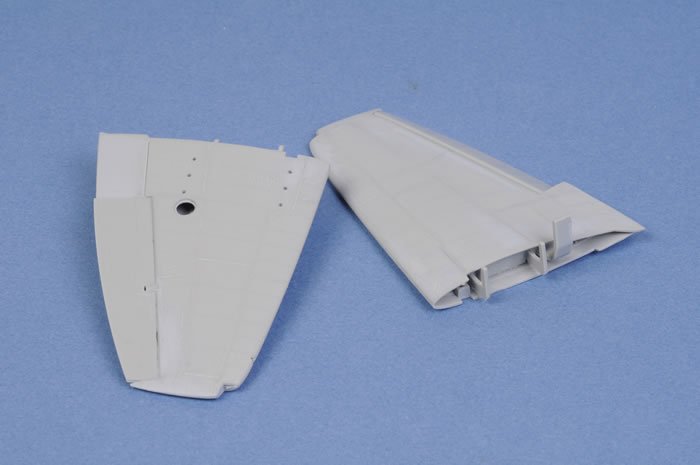
Hobbycraft’s horizontal tail surfaces were used because they were easier to fit to Hobbycraft’s fuselage.
Painting
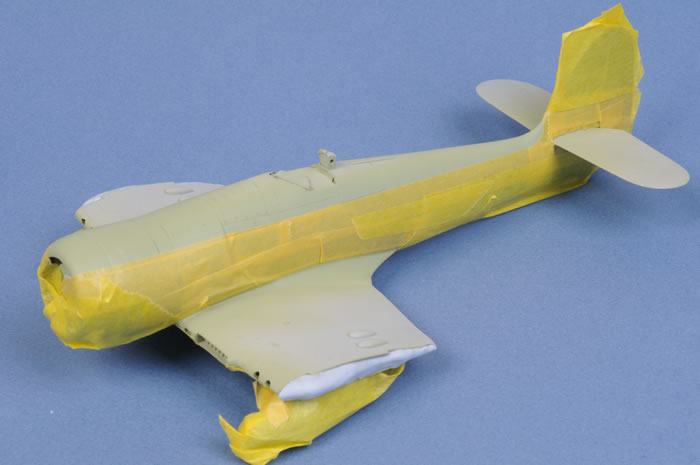
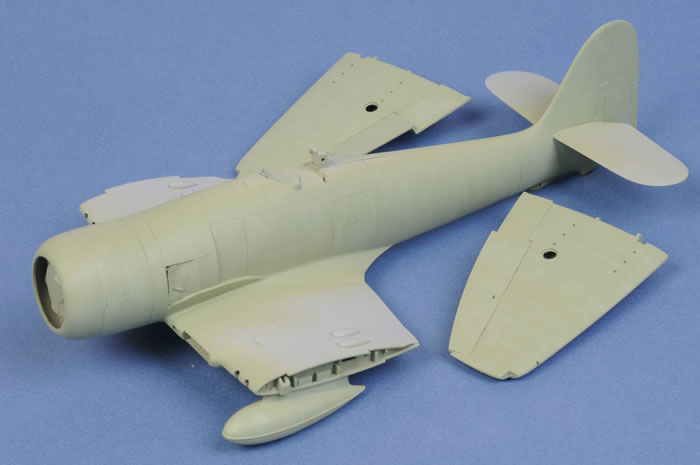
 The model first received a coat of Tamiya’s grey primer straight from the spray can. This coat helps identify any persistent gaps, steps and seams before the camouflage paint is applied. The model first received a coat of Tamiya’s grey primer straight from the spray can. This coat helps identify any persistent gaps, steps and seams before the camouflage paint is applied.
The Cooper Details 90 gallon drop tanks were fitted at this stage too. The mounts needed some reshaping to fit the more contoured Trumpeter lower wing.
All remaining paints were applied with my metal-bodied Aztek A470 airbrush.
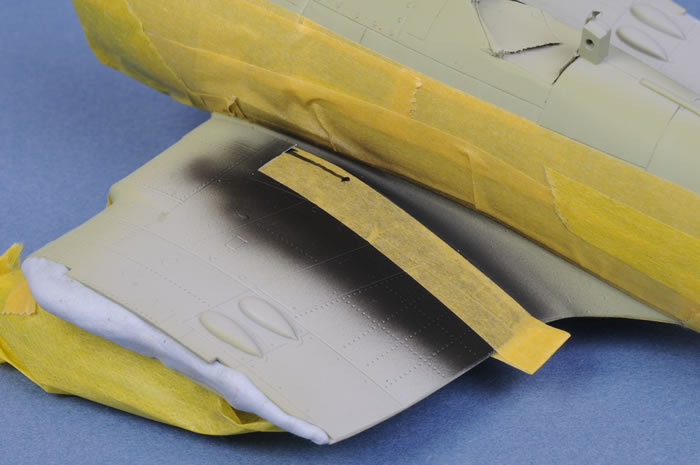
The first colour was Alclad II Magnesium to the bare metal exhaust panels and the base of the spinner. The wheel wells also received a coat of primer yellow. While the airbrush was loaded, the inside of the undercarriage doors were also treated to this colour. Wheel wells and exhaust panels were masked with Tamiya tape.
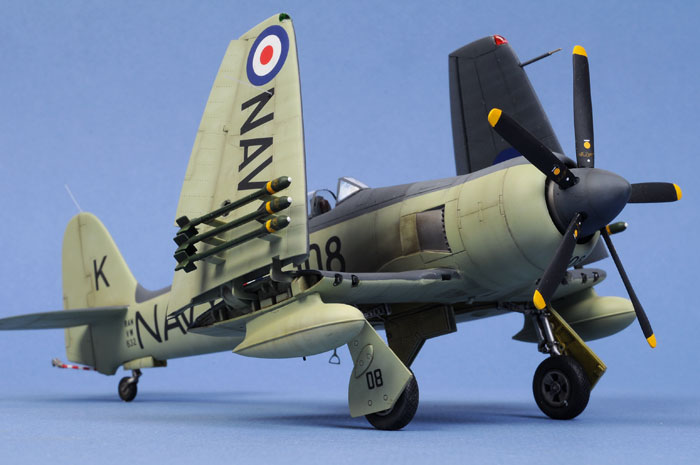
Tamiya acrylic XF-21 Sky was sprayed onto the fuselage sides and all lower surfaces. A fine mottle and streaks of a lighter shade of Sky (with around 10-15% white added) was applied to subtly break up the large expanse of colour.
The Sky sections were masked off with Tamiya tape in preparation for Extra Dark Sea Grey on the upper surfaces. Wing walk areas on both wings were sprayed Flat Black and masked off before the grey camouflage.
Tamiya XF-24 Dark Grey was used to represent Extra Dark Sea Grey. Once again, a pale mottle was applied over the base colour. The forward fuselage was also masked off and sprayed in a faded variation of the colour (I noticed this feature ina few contemporary photos of Sea Furies).
Canopy parts were masked and sprayed while attached to a paint brush using Bu Tack. This makes it much easier to handle the parts while painting.
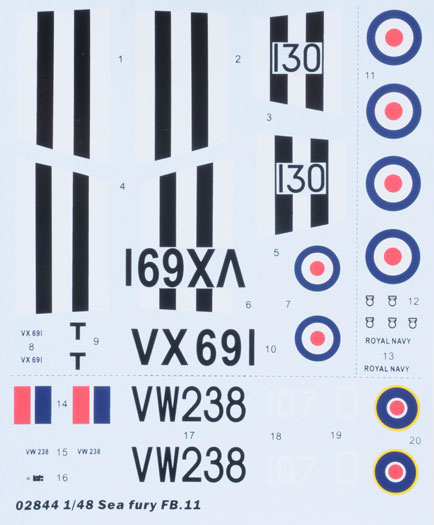
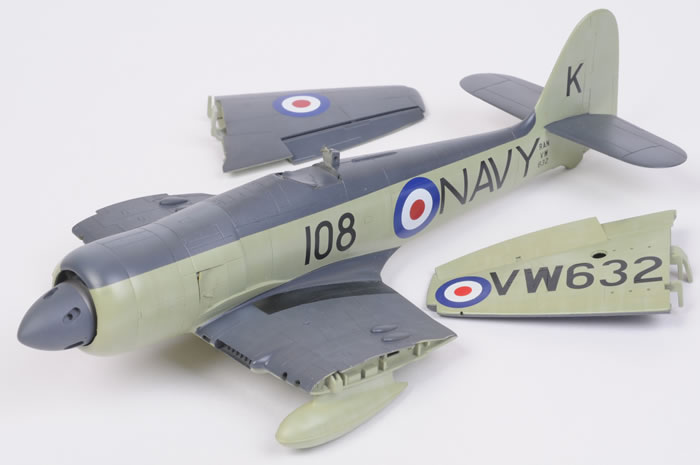
Markings were sourced from Aussie Decals’ 1/48 scale sheet number A48-005, although I used Xtradecal’s national markings for the fuselage and upper wings. All decals performed well using Micro Set and Solvaset.
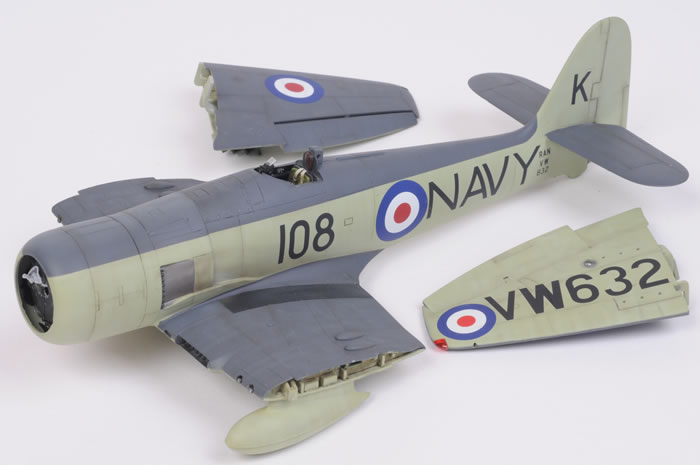
Weathering was kept light, with a thin black-brown mix being sprayed mainly around the engine cowl, exhaust panels and control surface hinge lines. Recessed panel lines in these areas also received a thin wash of Tamiya X-18 Semi-Gloss Black.
Two thin coats of Polly Scale Flat finished the paint job with just the hint of a sheen.
Finishing Touches
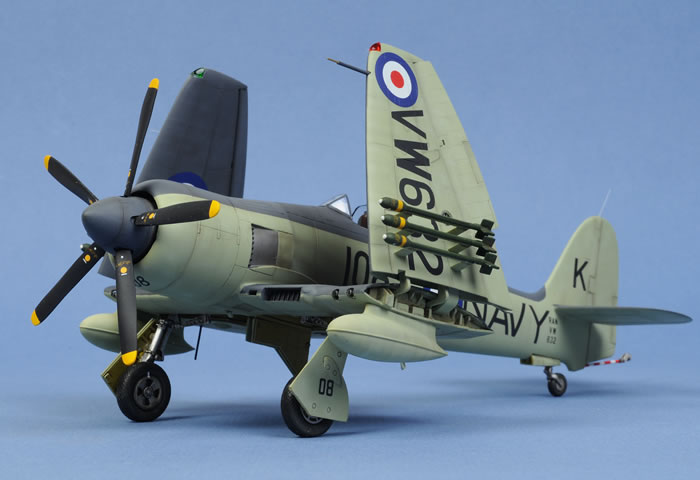
Trumpeter’s undersized main undercarriage legs were replaced with Cooper Details’ white metal items. The mounting points in the wheel bay were drilled out to accommodate the new gear.
Cooper Details' tail wheel assembly is gorgeously rendered, with a separate white metal leg and wheel.
The propeller blades from Cooper Details are also supplied in white metal. This is just as well, as Sea Fury props have quite a significant twist from base to tip. I carefully twisted the five soft metal propeller blades in an attempt to reproduce this distinctive feature.
Stencil markings on the rockets and propeller blades were cobbled together using 1/72 scale decals, markings from a 1/48 scale Grand Phoenix Seafire, plus painted bands and spots.
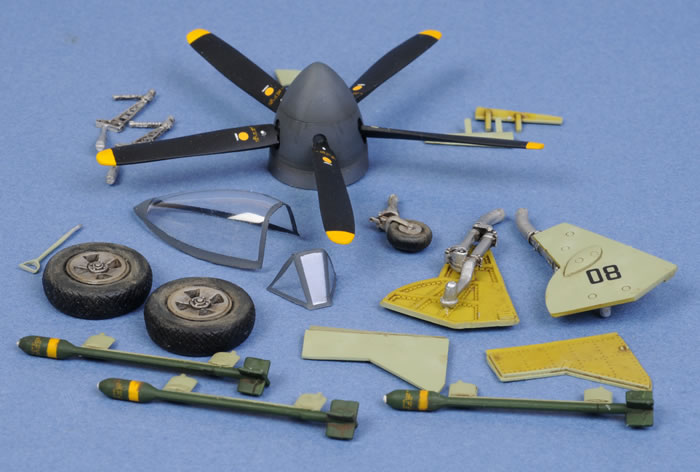
Whip aerials were cut from stretched sprue. These were added to the top of the fin and on the underside of the folded starboard wing. The tail hook is a white metal item from the Cooper details upgrade set.
The Trumpeter pitot tube was replaced with brass tube and rod cut to length. Brass rod was also used for the rod antenna underneath the starboard wing.
Next Time
There are a few changes that I would make next time I attempt the Trumpeter Sea Fury:
-
The fit of the wing tip navigation lights is less than perfect, so I would super glue the lights to the wings before painting, fill and sand the joins, polish the clear plastic then mask the lights before painting.
-
The landing lights are simple disks with no backing, They look more like clear inspection panels to view the interior of the wings. I suggest replacing these with MV lenses.
-
I would cut the rockets off the rails and replace them with rockets that have hollow tubes at the rear.
Trumpeter's 1/48 scale Sea Fury is like the proverbial Curate's Egg - it is good in parts.
The wings are the best aspect of the kit, and they are clearly superior to Hobbycraft's. Trumpeter's wing fold option is very welcome, and the positionable ailerons may be deflected outward when the wings are folded just like the real thing.
The scooped-out spine behind the cockpit, the poorly shaped spinner and the short landing gear legs are surprising considering the number of surviving Sea Furies (not to mention photos) available for reference. The shallow, caricatured cockpit, poor wheels and the blank-faced rocket tails are disappointing too.
Even so, I know that many modellers will be happy with the kit straight from the box. Trumpeter's Sea Fury fits well and it will be an enjoyable project with or without corrections.
The good news is that, if you are keen to address some of the accuracy issues, you do have a number of options. The cross-kitting of the Hobbycraft fuselage and the Trumpeter wings will take advantage of the strengths of both kits. The Hobbycraft kit may be picked up cheaply (probably even moreso now that the Trumpeter Sea Fury is available), so this will be an inexpensive conversion.
The addition of either the Cooper Details, Flightpath (previously from PP Aeroparts) or Cutting Edge upgrades will deliver an even more accurate result.
If you happen to have a Falcon vacform Sea Fury in your stash, you might be able to use this in a similar fashion. The Falcon vacform is probably still the most accurate Sea Fury available in 1/48 scale, and adapting the fuselage to the Trumpeter wings should be straightforward for any modeller with some vacform time under his or her belt.
You might also decide to use and improve the Trumpeter fuselage by blanking off the scallop in the spine, reshaping the cowl and spinner, smoothing out the curved windscreen join and buying a replacement Falcon vacform canopy.
Whichever route you choose, you'll have an interesting time!
Thanks to J.B. Wholesalers for the review sample.
Model, Images and
Text Copyright © 2008 by Brett Green
Page Created 19 July, 2008
Last Updated
24 July, 2008
Back to HyperScale
Main Page |
 Home
| What's New |
Features |
Gallery |
Reviews |
Reference |
Forum |
Search
Home
| What's New |
Features |
Gallery |
Reviews |
Reference |
Forum |
Search