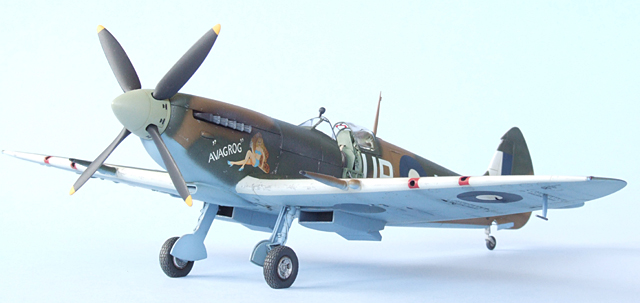
Hasegawa's 1/48 scale
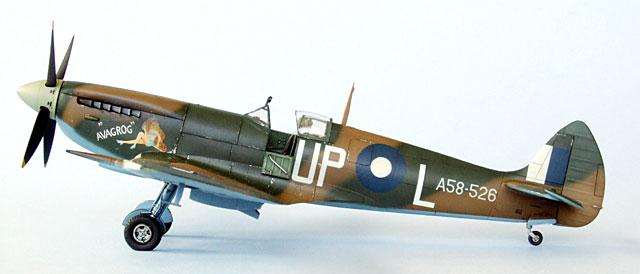
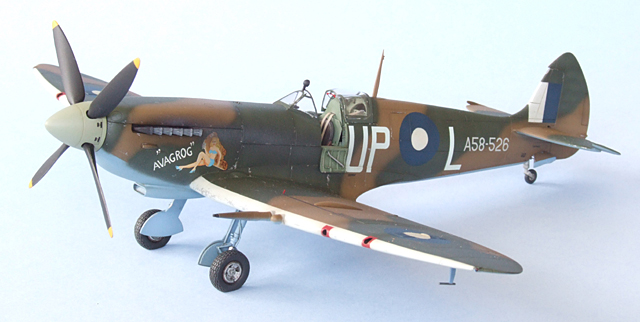
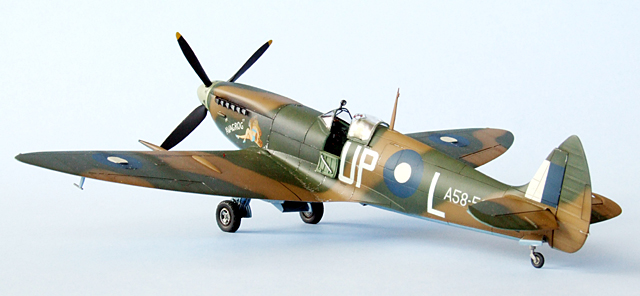
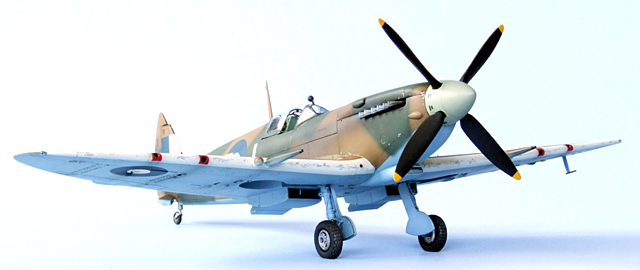
Spitfire Mk.VIII
by Bruce Salmon
|
Supermarine Spirfire Mk.VIII |

Hasegawa's 1/48 scale Spitfire Mk.VIII is avaiable online from Squadron.com
I started out with the Hasegawa Mk. IX kit intending to make a Mk. XVIe but changed my mind when some modelling buddies decided to do a Spitfire group build. I now elected to model a Mk. VIII in Aussie camo to fit in with the other aircraft in my WW2 Pacific collection. The Mk. IX kit has all the necessary bits to make the Mk. VIII.
Aftermarket Products Used
Aftermarket Products Used:
Eduard PE set (49 203) Spitfire Mk. IXc
Ultracast (48083) Spitfire Mk. IX Flared Exhausts
Ultracast (48140) Spitfire 4-spoke wheels (block tread)
Ultracast (48089) Spitfire pilot access doors
Ultracast (48149) Spitfire seats (without harness)
Aeromaster decals (48-779) Aussie Spitfires part 3
Cockpit
I used many references to detail the office - wire and plastic card/sprue gave it the dimension that the kit and PE parts can’t effectively create. I used the Ultracast harness-less seats and the straps from the Eduard PE set. I also scratchbuilt some ribbing on the floor behind the cockpit as this can be seen through the rear canopy section. The landing gear quadrant was altered as Eduard has it set in the “up” position. Pilot access door was removed to be replaced with a resin one later.
The interior was painted Humbrol 78 UK Cockpit Green, given an oil wash and drybrushed to pop out the details.
Wings
The wheel wells are not deep enough and need to be squeezed hard to mate with the upper wing half. This can warp the top surface if you’re not careful so it may be better to add plastic to the well edges. This seems to be a common problem with Hasegawa Spitfires. Also the wing-halves locating pins are misaligned.
The E-wing (from my earlier building) was recombobulated into a C-wing by cutting out and replacing the cannon breech covers. New corrected panel lines needed scribing, adding a leading edge fuel tank, sanding off of upper wing wheel well bulges and a bit of puttying to make the ailerons short span. Outer machine gun holes that had been previously filled were drilled out and the putty dug out of their ejector ports. I also drilled holes for where the undercarriage down indicators would later go.
The wing to fuselage join was iffy at best and needed plastic card and putty to correct the fit – rear underside join was also bad.
Fuselage
Have you noticed how things are slowly starting to go downhill? This is where the real trouble begins (knew it was too good to last!) Once the fuselage had been glued to the wings I noticed that the tail had a marked twist to port. I spurted forth many magic words but to no avail the Hasegawa Juju must have been more powerful than mine… I hiff the model back in the box in disgust… months pass…
That rear fuse is gonna have to come off – no other options; but where to cut it? First I try the natural join at the base of the tailplane – nope still too twisted. Next I cut at the panel line at the rear of the wing fairing – looks much more hopeful.
I manage to get the replacement rear fuselage I need from local modelling legend Andy Hosking – Thanks Andy. A quick dry-fit of the new fuse reveals the source of the problem. The starboard fuse half is wider than the port half! Originally I used liquid cement to glue the top half of the fuselage – once dry I lined up the bottom half and glued that. This method forced a nasty twist into the tail area. This time I glued it correctly and sanded the bottom to shape. Should I take this opportunity to fix the known (too short fuselage) length as well? – Nah bugger that – looks like a Spitfire to me!
I cut the new fuse to match the missing one and added reinforcement strips to the inside of the fuse join. It went together effortlessly with only a small amount of putty needed – this time it’s STRAIGHT!
I also noticed, too late, that the rear canopy section of the fuselage is too short and you can see a pronounced step – hence the rear canopy is too long and this is all especially noticeable if you decide to have the access door open. I posed the sliding canopy section further forward to try and hide the gap. The Ultracast door fits with the panel line perfectly but Eduard PE door is longer and will compensate for the inaccuracy. It was probably an engineering decision by Hasegawa to ensure that the canopy fitted in the closed position.
Elevators are cut out and repositioned and the rudder is also offset – making sure that they match the controls in the cockpit.
Engine and Cowling
“Chin” and air filter have fit issues requiring more putty. Eduard would have you add a mesh grate to the air filter inlet which doesn’t exist.
Details
Radiators are PEd – The Eduard instructions have the radiator flap braces on upside down.
Cannon barrels hollowed out at their tips with the point of a sharp knife.
The canopy was also masked with Bare Metal Foil and set aside for later painting.
Landing gear was given the PE treatment, brake lines added and then painted. A light spray with Tamiya XF57 Buff on the tyres simulates dirt and wear.
Note: You need to use the reflector gunsight (as found in the Mk V) not the gyro one.
Firstly I sprayed a coat of primer to check for any issues with the build and to make sure the paint sticks well. The underside Azure Blue was sprayed followed by lighter shades for initial weathering. After this was dry Dark Earth was sprayed on the topsides mainly in the areas it was to go – not an “all over” job. It was also post shaded at this stage. Once dry the border between the two upper surface colours was masked using thin “worms” of Blu-tack then covered with Tamiya tape.
Initially I sprayed Xtracolor X114 FS14092 Medium Green – Euro 1. According to respected authors this is the most uncontentious colour to use for RAAF foliage green (even though they contradicted themselves in the same article). It looked quite light and a bit icky but I decided to have faith and wait for the big reveal when the masking came off. Oooo Yuck! – It was lighter than the dark earth and looked nothing like build articles I had seen using the exact same paint (and yes it did match the tin lid). There was just no way I was going to let my model look that ugly – so on to the next suggested colour (see below) sprayed freehand then post shaded – bugger the Blu-tack method it just takes far too long:
Following these misadventures the roundels and fin flash were masked and painted. I had major issues with Tamiya tape leaving residue behind on the paint – this stuff is far too strong for modelling. Last of all is the white leading edge stripe and red machine gun blast tube covering tape.
Be careful with the Aeromaster painting guide as it is a bit suspect in places and they use Mk IX drawings not Mk VIII. I feel they should have at least included some photos as reference.
Paints used are as follows:
Undersides: 7 – Xtracolor X26 RAF Azure Blue/ 1 – Tamiya XF2 White
Topsides Dark Earth: Humbrol 29 Dark Earth cut with Humbrol 194 Brown Yellow (no white used)
Topsides Foliage Green: 1 – Tamiya XF27 Black Green / 1 – Humbrol 115 US Dark Green FS 34079 cut with Humbrol 105 Marine Green FS 34097 and Tamiya XF2 White
Spinner: Tamiya XF21 Sky
Roundels UK (Undersides): 2 – Tamiya XF8 Flat Blue / 1 – Humbrol 153 Insignia Red
Roundels RAAF (Topsides): 6 – Tamiya XF8 Flat Blue / 1 – Humbrol 153 Insignia Red
Decals
I chose to model something other than the ubiquitous “Grey Nurse” squadron so decided upon the green and brown UP-L scheme. This aircraft was from 79 Squadron based at Morotai (between New Guinea and the Philippines) in 1945 during the RAAF alcohol scandal and mutiny.
Both kit and Aeromaster decals went on very well and settled into the creases with Mr Mark Softer. Upper wing and fuselage decals were only applied to the brown areas as the green was oversprayed. I also noted some Janglish sneaking through in the kit decals (ELECTORICAL & RADIO SOCKET) I think not! The stencils were double-printed for some reason causing them to look a bit thick and out of focus.

Note: The “Walk Outboard” and “Wheels up when indicator flush” wing decals are in the wrong place – they need to be at the wheel well position. Underwing trestle stencil for starboard wing is also on the wrong way round.
Weathering
After a coat of satin varnish the model was given an overall wash with raw umber oil with some panel lines darkened with further darker washes. A few oil stains were drybrushed on and some restrained chipping using Tamiya XF16 Flat Aluminium applied with a fine brush. Gun smoke staining was made with Tamiya X19 Smoke using the same for the exhaust stain followed by a very light streak of Humbrol 28 Camouflage Grey. The exhaust pipes also had a drybrush of white oil paint on the openings. A matt-ish varnish was then sprayed to finish the job.
Final Assembly
Last on are all the breakables: Wheels, PE Radiator flaps, Cockpit access door, Cannons, Aerial mast, Undercarriage down indicators, Nav lights (from drops of 5-minute epoxy), Downward ID lamp (remade by filling the hole with epoxy) and PE fuel tank stop hooks.
On the run to the finish line I find that the canopy front windshield had a silvery seam line running through the middle of one pane due to bad moulding (Grrrrrrrr!) – replaced it with a spare provided by Kerry Carlyle.
Oh yeah, the rear view mirror doesn’t locate positively either.
Reference material on Aussie Spitfires is hard to come by – even the RAAF website has very little info. Colour schemes and placement of squadron codes are quite variable as the Aussies did a lot of painting experiments.
As always with patience, hard work and weathering you can turn out a half decent model. What surprised me were how many obvious inaccuracies I found in the Hasegawa and Eduard products – so much for Shake ‘n’ Bake. As for the other kit issues I had… I guess the Hasegawa quality control guy was on the Sake that day. Ultracast was the shining star of sanity in this Supermarine nightmare – good on ya!
Model, Images and
Text Copyright © 2008 by Bruce Salmon
Page Created 25 February, 2008
Last Updated 25 February, 2008
Back to HyperScale
Main Page |
 Home
| What's New |
Features |
Gallery |
Reviews |
Reference |
Forum |
Search
Home
| What's New |
Features |
Gallery |
Reviews |
Reference |
Forum |
Search