|
Wild Hare Ass'n + Tamiya 1/32 scale
FGR.2 Take Two
by
Frank Mitchell
|
Phantom FGR.2 |

HyperScale is proudly supported by Squadron.com
In 2002, I converted a 1/32 Tamiya F-4J to the British FGR2 version of the aircraft.
While doing so, it never occurred to me that six years later I would be building the same aircraft, but this time from a commercially produced conversion kit. That resulted from a conversation Dave Klaus and I had during the 2005 IPMS Nationals in Atlanta. We were looking at the model and kicking around how I did it (and the errors that were contained therein). He suggested that if I would give him the model, he would make a conversion kit (and correct a couple of errors). That sounded cool, but it also meant that my model would be ripped apart.
After a serious discussion with myself, I finally agreed, and with some mixed emotions, handed over the model.
As might be expected, there were some rather involved and time-consuming problems with such a complex project, but the kit was released in February, 2008, and obviously, everything on my bench was brushed aside to get started on this ghost from the past.
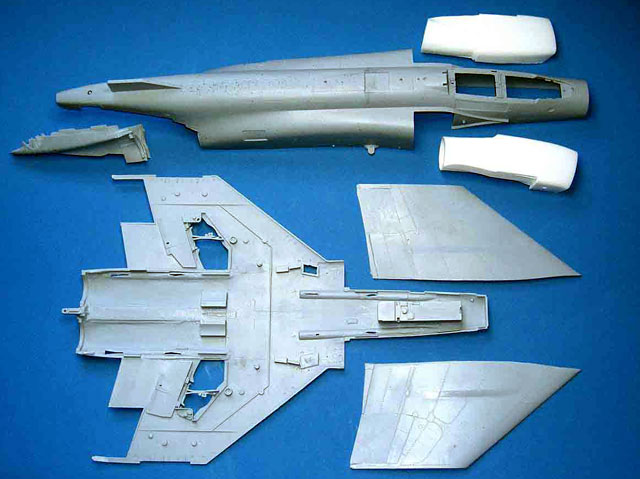
The Meteor Productions Conversion
The large and complex moldings of the fuselage and lower wing are very impressive, and there are also lots of smaller parts including Mk. 5 seats for some early Phantoms, exhaust nozzles, fuselage by-pass doors, etc.
The Meteor decal sheet(s) are truly is a work of art and, with only a little extra thought and research, they could provide markings for many more than the eight aircraft shown in the instructions.
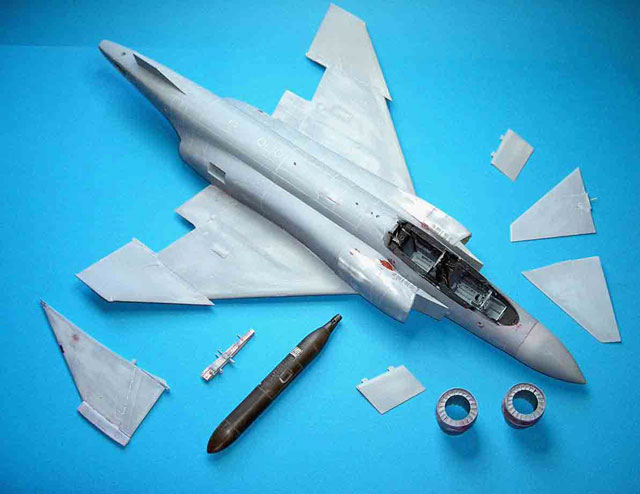
The Wild Hare Ass'n conversion kit did, in fact, include most everything one needs to make the FGR.1 or 2 version of the Phantom (with the obvious exception of a Tamiya donor kit; the J is preferable). The bottom line is that I am very satisfied with the result; and to make it even nicer, everything fit, or required only minor changes.
The following “construction” notes are not intended to be a detailed step-by-step description of the build; rather, the intent is to give an overview of what was involved and to show what the thing looks like when finished.
I suppose that I should mention that the best modeling references are, in my view, the Verlinden Lock-On No. 10 on the British Phantom, the AirDoc book on British Phantoms in Germany, and the Warpaint book on the British Phantom.
As mentioned above, the “donor” kit was a Tamiya F-4J, and the model was built pretty much out of the box(es), but I did make a few minor changes that were based on my previous experience with the FGR2 and three other Tamiya 32nd Phantoms.
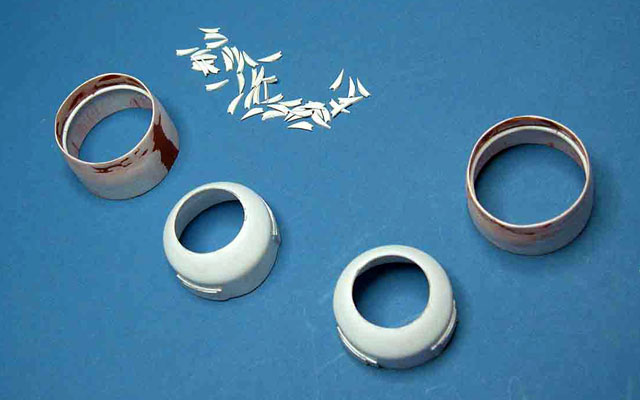
Intakes
As pointed out in the instructions, one Meteor seamless intake is very slightly longer than the other. No big deal, but one needs to be aware of it during assembling. I also preferred to use the Tamiya kit pieces for the engine intake faces (including the turbine wheels) and add the blunt, round nose from the Meteor parts. These changes seemed to me to be a bit easier than sanding the overpour from the Meteor parts.
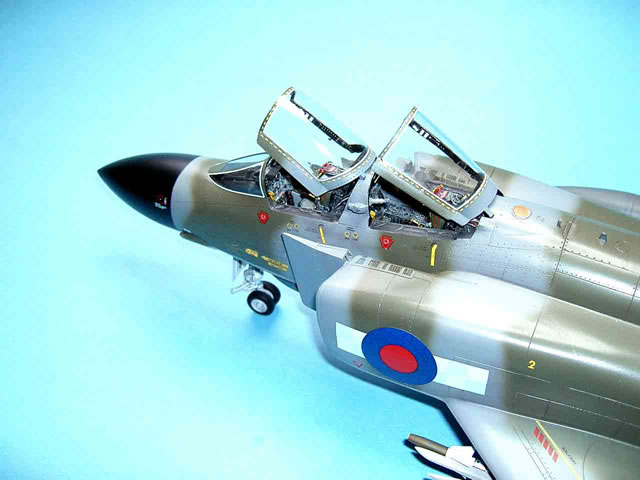
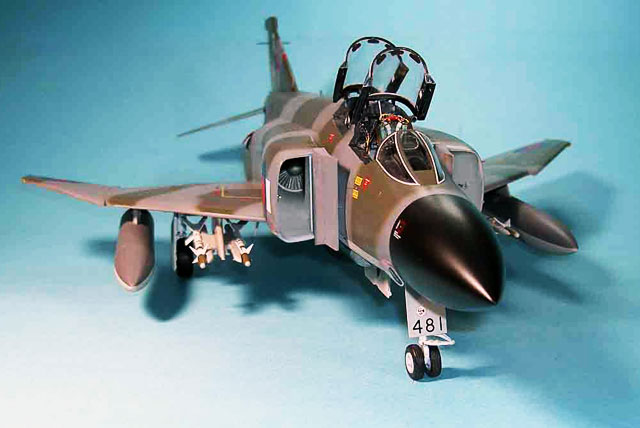
Interior: A complete interior was not included, but I used my original tub (Dave sent it back to me, along with some other parts). I did make up fresh Black Box (Avionics) H7 seats and added Aires sidewalls along with a fair amount of additional detailing. Since most of the changes in the British Phantom are in the backseat anyway, many of the kit parts could be used, and a good deal of the photoetch that is available for the F-4 can be used.
Wing
Although it is a large and complex piece, the Meteor lower wing fits well. It does need careful sanding and trial fitting, but it does go right into place on the new fuselage. One does, however, have to get the bottom wing fitted and glued before even thinking about adding the upper wings.
At this point I made what was probably a totally unnecessary change by using the Tamiya upper wings instead of the Meteor pieces. There is nothing wrong with the supplied upper wings, but my reasoning was that this was going to be a heavy model, and I just felt that the styrene upper wings would offer a bit more strength than the resin parts. It was an easy thing to do, just involving some trimming on the inboard edge, and did serve to show just how well the Meteor parts fitted. I should also note that Meteor added several locators to their lower wing to assist assembly and add strength, and they do help a lot, but with the weight of this model, I just figured that belts and suspenders would not go amiss.
The outer/inner wing joint is a traditional problem area of the Tamiya Phantom. Not only is the fit a bit of a problem, the kit ends up with a 25-degree dihedral, twice the actual 12.5 degrees. To help this problem, two short spars made of brass wire were added to each wing which made for a stronger joint and assured a more correct dihedral (a trick I learned from previous Phantom builds), but trial fitting and sanding are the watchwords. The Meteor inner wing did match up quite well with the Tamiya outer wing.
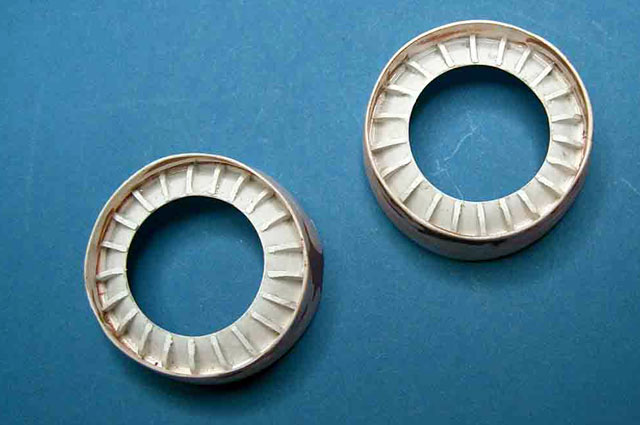
Engines / Nozzles
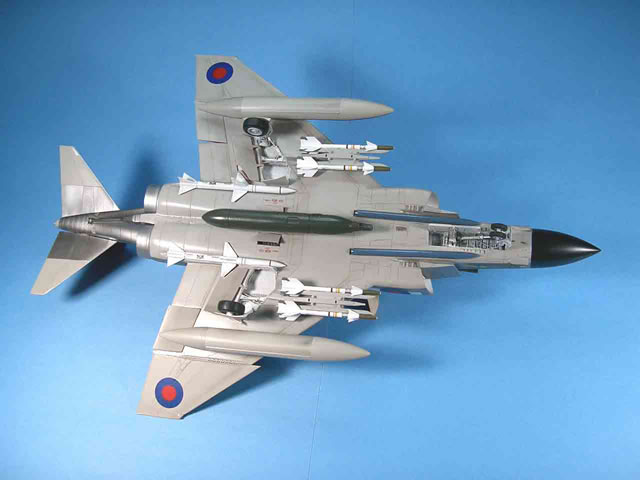
The kit nozzles are good and look fine, but, modelers being modelers, and since I still had the molds from the original model, I made another probably unnecessary change by making up a new set of nozzles that I thought were a bit more delicate in appearance (see the pictures from the original Hyperscale article). The only tedious part was making and adding the 42 tiny actuators.
The Meteor-supplied engine tubes were used, but they were shortened a bit so that they would insert through the stock fuselage openings. I also used some Tamiya parts for the interior of the exhaust. A bit inaccurate, but thankfully, most of the Spey interiors are very dark color, so I was able to get away with it.
After both sets were painted and shaded, it is difficult to tell them apart, and most of the attached photos are with the Meteor pieces. Both sets are close press fits so that they can be interchanged.
The new rear lower portion of the fuselage fits very well, considering how complex it is, but does require some careful fitting and sanding (also true in the Tamiya version, by the way).
Tail
The Meteor unslotted horizontal stabilizers were used, but this is one point that needs to be checked on any model of the FGR. Some aircraft had the slotted stabilizers, some didn’t. It was mostly the FGR1s that did have them, but that is not a constant. One other point is that the British Phantom had slightly less dihedral in the horizontal stabilizers due to the larger engines; again, no big deal.
Miscellaneous
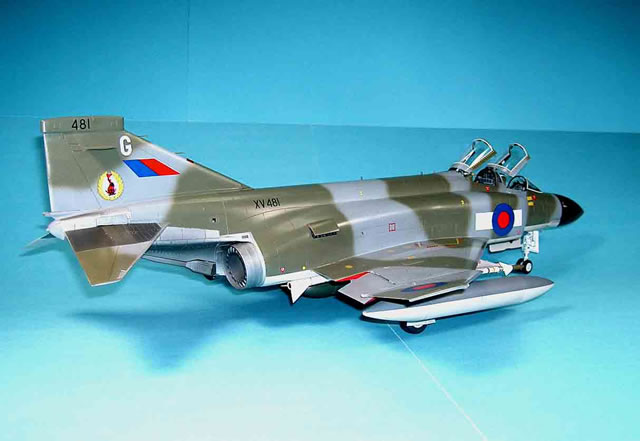
All the landing gear pieces fit well, as did all of the other ancillary parts such as pylons, canopies, etc. I did add a resin CAM SUU-23 cannon to the centerline. This was another part that came off the original, along with the landing gear, and the wing tanks. It also adds considerably to the overall weight of the finished model.
There is a bit of scribing necessary because of all the changes, but all the Meteor parts matched the Tamiya pieces very well in terms of panels surface, panel lines, etc. The good news is that the Meteor resin is easy to work with.
The paint was Gunze throughout, and was covered with Future before applying the decals.
A word about the decals: They are truly beautiful and complete down to the yellow dashed lines that outline the clear portions of the canopy. They are also very thin with no silvering. However, because they are so thin, they must be very carefully handled and placed on the model, because they don’t like to be moved after being applied. I used a very sophisticated method to combat that: A generous application of saliva allows the decal to be adjusted and, by the way, does not affect their adhesion and does not react with the paint or Future (at least mine didn’t). There is no evidence that the finished model is communicable.
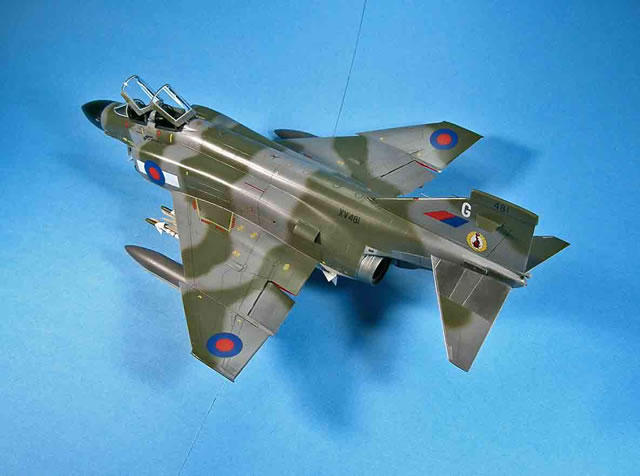
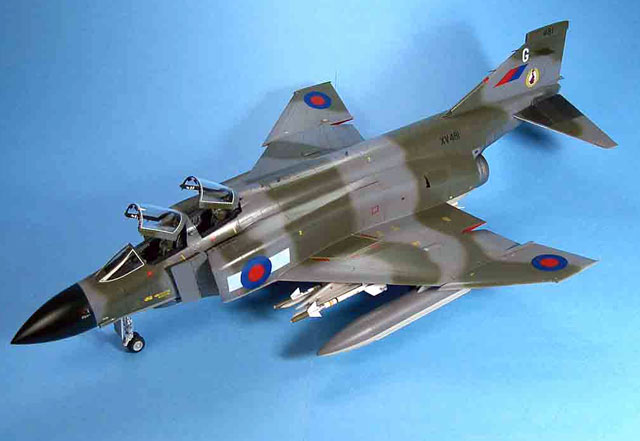
 After looking at what seems like a million pictures of FGR2s , I ended up using a mix of Testor Gloss and Flat for the final appearance. After looking at what seems like a million pictures of FGR2s , I ended up using a mix of Testor Gloss and Flat for the final appearance.
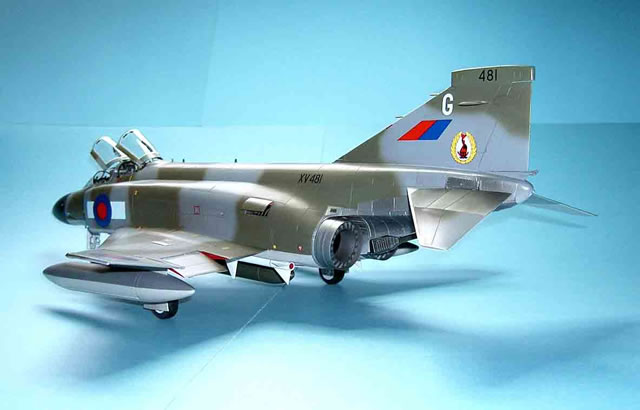
The markings are for 19 Squadron, although the pale blue of the marking does not show up well on the photos (the photographer’s fault).
This scheme was used because to me, British Phantoms are green and gray (or grey). Yes there are some gorgeous light colored birds, but for me--.
Overall, I have to say that I am very happy to have a British Phantom back on the shelves.
I will also note that while I am far from the first to have the experience, it was a rather odd feeling to be building a kit which I had a part in creating.
Addendum by David Klaus
Frank mentions in his article that we agreed to correct the “inaccuracies” in his original model.
I think this deserves a bit more explanation.
Frank designed and built his model in 2002 using the best available reference material of the day. Which wasn’t great, and many sources contradicted each other. For example, it had been published that the Spey engine air intakes were widened by 6”.
So did this mean the ENTIRE fuselage and wing were also widened the same 6”? And did that mean it was 6” on each side, or 6” total for both sides? Published references (including official publications) either did not say or were contradictory. Photos were helpful, but not conclusive.
When Frank and I discussed this problem, it seemed that the only way to be sure about the dimensions, angles, etc., was to actually lay hands on a real Spey Phantom. One problem: although much of the aircraft was manufactured in the United States and all the aircraft were assembled in the US, the United States Customs Service will not allow any Spey Phantoms to be “un-exported” back to America! Gotta love that Government logic.
So, off to Jolly Old England for me. On a lightning three-day trip over, my good friend Ted Taylor squired me around the country and helped photograph and measure a couple of Spey Phantoms. We carefully recorded all our information on 1/32 copies of the old Scale Models plans.
Upon my return, I measured and photographed – from the same angles – an F-4J at the NASM’s Hazy Center. You can imagine how helpful it was to have both sets of measurements recorded on the same set of plans.
Let me give you just one example of how accurately Frank built his original kit. I discovered there was only a 1.5 inch SCALE difference between the real Spey engine exhaust nozzle diameter and the diameter of the nozzles Frank scratch built for his kit!
To make my point as clear as possible, Frank may have implied in his article that his original model was inaccurate. The fact is that he used the best available references to make that original conversion, and did an amazingly accurate job of it at that. It was only because I flew to England specifically to measure a Brit Phantom that we were able to adjust Frank’s original work to match the real jet.
This difference was primarily in the wingspan. Frank’s original model had a 6” scale extension of both the left and right wings resulting in a fuselage-wing joint that was exactly the same as on the original Tamiya F-4J kit. Measurements proved the Brit Phantom wing was exactly the same span as every other Phantom, but the wider fuselage extended over the top of the wing at the fuselage-wing joint.
The Wild Hare Ass’n kit “corrected” that span issue (but remember that Frank only had inconsistent and contradictory reference information available when he converted his model in 2002).
Direct comparison measurements of both the Spey Phantom and the F-4J prove the air intakes were not widened as much as some people seem to think, although they are of course appreciably wider on the Spey jet. As Frank mentions in his article, that increased width is reflected in the Wild Hare Ass’n kit.
A final note on the status of WHA32001 British Phantom Super Massive Conversion Kit shipments.
Nearly all of the paid kits have been shipped, but as you know Meteor Productions has permanently shut down. I have nearly finished setting up a casting area in my home, and the remaining kits will be shipped within the next three weeks. I will possibly make one or two kits available on eBay within the next couple of months.
Model and
Text and Images Copyright © 2008 by Frank Mitchell
except Addendum Text by David H Klaus
Page Created 21 March, 2008
Last Updated
21 March, 2008
Back to HyperScale
Main Page |
 Home
| What's New |
Features |
Gallery |
Reviews |
Reference |
Forum |
Search
Home
| What's New |
Features |
Gallery |
Reviews |
Reference |
Forum |
Search