|
Tamiya's 1/48 scale
Fairey Swordfish Mk.I
by
Symon Rankine
|
Fairey Swordfish Mk.I |

Tamiya's 1/48 scale Fairey Swordfish Mk.I is available online from Squadron.com
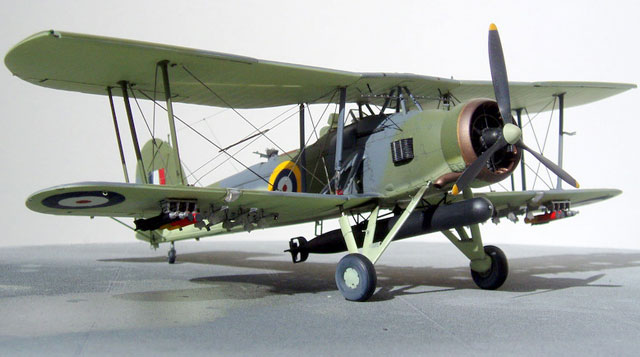
Here is my 1/48 scale Tamiya Fairey Swordfish.
This is an involved build but thanks to Tamiya’s superb engineering, what might have normally expected to be a very complex project went together with little difficulty. In spite of Tamiya's excellent design of the venerable "Stringbag" there are a few improvements I decided to pursue.
Though Tamiya offers a separate photo-etched set that greatly improves an already superb model I also elected to use the Eduard PE set as well. I very much enjoy Eduard photo etch sets and though I rarely use all the parts provided (often as not because I have lost them in the rug), I feel that most of the time the improvements these parts add to a model are well worth the effort.
While doing my pre build reference work I noticed that many Swordfish had their slats extended when on the ground. I cut the slats out and built the aria underneath these up with evergreen plastic stock and then re attached the slats that had been cut out in the extended position later on. The flight controls on the tail were also cut away and reattached in a slightly off center position to give the model a more animated look.
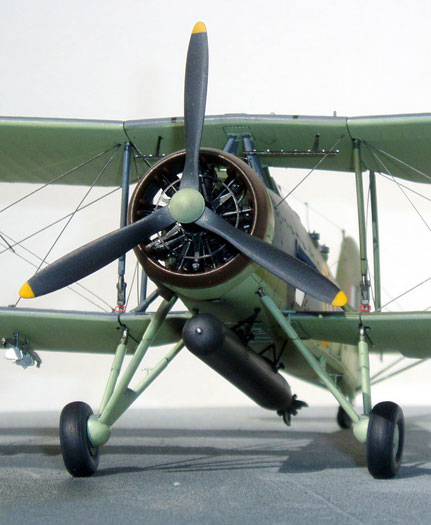 One of the real challenges for me with this model is painting the exhaust ring at the front of the engine cowling. This should be a burnt bronze color I found not easy to reproduce. Tamiya thoughtfully designed the model so that the bronze section is a separate piece from the painted section of the cowl ring but in the end this was not of much help to me as I chose to join the parts first to enable them to be sanded and filled before they were painted. I first painted the whole assembly with Tester's gold enamel then carefully masked the thin stripe between the exhaust ring and cowl with Tamiya striping tape. I then darkened the exhaust ring by airbrushing a mixture of thinned Tester's brown and copper paint. I finished it off with a clear coat of Tester's Dullcote aerosol spray. All this was masked and the rest of the cowl was painted with Polly-Scale acrylics. When I removed all the masking I discovered the bronze was all but destroyed when I removed the tape. I managed to clean things up and repainted the ring with a mix of Tester's gold, brown and copper. It looks good but not as good as it did the first time about. Just another day in the life of a model builder! One of the real challenges for me with this model is painting the exhaust ring at the front of the engine cowling. This should be a burnt bronze color I found not easy to reproduce. Tamiya thoughtfully designed the model so that the bronze section is a separate piece from the painted section of the cowl ring but in the end this was not of much help to me as I chose to join the parts first to enable them to be sanded and filled before they were painted. I first painted the whole assembly with Tester's gold enamel then carefully masked the thin stripe between the exhaust ring and cowl with Tamiya striping tape. I then darkened the exhaust ring by airbrushing a mixture of thinned Tester's brown and copper paint. I finished it off with a clear coat of Tester's Dullcote aerosol spray. All this was masked and the rest of the cowl was painted with Polly-Scale acrylics. When I removed all the masking I discovered the bronze was all but destroyed when I removed the tape. I managed to clean things up and repainted the ring with a mix of Tester's gold, brown and copper. It looks good but not as good as it did the first time about. Just another day in the life of a model builder!
The Tamiya photo etch set calls for the bracing wires between the struts to be placed when the struts are added to the wing. The problem is that once these are in place the space between the struts has an obvious joint that can be clearly seen on the bottom surface of the upper wing. In addition, the center section of upper wing sits on a square structure that is made up of the cabane strut assembly and was in some need of cleaning up as well. I therefore decided to assemble the wings in a different sequence from what Tamiya suggests. The center section of the lower wing and lower wing braces were attached to the fuselage as were the cabane struts and then painted at the same time. Once this was done the center of the upper wing was first painted then attached to the center cabane struts. I attached the inner strut boxes to keep the alignment of the upper wing center section straight and then filled, sanded and repainted all the joints as needed.
The upper outer wing assemblies were built next and all the struts were added along with the bracing wires. I then carefully filled and sanded the spaces between the struts under the bracing wires on the bottom surface of the upper wing so that these joints would not be seen later on. The assemblies were then painted before being attached to the upper center wing. Once done the pre-painted lower wing assemblies were attached to the lower wing center section and the bottom of the outer struts.
 My Swordfish was painted with Polly Scale paints applied with my ancient but reliable Badger 150 airbrush. My Swordfish was painted with Polly Scale paints applied with my ancient but reliable Badger 150 airbrush.
I elected to use the kit decals which were applied once the model was sprayed with Polly Scale clear gloss using micro sol and micro set. Though the decals proved to be somewhat thick they settled down perfectly. Later I discovered that the yellow on the fuselage insignias was slightly translucent around the edge giving it a somewhat blurry appearance. It’s late now but if I were to build this kit again I would replace these decals with ones from an aftermarket set.
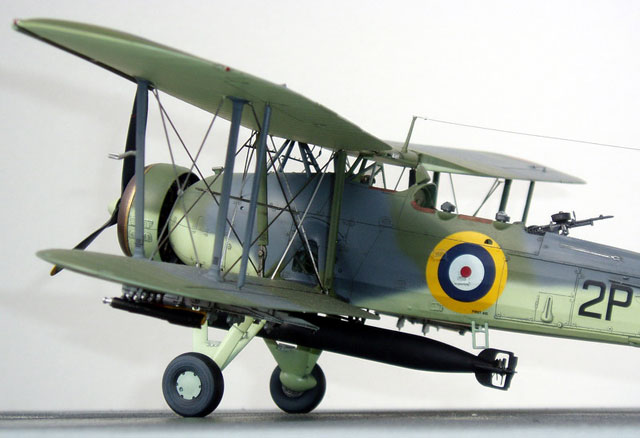
A friend of mine in our model club had given me some surgical wire to experiment with so I used this to add all the flight control cables on the empennage. I also used some of the wire for the radio antenna. The landing light was replaced with a K&S lens I acquired from the railroad section of my local hobby shop.
Would I recommend this kit?
You bet!
Tamiya has taken the dreaded biplane and turned it into a kit almost any modeller can build without much hassle. True, this is a busy model and one that doesn’t go together over a weekend, but the engineering is such that each individual step is no more complex than any monoplane kit.
The model has real appeal on shelf and is one that I love having next to my other WW II era kits and is now in the display case of my local hobby shop here in Lancaster PA.
Despite the rather hefty cost of this model I have since acquired another kit along with the Tamiya photo etch set and am now looking forward to building a second Stringbag in silver with wings folded.
Model and
Text and Images Copyright © 2008 by Symon Rankine
Page Created 17 March, 2008
Last Updated
19 March, 2008
Back to HyperScale
Main Page |
 Home
| What's New |
Features |
Gallery |
Reviews |
Reference |
Forum |
Search
Home
| What's New |
Features |
Gallery |
Reviews |
Reference |
Forum |
Search
