|
Hasegawa's 1/48 scale F-16B
"Lizard Falcon"
by David W. Aungst
|
F-16B Fighting Falcon |

HyperScale is proudly supported by Squadron.com
Background
This model is a real blast from my past. It was started all the way back in January of 1992, over 17 years ago. I was working at a hobby shop at the time (that is like having a wolf guard the sheep), and this guy walked in looking for information regarding the "lizard" painted F-16's. I found him some documentation with pictures and a camouflage diagram in the old Detail&Scale book (Volume #13) on the F-16. He was happy, bought the book, and left. But, this got me looking closer at these aircraft for myself. I decided to take out one of the newly released (at that time) Hasegawa 1/48th scale F-16 kits for a test drive and build the two-seat F-16B in "lizard" green camouflage.
It started as a simple enough concept and project, but then Advanced Modelers Syndrome (AMS) set in like it does from time to time. I started wanting to fix, enhance, and update too many things about the kit. Some of the things I wanted to do were simply outside my abilities at the time, but I would not settle for less than what I was thinking in my head. I kept plugging away, but eventually boxed the kit and assigned it to the SHELF of DOOM. It has sat there in the following condition since 1992.
Recently, I got on this kick of trying to clear out some of the more permanent residents of my SHELF of DOOM. This F-16B kit was near the top of the list of primary projects to liberate from the shelf.
Brief History on "Lizard" F-16s
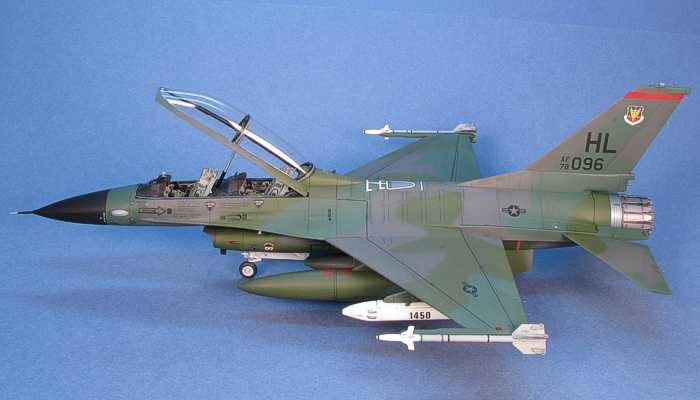
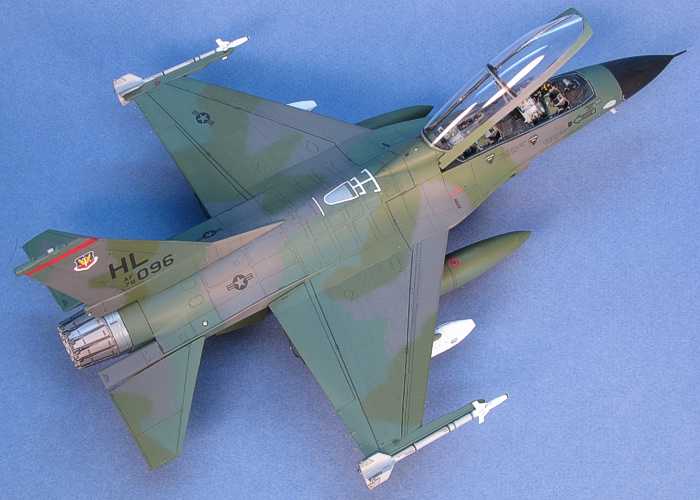
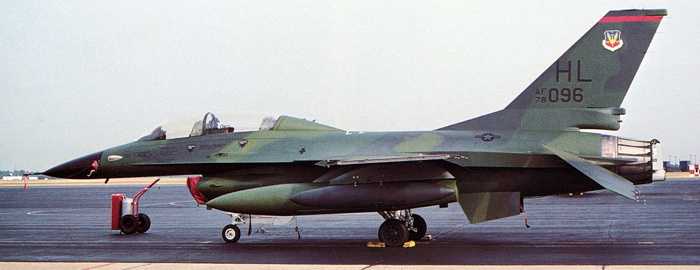
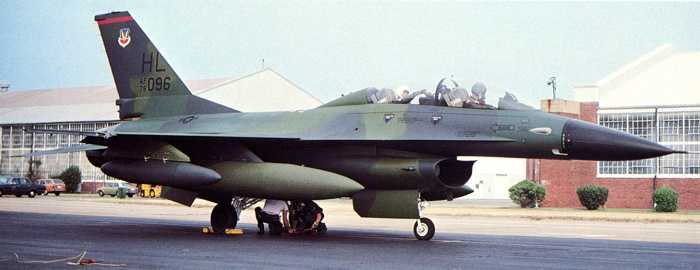
The short history of the "lizard" camouflage on the F-16 goes like this. Back in the very late 1970s, when European camouflage was showing up on everything in the US Air Force, the Air Force tested the camouflage (also referee to as "lizard" and less affectionately as "pickle") on the F-16. Two aircraft from the 388th Tactical Fighter Wing (TFW) were singled out for the test. They were F-16A serial number 78-0008 and F-16B serial number 78-0096. The tests proved inconclusive. The greens were better at concealing the aircraft over forested regions, but not so good anywhere else. It was also not much benefit over the Hill Gray camouflage with the gray camouflage being indistinguishable from the "lizard" beyond a mile or so. Hence, the Air Force opted to not re-camouflage the F-16 fleet into "lizard".
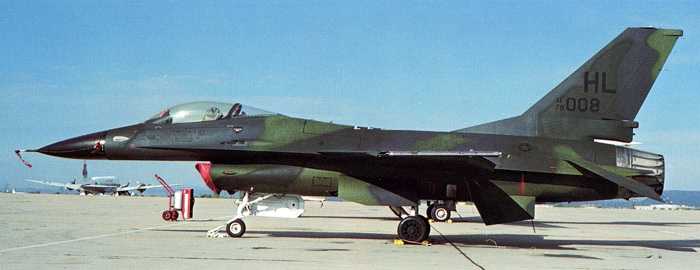
The F-16A that got painted in "lizard" was only briefly left in the paint scheme and had almost no unit markings, just an "HL" tail code. The F-16B, however, was in the camouflage for a while and had time to have full unit markings applied for the 34th Tactical Fighter Squadron (TFS). The added color markings made the F-16B more attractive (at least to me) than the rather plain looking F-16A, so I decided to model the F-16B.
As a side note, the US Air Force was at it again in the early 1990s with the same camouflage testing. They were developing the concept of the "A-16" (F-16's used in the close air support (CAS) role) and painted a few (seven or eight) F-16Cs in "lizard" camouflage at Nellis AFB. I guess the Air Force thought the camouflages would behave differently after a decade of time. I assume the results of the camouflage testing were the same as I have yet to see F-16s getting routinely painted into "lizard" camouflage.
Further history on "lizard" F-16's and lots of images can be found at Charcoal Lizard Vipers.
The Kit
Hasegawa's F-16 models in 1/48th scale are getting old, but they still are pretty good. They build easily and are mostly accurate to the versions they portray (leaving the early-released "wide-mouth" versions out of the discussion).
It is generally accepted that the recent Tamiya F-16 kits have out-classed the Hasegawa kits in both detailing and finesse, but that does not make the Hasegawa kits any worse than they were before the Tamiya kits were released. Besides, Tamiya does not yet make a two-seat version and did not exists as even a pipe dream when I started my project in 1992.
I am not going to go into a long description of the kit details. See some of the other reviews on the Internet, in magazines, and in various books for a complete review of the Hasegawa F-16 kits.
There is always room for improvement, though, even in kits that are done well to start with.
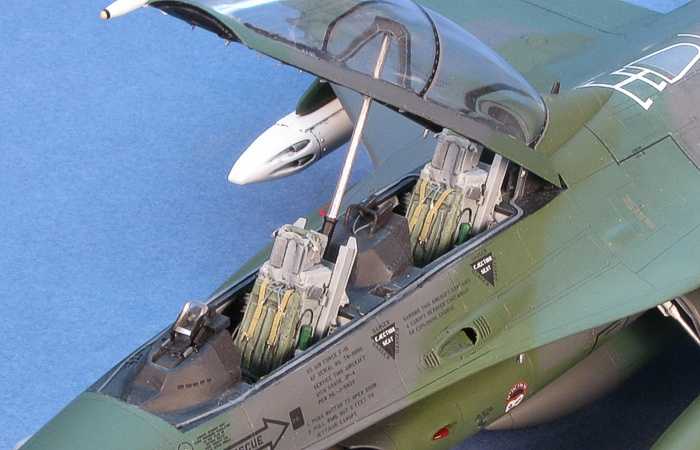
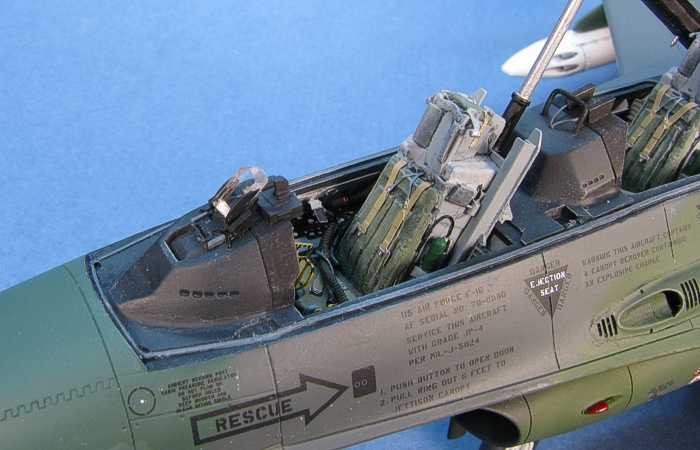
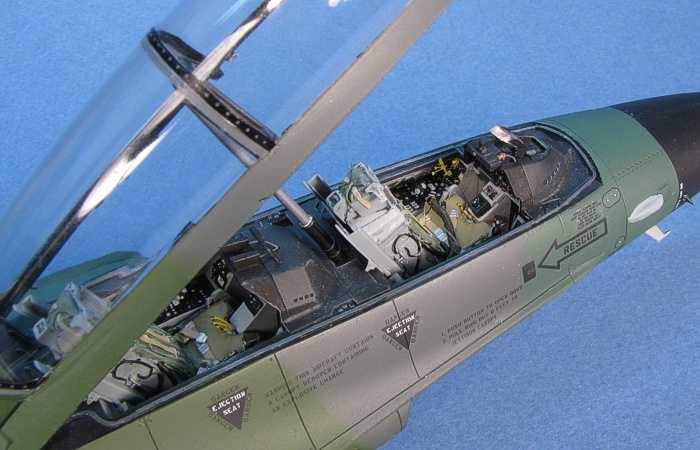
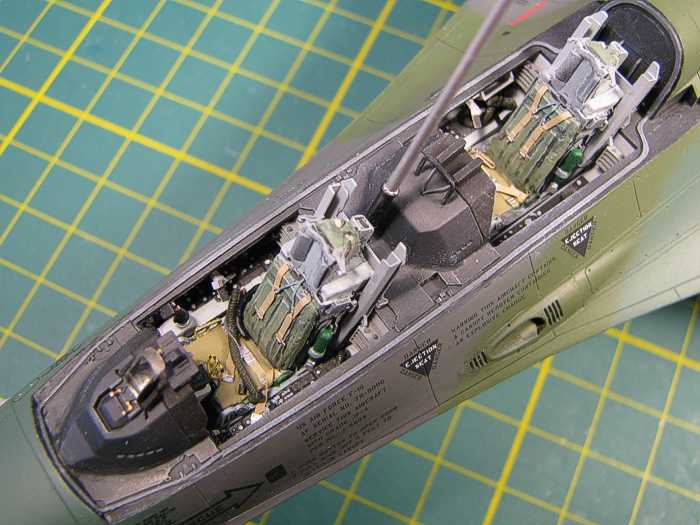
Cockpit
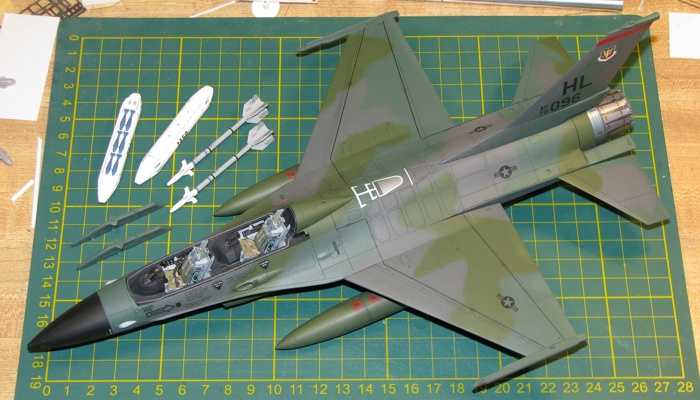
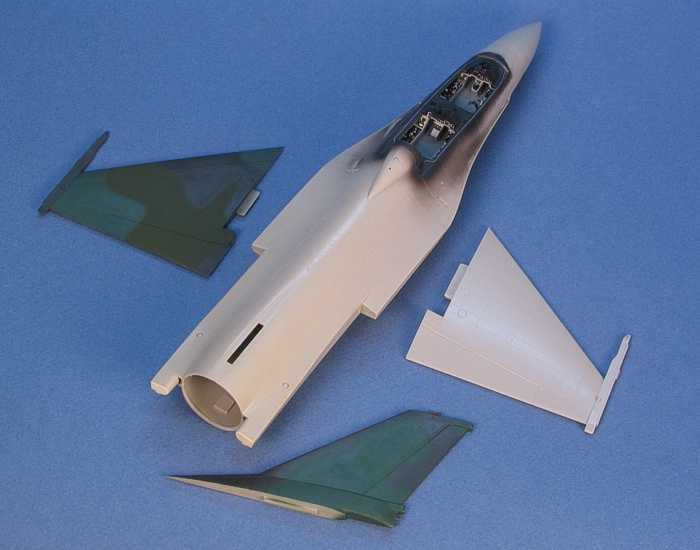
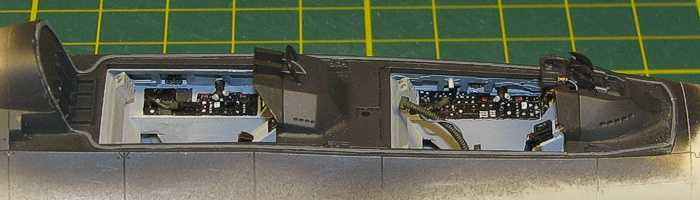
I wanted to upgrade the cockpit area to include side wall detailing and replace the ejection seats with resin versions. To do this, I picked up a couple Verlinden F-16A Super Cockpit Detail sets (stock#4387). I figured that two cockpits in the F-16B meant that I would need two sets. For the seats and control grips, this was true. I would have really only needed one set of etchings, though. Note: Black Box cockpits did not exist when I started this project.
The Verlinden set includes etchings and photo film for refurbishing the instrument consoles. I opted to leave the Hasegawa molded detailing in place. I did, however, use some of the Verlinden etchings to rebuild the lower center CRT screen in the front cockpit. The moldings in this one area were a little "soft".
Using the Verlinden items as a guide and with help from the the pictures in the Detail&Scale book on the F-16A/B, I scratch built the side walls for both cockpits. I also incorporated all the Verlinden resin items into both cockpits. With strip styrene, I scratch built the ribbing behind the rear cockpit and the canopy seal running around the sill areas. Careful painting of the cockpits made all the scratch building worth the effort. The final touch to make the cockpits complete was the addition of some Waldron oxygen hoses.
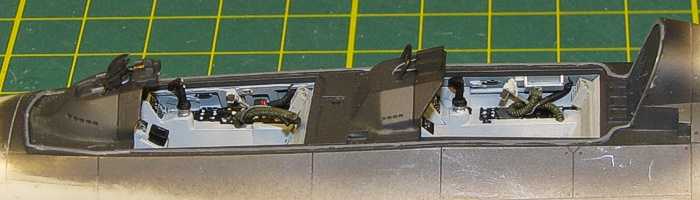
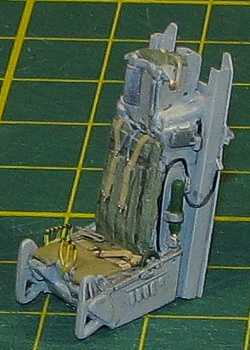
For the ejection seats, I chose to use the really old Verlinden seats from nearly 20 years ago. I liked these because they better represent the way the ACES II seats looked in the late 1970s (time period of the model), and the harnesses are not molded to the seats. Thus, I can add the harnesses myself and have the two seats get different harness layouts. I used an Eduard colored etching set for an F-15E Strike Eagle to get the ACES II harnesses. The funny part is that the etchings are only colored on one side, and the way they are etched, some of the etchings need to lay upside down, thus displaying the un-painted back sides. Also, if I twisted any belts to make them look more natural, the un-painted back sides again were visible. I ended up having to paint the pre-painted etchings -- go figure...
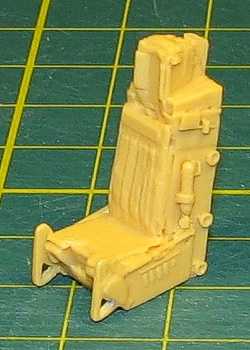
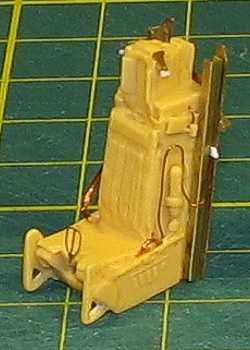
The following is the genesis from unpainted to completed ejection seat.
|
|
|
| "Raw" Seat |
Details Added |
Completed |
Getting the seats installed into the cockpits really made the area "pop". I laid the oxygen hose and harnesses in the cockpit across the seat and the side consoles in the front cockpit to better "link" the seat to the cockpit. The effect gave the front cockpit a more casual look than the rear cockpit.
After all the updates to the cockpit, of course I made more updates to the rest of the airframe. Here is where waiting 17 years to finish this project paid off. Some of the details I originally wanted to scratch build have now come out in fine crafted after-market resin sets. Who am I to argue with fate on these things?
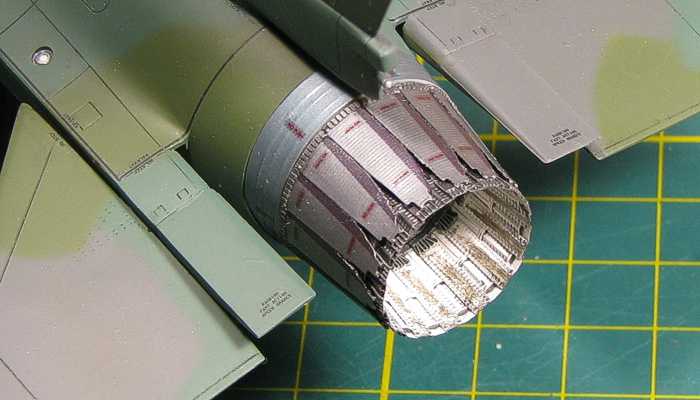
Engine Exhaust
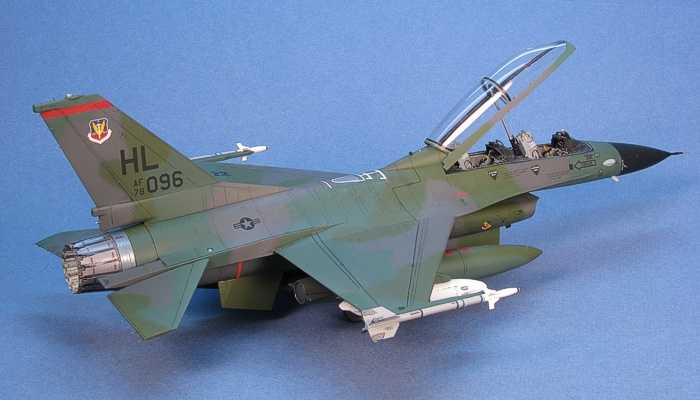
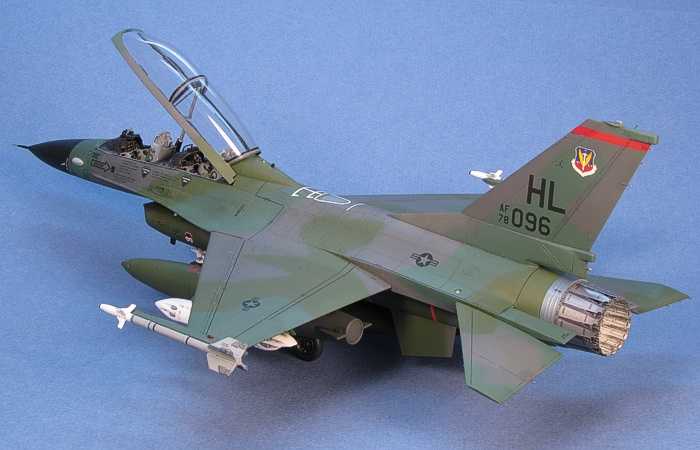
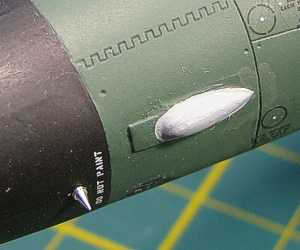
I originally planned to scratch-build the engine exhaust using Verlinden and Hasegawa etchings. This was the "straw that broke the camel's back" on the project in 1992. Unable to create an exhaust that I was satisfied with, I put the kit away to await "divine intervention". In time, High Flight came along with a decent replacement engine exhaust. Then, more recently, AiRes has released F-16 engine exhausts that rival anything I could have hoped for in etchings. I used the AiRes pieces on this project.
The AiRes set is not without issues, though. Due to resin shrinkage, the pieces did not assemble well and the mounting ring was a 32nd of an inch too small in diameter for the rear of the Hasegawa kit fuselage. I reamed out the mounting ring to get the exhaust cone pieces to fit inside. Then, I attached and faired the mounting ring onto the fuselage using a large amount of super glue as filler. Carefully painted and decaled, the finished engine exhaust in stunning.
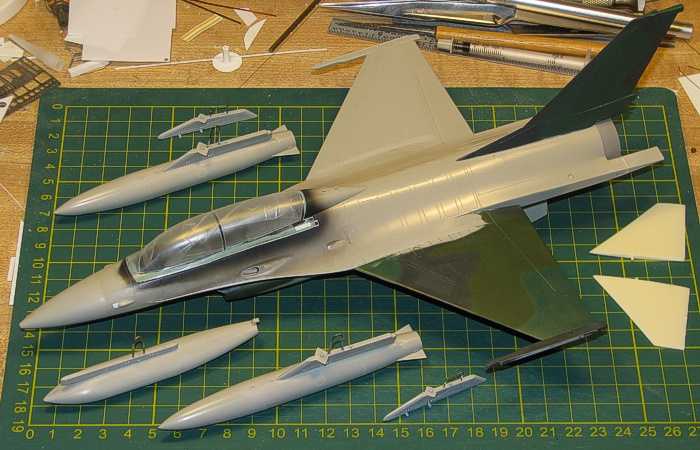
Block 1 Conversion
 More changes were required to update the Hasegawa kit to an early block F-16. The Hasegawa kit as provided in the box is of a block 15 F-16B, complete with its enlarged horizontal tails. The aircraft I wanted to build was an original block 1 airframe (the 64th F-16 ever built) and needed the original small horizontal tails. I had planned to replace the block 15 sized horizontal tails provided in the kit with block 1/10 sized tails stolen from a Monogram F-16A kit. However, a few years back, a friend of mine needed the tails I created for an F-16 project he was doing. Since this project was going nowhere at that time, I gave the smaller tails to him. Recently, both IsraCast and TwoMikes Resin have released block 1/10 sized tails for the F-16. The TwoMikes tails appear to be nothing more than castings of Monogram F-16A kit tails. The IsraCast tails have more finesse with some re-scribing to enhance the details. I used the IsraCast tails on my project. More changes were required to update the Hasegawa kit to an early block F-16. The Hasegawa kit as provided in the box is of a block 15 F-16B, complete with its enlarged horizontal tails. The aircraft I wanted to build was an original block 1 airframe (the 64th F-16 ever built) and needed the original small horizontal tails. I had planned to replace the block 15 sized horizontal tails provided in the kit with block 1/10 sized tails stolen from a Monogram F-16A kit. However, a few years back, a friend of mine needed the tails I created for an F-16 project he was doing. Since this project was going nowhere at that time, I gave the smaller tails to him. Recently, both IsraCast and TwoMikes Resin have released block 1/10 sized tails for the F-16. The TwoMikes tails appear to be nothing more than castings of Monogram F-16A kit tails. The IsraCast tails have more finesse with some re-scribing to enhance the details. I used the IsraCast tails on my project.
 In addition to the small-size tails, there were a number of antennae around the airframe that needed attention to convert the configuration to that of an early block F-16. On block 1 airframes, the UHF COM blade antenna is on the lower lip of the engine intake. I filled the hole under the rear fuselage between the ventral strakes and moved the kit-provided blade antenna to the location on the lower lip of the engine intake. I also needed to modify the shape of the threat warning antenna just in front of the nose wheel well. In addition to the small-size tails, there were a number of antennae around the airframe that needed attention to convert the configuration to that of an early block F-16. On block 1 airframes, the UHF COM blade antenna is on the lower lip of the engine intake. I filled the hole under the rear fuselage between the ventral strakes and moved the kit-provided blade antenna to the location on the lower lip of the engine intake. I also needed to modify the shape of the threat warning antenna just in front of the nose wheel well.
The last things were the threat warning antennae on the sides of the nose. These are add-on piece in the kit, and, as such, have crisp corner edges when applied to the model. Pictures of these antennae show them to have a softer outline, so I used white glue to fill the corners all around the antenna bulges and contour them into the sides of the nose more. I "filed" the white glue with a wet cotton bud to get a smooth, regular surface. Also, there is some small RAM patch in front of the blisters. I added this with a small square of 0.005" plastic strip.
Also, the Hasegawa box art shows nicely detailed angle of attack (AOA) spikes on the sides of the nose cone, but the kit provides none. It was a simple matter to drill a couple of holes on the sides of the nose cone and add the spikes. I got the spikes from a FineMolds turned brass set. They improved the look of the nose cone a lot when I added these.
Speed Brakes
I followed the kit instructions to open the speed brakes. Then, I looked at some pictures and found out just how much of their interiors needed to be re-built to make them even sort-of correct. Since the cuts to remove the speed brakes were all very clean, I just glued them back together (closed) and re-attached them to the rear of the fuselage. Perhaps I will tackle the speed brakes on some other F-16 project, but not this one.
Weapons
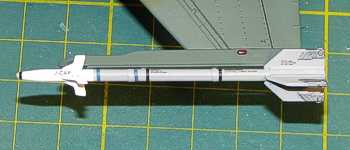
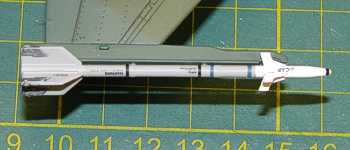
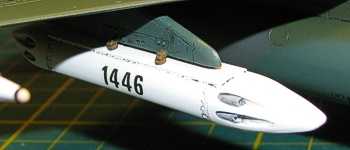
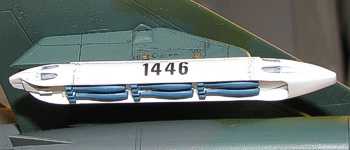
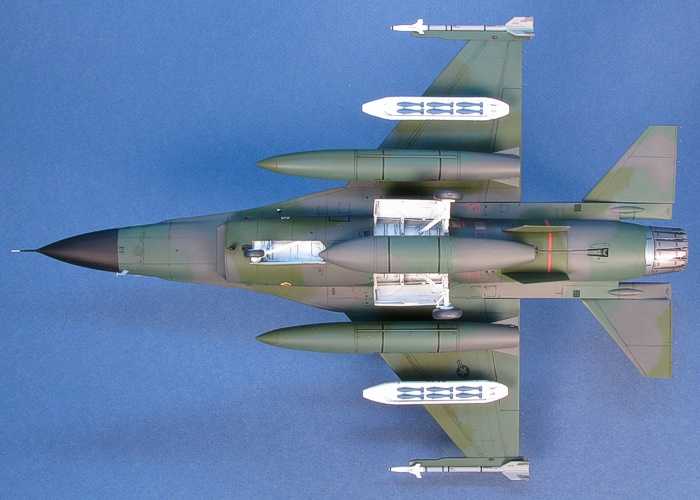
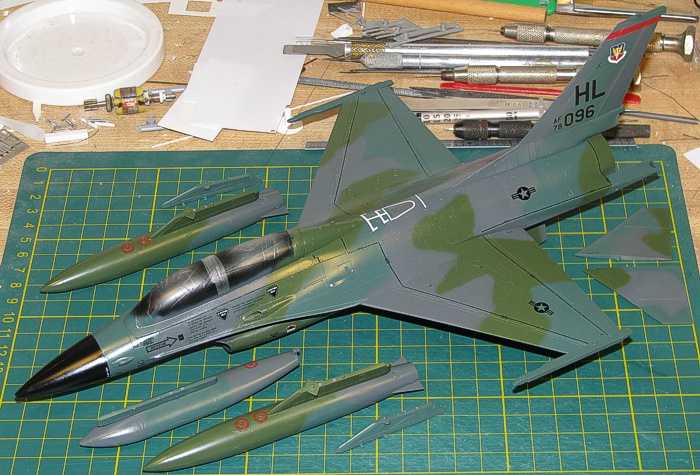
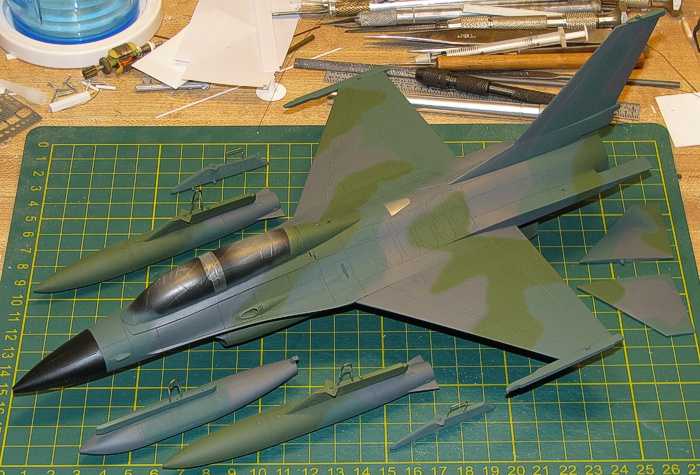
Last changes to the kit were the weapons. I replaced the poorly rendered kit provided AIM-9L Sidewinder missiles, using AIM-9J Sidewinders taken from the Hasegawa weapons sets. AIM-9J Sidewinders seemed much more common in the late 1970s, with the AIM-9Ls only just coming into usage. Also taken from the Hasegawa weapons sets, I added the SUU-20 practise bomb dispensers on the outboard wing pylons. I improved the detailing on the SUU-20 by drilling out the rocket tubes.
I resisted the urge to rebuild the wheel well interiors. While lacking in a lot a details (OK, almost all the details), they are not all too visible in the completed model. AiRes released a beautifully detailed wheel well set for the Hasegawa F-16 kits, but I was already too far along to incorporate that into this project.
With the airframe fully assembled and the canopy loose-mounted over the cockpits and masked, it was time for camouflage painting.

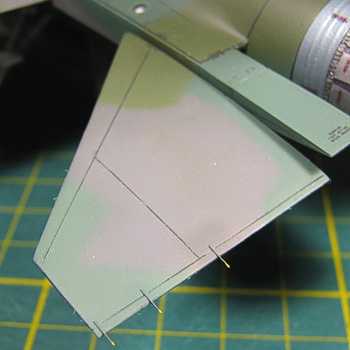
Camouflage and Markings
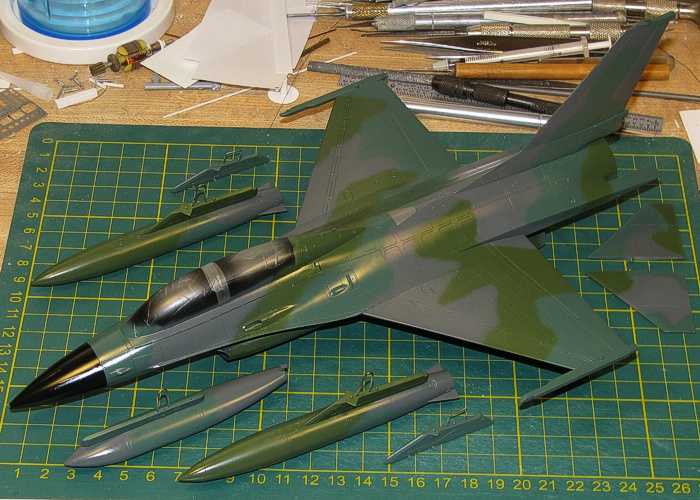
 I used Testor's Model Master enamel paints to paint the entire model. "Lizard" camouflage on the F-16 is done in European Green (F.S.34092), Medium Green (F.S.34102), and European Gray (F.S.36081). I scale effected the European Green and European Gray with a 6:1 mix with Neutral Gray (F.S.36270). I did the same to the Medium Green, only I used a 4:1 ratio. I used Testor's Model Master enamel paints to paint the entire model. "Lizard" camouflage on the F-16 is done in European Green (F.S.34092), Medium Green (F.S.34102), and European Gray (F.S.36081). I scale effected the European Green and European Gray with a 6:1 mix with Neutral Gray (F.S.36270). I did the same to the Medium Green, only I used a 4:1 ratio.
I had three different source for the camouflage pattern to paint the model. The first was the old Detail&Scale book (Volume #13) on the F-16. The second was the kit instructions from the old ESCI 1/72nd scale F-16B. More recently, if you want the camouflage pattern, TwoBobs Decals has released decals for the "lizard" F-16's on sheet 48-084 and includes the pattern in the instructions. What was troubling was that while all three were similar to each other, none of these patterns agreed with each other in detail. After looking closely at pictures of the real aircraft and comparing the diagrams, I decided that the ESCI pattern was closest for this F-16B aircraft. For the single-seat F-16A aircraft (78-0008), the Detail&Scale book pattern appears to be the closest (although it has the two greens reversed).
None of the available pattern diagrams mentioned the fuel tanks. I used some artistic license and painted them is a camouflage pattern that agreed with the airframe camouflage.
The decals for this aircraft did not exist when I started this project in 1992. I planned to cobble together a hodgepodge of various decal scraps that I dug out of my spare decals drawer. The tail code and unit badges were to come from an old SuperScale F-16 sheet (48-297) with the data markings coming from a SuperScale A-10 decal sheet (48-367). With the release of the TwoBobs decals, I hoped I would not need to work so hard at it, but there were some issues with the TwoBobs sheet. While the unit markings were fine, most all the airframe data markings were either missing or wrong.
17 years of additional F-16 decal releases had provided many more sources for airframe data markings. I searched through my personal decal stash and found some decal sheets to supplement the TwoBobs decals and provide the needed airframe data. IsraDecals does several beautiful Israeli F-16 decal sheets. I specifically used one of the F-16A/B decal sheets (IAF-22). While the units provided on this decal sheet are all Israeli, much of the airframe data is pertinent to all F-16A/Bs. I used many of the IsraDecals airframe data items on this model, including the wing walkway stripes. Any airframe data that was not available or in the wrong color on the IsraDecals sheet was available on the Afterburner Decals Alaskan Aggressors decal sheet (AD48-034). Decals for the external fuel tanks came from the AreoMaster F-16 data decal sheet (148-030). Even with all these decal sheets to look through, none provided the RESCUE arrow in black and the proper style, so I decided to make my own and print it.
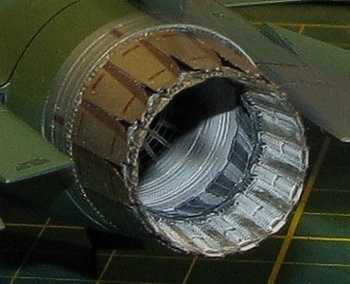
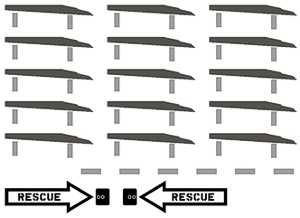 Another reason for printing my own decals included a need to use decals on the engine exhaust cone. An image of the decal artwork is provided to the right (reduced in size to save space). A couple of the after-market decals companies have started providing decals to represent the scuff zones on the exhaust pedals. I decided that was probably the easiest way to go, so I created some decals to do this on my engine exhaust. While doing this, I also included the small rectangles for the "NO PUSH" markings on the engine exhaust. On the real aircraft, these "NO PUSH" markings are heat resistent stickers on the pedals. They generally leave off-color rectangles on the pedals. It was a small matter to include these on the same decals that provided the scuff zones. Another reason for printing my own decals included a need to use decals on the engine exhaust cone. An image of the decal artwork is provided to the right (reduced in size to save space). A couple of the after-market decals companies have started providing decals to represent the scuff zones on the exhaust pedals. I decided that was probably the easiest way to go, so I created some decals to do this on my engine exhaust. While doing this, I also included the small rectangles for the "NO PUSH" markings on the engine exhaust. On the real aircraft, these "NO PUSH" markings are heat resistent stickers on the pedals. They generally leave off-color rectangles on the pedals. It was a small matter to include these on the same decals that provided the scuff zones.
Accuracy police -- do not read this next paragraph...
Of note are the wing walkway stripes. I have conflicting sources, but I do not think this aircraft had the stripes for the walkways. I like the look of these stripes on the F-16, so I chose to apply them anyway. Further, the white markings on the spine for the aerial refueling receptacle should be only the two "T" marks in front of the receptacle. But, again, I have some conflicting sources, and I liked the look of the full outline for the receptacle, so I decided to use the full outline on this model.
For weathering, I used my typical style of thinned down enamel paint washes and air brush shading. I finished the weathering with some dry brushing to pop out the surface details. For a more complete discussion of what I do to weather my models, see my posting on "Weathering Aircraft".
I was working at the same time as the airframe to paint and prepare the sub-assemblies, so now all I really had to do was attach all the assorted parts to the airframe.
The landing gear in the Hasegawa F-16 kits is passable, but the wheel wells are totally empty. I was growing tired of the project by the time I got to the landing gear and decided to leave it be. Hence, the landing gear is finished as Hasegawa provides it with no extra details. I considered just adding brake lines, but I was not in the mood for even that much. I did leave the landing gear un-glued (where possible) so I could remove and add details later (if the spirit moves me).
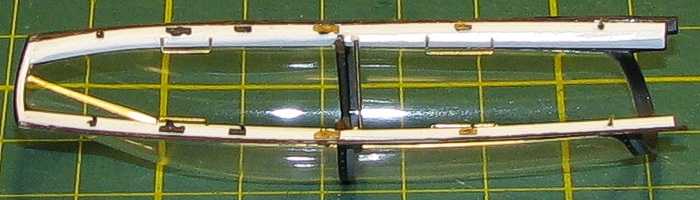
For the canopy, the kit provides a center brace and the lifting actuator, but it does not include any of the latching mechanism or latching hooks. The inside of the canopy is basically smooth. With all the work I did in the cockpit, I could not leave the canopy missing so many noticeable details. I added strip styrene to increase the thickness of the canopy lower frames. I attached to this strip the needed latching hooks and handles. I then laid the canopy aside while I completed the rest of the model.
Hasegawa molds triangular mounting locations on the wings and tail for where all the static discharger whiskers are mounted. The whiskers, themselves, are not provided in the kit. The after-market block 1/10 tails also have these mounting points molded on them. They are all pretty well overstated, so I filed them off. I replaced the whiskers with 0.010" brass wire. Trouble is, they are extremely fragile and easy to bump off. I bumped about half of them off the model at different points and had to keep making new ones up until I could get my "good" pictures to document the model. I have no idea how long they will survive on the model on my model shelves.
I had test-fitted the weapons and fuel tanks all along while I was building the model. I test-fitted them one last time, then added some super glue to make them permanent. Adding all the stores under the wings improved the overall look of the model. I really like the look of the F-16 with wing fuel tanks.
I attached the canopy lift actuator on the cockpit sill between the two cockpits and sat the canopy (without glue) into place over the cockpit. This finished the project.
Seventeen years is a long time for a model to be sitting on the SHELF of DOOM. Over the time while this model sat on the SHELF, I would periodically pull it out, evaluate where I left it, but ultimately put it away again. It feels good to have finally gotten that box off the SHELF.
Hasegawa has definitely been outclassed by Tamiya for F-16 kits. But, like I wrote earlier, they are still as good as everyone used to say about them before Tamiya released their kits. Until Tamiya releases a two-seat F-16, Hasegawa is still a very good option for these aircraft.
Project Statistics
Completion Date: |
15 February, 2009 |
Total Building Time: |
115.6 (estimated) |
Research: |
15.3 |
Construction: |
15.9 |
Painting: |
29.1 |
Decals / Markings: |
18.8 |
Extra Detailing / Conversion: |
36.5 |
Model,
Text Copyright © 2009 by David W. Aungst
Page Created 13 April, 2009
Last Updated
13 April, 2009
Back to HyperScale
Main Page |
 Home
| What's New |
Features |
Gallery |
Reviews |
Reference |
Forum |
Search
Home
| What's New |
Features |
Gallery |
Reviews |
Reference |
Forum |
Search