Revell’s 1/72 scale
Fokker Dr. I
by Michael Moore

HyperScale is proudly supported by Squadron
Ready, Fire, Aim…
You know those builds that come from nowhere? The ones you can’t really explain why you started, and just seem to flow, and before you know it you’re done? Even with all the self inflicted problems. This is a write up of one of those. This one moved along so fast, there aren’t even any in-progress photos. Actually the preceding isn’t entirely true. I kind of know where this one came from. I had thought about doing the recent Roll Models on-line contest, but I didn’t get the kit in time, and one thing led to another, and life got in the way. And then, on my way to the airport for one of those life things, I was running early, stopped into a hobby shop, and found the Revell kit. For $9, how wrong could I go? Out in the truck I opened it up, saw the red plastic, and jammed it back in that useless end opening box, thinking that with red plastic, I either got the wrong boxing, or the reviews I’d read of the kit were just a little off. When I got home a few days later, I stowed the kit on the shelf and fussed around with other projects.
And then, for some reason, I reached for it and actually took the parts out of the bags. Ok, they are molded in red and that’s not really nice. But if you look at them, the moldings are really pretty nice. For 1/72, there is an impressive amount of detail, even in the interior. The fabric effect on the wings is a little (ok, maybe a lot) overdone, but what the heck; the engine is a little jewel and some of the smaller parts are fine enough that I had to cut them away from the sprue with a hot blade to avoid damage and there in lay the first self inflicted wound. When I cut one of the tail struts off the sprue, it stayed stuck to the hot knife blade and shriveled up. Fortunately it was easily replaced with a piece of rectangular stock.
Before I knew it, the airbrush was in my hand and I was laying down a coat of Tamyia Buff on the interior of the fuselage, and I didn’t look back for two weeks.
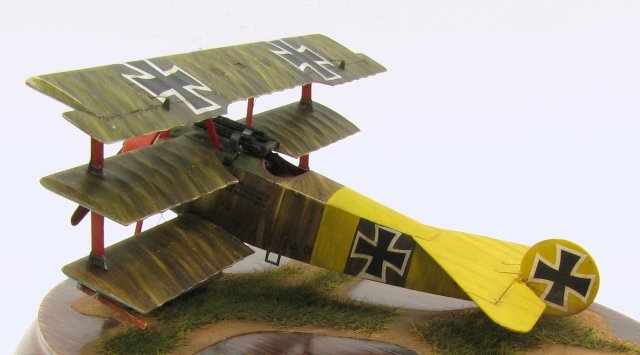
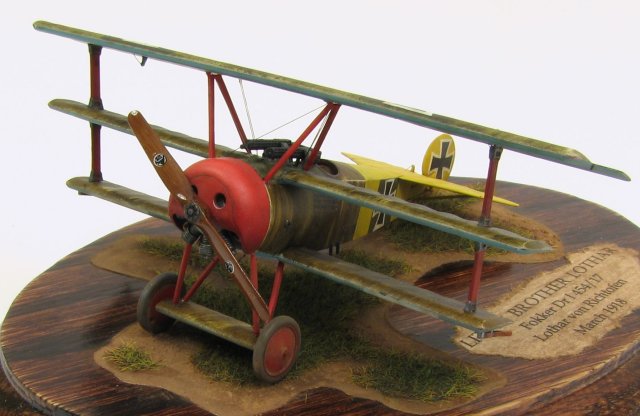
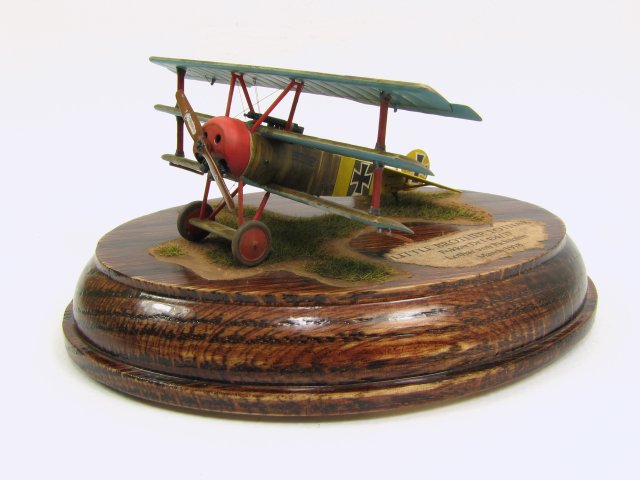
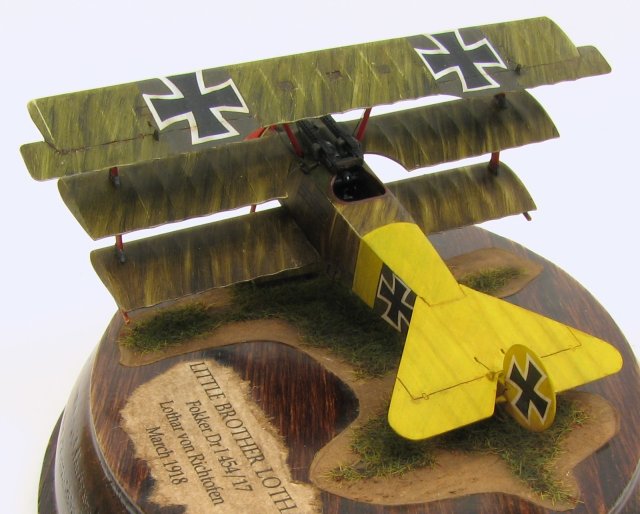
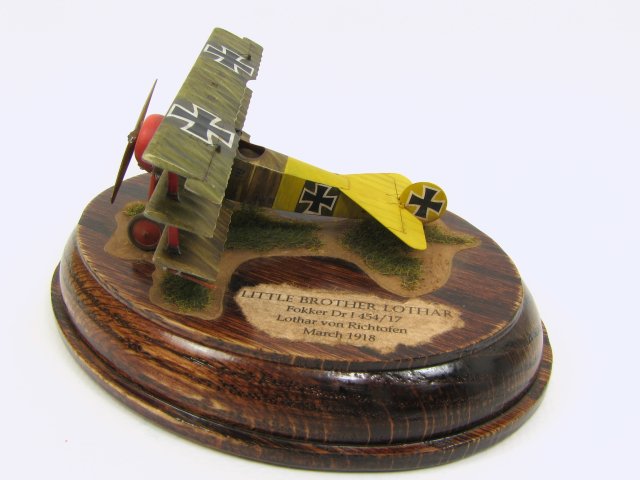
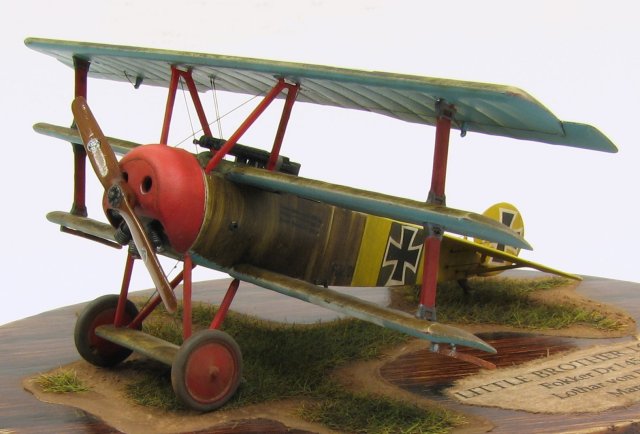
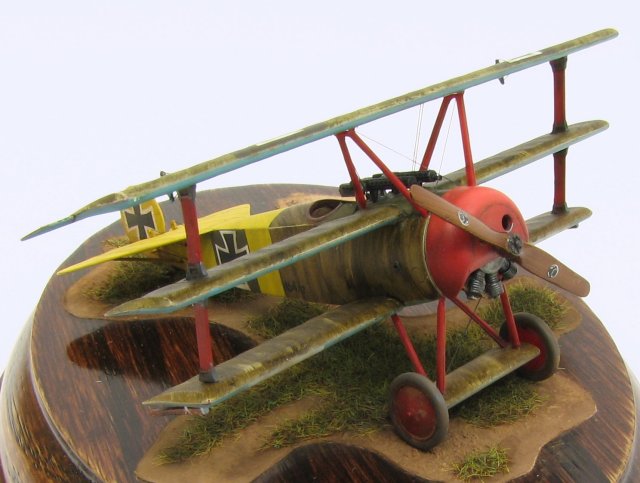
Obviously I didn’t do a lot of planning. I dabble in WWI modeling, and have some references, but I tend to research stuff just before I build it. To be honest, although I really do appreciate the aircraft and the men who flew them, for me modeling is really a process that I enjoy. I’m just enough of a historian to want to get things pretty much right, but I’m not gonna sweat a ton of stuff. I also didn’t have any aftermarket for this kit, including decals. So I was definitely going OOB with a kit scheme. There are two choices, Manfred or Lothar. Manfred was all red, and therefore pretty boring. But Lothar. Now there was a plane that would stand out, even being that tiny. Yellow tail, yellow top wing, red cowling and struts. Wow. That thing is gonna look cool in the display case.
So the interior is painted and assembled, fuselage, lower wing, and tail are all assembled, the struts have been glued into the middle wing (with just a tiny bit of filler needed), and the gear struts are glued into the landing gear foil (just a bit fussy, and again, just a touch of filler needed).
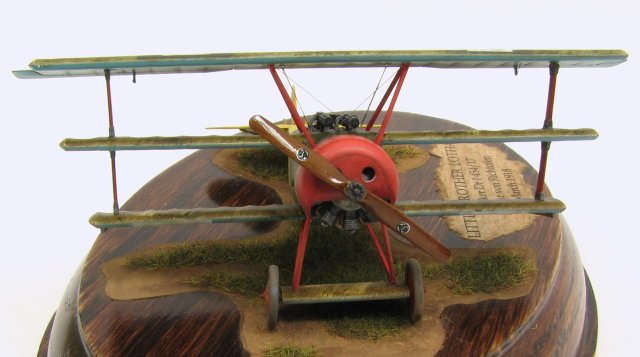
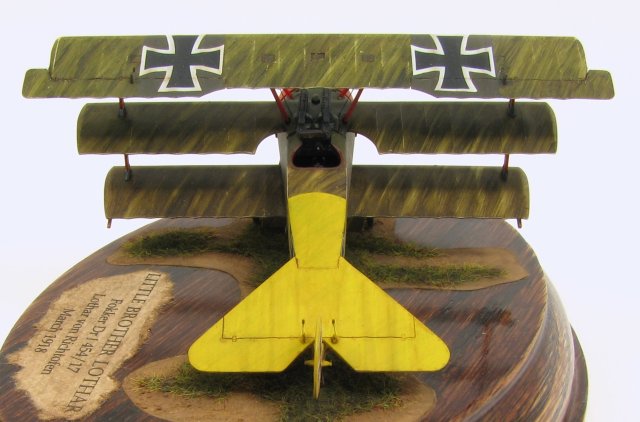
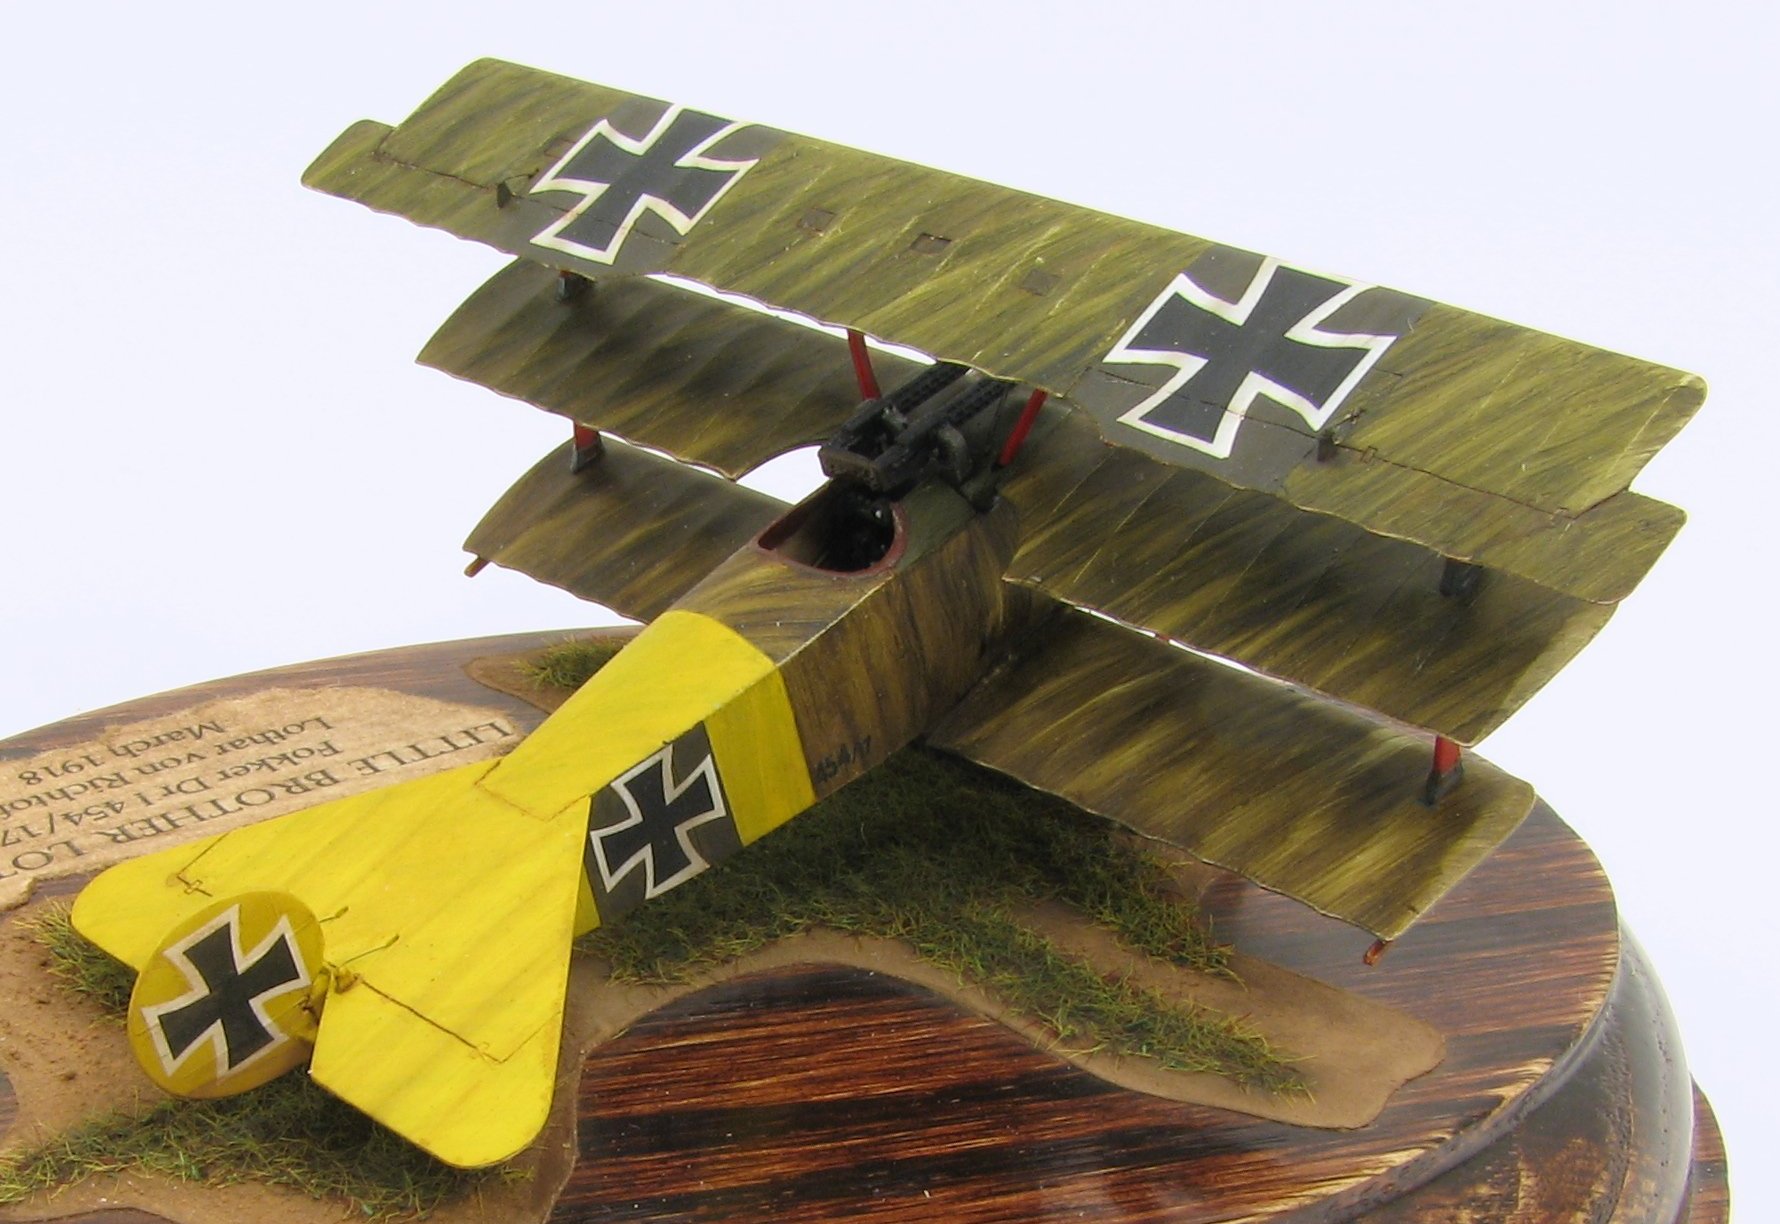
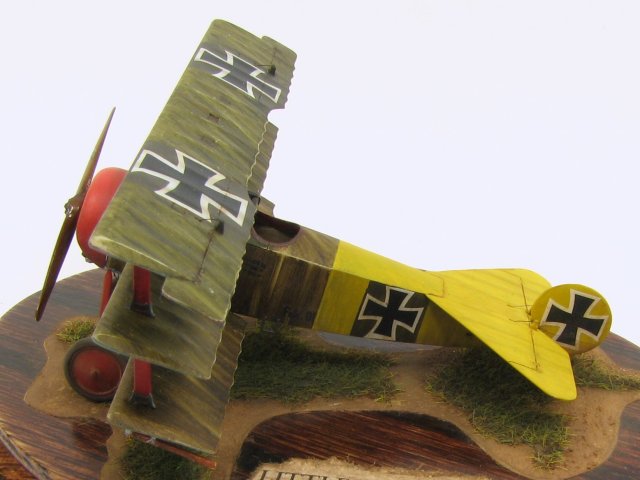
The cockpit is stuffed with bits from a make-up removal sponge (sorry dear), and I shot the whole mess with a home brewed mix of Tamiya colors for the doped linen. Flip her over and hit it with another home brew mix for the Turquoise Blue (I didn’t get it green enough IMHO). Then mask off the front and another home brew mix for the yellow. A little more masking and the struts and cowling were sprayed with Tamiya flat red (whew, no mixing). Now for the fun part. The streaked finish. I broke out an old ESCI Dv kit and sprayed the top wing of it with the linen mix so I would have something to practice on. The first thing I tried was some Vallejo Model Color Olive Drab thinned with water. It may have worked with some more fussing, but I decided to try some oils. I had picked up some Windsor & Newton Olive Green, and it looked pretty good to me straight out of the tube. I got a bit on a brush, and started liking what I was seeing on the practice wing. So my technique ended up being to dip a brush into the oil paint, neat, with no thinners, and start to work it a bit. Work it too much right away though, and you just smear it into a consistent shade, not what we’re looking for here. With a bit more practice, I managed to end up with a pretty thin, inconsistent, streaky look. After letting it dry for a few minutes I started going back and either removing some paint with a brush dampened with thinner (I use Napatha), or adding just a bit where I wanted it darker. In 1/72 scale, it really didn’t take long at all to get the three wings, landing gear foil and fuselage done, which was good. Once I got rolling, I kind of got in a bit of a rhythm, and stopping would have made a uniformly inconsistent look harder to come by. I tried mixing a little burnt umber in on the top wing and wasn’t satisfied it was worth the effort and wasn’t too concerned about a different look because the top wing was going to get sprayed yellow and the streaking would just show through.
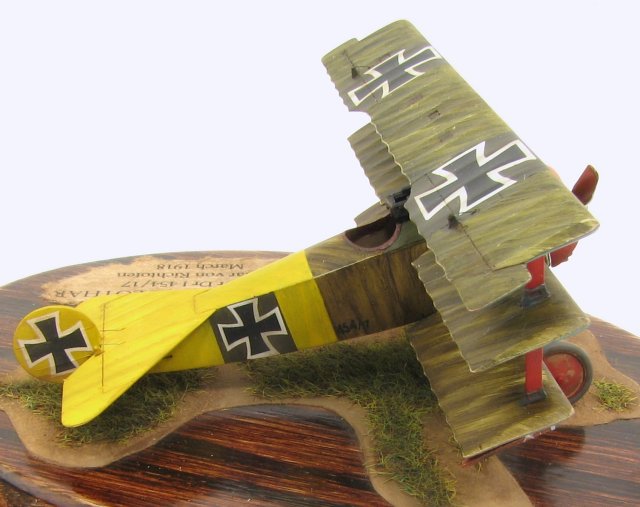
Hmm, wait a minute…shouldn’t there be streaking showing through the yellow on the tail end too? So I pulled some books down (there’s that fire, aim thing). Yup there’s a picture of Lothar’s mount on the cover of an Osprey book. And yeah, the yellow looks thin in the painting. But wait, why isn’t the wing yellow? So I googled. Whadaya mean the top wing wasn’t really yellow? CRAP. I spent a day or two trying to decide if I could ignore what I’d learned. Could I do that wing in yellow and explain that I had built the kit OOB, and hadn’t looked at any other references? Could I just build it the way I really wanted to and have that yellow wing? Obviously no. There is apparently enough historian in me to kowtow to common wisdom on this one.
And then I realized there was a pretty prominent seam running down the center of the bottom of the fuselage (a real “well, duh” moment there). So out came a ruler and the back of a #11 blade to scratch the seam. Well, actually, the ruler came out after I scratched a crooked seam. All of which meant I was going to have to re-shoot the yellow. At least it gave me the opportunity to mock-up some streaking on the tail. And actually, none of that happened until after I’d botched masking and painting the olive panels under the fuselage insignia. Not to mention some dirty finger prints on the yellow. So re-painting the tail had to happen. Pick a reason; I gave myself plenty of them. But I kinda had to wait for the oils to dry before I could mask the front off.
The oils dried enough to mask. I faked some streaking on the tail with that Vallejo Olive Drab, and shot thin coats of the yellow until the streaking was just visible. The sharp reader would now wonder if I was I smart enough to block out the olive panels under the insignia and mask them before spraying the yellow? No dear reader, I wasn’t. So I had to, once again, break out the tape and paint in the olive panels. At least this time I could also do the panels on the top wing too.
So now the middle wing and forward fuselage top could get glued on. The fit is perfect and no filler is required, which is a real good thing, as the fuselage under the wing has already been streaked. Now a few holes get drilled for rigging, not that there is much, thank god. Just the landing gear cross bracing, the upper wing cross bracing, and the aileron control lines. I also brush painted the forward decking of the fuselage with a very thin coat of the same oils used for the streaking, which really unified the scheme, but still looks different without the linen showing through; and the leather padding around the cockpit opening is done with burnt umber and raw sienna oils over a base of Vallejo flat brown. Put the decals on, and it’s time to finish this puppy.
Test fit upper wing. Fit is great. Tape it in place and see how the cabane struts fit. Not so bad, but the forward leg is a little long. Need to open up the forward mounting holes. More. More. More. I figure it’s safer to carve plastic out of the mounting holes than to cut the struts. If I go too far I can fill it in with a bit of super glue. I finally get to the point that the cabanes look about right. Pull it all apart, put dabs of superglue in the mounting holes for the upper wing at the main struts, put the wing in place, and hold for a few seconds (oh yeah, I also ran the aileron control lines through the upper wing before putting it on so I wouldn’t have to do it in that tight a space…finally a little forethought!) and it felt pretty solid.
Grab a cabane strut, get it in place at the fuselage mounting points, start tilting it up, and the upper wing starts tilting off. Apparently the 2 second super glue took a few minutes, and didn’t achieve full cure until the upper wing had tilted back about 25 degrees. I was just able to pull it off before everything hardened. But I ended up with superglue blocking all the mating surfaces for the struts and wing, not that there was all that much to begin with. So I got to carefully carve as much of that super glue away as I could so I could get something like a decent fit. Obviously I got the wing on, and ended up with pretty minor touch ups.
The last hurdle was the landing gear. I had eyeballed the position of the struts into the foil, and I figured I could use the bracing wires to pull it into alignment if the struts were a little off. Which may have worked pretty well if I had cleaned up the fuselage mounting points for them, but I didn’t. Which left less than positive attachments for a pretty fragile set of struts. I got the gear into place, and as I suspected, it was a bit out of alignment. So I tensioned one of the braces more than the other, and got it straight. Until I didn’t put the model down gently enough, and the strut under tension snapped at its weakest point, just where it tapers to the mounting ball at the fuselage. All I could do then was put a tiny dot of super glue where it broke and try to hold it while it set. Which I didn’t quite get right, so now there is a slight twist to the gear which gives the model a left wing low attitude. And gives me the heeby jeebies every time I put it down because I just know it’s going to go again sometime, and I’m pretty sure Murphy was a blood relative.
So now it’s down to the details. The engine had already been painted, as had the guns and prop. Touching up the upper wing from where the aileron control lines came through was real easy with the streaked finish, and I kind of amazed myself by getting the double control wires in on each side. The undersides were weathered by spraying a thin mix of Tamyia flat black and red/brown (where have I heard that before?) along the underside of the wing ribs and the ribs of the tail surfaces, some light oil washes, and finally a little MIG European Dust pigments. I didn’t really think the streaked finishes needed any weathering.
The Base
The base is an oak oval rosette I picked up at a home improvement store. I masked off a rough outline of the plane, and sprayed heavy coats of Tamiya Flat Earth followed by some of the aforementioned MIG pigments and then an application of static grass that was then painted with various Tamiya greens.
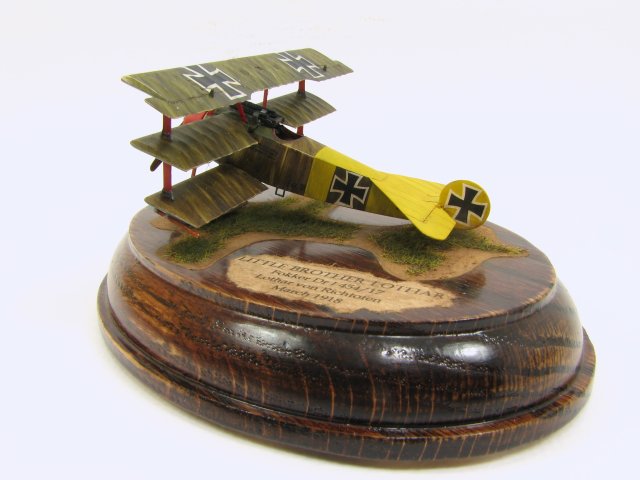
The label is done on my inkjet printer and soaked in a wash of burnt umber oils and then white glued to the base. Except I spelled it “Richtofen” and will have to re-do it. I never kould spell.
All in all a most satisfying project. Even if I did manage to fire before aiming more often than not. It’s been years since I knocked out a model in two weeks, and I kind of enjoyed the lack of research. Some more thinking ahead may have been nice, but just digging in and building what was in the box was fun.
Model, Images and Text Copyright ©
2009 by Michael Moore
Page Created 23 June, 2009
Last Updated
23 June, 2009
Back to
HyperScale Main Page |
 Home
| What's New | Features | Gallery | Reviews | Reference | Resource Guides | Forum |
Home
| What's New | Features | Gallery | Reviews | Reference | Resource Guides | Forum |