|
CMR's 1/144 scale
Martin JRM Mars
by Don Hinton
|
Martin Mars |

CMR's 1/144 scale Martin Mars is available online from Squadron.com
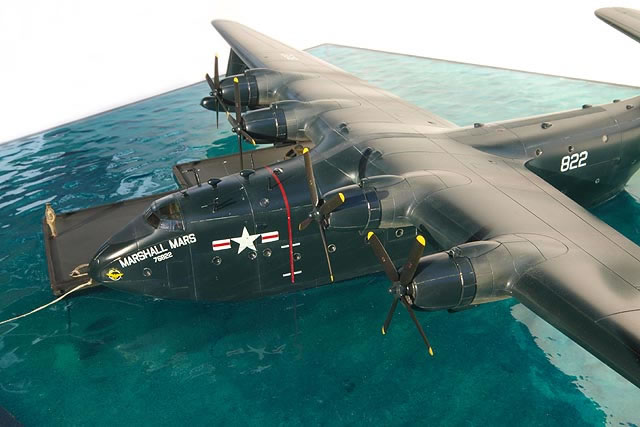
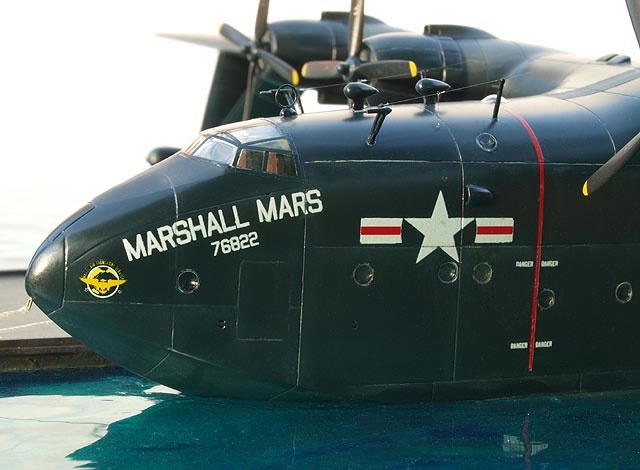
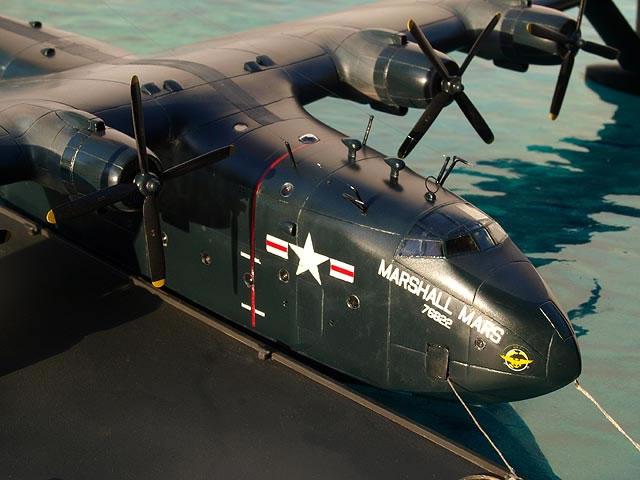
I love seaplanes and was thrilled when CMR released the Martin Mars in 1/144 scale. I was stationed on Oahu at the time and wanted to model it as the Hawaii Mars, but by a neat coincidence while I was actively building the model, the wreck of the Marshall Mars was located ten miles from my house—but over 2,500 feet deep off the Pearl Harbor Channel. So I changed my plans and decided to model Marshall Mars.
The Martin Mars
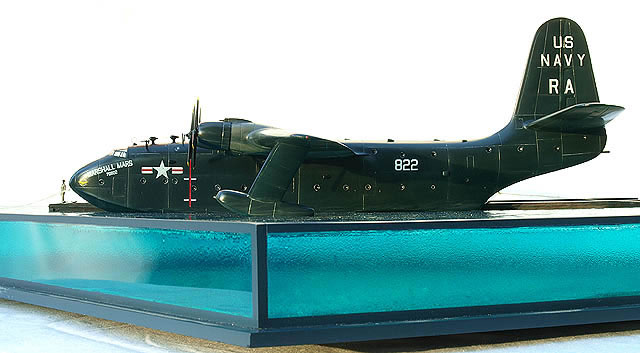
The Martin JRM Mars was originally designed as an enlarged patrol bomber based on the PMB Mariner design. Only one of the original patrol bomber versions was built before the Navy changed the requirement to be a transport aircraft. Twenty JRMs were ordered, but only six were produced. Like a ship, each Mars was named, all after a Pacific island chain; they were the Hawaii Mars (lost in an accident in 1945), Marianas Mars, Philippine Mars, Marshall Mars, Caroline Mars, and a second Hawaii Mars. Remarkably, two of the Mars still fly operationally today as water bombers for Coulson Forest Products in British Columbia.
CMR's 1/144 scale Martin Mars
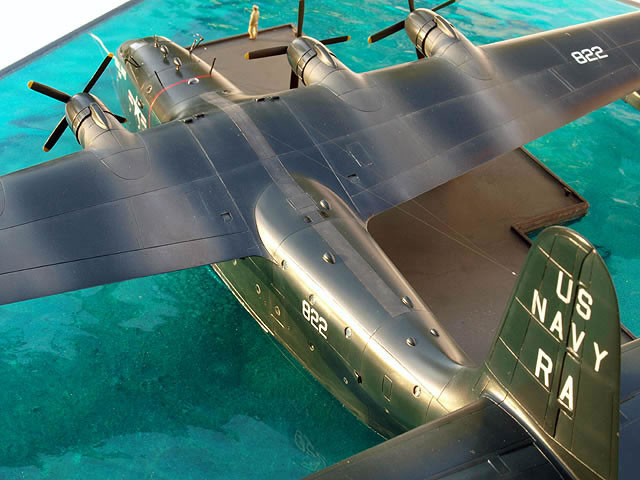
This is CMR’s first issue of the mighty Martin Mars. Except for the canopy, which is clear resin, all parts are molded in high quality, odorless cream-colored resin with only a handful of pinholes here and there. The fuselage is hollow, while the wings are solid left and right halves that are wonderfully engineered to meet at the centerline, ensuring a nice strong attachment point. All trailing edges are very sharp and don’t require thinning. The flying surfaces are molded with the leading edges at the top of the mold, resulting in no air bubbles on the trailing edges and none to speak of on the leading edges. Only the small pieces are attached to pour stubs, the main pieces have only a tiny amount of resin left to remove—a very nice touch for a resin kit. A stout box protects the pieces inside, with the kit parts sealed into individual plastic sleeves—I had no breakage of any parts. The entire kit is thoughtfully designed and produced for easy assembly for a resin kit. Even with the size of the kit, it can be built by anyone with a little experience with resin.
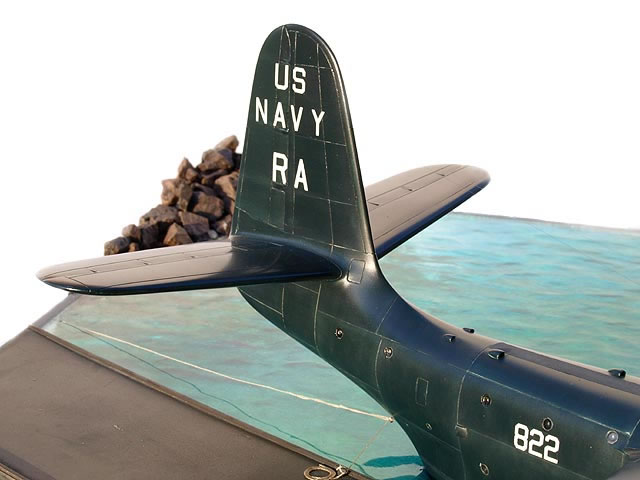
Decals are provided for all six Martin Mars as they appeared during their US Navy service. Other CMR releases offer markings for the colorful red and white Coulson water bomber versions that still operate to this day.
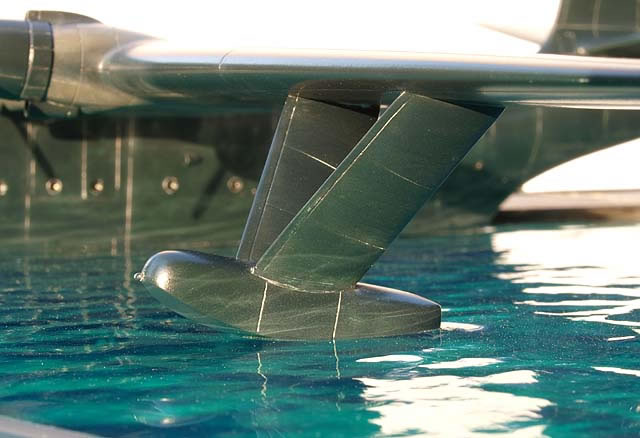
Construction was straightforward using cyanoacrylic glue (superglue) for all assembly work. The large, hollow fuselage halves fit very nicely with only a bit of filling required here and there. The wings, being solid halves, meet at the centerline of the fuselage and offer a nice, large mating surface to glue together, though I did strengthen the joint with two sections of brass rod connecting the halves. The only real problem I encountered with the model was the horizontal tailplanes did not match the corresponding area on the tail; the tailplanes are longer in chord than the attachment areas on the tail. This was easily solved by supergluing chunks of resin to the rear of the tailplane attachment points and filing it down to meet the trailing edge of the tailplanes, a simple enough fix that anyone building resin kits will find easy to do.
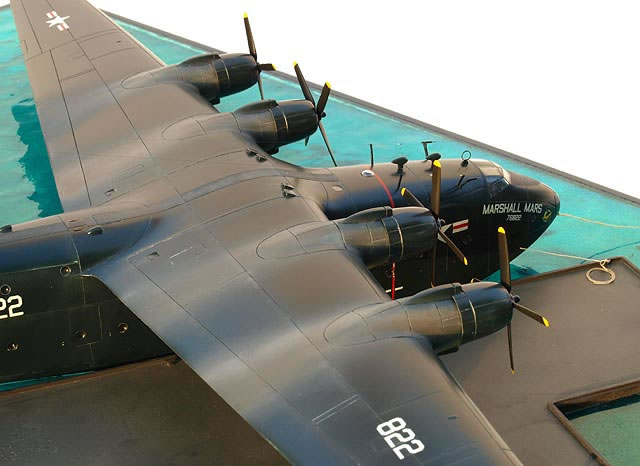
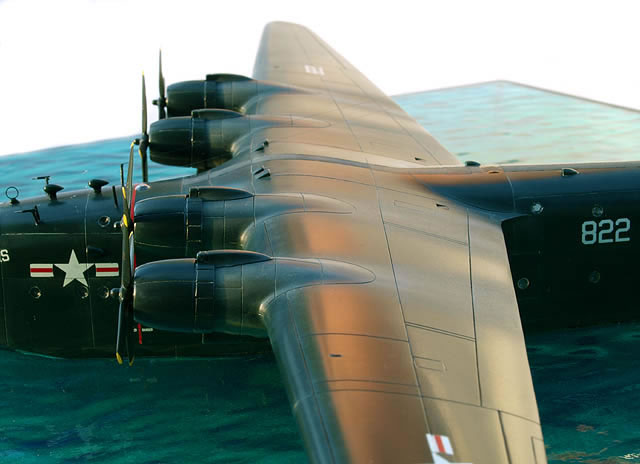
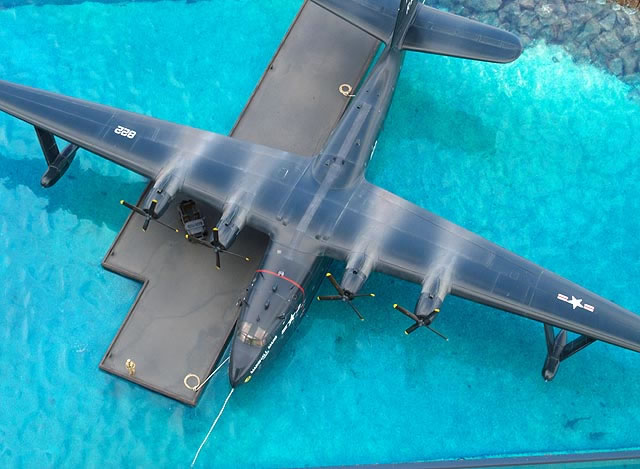
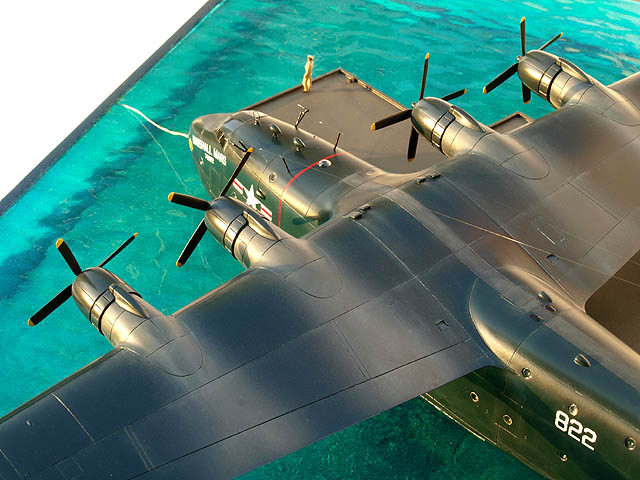
Panel lines are very nicely replicated with fine recessed lines, though I did add some additional panel lines. I added the cabin fresh air scoops to the top and sides of the fuselage. Cabin windows are disks I punched out of 10-thousandths Squadron clear plastic. The engines on the real Mars are obscured by cooling fans, just like on the Fw-190, so I scribed these into the tiny openings in the cowlings. The props, of which you get duplicates, are delicate and very nice in this scale, though I did thin the trailing edges a little more. I feel when modeling in 1/144 every effort should be made to create thin trailing edges on all surfaces, as thin as possible.
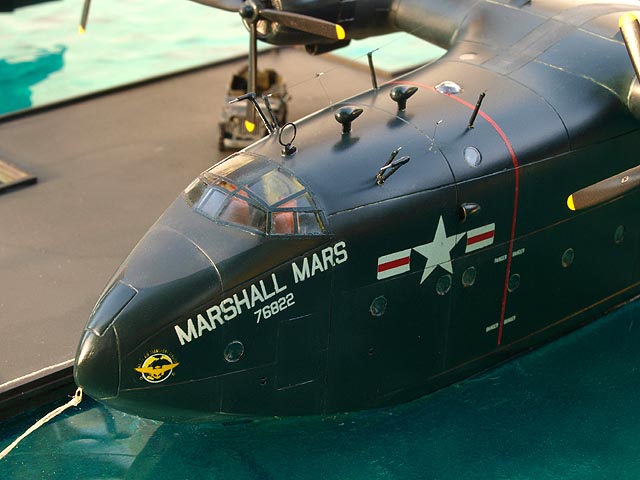
There are two different suites of antenna arrangements on the Mars and I chose to use the type that appeared on Marshall Mars when she sank in 1950. This means moving the pitot tubes from the top of the wings to the top of the fuselage over the cockpit. For the aerials to look in-scale, I used 100-micron ophthalmic eye suture “thread” which measures out to around ¼-inch in 1/144, which means it is almost invisible in this scale. While I really like the effect this creates, I must say I’ve never worked with anything as difficult as this as it is so thin that you can’t push it into a hole filled with any kind of glue, nor can you get glue to stick to the end well enough to place it into a hole. I think Gatorglue would do the trick now, as it is sticky enough that it would probably stick to the end of the thread where you want the glue to be; only Gatorglue didn’t exist when I built this model.
Paint
 Gloss Sea Blue, I love it! And what a huge expanse to paint GSB, even in 1/144 scale this kit is as large as a 1/72 B-17. At 200 feet, the Mars’ wingspan was over four feet wider than a 747-100, though its’ length was quite shorter. Gloss Sea Blue, I love it! And what a huge expanse to paint GSB, even in 1/144 scale this kit is as large as a 1/72 B-17. At 200 feet, the Mars’ wingspan was over four feet wider than a 747-100, though its’ length was quite shorter.
Being a resin model, I primed it with Gunze Mr. Primer spray can for metal and resin and then sanded it smooth.
Next I airbrushed Model Master GSB in light coats, building it up gradually. I polished this out but in the process polished some areas too deep and had to reshoot these. I also shot some panels in slightly different tones, adding a few drops of green or red to the GSB for different shades, the effect is hardly noticeable but slightly breaks up the overall monotone look.
I did a final polishing of the aircraft to where it looked like highly polished hard plastic.
Markings
Decals were next and they laid down beautifully on the polished finish. The decals were in perfect register and very thin. The white decals were opaque enough to cover the GSB with no noticeable see-through.
I hated to get rid of the highly polished look of the GSB I had achieved, which looked almost toy-like, but I wanted a slightly weathered and more realistic appearance so I sprayed a light coat of Polly S Clear Satin, leaving enough shine to look like real GSB (at least to me it does).
The massive Wright R-3350-24WA Cyclone engines produced very heavy light-colored exhaust stains which were especially visible against GSB. Using highly thinned artist oil paints I airbrushed a light gray going to a darker gray while focusing more and more in the center of the stain over the top of the wing. I then dry brushed some pastels across the exhaust stains and used Q-tips to wipe the pastel in the direction of the air flow. I picked out some panel lines with pastels just to break up the single color of the model.
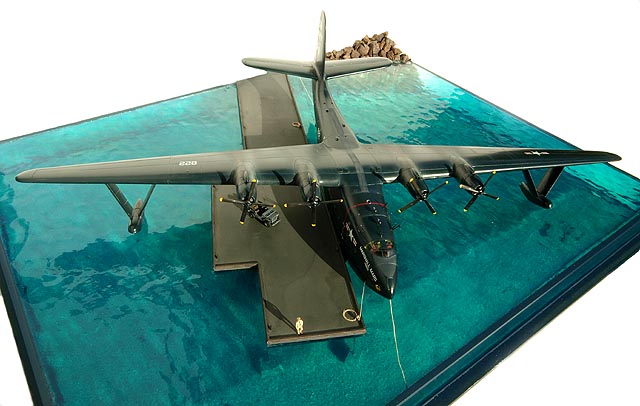
The Base
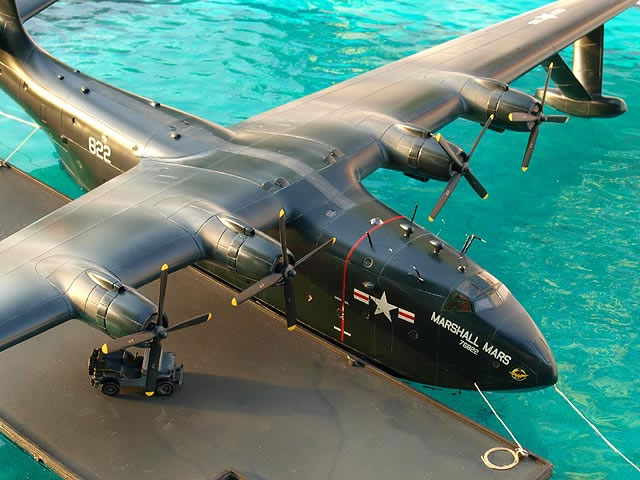
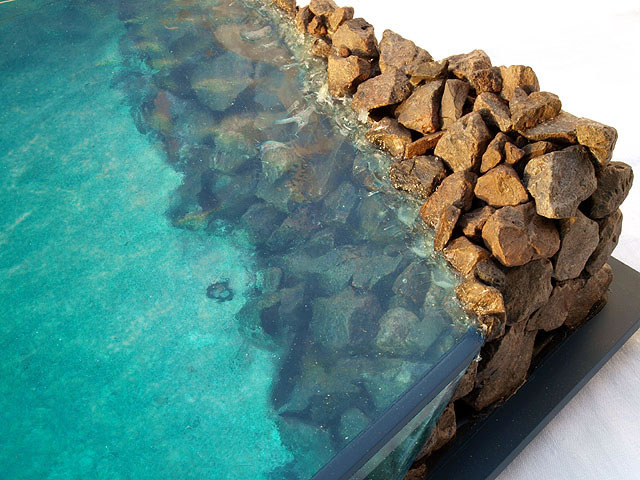
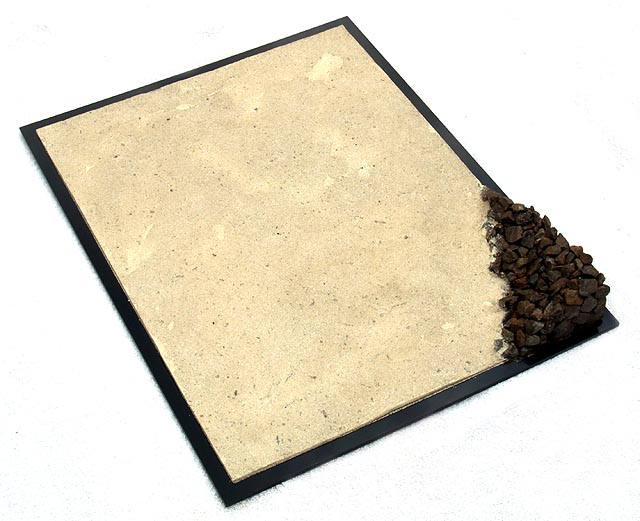
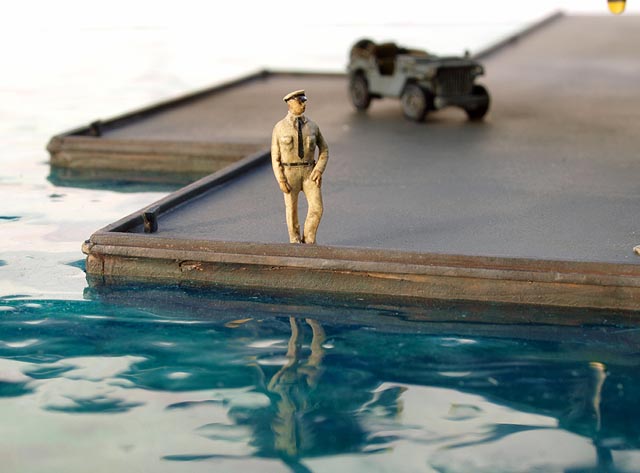
On Oahu, the US Navy used John Rogers Naval Air Station to dock the Martin Mars during WWII and into the 1950s. The base no longer exists, but it was on the east side of what is now Honolulu International Airport where the large maintenance hangers are today. The original seaplane landing lane is still in use. When the Mars flew from this seaplane lane the area was more open to the ocean, but today it is almost boxed in by Runway 8R, making the water a blue-green milky color on most days. I figured the water would have been clearer and less milky before the additional runway was built, so that was the effect I went for. Several pictures exist showing the docks on John Rogers with Mars tied to and I used these to model the dock structure for the diorama.

The bottom of the base is ¼-inch black acrylic. The sea bottom is Deco Decomagic Soft Clay, which has a texture of a light-weight fibrous plaster when dry. To get the clay to stick to the acrylic base I took a hot soldering iron and pushed holes into the acrylic, intentionally leaving a mound of plastic surrounding each hole. I then pushed the clay into the holes, covering the entire base. I smoothed it out but left little bumps and defects on purpose. After drying several days I used more clay to fill some cracks that had appeared. To get a coarse sand effect I sprayed American Accents Stone Creations (available at home improvement stores) onto the plaster, giving me a multi-colored, speckled sandy finish. I applied a dark wash to finish the sea floor to finish it. The rocks represent the original rock seawall on John Rogers NAS. I picked up some small, local dark red-gray volcanic rocks from a gravel walkway next to my house and individually glued these to the base with epoxy—they closely match the existing seawall rocks. I wanted these secured very well; if even one rock came loose it would wreak havoc on the model.
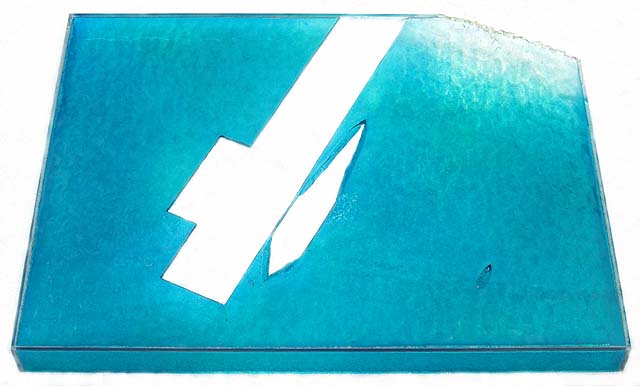
The top of the base is wavy acrylic glued onto regular acrylic side pieces. The water is 12 feet deep at the seaplane docks, so made the depth of the “water” a scale 12 feet. I cut out the areas where the dock and the model would go, being very careful to make the cutouts perfectly match the model and dock. I created the sea color by spraying Tamiya spraycan Clear Blue and Clear Green onto the bottom and inside of the clear acrylic surfaces. These Tamiya paints are synthetic lacquers that dry quickly and are made for RC modelers to paint car bodies. The trick in applying these is that you must spray them very fast (to keep the paint from drying too quickly) and evenly, but at the same time lightly to keep the color from becoming too dark. I must say I wasn’t as good at this as I hoped, but I still like the effect. The color looks very realistic in sunlight or incandescent light, but too green in fluorescent or compact fluorescent light bulbs. Next time I will use more blue and less green paint.
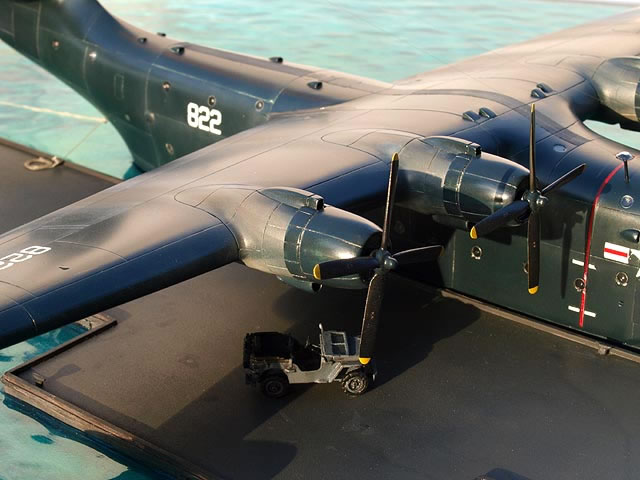
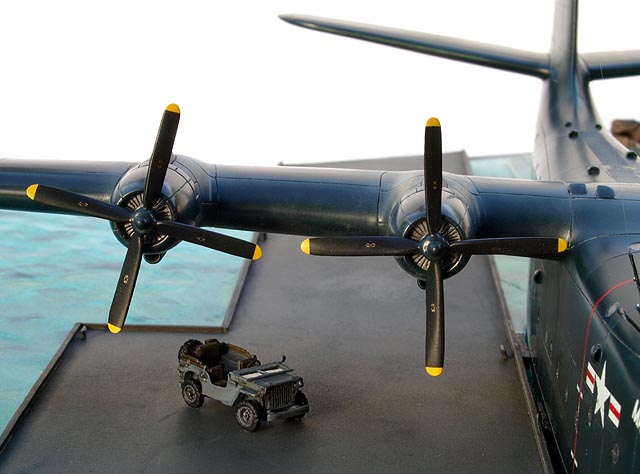
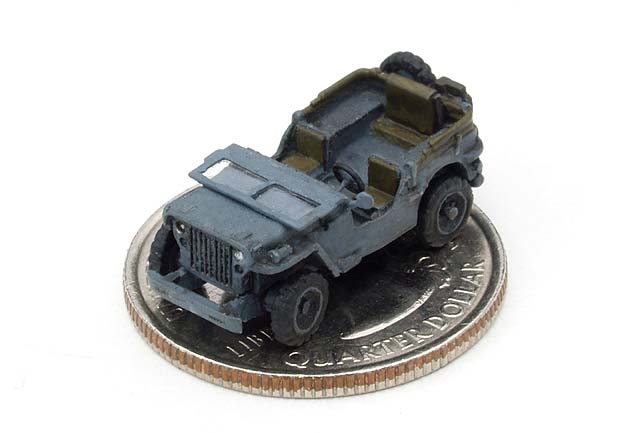
The dock is built up from Evergreen styrene. The jeep is a 1/144 white metal jeep from Pro-Hobby Micro Gallery, a Japanese limited run kit, number MGM-4, painted in USN colors of the era.
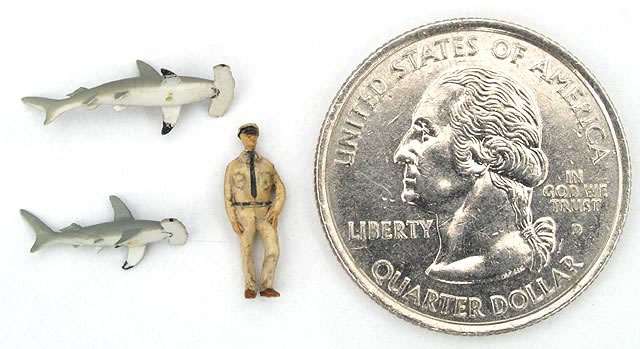
The figure is from Preiser’s 1/144 US Army Air Force crew set, but I wanted a young USN officer on the dock so I cut off the flight jacket from an Army figure and painted it in USN colors. Tiny strips of black decal make up the tie, the black leather band around the hat and the belt.
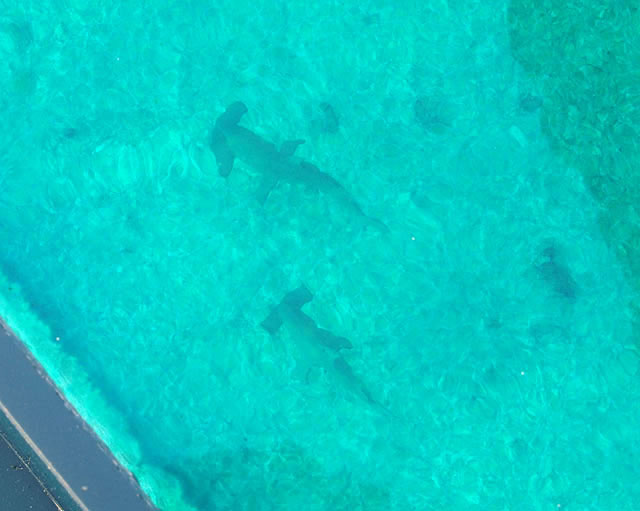
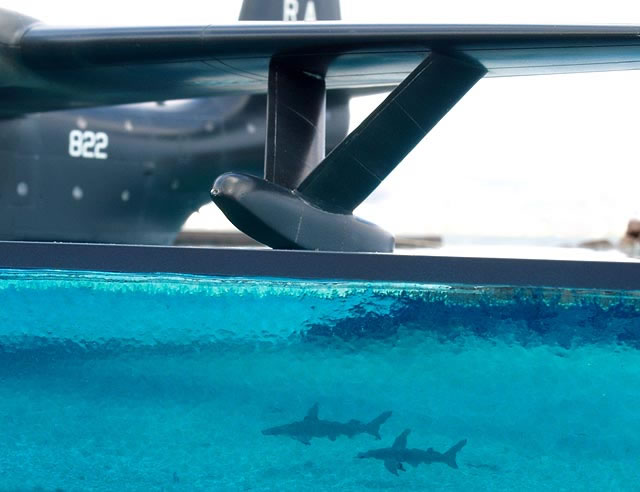
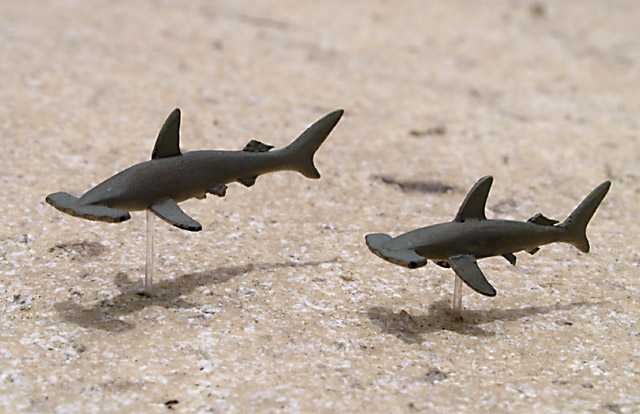
Mano, Hawaiian for shark. I just had to add some type of sea life to the diorama and of course I chose the shark. Ke’ehi Lagoon, where the John Rogers NAS sea lane is located, is a breeding ground for Scalloped Hammerhead Sharks which can grow to 15 feet, but I chose a more realistic four-foot female and five-foot male hammerhead.
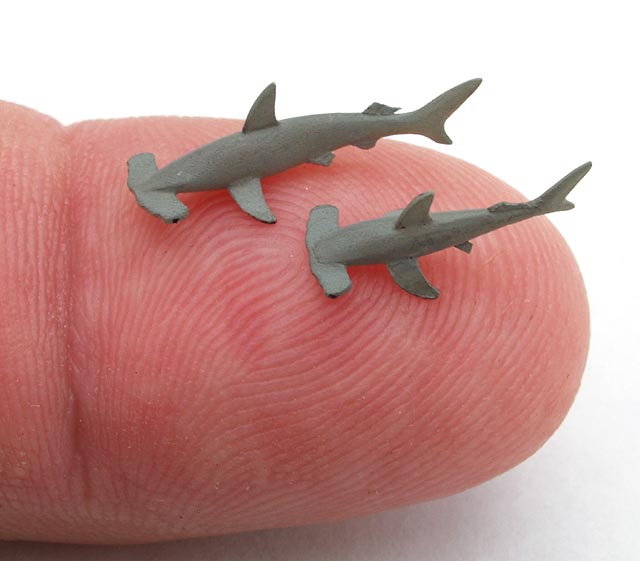
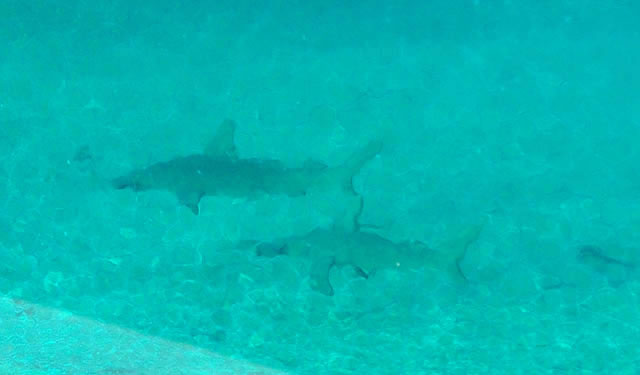
I couldn’t find any existing model sharks for this scale so I carved the bodies out of Evergreen styrene and added the “hammerhead” and fins with 10- and 5-thousanths Evergreen styrene. To attach the sharks to the base I stretched clear styrene into very thin, almost invisible, stalks. I suspended the sharks a foot above the sea floor, almost under the left float.
Once the base was finished I attached the dock and Mars in place with Future floor finish (now under the Pledge brand name).
The Real Marshall Mars Sinks
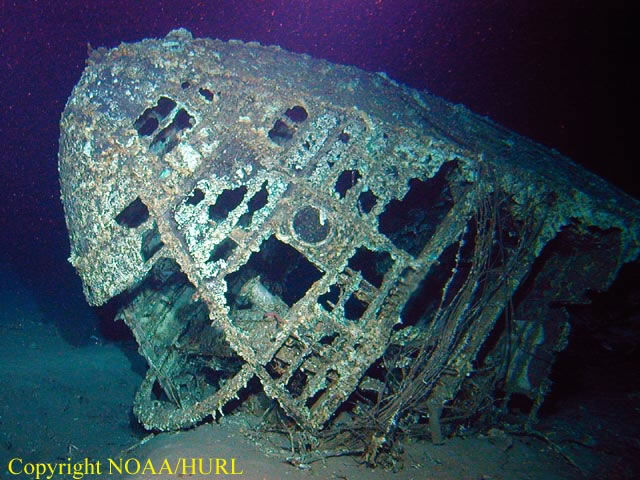
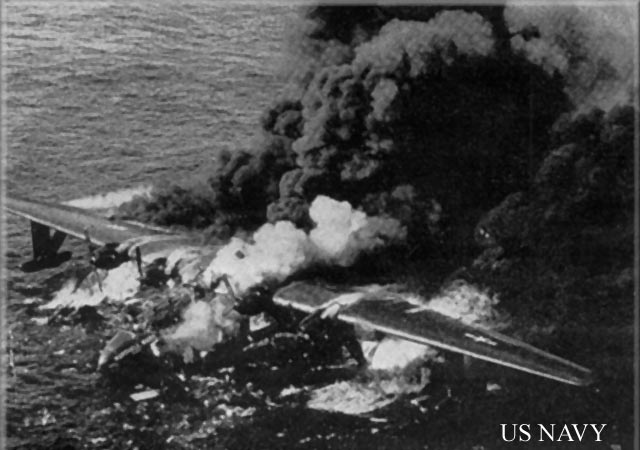
In the spring of 1950, Marshall Mars took off an engineering flight check after having an engine change. The engine caught fire and the crew set her down on the sea off Barbers Point and the Pearl Harbor Channel, where rescue boats, helicopters and aircraft promptly responded. The crew abandoned Marshall Mars as the fire raged out of control, even with a firefighting boat pouring water onto the fire. Soon, a Hollywood-type explosion destroyed Marshal Mars and she sank, never to be seen again. Until 2004, that is…
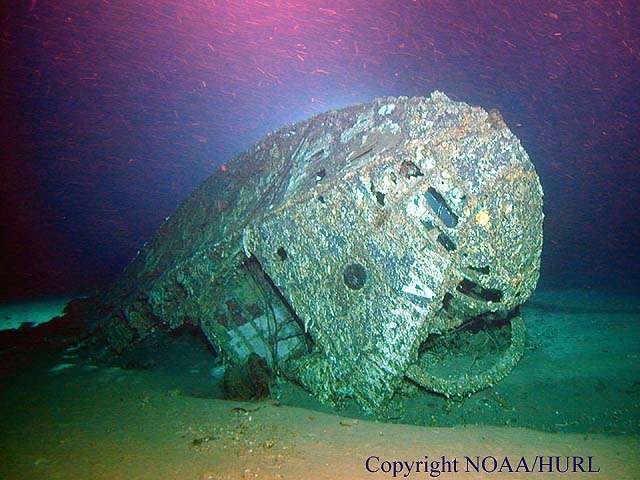
In August 2004, while searching for one of the missing Japanese midget subs from the attack on Pearl Harbor, explorers from the Hawaii Undersea Research Laboratory (HURL) and the National Oceanic and Atmospheric Administration's Office of Ocean Exploration (NOAA), discovered the wreckage of a large seaplane resting on the ocean floor off the Pearl Harbor Channel at around 2,500 feet deep. Surprised at their find, they maneuvered their submersible around the debris field and came across the upside-down cockpit section, with the words “Marshall” still legible.
I enjoyed building this diorama, though I must say that it took me much longer to build the base, dock, figure and sharks, then it did to build the model. But it sure makes an interesting display!
Models, Description and Images Copyright © 2010 by Don Hinton
Page Created 19 January, 2010
Last Updated
19 January, 2010
Back to HyperScale
Main Page

|
 Home
| What's New |
Features |
Gallery |
Reviews |
Reference |
Forum |
Search
Home
| What's New |
Features |
Gallery |
Reviews |
Reference |
Forum |
Search