Special Hobby 1/48 scale conversion
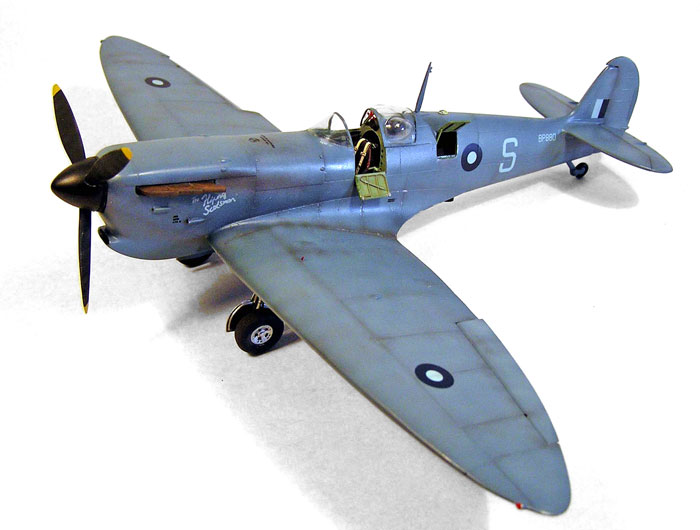
Spitfire PR.ID (PR.IV)
by Fernando Rolandelli
 |
Supermarine Spitfire PR.ID (PR.IV)
BP880, 681st Sqn, Chandina, Arakan Campaign
February 1944 |

Special Hobby's 1/48 scale Spitfire Mk.VC is available online from Squadron
History
PR.IV was the first Spitfire photo recce version built from the factory as such. The first batch might have been converted machines, but soon they were being built at the factory, interspersed among the Vc production line. Hallmark of this version was the “wet” wing, also called “Bowser wing” (I presume after the refueling boats used in ports) or even “D wing”, though to my knowledge there was no such a denomination. Rear tank was removed, nevertheless, total capacity rose to 218gal, giving a range of 1800 miles. Fuel in wings, cameras in fuselage was a logical solution and this version followed it, setting the trend for all subsequent PR Spit marks.
681st Sqn (ex- 3 PR) fought the entire Burma campaign mounted in a variety of machines, among these Hurricane PR.IIs and B-25Cs. Theirs were the first Spitfires in India, BP911 and 935 arriving to Dum Dum airdrome from the Middle East by October, 1942, painted in a dark Blue known as Royal Blue, widely used in the Mediterranean. By mid-1943, this livery had been changed into the more standard “Camotint Blue –Dark” or “PRU Blue” and the insignias to the India Command Dull Blue – India White type (authorized June 1943).
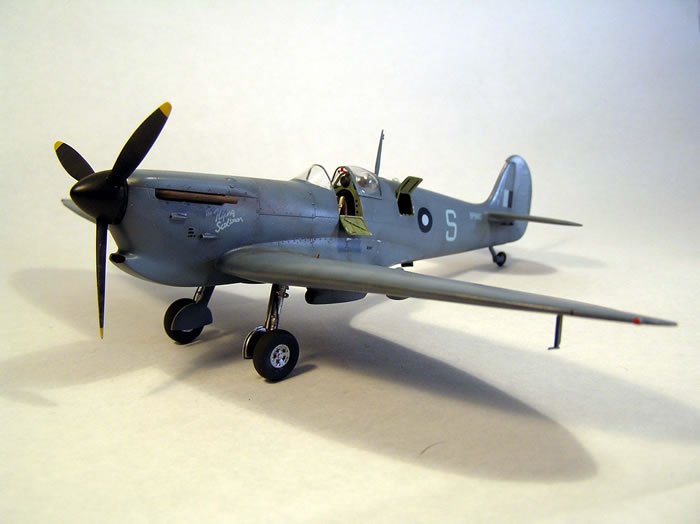
BP880 was a PR.IV built new interspersed among a batch of Vcs. It might have been sent to India via the Middle East in Royal Blue livery, being repainted PR Blue in-theatre (the absence of traces of the bigger roundels in pictures hint at a complete repaint), or else painted PR Blue in factory. Sources claim it did not return from a sortie over the Bay of Bengal in March, 1944; it might be the PR Spitfire recorded as lost on 23rd March with the loss of Ft Lt Cross in “Bloody Shambles III”.
The Kit
You can get to a PR.IV through several roads, so to speak. A Tamiya Mk I would be a possible way, with a lot of aftermarket items involved. I was eager to try a Special Hobby kit, which at least offers a good Vc, and that was the one I chose. I used an Airwaves PR canopy and CMK round exhausts; an Eduard Zoom detail set furnished the cockpit. All other details were scratchbuilt.
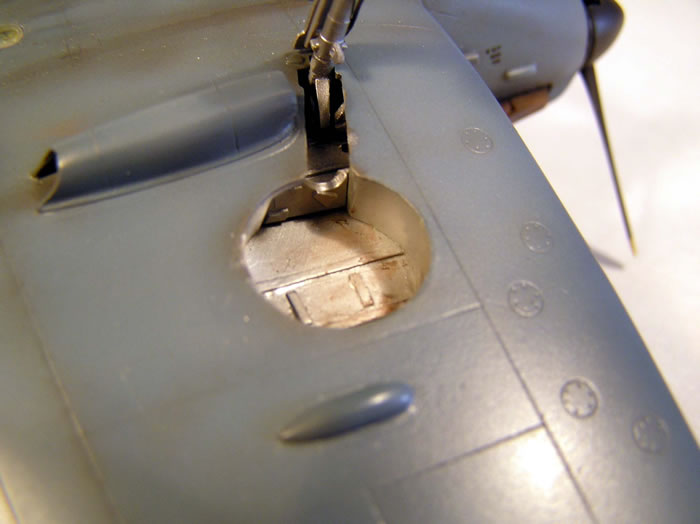
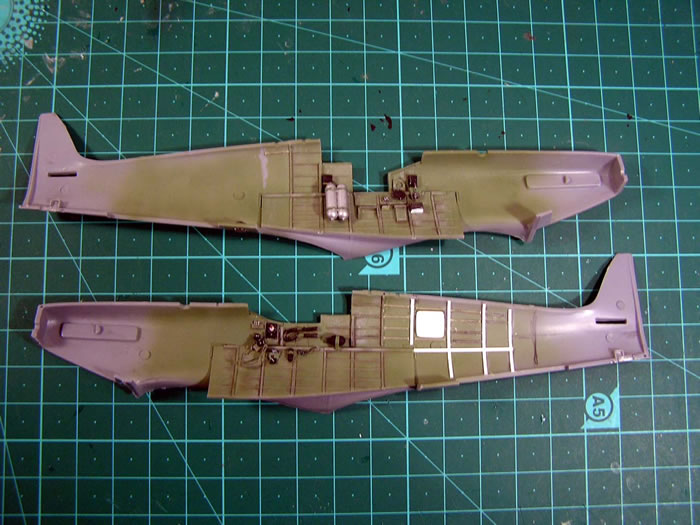
The SH Spit is one of those kits that looks promising in the box but unfolds in a lot of challenges once you start building. Cockpit is a bit flimsy. The idea of extending the sidewalls to the floor of the cockpit is good, though they are not rounded as they would be. They proved difficult to align. The join between wings and fuselage required some putty and sanding, more on the Vokes filter bath and more on the wing’s leading edge. The idea of closing the wheel wells with multiple parts is good and the results accurate, but you should prevent the upper wing to “float” and a gap be created. There is no detail in the wheel well roof (in later boxings, like the Seafires, a separate resin piece is included) so I scratchbuilt some; it ended being a bit heavy. The ailerons look much thinner than the wings but once you pose them with a bit of deflection they look fine (posing them closed must be a pain, though). Same goes for the separated rudder. Undercarriage legs joins are ingeniously made, but dry fit them carefully to get a good fit. Radiator and oil cooler baths need work to be properly set into the wing.
Many of these problems I suspect were self-inflicted, mostly because the added detail inside the fuselage.
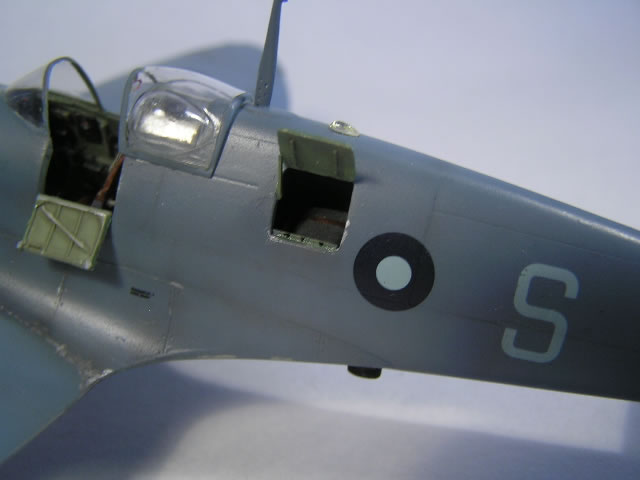
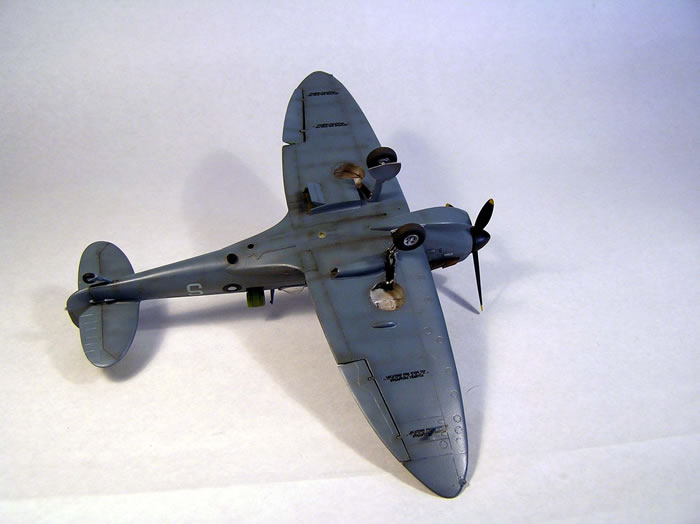
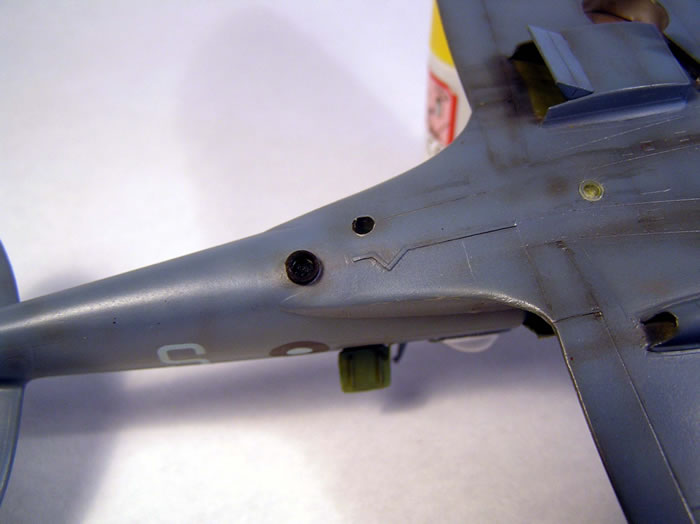
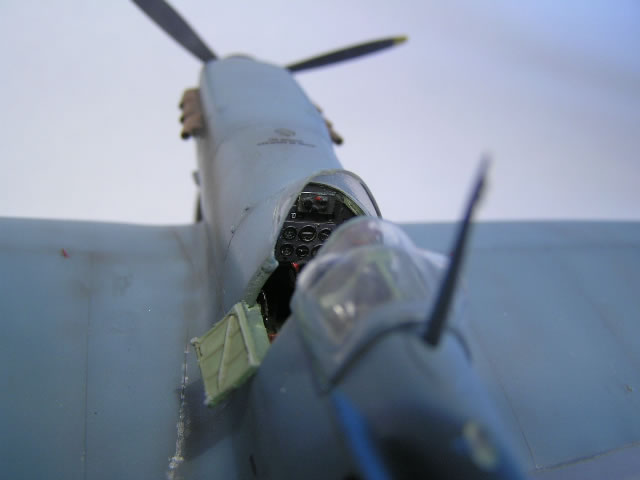
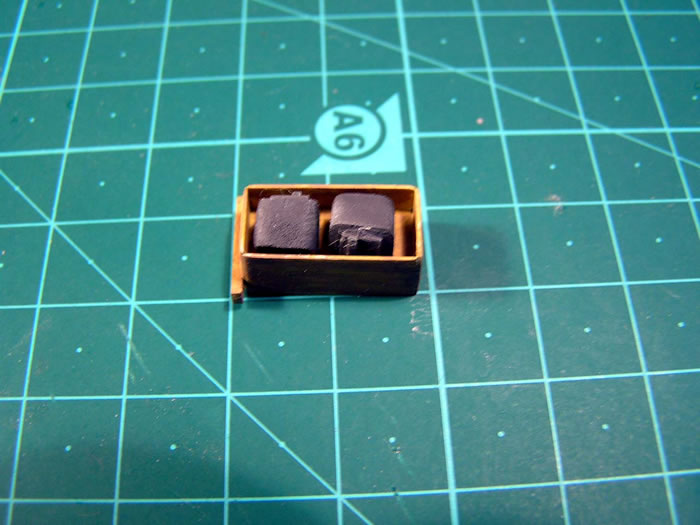
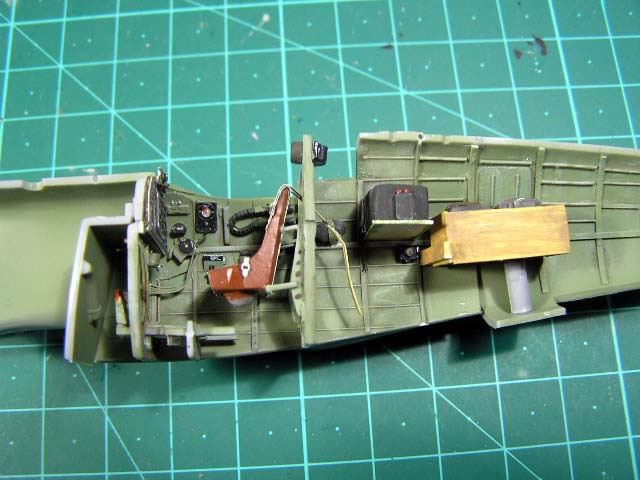
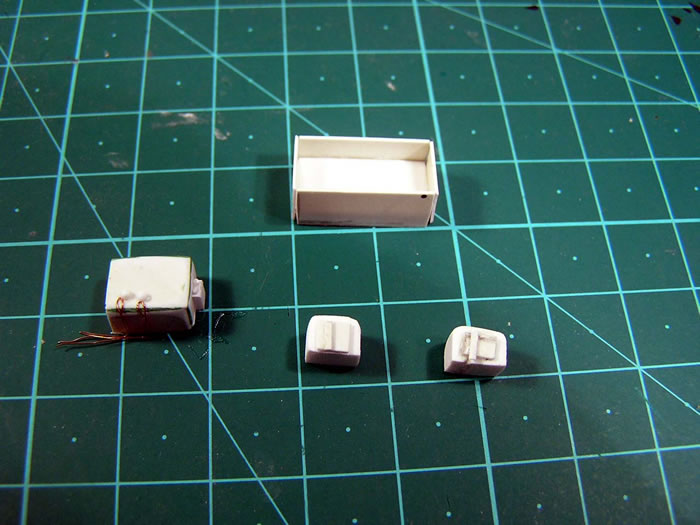
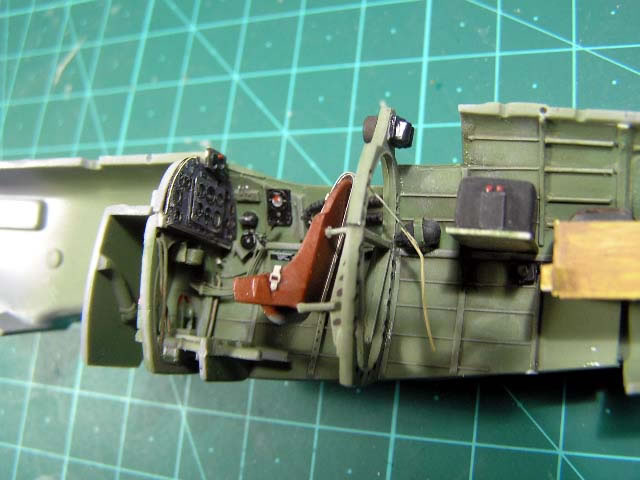
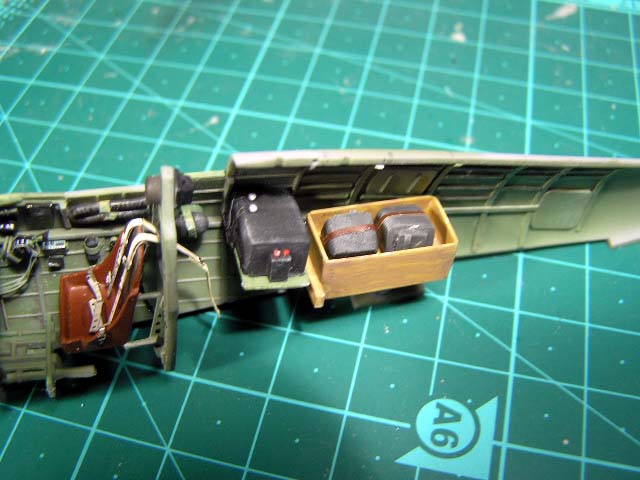
The absence of armor behind the seat gives you little choice but scratchbuild a radio unit, and I wanted to depict the camera equipment behind it, opening the R/T inspection hatch. Therefore, I built a radio rack, and what may or may not pass for a T.R. 1143 radio equipment. Then I made the wooden box for the cameras, and placed two cube shapes for the F.8 cameras (the so-called “W installation”), which more or less aligned with the camera ports drilled on the belly, including the unusual tube extension.
The lenses were made with clear sprues, painted Black on the sides, and Tamiya Clear Green on the inner side. The effect is that of a glazed port and a lens further inside, quite convincing in my opinion. When closing the fuselage the camera container box tilted a bit upwards, but it is not noticeable from the hatch. Cockpit mods included the master camera controls on the lower left and the triggers on the instrument panel. The frameless windscreen was faired in with some work, which included using the lips of the issued one to smooth the openings. SH has molded the characteristic windscreen lip on the clear part (Tamiya-like) and also scribed it on the fuselage; this should be erased.
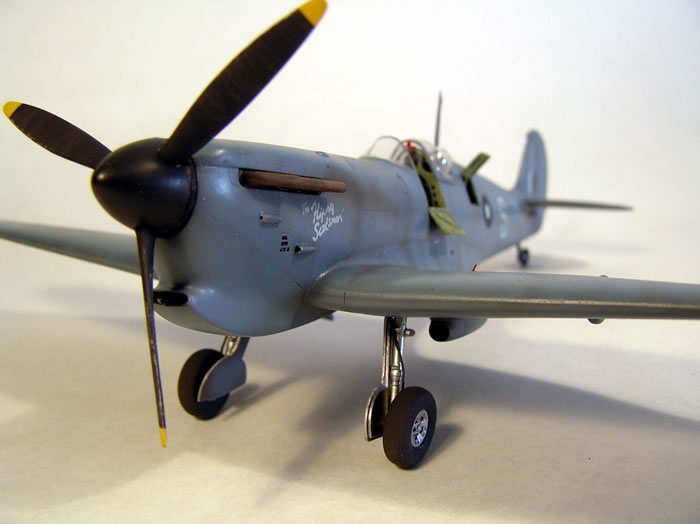
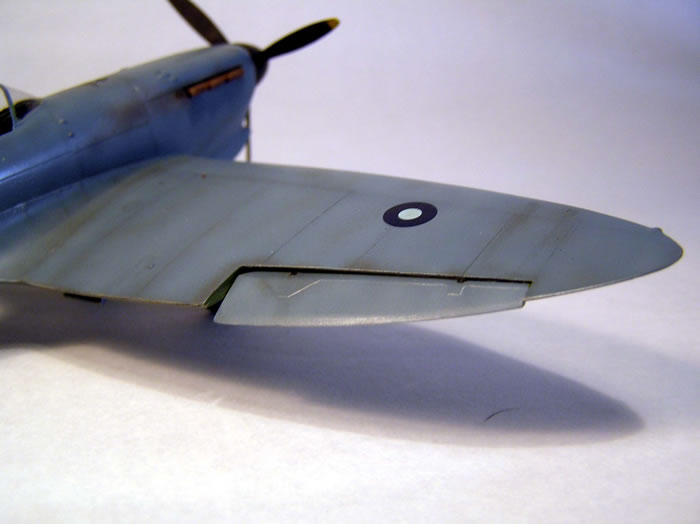
An intake was added to the left side of cowling. The bulges over the fuel pump were made from Parsecs resin added to the left wing, using the Airwaves conversion as a model. I scribed the new hatch on the right hand fuselage (nice to open it in a future project) Provided prop and spinner were spot on for this machine.
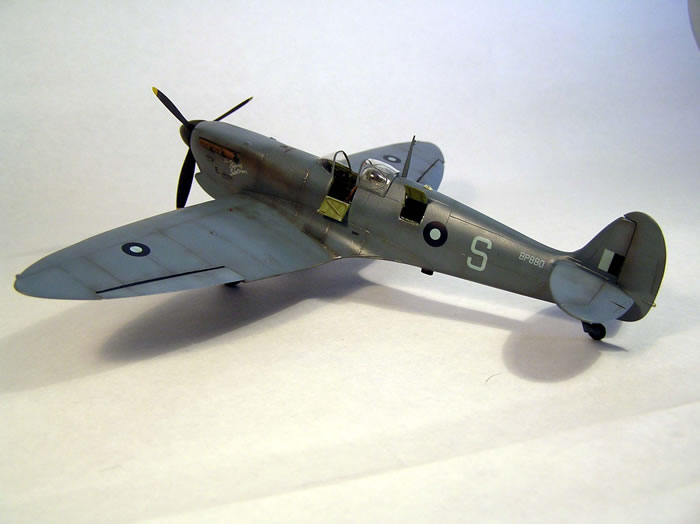
There has been a discussion over whether this particular machine had wheel bay reinforcement strips on the upper wing surface. As a Vc offshoot, it shouldn’t, but a picture hits at their presence (and one of a probably similar machine shows them clearly). I settled for no strips, more evidence is required.
Aerials: T.R.1143 doesn’t use the mast-to-fin post aerial. This machine lacks IFF so no fuselage-to-ailerons aerials.
Painting
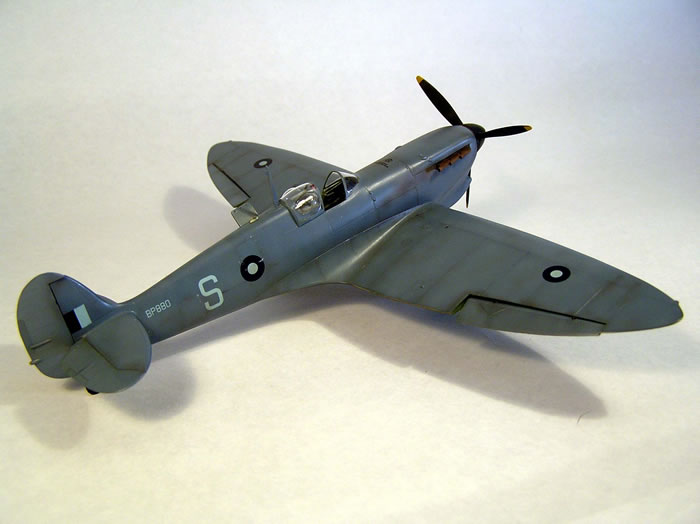
I have seen profiles of this machine both in Royal Blue and in PR Blue, with or without the name “The Flying Dutchman” on it. The only pictures of it I saw, in “The Eye of the Phoenix”, show it undoubtedly in PR Blue, so I settled for it, though it may have been in Royal Blue earlier (but not with the SEA roundels?) I used a heavy preshade and then the Xtracrylix version as the base colour. I then gave a heavy postshade in ligher tones, as well as insisting on the fabric covered tail flying surfaces. The pictures show the machine rather overworked, different from the pristine look you expect from PR machines in the UK, so I weathered it heavily with exhausts fumes made from a combination of Light Grey and Burnt Umber passes, and then dirtied the whole model with Burnt Umber, all after decals were applied.
Decals
I used decals from a Model Art sheet on PR Spits. They performed flawlessly. They show roundels even on the underside of the wing, a practice uncommon (though not unheard off) on PR machines, especially those in PR Blue; I left them off. Serial and code letter sources show in both MSG and India White (and in Sky in the Pavla decals!); I settled for India White, just because I thought they would have used the paints at hand when repainting the whole airframe.
I used some stenciling from the kit’s own. They are very thin, and will fold over at the first opportunity, but otherwise they perform well.
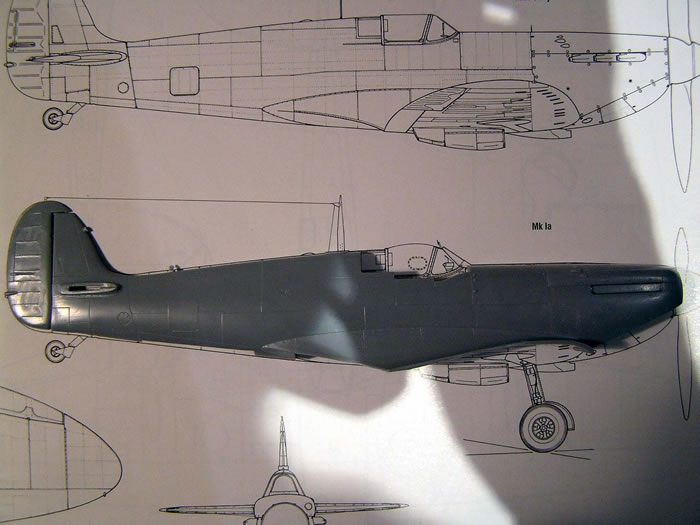
The SH kit is a good, honest Vc, in my view accurate enough. Maybe it lacks a couple of millimeters from rudder post to spinner backplate; if spread over plans (SAMI’s) with the cockpit as point of coincidence, it lacks less than a millimeter in either direction, so the difference is spread over the entire fuselage (and therefore both impossible to correct and less evident). Fit is not Tamigawa, but nothing dreadful; the model squares off and sits properly.
The conversion renders a nice looking model. PRs stand out in any line of Spitfire models. Anyway, I wouldn’t probably attempt another conversion from a SH kit but from a Tamiya Mk I, so as not to craze the marginal fit even more, paying eventually the price of the need for further detailing and correcting the kit.
-
“Merlin PR Spitfires, Classic Warbirds n° 10”, Ventura Publications
-
“The Eyes of the Phoenix”, Hikoki Publications
-
“Bloody Shambles Part III: the Air War for Burma”, Christopher Shores
-
“PR Spitfires on Worldwide Service”, On Target Profiles n° 8.
Model, Images and Text Copyright ©
2011 by by Fernando Rolandelli
Page Created 2 June, 2011
Last Updated
7 June, 2011
Back to
HyperScale Main Page

|
 Home
| What's New | Features | Gallery | Reviews | Reference | Resource Guides | Forum |
Home
| What's New | Features | Gallery | Reviews | Reference | Resource Guides | Forum |