Hasegawa's 1/32 scale
Ki-84 Frank
by Matt Odom
|
|
Nakajima Ki-84 Frank |

Trumpeter's 1/32 scale SBD-5 Dauntless is available online from Squadron
Between a rock and a hard place. That’s where I find myself now. You see – I’m far too late to write a review of this kit, but on the other hand I would find it impossible not to tell the modelling world just how great of a kit it is; I would go as far as to say perhaps my absolute favorite up to this point.
Hasegawa is routinely held on a pedestal which is almost on par with Tamiya, but said pedestal can consistently be found a little lower than that of Tamiya. I love Tamiya as much (more?) than the next guy, however for once I find that Hasegawa’s mantra of fewer parts with just as much detail as their more complex Tamiya counterparts has panned out greatly.
The Plane
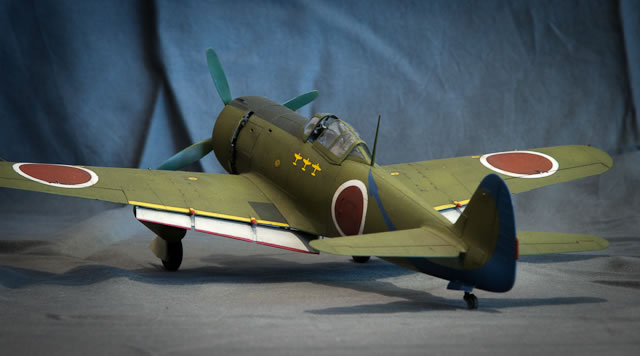
I have always had a love affair with the Ki-84 Frank. It is in every aspect so very Japanese; lightweight, fast, maneuverable – but shows a distinct change in the philosophy with which the Japanese designed their late war fighters – it’s better armed, better protected and surprisingly HUGE. It wasn’t until I completed this model that I realised just how large the Frank is – almost the same size as my recently completed Dauntless, and not much smaller than a P-47 – yet it manages to maintain the appearance of the traditional Japanese fighter: slim and graceful.
So it was without hesitation that when Hasegawa released their 1/32 scale Frank that I immediately picked up the first example I came across. I had already read the reviews here on Hyperscale and I was excited to get home and open the box. I was shocked when I did though – there is surprisingly nothing to this kit! I certainly don’t mean this as a slight, I simply couldn’t believe how few parts were in the box. Further evaluation showed that the model really wasn’t wanting for anything else. The parts breakdown was simple and elegant, the parts molded with a crispness and certainty previously unseen in Hasegawa kits.
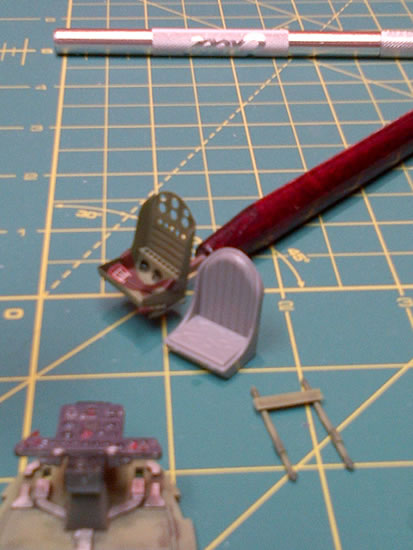
The model is not without its faults however. Bluntly the seat is ATROCIOUS! In a similar vein to Trumpeter’s seat in their 1/24th scale Spitfires, I have no idea where Hasegawa found the seat they included in this kit, but it’s almost reminiscent of a vintage Monogram kit. My other bone of contention is the wing mounted cannon barrels – they’re more akin to something you’d find in a Lego set than in a high end plastic model. Lastly the engine was bizarrely missing some prominent detail. It comes across as Hasegawa cutting corners and using an engine they had previously molded in order to save cost. I was determined to rectify these short comings, and most of my answers were found in the name of Eduard.
Eduard’s Colour Photo Etch Interior set
I purchased Eduard’s photoetched interior set. It’s a very simple set and well worth the investment. I chiefly purchased it for the outstanding replacement seat. If memory serves me correctly, the seat itself is around 17 pieces and – as much as I hate the expression – a model unto itself.
I apologise for the poor quality of the photo I took of this versus the kit seat, but I think you still get the idea of how drastic the difference is. The colour photo etch bits went in nicely, and the set greatly expanded the build time of the kit but not in a way to make it tedious and tiring. Being my first real foray into photo etch I have to say I really enjoyed it.
Decals
I purchased a set of aftermarket decals for my Frank, but I was immediately presented with a problem – the elaborate scheme with a coloured tail presented me with the risk of having a spinner which didn’t match in colour and a Hinomaru which covered an intricate fuselage hatch which I didn’t want to risk having not set properly. I put my usual plan of attack in place and set off to plan out painting the markings using positive or negative masks – a skillset that has served me well lately.
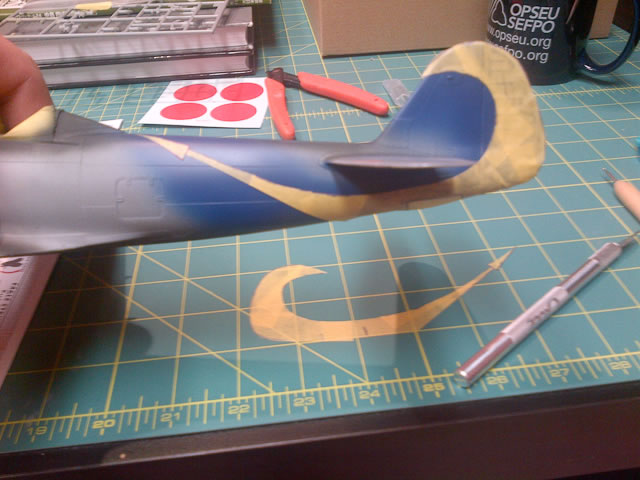
I decided to paint ALL of the markings (except the kill markings). I’ll cover this technique in depth in another article, but I have included some photos of the process. In this instance I decided that positive masks were the way to go. I painted the rear of the fuse and the spinner blue, the leading and trailing edges yellow, and the insignia red (all pre-shaded with Tamiya’s nato black), then I used the aftermarket decals to make masks. I masked off the blue, red and yellow – placing the masks in the same way you would with decals, using landmarks to ensure symmetry. Then I proceeded to paint the white borders of the insignia, masked those as well, and then I set off to work on the painting.
Painting
It’s always odd when painting follows the decaling process isn’t it? I used Brett Green’s usual technique which I originally discovered in his book How to Model the P-47 Thunderbolt – starting with my base colour and then mottling in two or three lighter variants of the same colour. I followed up with everyone’s favourite mix of brown/black sprayed along the major panel lines and lastly I used the same colour, but only two drops in a colour cup of clear flat to spray the exhaust staining. Using clear flat instead of just thinning the mix further allows for more control than having highly thinned paint, but still enables you to build up the colour very slowly. Lastly a wash of Pro-Modeller’s dark dirt was applied – if you haven’t tried this product yet then I DEMAND you do so. It has all the benefits of a traditional wash, without any of the worry.
Odds and Sods
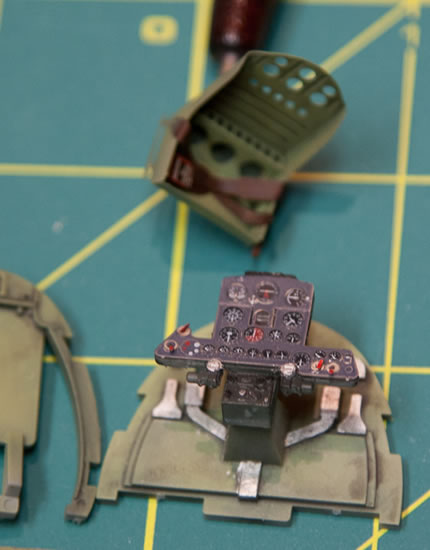
I replaced the horrible gun barrels with the amazing Master Model pieces – the cannon’s used in this aircraft aren’t currently made by Master Models, but the actual weapon was more or less a clone of a similar American Browning, so a pair of those barrels substituted nicely. I replaced the kit exhausts with Ultracast items simply because the asymmetrical exhaust is such a prominent feature of Frank and the Ultracast items are suitably gorgeous.
Hasegawa has thoughtfully included cowl flap actuators for those of us who elect to display the flaps in the open position – perhaps their way of apologizing for the detail I felt necessary to add to the engine. I added the prominent propeller pitch adjustment mechanism that sits on top of the crank case, and I wired the engine and put the balance tubes on the face of each of the forward cylinders. These details are much more visible than photos would suggest.
Wrapping up, all in all this kit was absolutely fantastic and my gripes with it were dealt with in mere minutes. I would build another one of these kits again in a second, the fit was beyond reproach and no filly was used anywhere. It’s a wonderful model for someone who wants a nice quick clean build out of the box or for someone on the opposite end of the spectrum who wants to add the requisite photo etch and resin parts. The Frank sits beautifully and its shape belies its size. I hope Hasegawa continues with its trend of building 1/32nd scale Japanese aircraft – I’m still waiting for them to mold me a George…..
Model, Images and Text Copyright ©
2012 by Matt Odom
Page Created 6 August, 2012
Last Updated
8 August, 2012
Back to
HyperScale Main Page

|
 Home
| What's New | Features | Gallery | Reviews | Reference | Resource Guides | Forum |
Home
| What's New | Features | Gallery | Reviews | Reference | Resource Guides | Forum | 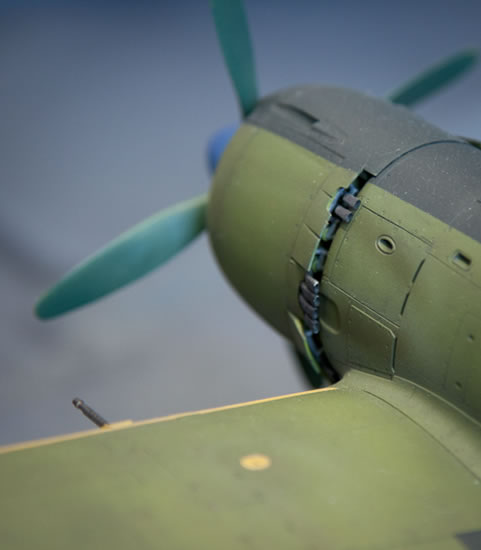
_fs.jpg)
_fs.jpg)
_fs.jpg)
_fs.jpg)
_fs.jpg)
_fs.jpg)
_fs.jpg)
_fs.jpg)
_fs.jpg)
_fs.jpg)
_fs.jpg)
_fs.jpg)
_fs.jpg)
_fs.jpg)
_fs.jpg)
_fs.jpg)
_fs.jpg)