Tamiya + Aeroclub + Pavla 1/48
Spitfire PR.Mk.IV
by Fernando Rolandelli
|

|
Supermarine Spitfire PR.Mk.IV |

Tamiya's 1/48 scale Spitfire Mk. I is available online from Squadron.com
Background
The PR.IV was the first photo reconnaissance Spitfire purpose-built at the factory.
It incorporated the so-called “bowser” wing, sometimes called “d” wing, which was a kind of avant-la-garde “wet” wing, incorporating a conformal fuel tank in the leading edge (the “D” shaped torsion box originally intended for the condensation cooling system). Despite the removal of the rear tank, total fuel capacity rose to 218gal, giving a range of 1800 miles. It was a versatile machine that could be fitted with a sand filter, and various standardized camera combinations allowing for high and low altitude aerial photography. It served right up to the end of the war, especially in 681 Sqn in the CBI theatre.
The Kit(s)
Well, if you have in your stash a heap of Tamiya or Special Hobby/Classic Airframes/Eduard early Spits or Seafires, and love them dearly (as I do, in my heart), my advice would be skipping this section entirely. Go on reading from here on your own risk.
After building several Tamiya and Special Hobby Spits, with more on the “to do” list, and having made some corrections to them (mainly correcting the wing shape by thinning the wing chord in the Tamiya kits) which certainly improve their look, I decided to check seriously what is considered their main flaw, that is, the relative position of the wing and cockpit.
You see, in a real Spit, the back of the entry door aligns dead on to the point where the wing joins the Karman fairing in the fuselage (check any drawing or the Eduard Mk.IX superkit); the line (actually a bulkhead) coming straight down from the front of the rear window. In the Tamiya/SHs, the wing is much further back, almost 4 mm. It is one of those inaccuracies that once you spot it, it haunts you for your lifetime; if you drop the entry door, it becomes sorely apparent.
Up to date, there is no correction to this and no kit is correct (exception made of the latest Airfix Mk.I/II/Va, and that one with a caveat; and the Hasegawa Vb).
Aeroclub, which issued its famous Mk.IX fuselages to replace the short one in the Hasegawa kit, has not deemed necessary or commercially viable doing the same with these kits (probably because the Hase kit was declared FUBAR as soon as it appeared, and the Tamiya one was well established by the time knowledge of this inaccuracy –certainly no less grievous- became widespread).
To our advantage, we can use an old Spitfire apothegm, that is, that all Spitfires measure the same from firewall to rudder post. That means that we can graft the nose of a single-stage Merlin (I-II-V-VI) into a two-stage fuselage (VII-VIII-IX), and be still within legal boundaries.
Now, where to get spare Mk.IX fuselages? The first source would be those Aeroclub Mk.IX fuselages, now obsolete because of the Eduard kit. They were not cheap and nowadays have all but vanished, but if you have a heap of them and are replacing the Hase/Aeroclub combo for the Eduard kit in your Mk.IX projects, that’s a way to go. I cannot say about the Loon Models equivalent, but I guess it would be the same. Another obvious, cheaper and available source would be the ICM kits (its fuselages surplus from your F.XIV projects using Airfix PR.XIXs fuselages), if you correct the weird shape of the spine. If only Eduard would sell fuselage sprues instead of wing ones!
For this model I chose the Aeroclub fuselage, several of which I have available, combined with the wings and everything else from a Tamiya Mk.Ia; the Eduard FE256 Zoom set and the customary Airwaves oil cooler rounded up the basic Spitfire “Mk.V-type” model. For the conversion to PR.IV, the Pavla conversion set provided eventually the seat; the Airwaves conversion the prop blades (and provided the model for the various bulges and panel scribing), while the canopy came from Aeroclub. A CMK detail set provided the round exhausts. Cameras, radio set and various cockpit fittings would be made from scratch.
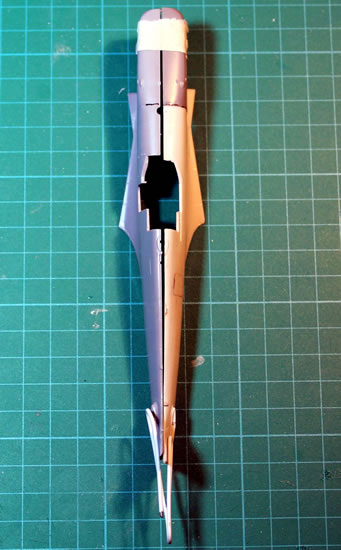
First of all, the butchery. I cut the noses by the firewall panel, while keeping the wing root in the Aeroclub fuselages.
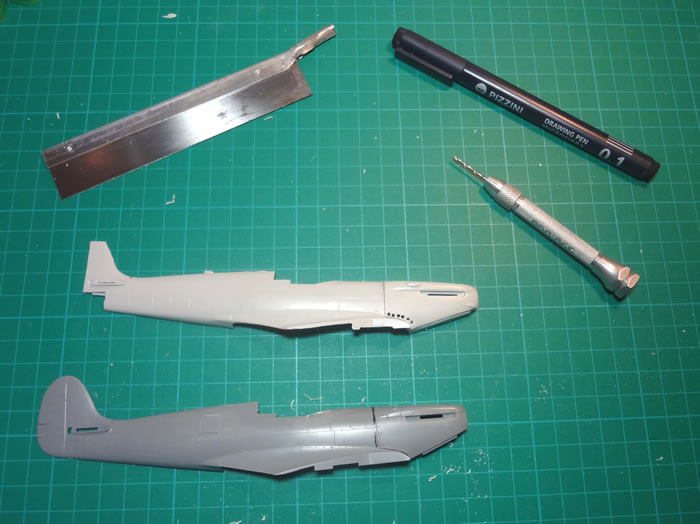
The parts mated reasonably well; the squarish and wider Tamiya nose showed fully, leaving a gap in the Aeroclub fuselage joint, but the outer skin matched well. Even so, it was a long juggling: sanding, dry fitting, committing to glue, checking, disassembling, correcting, gluing again, and so on.
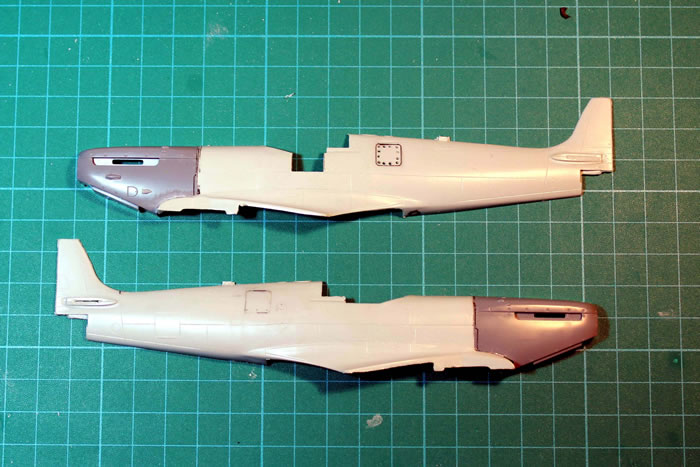
Fuselage to wings was more difficult; the Aeroclub fuselages are very thick, and the Tamiya wings have lugs which have the bad idea of only matching their own fuselages. All this combined with the wider rear fuselage join in the Tamiya wings promised long sessions of putty and sandpaper, but it looked as if the parts basically matched. Once I got “preliminary convinced” that the structure was viable, I committed to assembling the interior.
Cockpit Interior
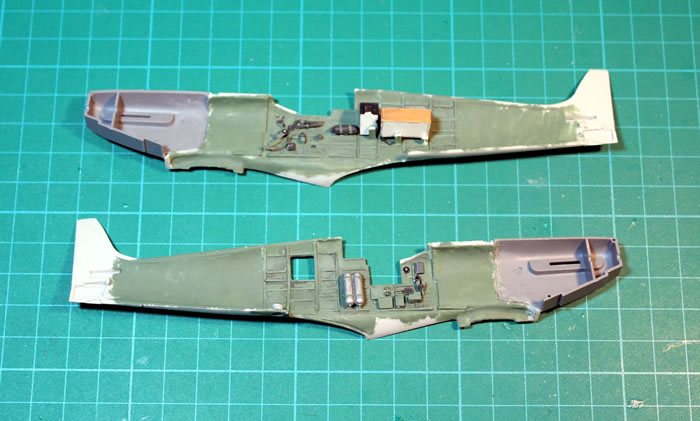
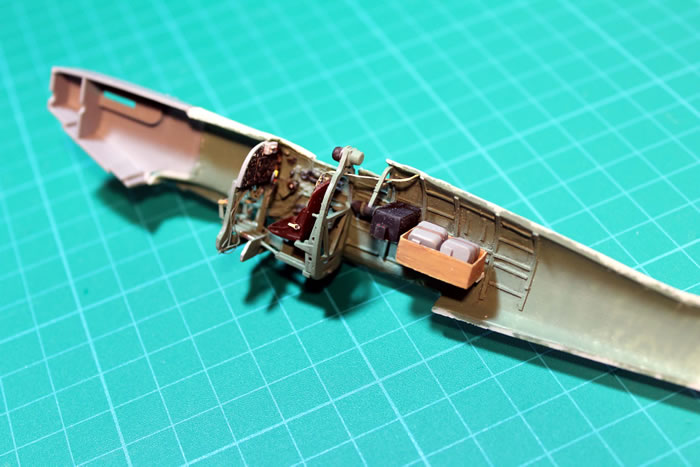
Tamiya pieces and Eduard PE bits formed the basis for the cockpit interior; I modified the false “floor” as customary. Tamiya pieces fitted reasonably well; though they are made for the slightly shorter cockpit in that kit; the Eduard bits dress it up appropriately; the u/c control is outstanding. Scratchbuilt items included the camera control panels and various fittings. The seat I replaced by the resin in the Pavla set, deprived of its molded-on lapbelts.
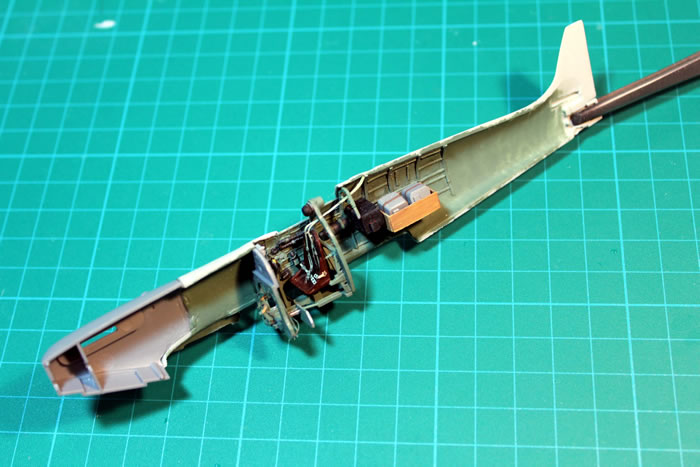
There is no cockpit armour in the Tamiya kit, and this plane lacked it altogether, giving you free sight into the radio, and camera compartment. The radio and camera compartments were scratchbuilt; I thinned the very thick Aeroclub halves with a motor tool, made the structural detail out of styrene strip;. I set for a “W type” camera arrangement: two F.52 verticals in a wooden box; the lenses I made with two pieces of clear sprue, a bit countersunk.
Fuselage
I opened both the left camera and the entry hatches, replacing by their similar (extracted from the Tamiya fuselage) and scribed the one in the right side using the template in the Quickboost PR.XI conversion set. The fin in the Aeroclub fuselage is very thick; I furiously sanded its inside to scale; the rudder came from a Hasegawa IX kit. The Tamiya nose being wider, there was a gap all along the Aeroclub fuel tank cover, which was filled with strips of styrene and putty. I also made up the sill for the rounded PR windscreen with styrene.. A small intake on the left side of the cowling (I assume it is related to the Merlin 45 conversion) was made from scratch.
Wings
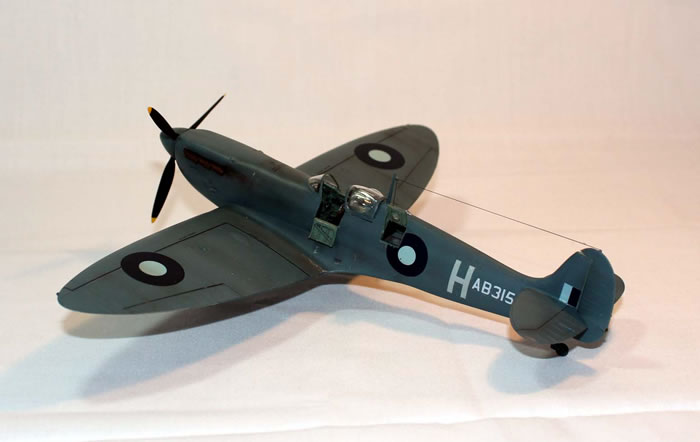
Having settled for a PR.IV, I of course had to erase the gun panels, and to rescribe some more. This was done without difficulty, but it was tiresome work. One of the camera ports goes in the wing “tail”; moreover, the lens shroud is visible under the radio. I made a tubular extension, taking care not to craze the camera box. The Airwaves oil cooler went without further ado.
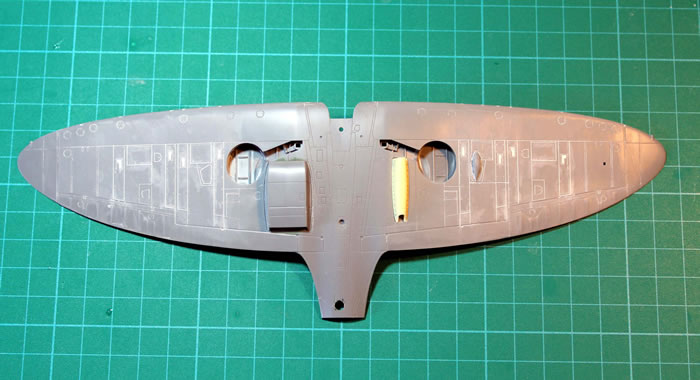
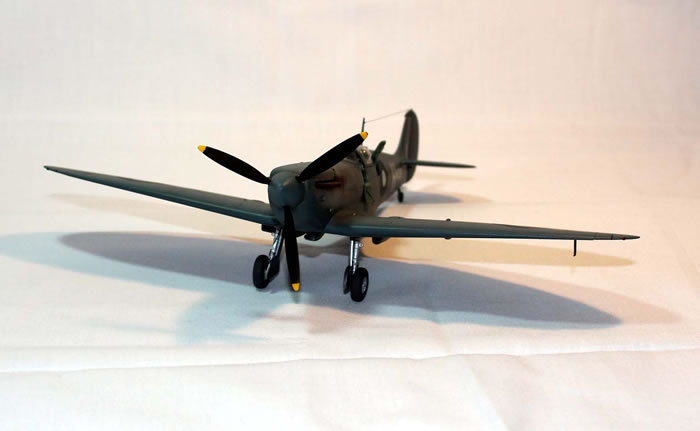
I made the bulges over the wing pumps with styrene rod, as the intake in the left nose. Too late in the construction stage (the model was already painted and decaled) I realized that this machine would most probably have had metal ailerons; it was too late for me, but you could just sand the rib detail to convert them.
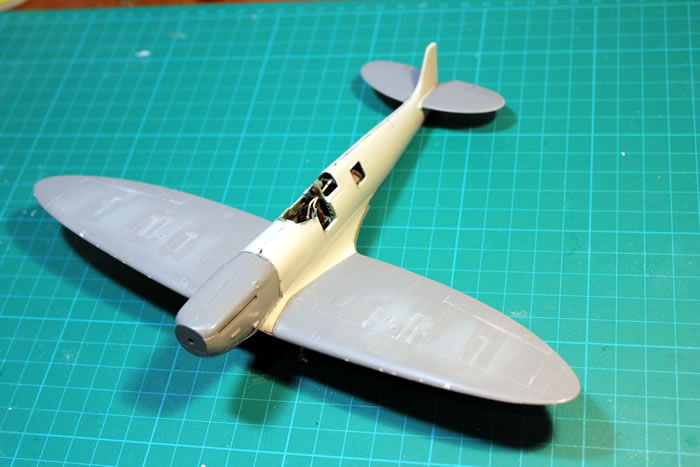
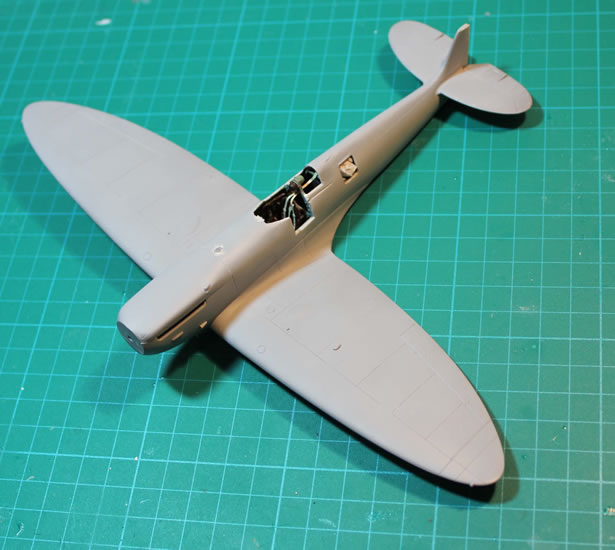
Matching Everything
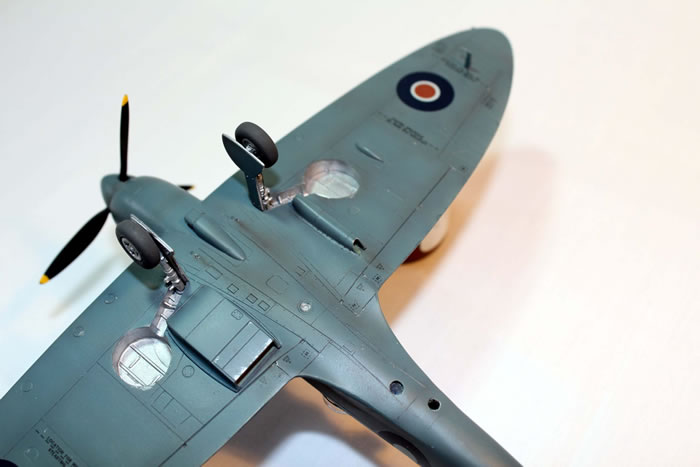
As foreseen, wing and fuselage matched better than some short run kits. The wing roots in the Aeroclub fuselage were sanded until they went inside the lugs on the Tamiya’s wings. Wing roots were puttied and sanded and then rescribed. The wing “tail” fit was helped by some plastic strip, being mindful of the camera ports. The much wider trailing edge fairing was carefully trimmed and shaped in situ. I made a mock up installation of the u/c to check alignment (my nightmare all along the build), and it looked acceptably right (though the fuselage looks just slightly “crooked” when seen headlong, the dihedral at wingtips and the height of the tailplanes look ok).
I only then installed the windscreen and PR hood, which were Aeroclub vacuforms. Fitting the windscreen was again a matter of dry fitting, gluing, thinking it over, disassembling, and so on (the final result was not entirely perfect); the rear quarterlight was the Tamiya piece. Surprisingly, the Aeroclub fuselage displays the infamous “step” between the forward quarterlight and the rear of the entry door; I chose to cover it with small styrene slabs resting on the seat carrying bulkhead (but it took the cockpit a bit forward. More on that later) I replaced the Tamiya propeller, needle thin, by the wider blades in the Airwaves conversion, using a simple jig (a cardboard sheet with a hole for the base plate shaft and a straight pencil line).
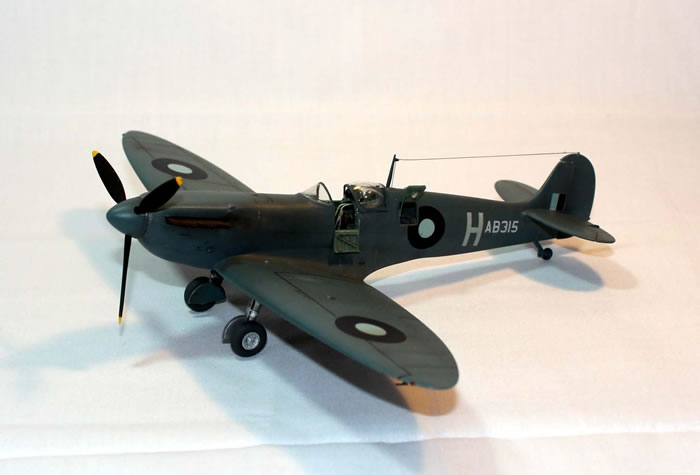
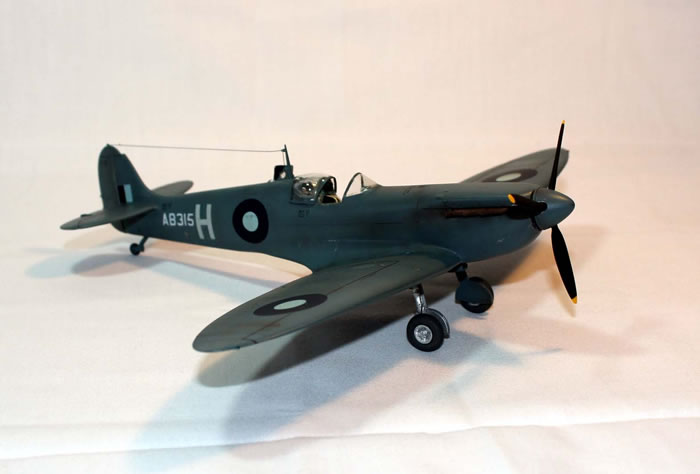
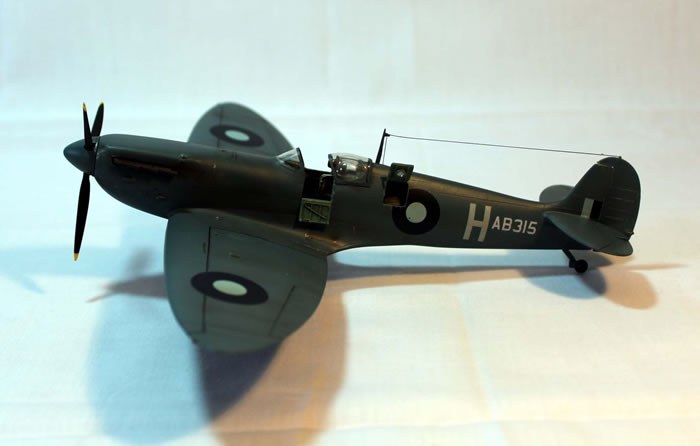
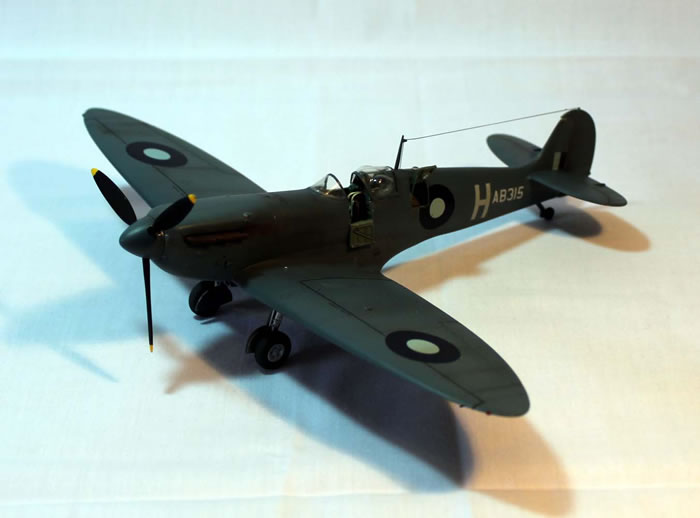
Having long been interested in the CBI theatre of operations, I found in the Model Alliance 48-131 decal sheet an example that fit the bill exactly, AB315 “H”, 681 Sqn, operating out of Comilla in 1944. Painted PR Blue at the factory, with Type B roundels converted into CBI type by over painting the Red centres in India White, an oft-seen practice. The associated On Target booklet declares “private photos” as the source; I made what limited checking one can do from home, and found that indeed AB315 was built by Supermarine as part of the contract B19713-39 as a PR.IV.
PR Blue is a colour that renders itself well to the kind of abuse we modellers like to give to our paint jobs. I used Xtracolor enamels, over a Dark Brown preshade; then, I post shade it “mottle fashion” in a lighter shade of the same. Wheel wells I painted Silver using an Xtracolor “Steel” paint (one has to make do with what he has available, here at Nairobi); it can be persuaded to be hand painted with little fuss. I use to coat my models in Xtracrylix Gloss Varnish; that way, they are impervious to washes. This time, a non-too-rare occurrence happened: the varnish, even diluted with denatured water, bleached. It was quickly corrected by a coat of pure varnish applied by handbrush; it certainly looks terrible when you are applying it, but it settles remarkably well. Matt varnish was applied making a mix of Xtracrylix Flat, an acrylic artist’s matt cote, all diluted with Xtracrylix thinner. It also worked well. Then I proceeded to wash the model in a Burnt Umber concoction and to spray the engine exhaust fumes; first in a Light Grey, to mimic the fuel residue (typical of the rich mix used in prolonged high altitude flying), and then in the same dark concoction. I hit on a brilliant way of mimicking the dirty, battered look of these aircraft engine covers… no, that’s a lie; actually I overdid the exhaust fumes, and as a last resort proceeded to wash them off with White Spirit (the cheap one you get at a supermarket here in Nairobi); the acrylic clear coats make the paint impervious to this, and the effect was smearing the dark wash all around the nose and mid fuselage; the effect looks quite convincing. Exhaust fumes were then reapplied.
MA decals are thin and allow themselves to be fooled around until you hit the correct location, allowed they are floated in water; no decal setting solution was needed. I had to cut the portion in the left side fuselage roundel that would go into the camera hatch. The location of the upper wing roundels (which are a non-standard size) was determined by looking at pictures of Mk.XIs in “The Eyes…”; the undersurface ones are in standard Spitfire locations. The “H” is White and should stand more clearly than the MSG serial; however, as the MSG has been printed more solidly, the White is translucent and the effect is the opposite! General stencilling came from a sheet of Mk.IX stencils from Eduard.
Was it worth? Well, the answer is “yes”.
The Aeroclub fuselage should be worked with care and in the end its cockpit is just a bit too forward (the Airfix Mk.I shows the same inaccuracy, for the same reasons, as well as a couple of others). Tamiya’s are high quality, detailed parts and there is where the final model shows when compared to one made using an Airfix Mk.I as a base (a parallel project of mine), which looks considerably chunkier. Besides, the project was complicated more by the conversion to PR than by the kitbashing; let’s add that most of the interior detail would only be visible under very close and minute scrutiny, if at all; if I made another one, I would curtail the amount of scratchbuilt detail by a good deal.
Probably I shall try some more (kitbashing the whole SH Spit/Seafire family would be a feat), at least until a correct, first-class kit appears on the market.
Reference Sources
-
“Merlin PR Spitfires, Classic Warbirds n° 10”, Wojtek Matusiak,Ventura Publications
-
“The Eyes of the Phoenix”, Geoffrey J. Thomas, Hikoki Publications
-
“PR Spitfires on Worldwide Service”, On Target Profiles n° 8.
-
“The Supermarine Spitfire. A Comprehensive Guide for the Modeller. Part I: Merlin Powered”, Robert Humphreys, SAM Publications.
Images and Text Copyright ©
2013 by Fernando Rolandelli
Page Created 8 November, 2013
Last Updated
8 November, 2013
Back to
HyperScale Main Page

|
 Home
| What's New |
Features |
Gallery |
Reviews |
Reference |
Forum |
Search
Home
| What's New |
Features |
Gallery |
Reviews |
Reference |
Forum |
Search