Blackburn B.46 Firebrand
TF Mk.V / Mk.5
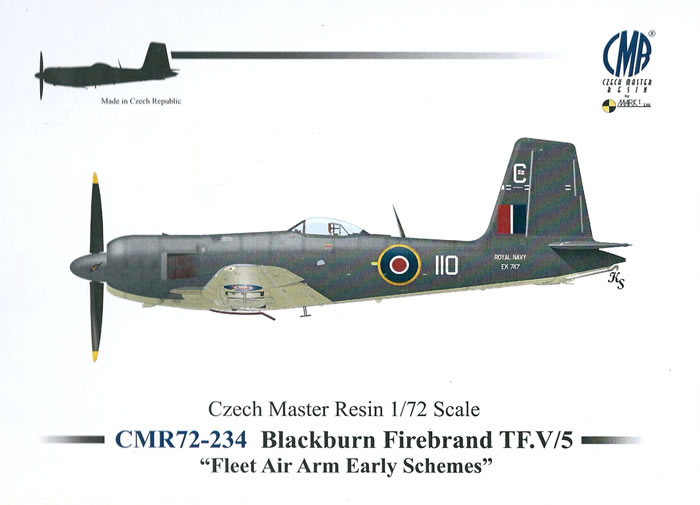
Czech Master Resin, 1/72 scale
S u m m a r y : |
Catalogue Number: |
CMR72-234 Blackburn B.46 Firebrand TF Mk.V / Mk.5 |
Scale: |
1/72 |
Contents & Media |
89 green, 5 black, and 2 clear resin parts; one pre-coloured and one plain PE fret of about 165 five parts, 2 vac-form canopies; and a decal sheet covering 10 options. |
Price: |
Available online from these on-line stockists: |
Hannants |
West Coast Hobbys |
Aviation Megastore |
GBP 47.49 |
Can$59.00 |
Euro 53.68 |
Click these links for currency conversion and more CMR stockists. |
Review Type: |
First Look. |
Advantages: |
This is the best Firebrand TF Mk.V kit to date. It is thoroughly researched, highly detailed, produced to very high standards, has superb instructions, and uses a good blend of different media. |
Disadvantages: |
None apparent, |
Conclusions: |
This is the best Firebrand TF Mk.V kit to date.
Comparison of the CMR and Aki Firebrand kits has obvious interest to anyone tempted to build one; after all, at this price level you want to be sure of buying the best. Other than its slightly simpler construction, Aki’s kit is beaten on all counts by CMR’s. The CMR kit is far more accurate, has superior detail, and offers a more comprehensive package; with significantly more payload and markings options; all for around 10% less cost.
This kit has superb detail, and all components are very good quality. The use of various media types make this kit a very complete package; although I think that not offering paint masks, as provided with previous CMR kits, is a backwards step, they will be missed by many I am sure.
This is generally a very simple kit from an airframe standpoint, with only the Fowler flaps presenting much of an assembly challenge. There are however quite a few very small resin and PE details that some may find quite fiddly.
Payload selection may rest with the degree of PE talent a modeller possesses. PE-maestros will be drawn to multitude of tiny rocket fins, whilst those with a PE-allergy will likely opt for a mine, bombs or drop-tanks. The in-betweeners will probably plug for the torpedo with air tail.
This kit has the potential to be a most enjoyable build, and result in a stunning model. I recommend it highly. |
Reviewed
by Mark Davies

HyperScale is proudly supported by Squadron.com
First conceived as a naval interceptor in 1939, the Firebrand was to experience a very drawn out gestation that meant it would not see service until after the end of WW2. The Firebrand was intended to use the Napier Sabre H-24 engine; and despite this engine’s considerable promise, the Firebrand Mk I proved to be under-powered. Furthermore, development of Supermarine’s Seafire promised an interceptor of superior performance and maneuverability to the Firebrand.
However, recognition of the Firebrand’s load-lifting capability led to it being re-designed as a torpedo fighter. This required the enlargement of the wing’s centre to enable the undercarriage to clear a centrally-slung torpedo. The result was the Firebrand TF MK.II. Most of the few of Mk I’s were converted to Mk.II’s, but a decision to allocated Napier Sabre production to the Hawker Typhoon meant that only twenty-one Mk III’s were built.
The Firebrand was redesigned again, with some TF Mk II’s converted, to use the Bristol Centaurus radial engine to become the TF Mk III; but this version suffered from directional control problems and only twenty-seven were built. This led to further modifications and the TF Mk.IV. The TF Mk.IV had an enlarged tailfin and rudder, and ailerons that both sat at a neutral position of +6 degrees to improve longitudinal stability. Wing-mounted dive brakes and a two-position torpedo mounting were also added to this version. It first flew in May1945, and 102 in total were produced.
.jpg)
The TF Mk. V and 5A had various detail improvements compared to the Mk.IV, including horn-balanced elevators, longer-span aileron tabs; whilst the Mk.5A had powered ailerons. Production totaled 68, and about forty were also converted from Mk.IV’s. The Firebrand was replaced by the Westland Wyvern in 1953.
Previous 1/72-Scale Firebrand Kits
Rareplanes and Airmodel both offered vac-forms; the former a Mk.V, and I cannot say for the latter. Magna offered all marks as rather basic resin kits with white metal parts in the early 1990’s; and theirs are still the only kits of the Mk I and III available. One of Valom’s earliest limited run kits was a Mk.II, and is also still available. Aki Products issued a beautifully cast resin kit of the Mk.V a few years ago. This was more akin to an injected kit in the way that the parts were presented. A build article by Brett Green said it was very easy to assemble and nicely detailed; but it offered only one decal option, had fixed flaps, and only a torpedo or one type of rocket for under-wing stores. Lovely kit that it is, the Aki offering still has some faults:
-
What should be a 3 degree offset to starboard of the tail fin to counter engine torque is cast in the wrong direction to port (possibly attributable to a reversed image in the Warpaint publication on the Firebrand).
-
The fuselage profile along the length of the rear fuselage monocoque is inaccurate.
-
The spring balance tabs on the ailerons are for a Mk.IV, and not the low inertia type fitted on the Mk.V.
-
The catapult hooks and the two recesses for them are completely missing from the underside of the wing
-
The engine looks impressive but is the wrong installation for the Firebrand, as the engine and exhaust configurations are like those of a Hawker Sea Fury. The Firebrand had eight rather than the Sea Fury’s nine exhaust stubs each side of the fuselage, as well as two long exhaust pipes on the fuselage underside. Less apparent is the different arrangement between the two aircraft types within the cowl.
Suffice to say, the Aki kit set the benchmark for Firebrands. Uuntil now, that is.
CMR 235 - The Provost Kit |
Overview
The kit reviewed here is typical of CMR’s products released over the last few years. It has a highly detailed resin airframe, clear vac-form canopies, and includes plain and coloured PE parts by Eduard. CMR supplies these parts, a sheet of decals and several pages of instructions in a large and sturdy top-opening box. This is the second CMR new release I am aware of without pre-cut paint masks, which have been a nice added value feature of CMR kits for several years past. I assume that this is a cost-cutting measure by the new Mark 1 management. It is not the end of the world, but it removes an edge that CMR kits had over much of the competition; and I think it is a step backwards.
The instructions acknowledge the Firebrand experts who helped with the research for the kit. In fact, CMR’s global network of experts and enthusiasts is a major strength that underpins much of their quest for accuracy and high levels of detail.
Comparison will inevitably be made of the CMR and Aki kits. I do not own both to make a direct comparison; but nevertheless, I have read various reviews and build articles on the Aki kit, and sought advice from aviation historian and Firebrand expert, Andy White. I am aware of several features that contrast the two releases as a result; and I shall mention them as they come up in my description of the CMR kit.
Kit Contents
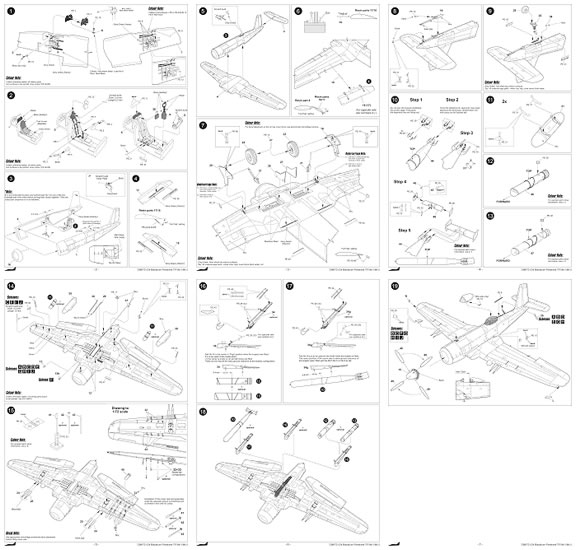
CMR’s instructions have a parts map and use an easy to follow diagrammatic format. What is immediately apparent is just how crisp and well drawn the graphics are. I rate the constructional diagrams as some of the best I have seen, mainstream kit brands included; in fact Tamiya is the only company that I can think of that would rival them.
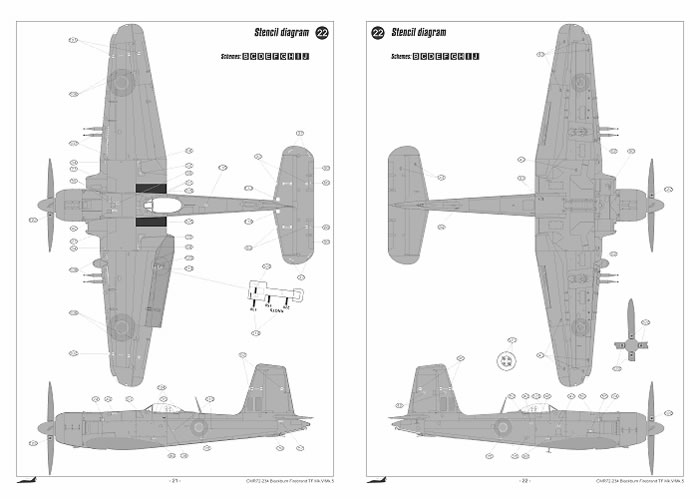
All text is in English, with instructions used where diagrams alone will not suffice. Notes cross-reference features specific to the ten colour schemes. The schemes are dealt with by several pages of monochrome shaded diagrams. A further page is devoted to payload colours and markings, and two more guide stencil placement. Paint colours have at least a generic name, whilst some have their military name and FS-595 number equivalent. As with their recent Provost kit, no images of the aircraft in service or walk-around shots are included, despite this being common past-practice with CMR’s hi-tech style kits. This is less of an issue than no paint mask, but they it did do something for the kit’s credibility when you could see photo images of the same aircraft as represented by the kit decals. I cannot imagine much cost is saved by leaving out two or three laser-printed pages.
The kit is packed in CMR’s usual heat-sealed plastic pouches that separate the resin parts broadly by size and fragility. PE parts and canopies are further sealed and protected, as are the decals. A final outer bag then encloses everything, so there is little chance of parts going missing until unpacked. However, I do advise care opening the pouches, just in case some small parts have broken off their casting blocks or been damaged.
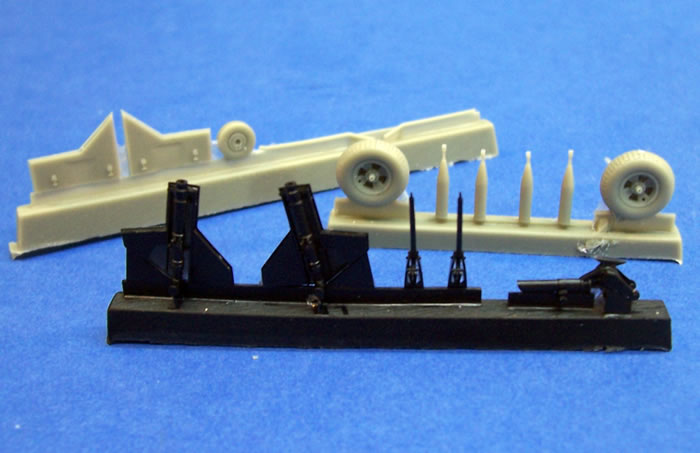
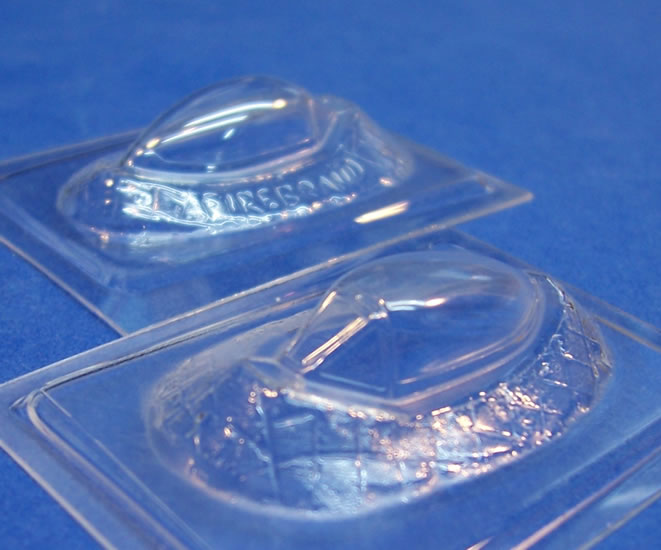
Most of the resin parts are green and joined to easy to remove casting blocks that have thin attachment points. This is leaves only minimal cleanup to be done after their removal. Detail levels are superb, with some incredibly fine and small resin pieces. Stronger black resin forms the undercarriage, as is common to most weight bearing parts in CMR kits. The plain and colour PE frets are produced to Eduard’s usual high standards. The kit includes two vac-form canopies that are very clear and well formed.
CMR’s packaging and presentation is very good by resin kit standards, but the Aki kit is virtually unique in that it cast on sprues and appears essentially the same as a mainstream injected kit. In this respect it is unassailable.
Airframe
The first thing that struck me is that there are relatively few parts to make up the rather large airframe. Much of the resin parts count is tied up in payload options.
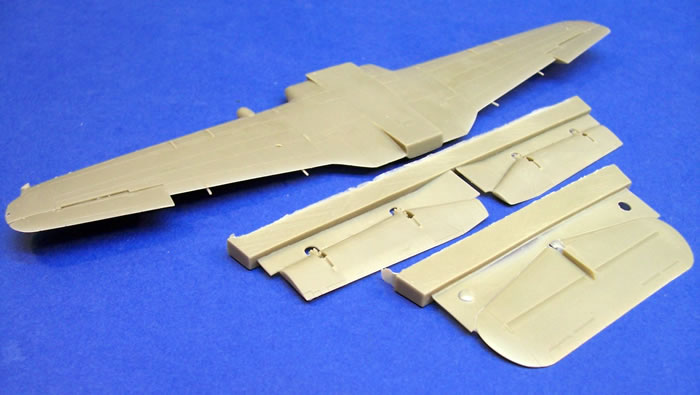
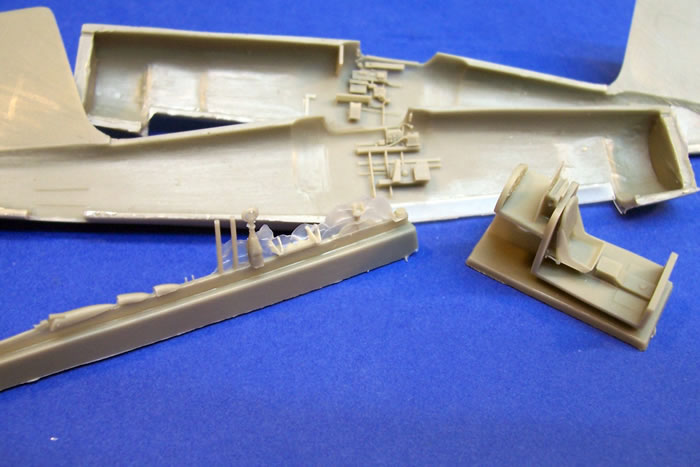
The standout feature for me was the beautifully cast on-piece wing with the scalloped recesses for the huge Fowler flaps. So rather than start with the cockpit, I shall begin by describing the wing.
The wing brings us to the first point of contrast with the Aki kit, which has it flaps cast in the closed position. The CMR kit allows the Fowler flaps can be modeled up or down as you wish; but they will look most impressive lowered, along with the small split-flaps on their trailing edges also in the open position. These small split flaps are PE parts that fit into rebated areas on the main resin Fowler flaps. The instructions illustrate the correct lowered deflection for both Fowler and split flaps. There are also two smaller split flaps made of PE to fit to the inboard section of the wing; and again a diagram provides guidance as to their correct degree of droop. To aid longitudinal stability, the Mk.IV and V the neutral position for both ailerons was +6°; an unusual characteristic that CMR has captured nicely. The wing includes the open ground-handling holds at its tips, as well as the interesting spoiler air-brakes that extended above and below the wing just behind its leading edge. The wheel-wells are integral with the wing casting and beautifully done with good detail and a nice undercut. The tail-plane is a single piece that simply slips into position at the rear of the fuselage.
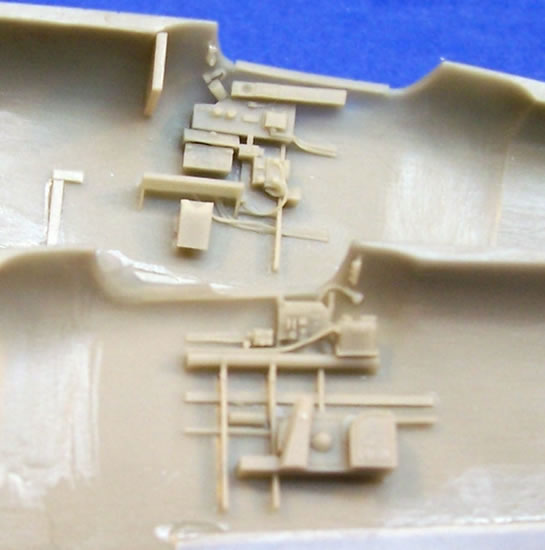
I shall now address the traditional start-point for aircraft kit reviews, the cockpit. CMR has made a lovely job of the Firebrand’s cockpit, using a sensible combination of fine resin and PE. The floor and rear bulkhead is cast in resin with the seat in place. This is garnished with pre-coloured PE belts and is topped off with PE head area armour and a resin head cushion.
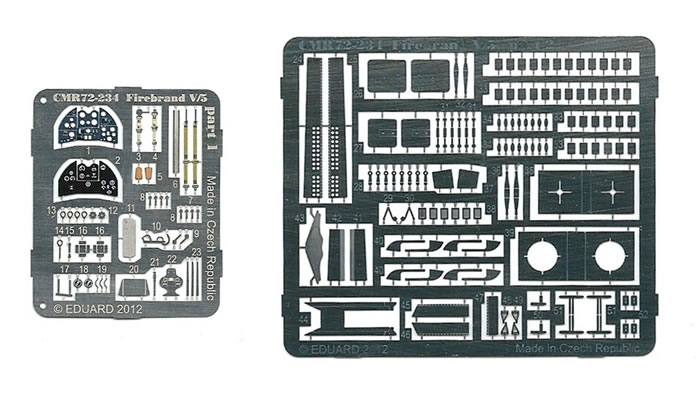
The fuselage sidewalls and other cockpit areas include delicate integral resin detail, to which is added various very fine plain and coloured PE parts. The nicely cast control column and rudder pedal round out the controls. The pedal frames need two small scratch-built lengths of rod to be added to them. A pre-coloured PE instrument panel really adds some panache to the whole assembly. The final touch is a nicely detailed gun-sight fixed to its bowed mounting frame; to which a home-made clear glass plate needs to be added. I consider the CMR cockpit to be superior to Aki’s, with finer details and all of the benefits pre-colored PE can bring to 1/72-scale. CMR have been very attentive to detail, and even captured the small bulge by the port windscreen that encased the external heads up ASI used during landing (an early form of HUD you might say!).
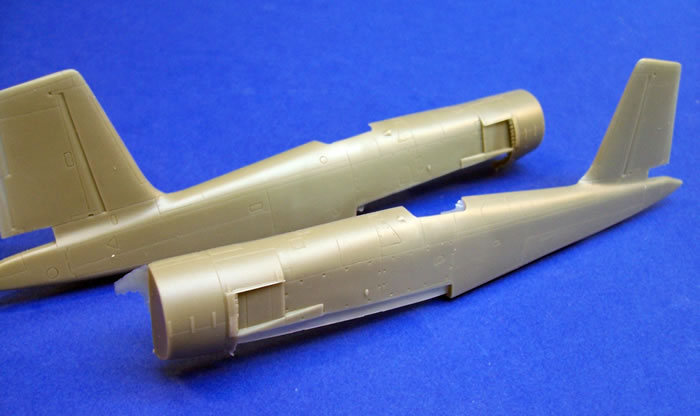
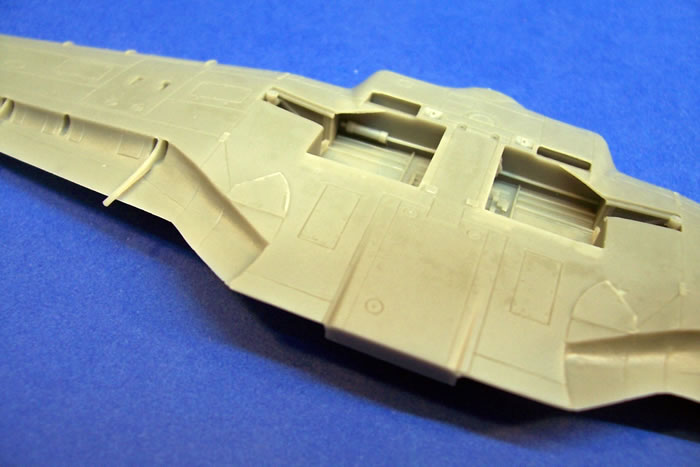
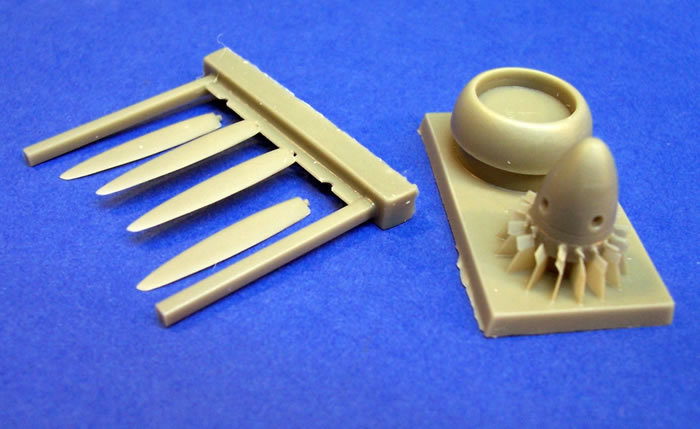
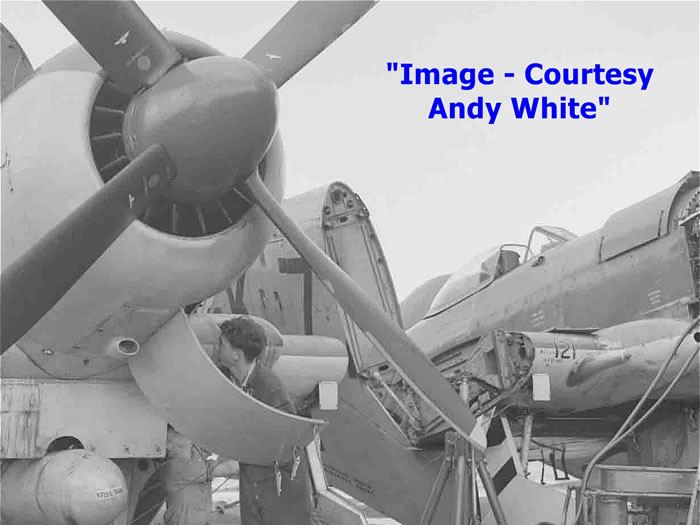
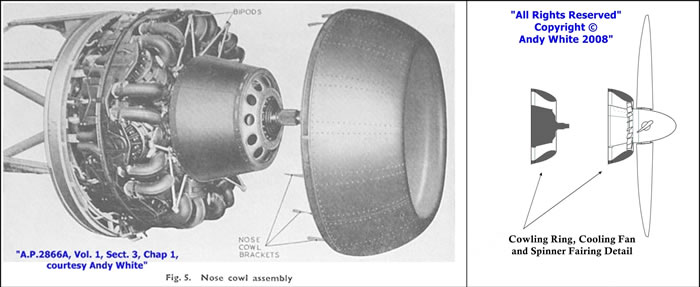
Once the fuselage halves are closed there is the front of the engine cowling to add. This is a major area of contrast to the Aki kit, which has an absolute gem of a Centaurus engine included. CMR does not provide an engine at all, only the cooling fan and spinner that would largely hide it from view anyway. The four separate prop blades need to be added to the spinner and fan assembly; all of which are nicely cast.
Two points to note about the fuselage are that CMR have captured the correct fin offset angle and profile of the rear fuselage, unlike Aki.
At first I thought CMR maybe cutting corners by not providing an engine. However, the Firebrand’s Centaurus installation had an annular duct within the spinner that was fed by the prop-mounted fan, and this obscured any direct view of the engine without a torch, and such illumination would only reveal a small section of engine cylinder deep within the cowl (see accompanying images). With this in mind, the way CMR has mastered the kit makes perfectly good sense. This said; the fan and spinner will need care removing from the casting block. Unlike the Sea Fury’s Centaurus installation, with its nine exhaust stubs grouped either side of the fuselage, the Firebrand actually only had two groups of eight stubs exhausting sixteen cylinders. The remaining two cylinders exhausted through two long pipes running along the aircraft’s belly between the wheel wells. Aki’s Firebrand correctly reflects this arrangement externally, but the exposed engine installation is incorrect; based it seems on the Sea Fury.
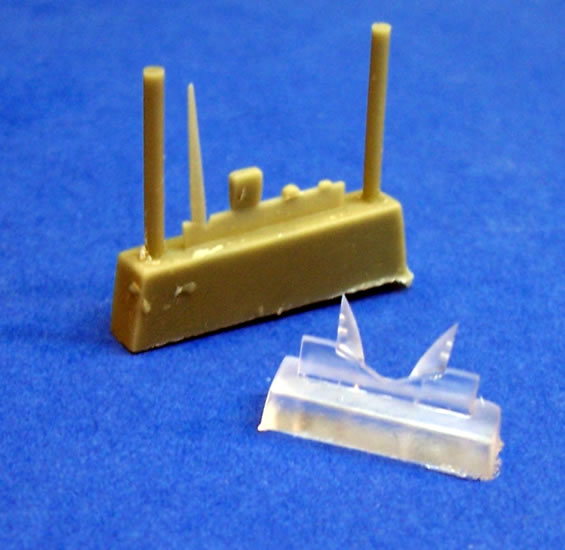
There are two copies of a nicely formed vac-from canopy provided for practice or insurance, depending on how you view it. The instructions have a diagram illustrating the maximum extent that the canopy should be displayed open if you choose to model it so.
The airframe has been almost fully described. There remains to mention this list of smaller items:
-
Four cannon barrels to fit into the wings,
-
Clear navigation light covers s for the wingtips (these already have holes to represent the bulbs),
-
PE canopy centre-line rail,
-
Optional PE air scoop on top of the cowl (advice matching this to decal options is provided)
-
Choice of resin scoops below the cowl (advice matching these to decal options is provided),
-
Oil-cooler vent flap,
-
PE pilot’s step, and
-
Pitots, little resin bulges, and various antenna.
Although I have only have photo images of the Aki kit to go by, I am left with the impression that the CMR kit offers many more small details than Aki does.
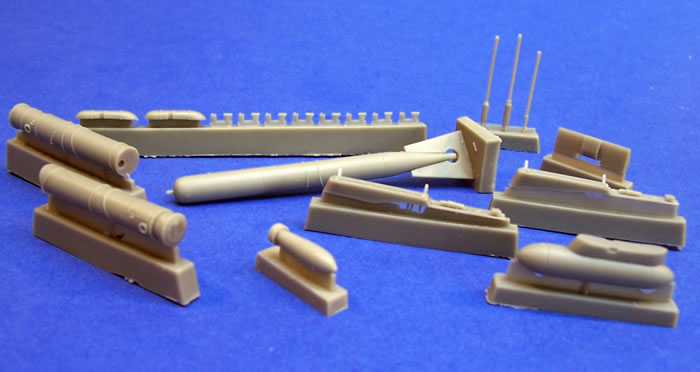
Payloads
Now we come to the point where you can choose to either have a lot or just a little assembly and painting left to do. CMR, in contrast to Aki, provides a very comprehensive payload selection. This includes:
-
1 x Mk.XV/XVII Torpedo (18") with M.A.T. Mk.IV Air Tail.
-
1 x Aircraft Mine 'A', Mk.VI - Optional markings for: TORPEX or Sodium Phosphide (explosive fillings), H.E.S. (Practice) mine.
-
1 x Aircraft Mine 'A', Mk.7 - Optional markings for: TORPEX or Sodium Phosphide (explosive fillings), H.E.S. (Practice) mine.
-
2 x 45-Gallon Wing Drop Tanks.
-
2 x Wing-mounted Mk.2N (Special) Bomb Carriers.
-
2 x 500-lb SAP Bombs.
-
8 x Mk.8 Rocket Projector Rails.
-
8 x 60-lb. SAP/HE Shell, No.1, Mk.1 Rocket Projectiles.
-
8 x 60-lb. Concrete Practice Shell, Rocket Projectiles.
-
8 x 25-lb. AP Shot, No.2, Mk.1 Rocket Projectiles.
CMR devotes a whole page of instructions to a payload colours and markings.
It seems appropriate to begin with the torpedo, given the aircraft’s Torpedo-Fighter designation. The kit’s torpedo is quite an elaborate sub-assembly, at least in its tail area. There are four PE fins that fit the tapered rear of the resin torpedo’s body. The kit provides a PE jig to guide this process and ensure precise alignment. Behind and within the space enclosed by the fins are eight tiny PE screw blades to fix to the torpedo’s rearmost tapered part. Then comes what may prove to be the trickiest fitment of all, the Mk.IV air tail. This has resin wing section and two PE end plates, to which a tiny resin fixture is added to the starboard plate. A very delicate bracket has to be bent to conform with a diagram in the instructions before it is affixed to the centre leading edge of the air tail. This bracket sets the angle of attack of the air tail in relation to the torpedo body. This bracket fits to the upper and lower torpedo fins, whilst the torpedo’s two side fins locate to the leading edge of the air tail. This will definitely be amongst the last parts to fit I feel. There are images of Firebrands carrying torpedoes without the air-tail fitted, so you could choose to leave this off.
The torpedo then mounts to a resin carrier which has a few PE parts to be added. The instructions describe the in-flight and on-ground positions as the torpedo pivoted downwards at the nose in order to raise its tail for ground-clearance. Two slightly different resin parts are supplied to cater for each position. The instructions also describe how the carrier appeared when empty or a mine was attached to it. This is a good example of CMR’s thorough research.
Further outboard on the wings you have the option of bomb pylons only, pylons with bombs, or drop-tanks. Further out you can fit resin zero-length launchers in a choice of configurations. To these can be fitted one choice of three rocket types. Each rocket comes as one resin piece covering warhead and motor body, to which you must add four PE fins. As with the torpedo, a PE jig is supplied to aid this very fiddly process. The results should be excellent if you have the PE skills to do tackle this challenge well.
In all cases the painting and markings for each weapon type is covered. It is not often that I see a kit that details and supplies different markings for three kinds of explosive filling for two kinds of mine. Now that is thoroughness for you!
Colours & Markings
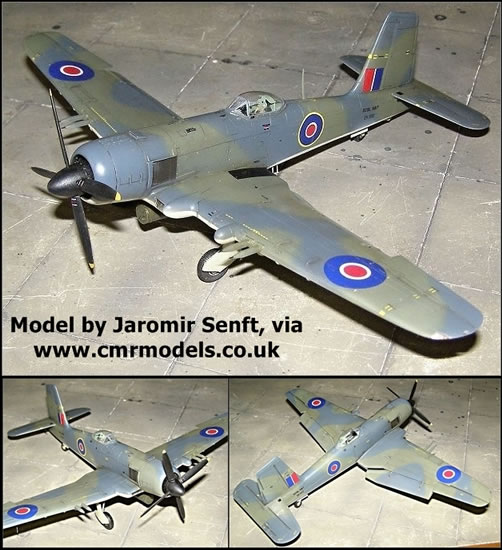
To continue my sideline comparison with the Aki kit, markings options is where the Czech leaves its Japanese completion for dead. Unlike Aki’s single choice of markings, CMR offers no fewer than ten. Three use the Temperate Sea Scheme of Extra Dark Sea Grey and Dark Slate Grey camouflage over Sky under-surfaces. These being:
-
EK692 - Firebrand TF Mk.IV modified to Mk.V Spec, used for RAE catapult launching trials, HMS Illustrious, October-November 1946.
-
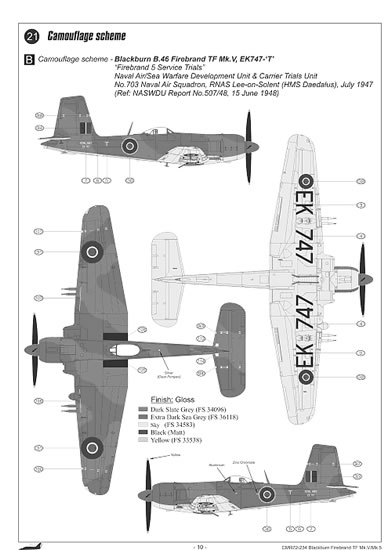
EK747 - T, used for Firebrand 5 service trials, NASDWU, 703 NAS, RNAS Lee-on-Solent, July 1947.
-
EK748 - 703 NAS, Thorney Island, September 1948
The other seven are in the Naval Pattern No 1 Scheme of Extra dark Sea Grey over Sky undersurfaces. There is some variation within this fairly simple scheme, as the demarcation between the upper and lower colours around the cowl varies between some aircraft; as is the spinner colour in a couple of instances. The kit options are as follows:
-
EK767 - LP033, used for Firebrand 5 service trials, NASDWU, 703 NAS, RNAS Lee-on-Solent, August 1947.
-
EK766 - 121/FD, 813 NAS, used for deck trials, HMS Implacable, Firth of Forth, Scotland, 24th November 1947.
-
EK748 - 703, NAS, Thorney Island, December 1948.
-
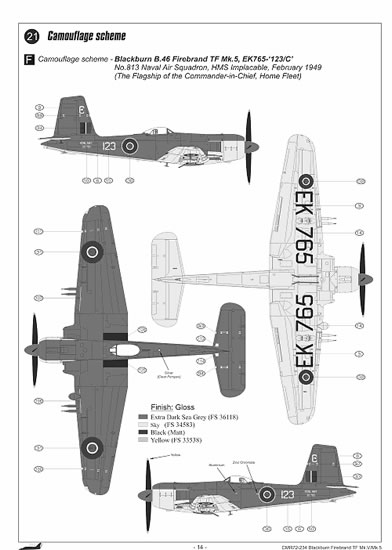
EK765 - 123/C, 813 NAS, HMS Implacable, February 1949.
-
EK747 - 110/C, 813 NAS, RNAS Lee-on-Solent, July 1949.
-
EK773 - 183/CW 738 NAS, Naval Air Fighter School, RNAS Culrose, at Gibraltar, July 1950.
-
EK780 - 121/FD, 827 NAS, RNAS Ford, 1951.
The decals look to be very good quality with sharp registration.
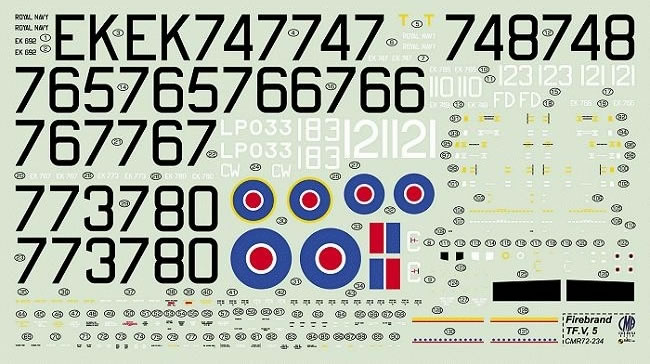
My past experience with CMR’s decals would suggest that they have good colour density as well, and that they should conform well to the model’s surfaces. The kit has a lot of stenciled markings to apply; and this task is guided by two pages of instructions.
Wing-Fold Set
CMR’s website lists wing-fold detail set to compliment their Firebrand kit as a future release. This will require separate purchase as is the case with CMR’s Sea Venom and Seafire wing-fold sets. No release date is indicated.
Comparison of the CMR and Aki Firebrand kits has obvious interest to anyone tempted to build one, as at first glance they seem similar in content and price. However, at this relatively high price level you want to be sure of buying the best; so I shall summarize this aspect first.
Other than its slightly simpler construction, Aki’s kit is beaten on all counts by CMR’s. CMR’s kit has superior detail and is far more accurate (fin offset, aileron tabs, fuselage profile, and exhaust installation). It also offers a more comprehensive package that includes separate flaps, more payload choices, and ten times the decal options. And you can get all of this for around 10% less cost, and with more stockists. This is a very clear-cut choice then.
CMR’s Firebrand kit has superb detail, and all components are very good quality. The use of various media types make this kit a very complete package; although I think that dropping the paint masks is a backwards step, they will be missed by many I am sure. The absent photo supplement may less missed, but these and the paint masks were features that helped to elevate CMR kits above most of their competitors.
It is a very simple kit from an airframe standpoint, with only the Fowler flaps presenting much of an assembly challenge. There are however quite a few very small resin and PE details that some may find challenging; but the secret here is to own a good opti-visor, and take extreme care not to lose any small parts to the carpet monster.
Masochists and PE-maestros, for whom fitting thirty-two tiny PE fins should be irresistible, may well choose to arm their Firebrand with rockets. If you are just a little PE-kinky, opt for the torpedo with air-tail; otherwise play safe with a mine, bombs or no payload at all. The drop tanks can compliment all but the bomb option. I suspect that many will, like me, be drawn to the torpedo, air tail and drop tanks.
This is the best Firebrand TF Mk.V kit to date. It has the potential to be a most enjoyable build, and result in a stunning model. I recommend it highly.
Thanks to CMR by Mark 1 Ltd for the review samples.

Review Text and Blue Background Images Copyright © 2013 by Mark Davies
Page Created 19 March, 2013
Last updated
4 May, 2013
Back to HyperScale Main Page
Back to Reviews Page
|
 Home
| What's New |
Features |
Gallery |
Reviews |
Reference |
Forum |
Search
Home
| What's New |
Features |
Gallery |
Reviews |
Reference |
Forum |
Search