Airfix 1/72 scale
de Havilland DH 82a Tiger Moth
by Mark Davies
 |
de Havilland DH 82a Tiger Moth |

Airfix's 1/72 scale Tiger Moth is available online from Squadron
 I receive quite a number of kits, decals and accessories for “First Look” review here on HyperScale. I have a personal policy of writing articles on any these items that I subsequently build or use. It seems only proper to do so, both in recognition of the donor company’s contribution to my modelling enjoyment, and as a follow up for readers of my initial assessment. In this case I have built Airfix’s new-tool Tiger Moth and used Xtradecal’s markings to finish it. Both of these items were subjects of “First Look” reviews by me, plus I happened to buy Eduard’s pre-coloured PE detail set; so this gets a mention here too. I receive quite a number of kits, decals and accessories for “First Look” review here on HyperScale. I have a personal policy of writing articles on any these items that I subsequently build or use. It seems only proper to do so, both in recognition of the donor company’s contribution to my modelling enjoyment, and as a follow up for readers of my initial assessment. In this case I have built Airfix’s new-tool Tiger Moth and used Xtradecal’s markings to finish it. Both of these items were subjects of “First Look” reviews by me, plus I happened to buy Eduard’s pre-coloured PE detail set; so this gets a mention here too.
My “First Look” review of Airfix’s new-tool was published here on HyperScale in April this year. At the time I concluded:
This is an excellent effort from Airfix, and one I rate as being amongst their better 1/72-scale kits. It appears to be generally accurate in outline shape and detail.
The surface detail is very nicely done; whilst the cockpit detail is quite adequate, but will need harnesses added to look its best. The interplane strut engineering aids building; I would expect the kit to assemble well as far as biplanes go. However, I do not like having to perform surgery on the rear fuselage decking to incorporate the anti-spin strakes. I think it would have been better to mould these in place and simply remove them and sand smooth for versions without them fitted.
The kit is great value, costing about half its nearest rival’s price whilst generally being superior in appearance and shape, but by comparison has, only one markings option in keeping with it Series-1 status. It matters little however, as Xtradecal and others have come to the rescue with aftermarket decals.
This is the best 1/72-scale Tiger Moth kit so far, and a bargain. I recommend it highly.
Having now built the kit, I generally stand by my original assessment, but admit that it did not assemble quite as easily as I expected. This was largely due to the fragility of the cabane and interplane struts, and the need to trim some parts for best fit; not to mention my own limitations when it comes to building biplanes!
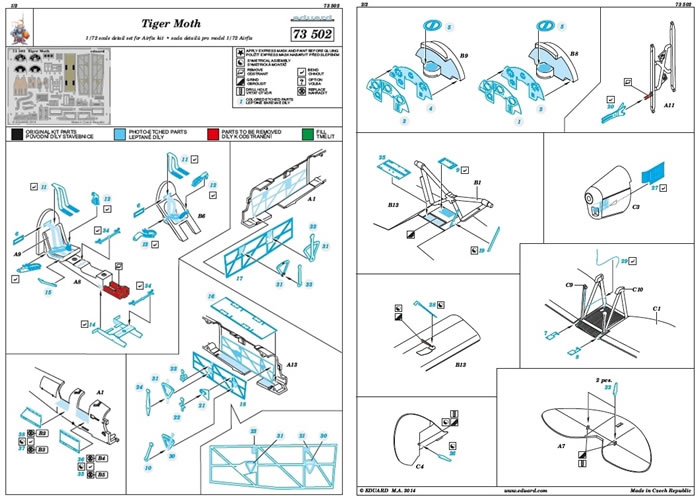
I departed from an OOB-build by using the Eduard Pre-coloured PE set. Its contents can be viewed here, and its instructions downloaded or opened as a PDF here. This was a comparatively expensive addition at just over twice the price of the kit. It undoubtedly added refinement and scale finesse, but any future DH 82’s I build will make do with just aftermarket harnesses.
I chose to use a markings option from the Xtradecal’s excellent DH 82a Part 3 - Overseas Operators which I reviewed, along with part 2- Civil Schemes, here on HyperScale in August this year. I also reviewed Part 1- RAF, FAA & Commonwealth, here in April. These three excellent sets have tempted me to build more Airfix Tiger Moths, so it is clear I have not been put off by my build experience.
General Construction Observations
All parts need a tiny bit of clean-up on their edges to remove very slight mould seams. The plastic is seemingly both soft and yet a bit brittle, so care needs to be exercised when cutting fine or thin parts from the sprues, and indeed when cleaning up their edges. I subsequently broke two cabane struts, as well as an interplane strut and undercarriage leg during parts clean-up and general handling. I replaced one cabane with a scratch-built item, but salvaged the other damaged pieces. HyperScale’s Airfix Group Build forum has recorded similar problems, as have two of my mates when building the same kit.
The cockpit bulkheads need adjustment to fit nicely within the fuselage and be blended in with putty to look like a single sheet of plywood. I failed to do this, and my bulkheads look distinctly separate as a result.
Parts fit can be tight, with the need for some very minor clean-up where the cabane struts and undercarriage join the fuselage. The lower wing also needs a fair amount of fit adjustment where it slots into the fuselage in order for the wings to fit nicely, and for the brackets located at ¾-chord at the wing-root to join the lower wing. I had to pare away a fair amount from the inside of the structure linking the lower wings to get it to sit right within the fuselage cut-out.
The interplane strut stagger is fixed by a disposable linkage. I used this system, but chose to fix the cabane struts to the fuselage rather than the upper wing as suggested by the instructions. I considered it better and easier to ensure a good fit to the fuselage and let top of the cabanes slot fit into the upper wing, rather than the other way around.
Removing the interplane strut stagger links once they were in place was fiddly, and clean-up a nightmare as the struts were so flexible and weak, which is how I broke one. The tapered points of the interplane struts that fix to wing are very narrow, and on reflection I think that I would have perhaps achieved a stronger and more rigid join using superglue rather than cement (which I think weakened the very narrow join).
When I build another DH 82 I shall experiment with fitting the interplane struts after having first removed the temporary stagger braces and cleaned up in advance of fitting. I am unsure of whether this will make construction a lot more difficult, but it will reduce the risk of strut breakages as no trimming or filing will be needed once they are in place. As an aside, colour schemes where the struts are natural wood-grain or painted a different colour to the fabric surfaces will probably require the removal of the temporary braces anyway, so as to enable separate painting of the struts and airframe before assembly.
In my “First Look” review I mentioned reading on HyperScale “Plane Talking” where the builder found the cabane struts to be too long. However, another poster pointed out that probably the bottom wings had lost some of their dihedral whilst packaged in the box, and once this was restored it counteracted the apparently overly long cabane struts. I mentioned this at the time as it seemed possible for others to strike this apparent problem when building; but I was lucky, and found no such issue with my kit.
The tailplane needed a little shaving to have it sit flush with the rear deck of the fuselage. However, ensure you retain the kit’s gap between the bottom of the tailfin and fuselage, as this is correct. I suggest leaving the tailskid or optional tail-wheel off until near the end of the build, as both are very fine and vulnerable to snapping. I also fitted the windscreens at around this stage, having first brush-painted their frames. Fitting the front screen is a bit fiddly due to proximity of the upper wing and cabane struts, but can be done with care.
Despite the forgoing comments about strut fragility, the rest of construction was generally ok and not too demanding. Fit is alright provided you test-fit and do minor trimming as needed. It certainly does not fall together, but neither is onerous to build if you manage to preserve the struts! Most challenges are simply due to its small size and biplane configuration.
My Modifications
It seems simplest to just list the various modifications I made to the kit, rather than distract from the above constructional comments applicable to an OOB-build:
-
Removed kit sidewall detail and front part of pilot’s rudder pedal support to allow for fitting of PE parts.
-
Removed kit control horns and actuators.
-
Drilled out the wheel hubs with the raised “DH” initials logo and replaced with plain punched plastic discs. I did so as photos suggested these initials were not always present on military machines.
-
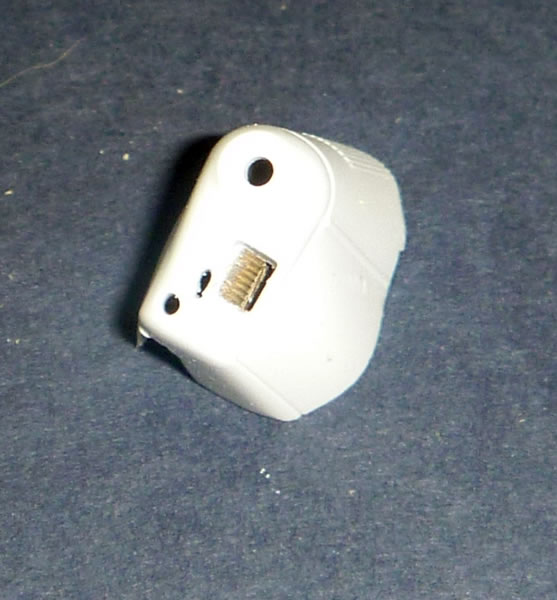
Drilled out holes in engine cowling and scratch-built the side air-scoop to have a finer open mouth than the kit part. I also drilled out the end of the kit’s exhaust pipe.
-
Made a blanking plate to go behind the cowl to eliminate any see-through effect.
-
Pre-drilled holes for control horns and wires, and for interplane rigging.
-
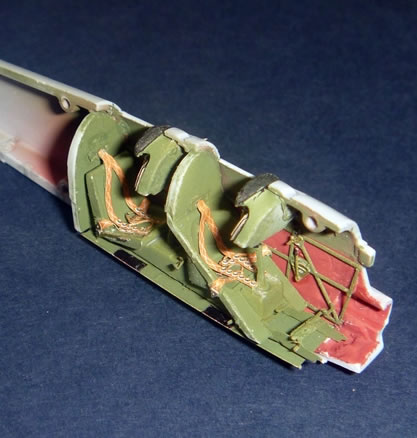
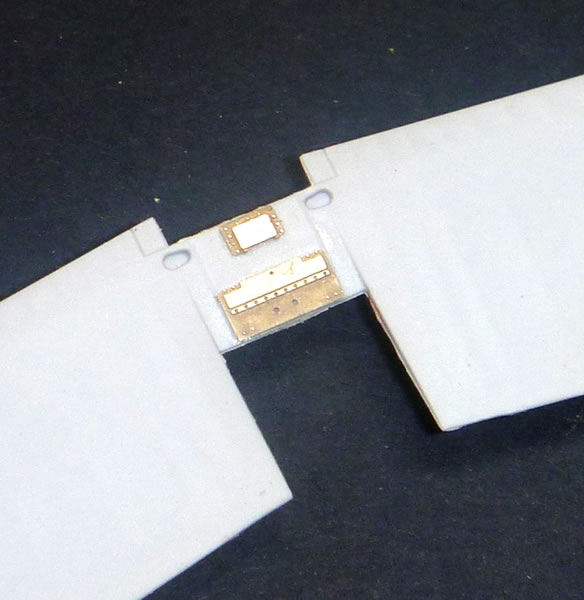
Added PE cockpit detail which included harnesses, rudder pedals, compass repeaters, instrument panels, some very tiny engine controls, cockpit framing and floor (these last two items being repainted, despite being pre-coloured by Eduard). I also used two of the PE cockpit access hatches in preference to the kit items.
-
Made a fuel line from the upper-wing tank using lead wire, and its associated valve linkage from stretched sprue.
-
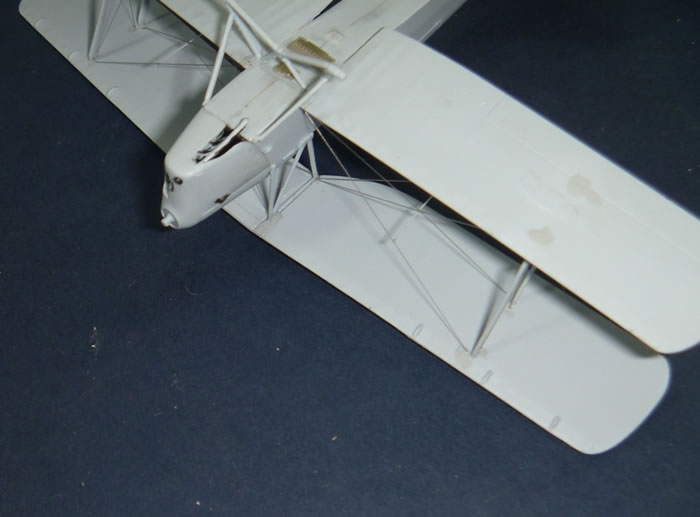
After painting and decaling was completed I added the PE control horns and aileron actuators, which were rigged with monofilament superglued in place. I added a small spigot either side of the fuselage in line with the rear cockpit back edge. These hold the wires clear of the fuselage side and put a very slight kink in the run of the rudder wires, as per the original. The rudder wires should relay be a double run rather than single, but the monofilament was already over-scale, without the added difficulty of a trying to run parallel lines the length of the rear fuselage. I also added small pieces of plastic under the upper elevator control wires to represent the device they run through to avoid chafing and cutting the real aircraft’s structure where they curve around the tailplane’s leading edge.
Rigging
Rigging was done using nylon monofilament with shallow holes in the upper wing and penetrating ones in the lower wing and fuselage decking ahead of the front cockpit. The rear cabane cross-wires must angle forward to clear the front windscreen.
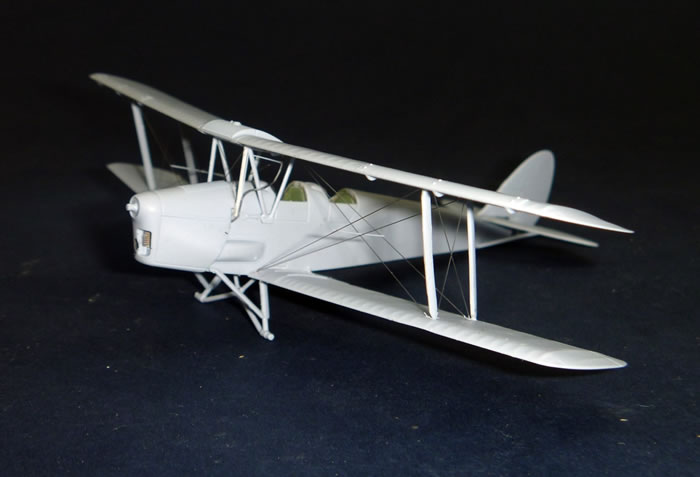
The wires were individually tensioned and superglued in place, and then finished flush with the lower wing’s underside. The cabane cross-wires were tensioned through the fuselage opening before fitting the engine cowling.
The bars that link the flying wires were made of stretched sprue, and proved quite tricky to position using white glue. I rigged before painting as the flying wires were to be the same colour as the airframe (something I noted for some overall yellow machines too). This made clean-up of where the wires finished easier; and added quite a bit more strength and rigidity to the model.
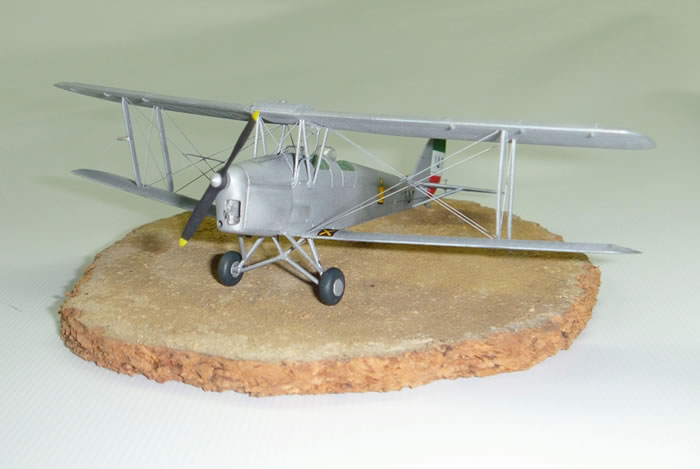
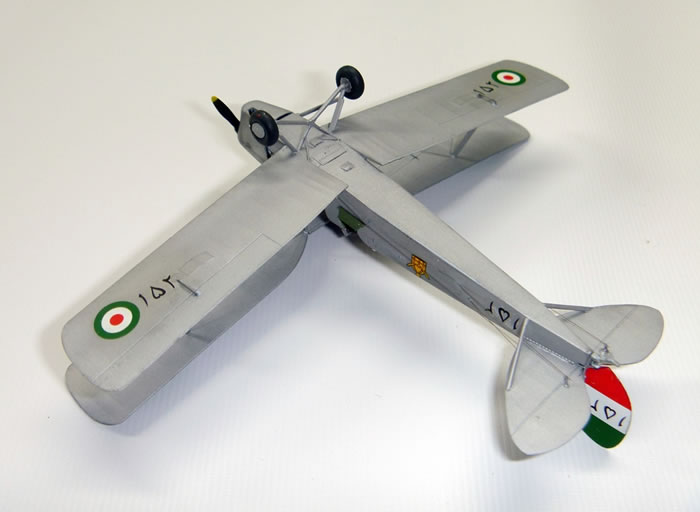
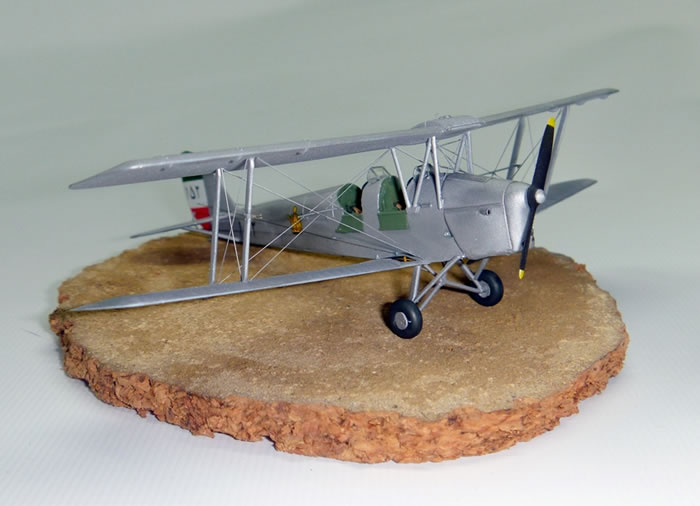
I selected Xtradecal’s Imperial Iranian Air Force scheme from Part 3 of their Tiger Moth series. I used Tamiya matt aluminium enamel, mainly because it seemed closest to the final finish I wanted out of the paints I had to hand. On reflection, I wished had used something like Xtracolour’s Weiss Aluminium instead, as its gloss finish would have helped more with decaling.
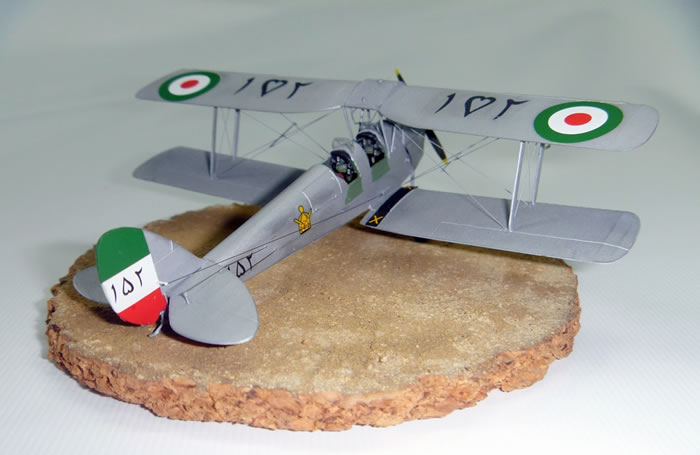
I was feeling a bit lazy and simply applied the Xtradecal decals over bead of Future, which seemed to work well enough, although I got little silvering in places. However, my biggest problem was not silvering, but simply a slight difference in finish in from the clear rectangle of carrier film backing the Persian script on the upper wing. This became even more apparent when I sprayed matt varnish to take the shine out of the decals and blend them with the matt aluminium finish. Against my better judgement, I tried painting the clear area out. This did not work, so I removed the script and roundels from the upper wing using tape and re-sprayed the aluminium finish.
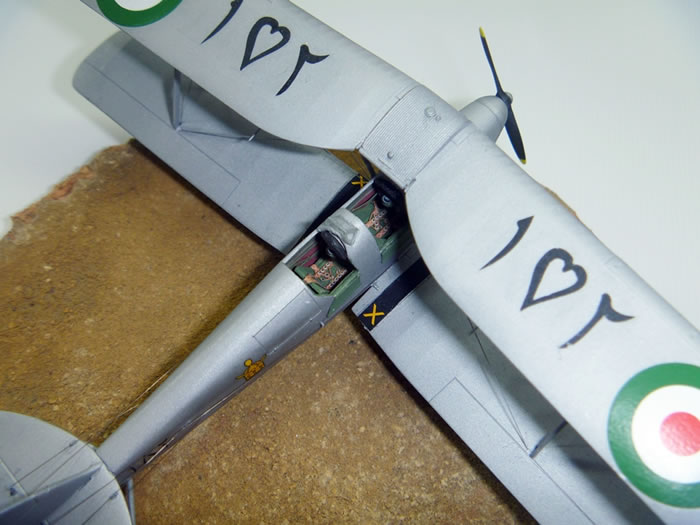
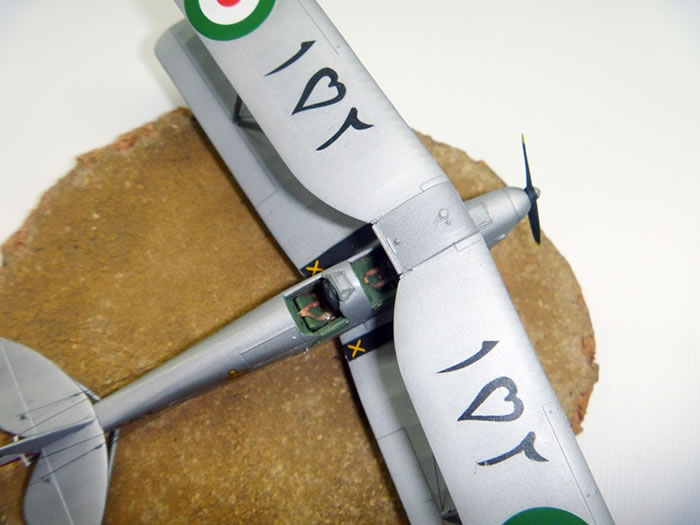
Fortunately I had two sets of the decals needed as I had bought my own set as well as receiving a free set for review. The second time I chose to cut each text character out from its clear backing. I first marked the text spacing out on Tamiya masking tape, and placed this on the upper wing to serve as an alignment and spacing guide for decal placement. This time I avoided the background contrast issue, and also applied new upper wing roundels. If I had used a better gloss finish I would probably have avoided the problem in the first place. (A day after writing this I have just noticed that I placed the heart-shaped Persian letters upside down on the upper wing – Double-doh!! Well they can stay that way now, I’m moving on to my next build...).
I used the kit wing-walk decals as I forgot to paint these before I had fitted the upper wing, rigged the model – Doh! The wing-walks include yellow X’s which probably do not apply to the original Iranian machine, but I liked the splash of colour they add.
This build proved a little harder than I expected. Some of my difficulties were due to the model’s small size and the fact it is a biplane. Things are not helped however by weak and easily snapped struts. I know of others having similar problems with strut breakages, so it’s not just down to me. Strut fragility, some need for minor fit adjustments, along with its biplane layout, all mean that this kit does not fall together; but nor is it by any means a nightmare to build either.
I added a little complexity to my build by using Eduard’s PE detail set. This was easy enough to use, despite having some very small parts indeed; and thankfully, they include spares of several of these. It definitely adds scale finesse and detail to the base kit, but overall I think that most would consider it to be too great an outlay for the benefits it offers. I am happy to have used it on this occasion, but once is enough. My future Tiger Moths will just have aftermarket seat harnesses (almost certainly Eduard’s!), and some of the many attractive schemes offered by Xtradecal.
Xtradecal’s decals performed very well, but were let down initially by my taking a shortcut with my paint finish. Just using localised Future “puddle application” over a matt aluminium finish was asking for trouble, given the large clear backing of the upper wing text. They did not silver, but the textural difference was too great between the smooth decal and comparatively coarse matt aluminium paint. I would have had the same situation with any brand of decals I can think of, so it’s certainly not the fault of the decals. I should have glossed properly to begin with. Trimming the large clear carrier film solved my self-inflicted problem the second time around. The range of markings available from Xtradecal’s three Tiger Moth sets is the primary reason I will build more, and I know from past experience that they will perform flawlessly on a decent gloss finish.
Forewarned is forearmed. Hopefully my comments here will help others avoid some of my pitfalls. Airfix’s new-tool DH 82a is a great little kit that captures the Tiger Moth’s lines very well indeed. I still recommend it most highly.
This Airfix kit was purchased online from Hannants,
who also contributed the Xtradecal’s used
Model, Images and Text
Copyright ©
2014 by Mark Davies
Page Created 15 September, 2014
Last Updated
15 September, 2014
Back to HyperScale Main Page
|
 Home
| What's New | Features | Gallery | Reviews | Reference | Resource Guides | Forum |
Home
| What's New | Features | Gallery | Reviews | Reference | Resource Guides | Forum |