|
Aero Daimler Motor 120-hp
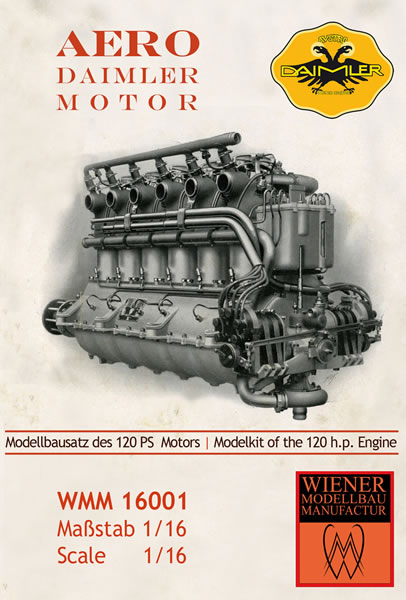
Wiener Modelbaumanufactur, 1/16 scale
S u m m a r y : |
Catalogue Number: |
Wiener Modelbaumanufactur Kit No. WMM16001 - Aero Daimler Motor 120-hp |
Scale: |
1/16 |
Contents & Media |
106 resin parts, 12 machined metal pieces, 1 PE fret with 101 parts, various wire and rod stock, plus instructional booklet. |
Price: |
Available on-line from Wiener Modelbaumanufactur
Finished Model for €1320.00 (Includes Tax) |
Review Type: |
First Look |
Advantages: |
Very good quality, excellent detail. |
Disadvantages: |
A lot of very fine holes required to be drilled, with no precise dimensional location guidance provided. Also no scale plans or templates to guide wire bending and plumbing fabrication. |
Conclusions: |
This is a product with real niche appeal due both to the subject and its scale. This fact, and what is a quite hefty price tag for a small model, will naturally restrict numbers building this kit. Of course if money is no object, you can buy the finished article from the manufacturer; but this option is I suspect for a different readership group to HyperScale’s.
Some of the minor criticisms concerning drilling holes and lack of dimensions for plumbing fabrication will matter little to most modellers prepared to tackle this kit, as it should be apparent that a “shake & bake” it is not. Likewise, the sequencing of the instructional steps is only ever a guide.
This is a quality effort from a most interesting manufacturer. It is expensive, but the price seems fair to me, given the engineering and quality of the kit, and of course the limited quantities it is likely to sell in.
The potential to produce a super-detailed model of this classic engine is sure to find some enthusiastic enough to buy and build this kit. I am happy to recommend this kit to such modellers. |
Reviewed by Mark Davies

Tamiya's 1/72 scale A6M3/3a Zero is available online from Squadron.com
Design and Development
The first Austro-Daimler six-cylinder engine was designed by Dr-Ing Ferdinand Porsche to be an aircraft engine from the outset. Of high quality manufacture the Austro-Daimler was modestly rated at relatively low rpm, which gave the engine family a reputation for robustness and reliability.
Features of the Austro-Daimler included welded steel water jackets, (originally copper), seven main bearings and large diameter inclined inlet and exhaust valves opened by dual action push-pull rods and closed by spring pressure.
The Austro-Daimler inspired many imitators such as the Mercedes D.II, Benz Bz.IV, Beardmore, and Hiero 6. Modest availability of the Austro-Daimler engines forced some aircraft manufacturers to substitute Mercedes (the German Daimler company) engines in their aircraft, due to greater availability.
Variants
-
Austro-Daimler 90 hp 6-cyl. The original low capacity version developing 90 hp (67.11 kW), introduced in 1910.
-
Austro-Daimler 120 hp 6-cyl. Up-rated with a capacity of 13.9 l (848.23 cu in), from 130 mm (5.12 in) bore and 175 mm (6.89 in) stroke, developing 120 hp (89.48 kW) at 1,200 rpm, introduced in 1911.
-
Austro-Daimler 160 hp 6-cyl. Developing 160 hp (119.31 kW), introduced in 1913.
-
Austro-Daimler 185 hp 6-cyl. Developing 185 hp (137.95 kW), introduced in 1916.
-
Austro-Daimler 200 hp 6-cyl. Up-rated with a capacity of 15.03 l (917.19 cu in), from 135 mm (5.31 in) bore and 175 mm (6.89 in), developing 200 hp (149.14 kW) at 1,350 rpm, introduced in December 1916.
-
Austro-Daimler 210 hp 6-cyl. Developing 210 hp (156.60 kW), introduced in late 1917.
-
Austro-Daimler 225 hp 6-cyl. Developing 225 hp (167.78 kW), introduced in 1918.
General Characteristics
-
Type: 6-cylinder liquid-cooled inline engine
-
Bore: 130 mm (5.12 in)
-
Stroke: 175 mm (6.89 in)
-
Displacement: 13.9 L (850.5 cu in)
-
Length: 1,690 mm (66.5 in)
-
Width: 520 mm (20.47 in)
-
Height: 1,040 mm (41 in)
-
Dry weight: 320 kg (705 lb)
Source: Wikipedia.org
The Kit Manufacturer
The kit is made by Wiener Modelbaumanufactur, an Austrian company I was unaware of until this lavish kit arrived from Brett Green for review. I took a look at their website and discovered an intriguing range of aviation, naval, military and figure subjects in a variety of scales. They supply some as both kits and finished models. I encourage readers to check their range of products.
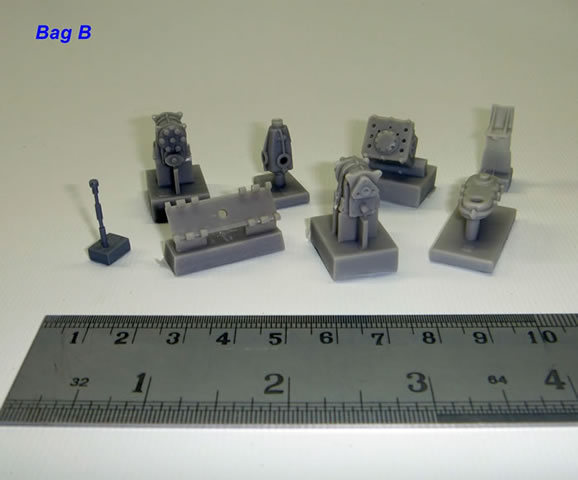
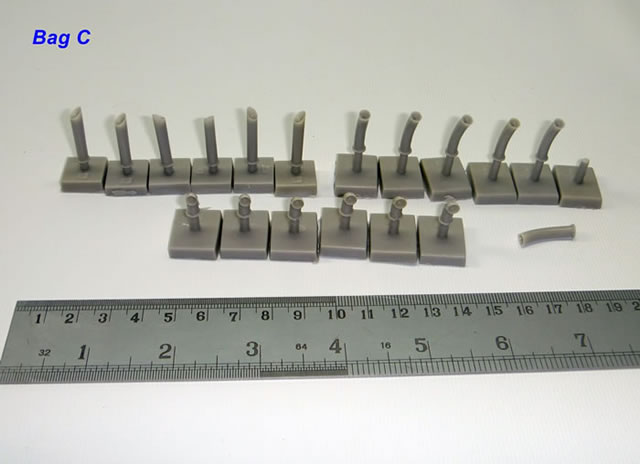
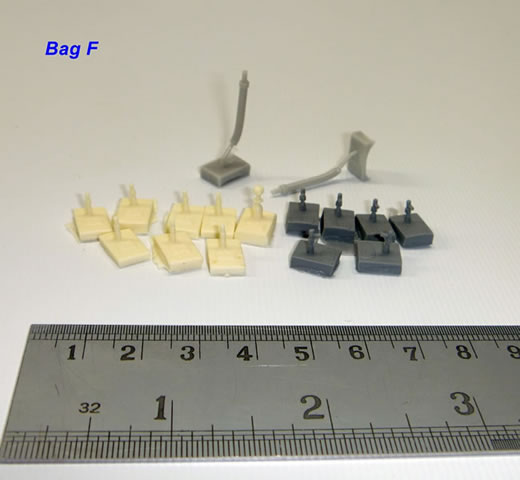
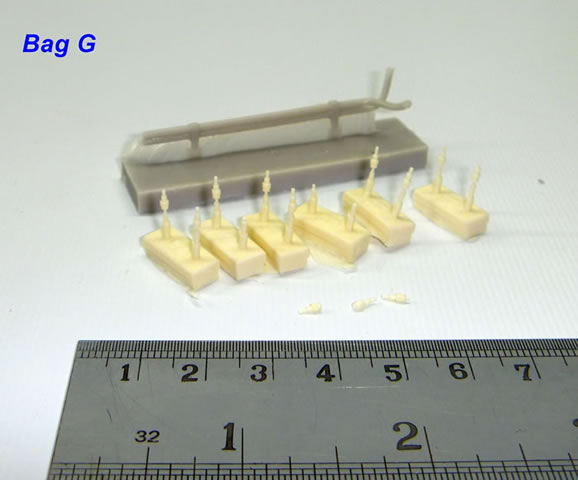
Contents
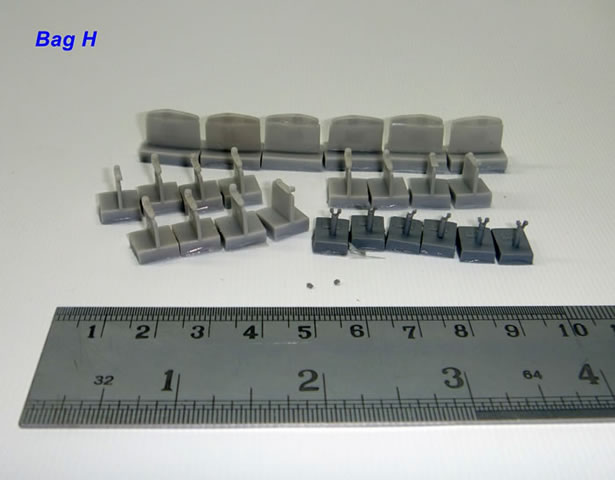
The kit comes in a very good quality and sturdy top-opening box with attractive artwork. Within is a beautifully produced instructional booklet, and a series of clearly labeled zip-lock plastic bags containing the kit components. These are cushioned and wrapped in a few cases by strips of bubble-wrap. The pack is fairly tight, and no doubt this reduces movement in transit.
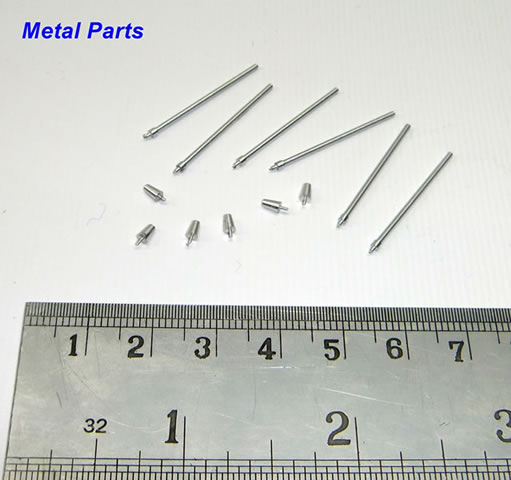
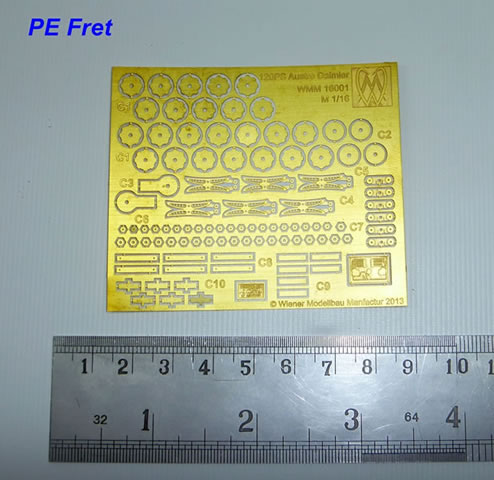
The components are mainly medium grey resin, although some parts are darker grey or in cream resin. This is not case of different resin properties for different applications (like CMR’s black resin undercarriage resin for example), but simply different coloured brews. There is also a PE fret, some machined metal parts, and bag of fine metal rods and copper wire.
The Instructions
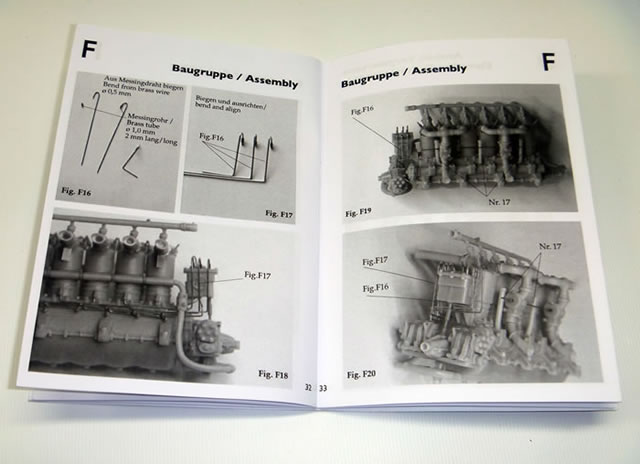
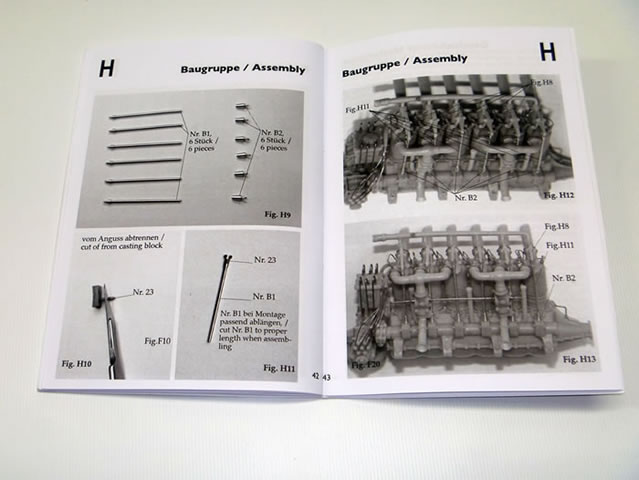
The instructions are provided by a fairly small but excellent quality booklet. These are very clearly printed and break assembly down into stages that correspond with the labelled bags of contents – A nice touch, and one that simplifies coming to grips with the relatively high parts count. The instructions use good monochrome photo images with printed text indentify the parts and their quantities.
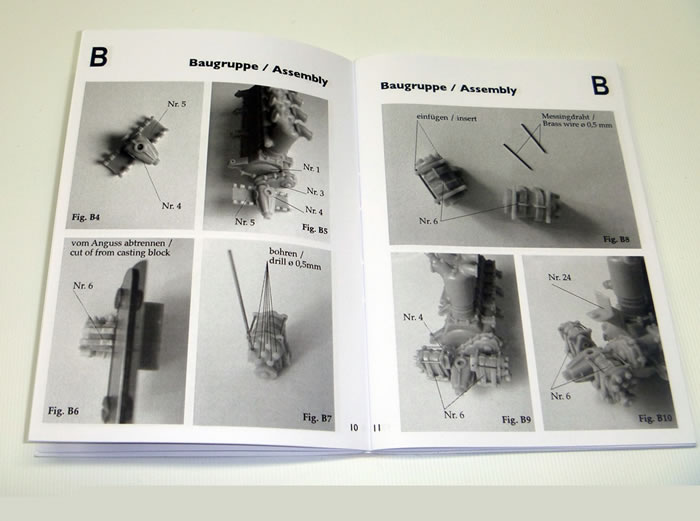
There are a lot parts that need to have holes drilled in them, often with a very fine 0.5-mm bit. In many cases this is to locate wire strengtheners used at various joins. Many of these based on my resin assembly experience seem to be overly cautious, as a resin-to-resin butt-fit would seem sufficiently strong; an example of this being the exhaust pipe to cylinder-head join. In other cases, many of the holes will be needs to receive metal rods, wires and so on as detail parts.
I can see builders of the finished kit either being expert at drilling fine holes, or sick and tired of broken drill bits. Often the location that holes must be drilled is only indicated by a printed arrow on a photo, with no supporting dimensional information; nor is there a mark cast on the parts to indicate hole loactions. I was also surprised to see the instruction directing hoes be drilled in the crankcase after the cylinders, exhaust and cooling pipes had been fitted to the engine. I think that it would make far better sense to drill these holes in the crankcase before any other parts are added to it. Obviously, a thorough familiarisation with the instructions is needed before assembly starts, and no doubt builders will make their own sensible changes to assembly steps after doing so.
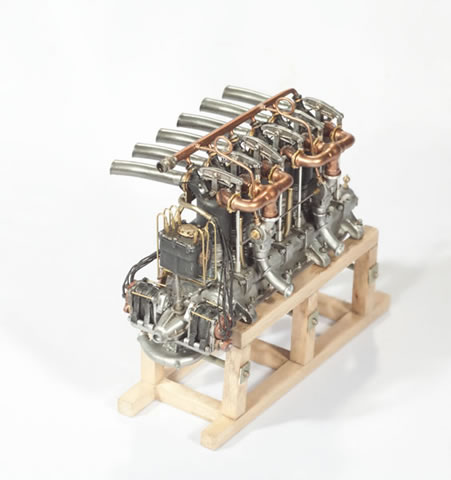
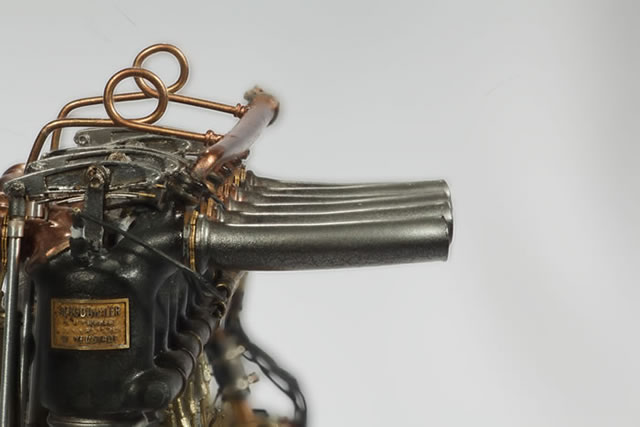
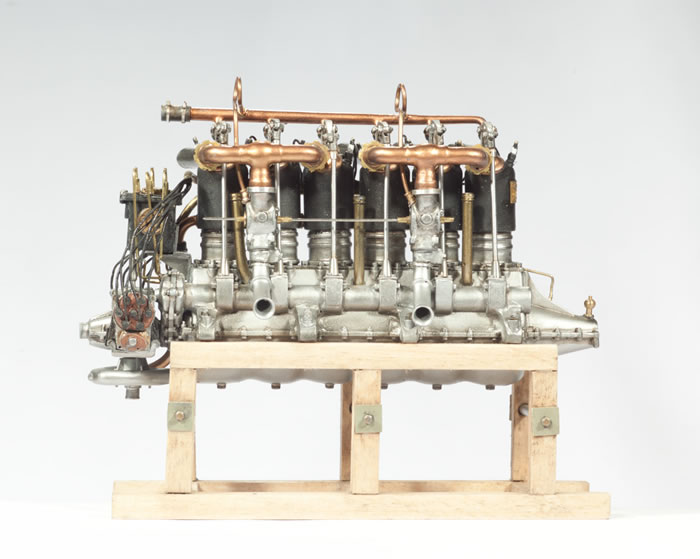
The instructions do not include colour call-outs, but here are some colour images of the finished model included within their pages and on the cover. A far better guide due to the larger size of the images is to refer to Wiener’s website. I have included these images with this “First Look”. Please note that the kit does not include the “wooden” trestle featured in the images of the finished model.
The Kit Components
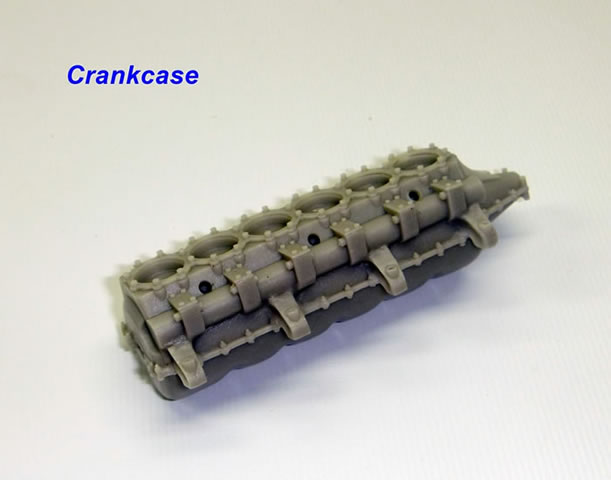
The resin parts are all very good quality. There were two or three instances of small parts that had broken during transit, but these had been saved by the careful bagging. I have included these parts in the accompanying images. Casting blocks should generally be easy to remove.
The machined metal parts and PE fret are also very good quality items; and the wire and metal rod stock seems equally good.
Despite its large scale, there are still many very small parts, particularly PE ones. Care will be needed to avoid losing any.
Challenges include the extensive drilling already mentioned, and bending the stock metal rods and wires to provide various oil plumbing and ignition conduits for the engine. The instructions mention that the oil system layout advised is but one of many variations used, as period photos show different connections and tubing paths being used. Perhaps this is one reason why no resin formers are provided to guide bending the metal stock. As with drill-hole locations, the builder will need to establish dimensions from comparison of the kit parts to instructional photos; it is a pity that no 1/16-scale plans or templates are provided to guide this fabrication.
This is a product with real niche appeal due both to the subject and its scale. This fact, and what is a quite hefty price tag for a small model, will naturally restrict numbers building this kit. Of course if money is no object, you can buy the finished article from the manufacturer; but this option is I suspect for a different readership group to HyperScale’s.
Some of the minor criticisms concerning drilling holes and lack of dimensions for plumbing fabrication will matter little to most modellers prepared to tackle this kit, as it should be apparent that a “shake & bake” it is not. Likewise, the sequencing of the instructional steps is only ever a guide.
This is a quality effort from a most interesting manufacturer. It is expensive, but the price seems fair to me, given the engineering and quality of the kit, and of course the limited quantities it is likely to sell in.
The potential to produce a super-detailed model of this classic engine is sure to find some enthusiastic enough to buy and build this kit. I am happy to recommend this kit to such modellers.
Thanks to Wiener Modelbaumanufactur for the review sample.
Review Text
Copyright © 2014 by Mark Davies
Page Created 7 May, 2014
Last updated
7 May, 2014
Back to HyperScale Main Page
Back to Reviews Page

|
 Home
| What's New |
Features |
Gallery |
Reviews |
Reference |
Forum |
Home
| What's New |
Features |
Gallery |
Reviews |
Reference |
Forum |