Airfix 1/72 scale
Boulton Paul Defiant Mk.I
(New Tooling)
by Roger Hardy
 |
Boulton Paul Defiant Mk.I |

Hasegawa's 1/72 scale B-47E Stratojet is available online from Squadron
S
u m m a r y |
| Catalogue Number: |
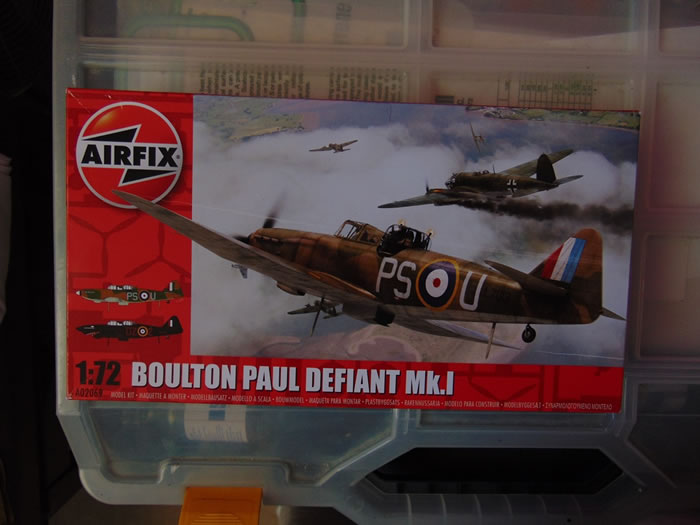
Airfix Kit No. A02069 - Boulton Paul Defiant Mk.I (New Tooling) |
| Scale: |
1/72 |
| Contents and Media: |
Injection moulded. Three sprues of 62 light grey plastic parts; one sprue of 8 clear parts; markings for two aircraft. |
| Price: |
£7.99 plus shipping from Hannants
and specialist hobby retailers worldwide |
| Review Type: |
Full build review straight-from-the-box. |
| Advantages: |
Current technology kit, accurate, comprehensive, well detailed. All canopy options provided. Perfect fit. |
| Disadvantages: |
Canopy framing is a little clunky. |
| Conclusion: |
Close to perfection. Highly recommended. |
Background
 History (see http://en.wikipedia.org/wiki/Boulton_Paul_Defiant) History (see http://en.wikipedia.org/wiki/Boulton_Paul_Defiant)
The Boulton Paul Defiant was a British interceptor aircraft that served with the Royal Air Force during the Second World War. It was designed and built by Boulton Paul Aircraft as a "turret fighter", without any forward-firing guns and, designed by J D North, it was a decent design, given the additional weight of the turret installation and the fact that it had to be a 2-crew aircraft. It was about the same size as a Hurricane. The idea was that it was easier to point a set of guns rather than the entire aircraft, a concept that was, by then, unique to the UK, a message that should have been clear to the British Air Ministry. It had no forward-firing guns, just a set of four .303 machine guns in the turret. This made it very lightly armed compared to the single-seat Spitfire and Hurricane which had eight of these guns; half the crew but twice the firepower and the same Merlin engine.
Contrary to popular belief, the fact that it could not fire forward did not make it prone to frontal attack because the closing speed of a head-to-head attack is too high and there is inadequate time to aim and get a decisive shot. The real flaw of the turret fighter concept was that it could not attack other aircraft ahead of it, only from the side or from below and this was a massive disadvantage as there was no way it could engage in a dogfight. To be fair, it was designed as a fighter to destroy bombers, not other fighters, and therein lay its weakness because it could not effectively defend itself from fighter attack.
In practice, the Defiant was found to be reasonably effective as a bomber-destroyer, but vulnerable to the Luftwaffe's more agile, single-seat Messerschmitt Bf 109 fighters. Lack of forward armament proved to be a major weakness in daylight combat and its potential was only realized when it switched to night combat. It was supplanted in the night fighter role by the twin-engined Bristol Beaufighter and de Havilland Mosquito. The Defiant later found use in gunnery training, target towing, electronic countermeasures (ECM) and air-sea rescue.
The Kit
This kit is an all-new offering from New Airfix, and replaces the venerable kit that first made when I was nine years old, way back in 1960. I thought it was great then and it didn’t even need to be painted as it was moulded in black plastic! Fab! In retrospect, it had a lot of faults in outline and was covered in rivets but it always looked good and I loved those models with their little turrets. I made several of them, I was so impressed. My pocket money was two shillings and sixpence but this model only cost two shillings (10p) in its plastic bag. Series 1 heaven!
Until now, in 1/72 scale there has only been the original Airfix offering and those from MPM and Pavla. This new model is absolutely state-of-the-art and continues the high quality that we are getting used to from New Airfix and is a lot cheaper than the competition. I haven’t built the others so cannot compare them but they could hardly be better than this new kit from Airfix. The grey plastic is slightly soft and the model features subtle but crisp engraved detail, good cockpit and wheel-wells, a nice turret and open canopy option plus the option of the canopy and fuselage geometry changes when the gun is in use. The kit also includes two well-shaped and realistic crew members which mean that you don’t need to add seat belts if you use them. My personal choice is that I don’t use crew members because I think that models look better when you can see inside the cockpit plus I’m not very good at figure-painting which is a different kind of modelling skill.
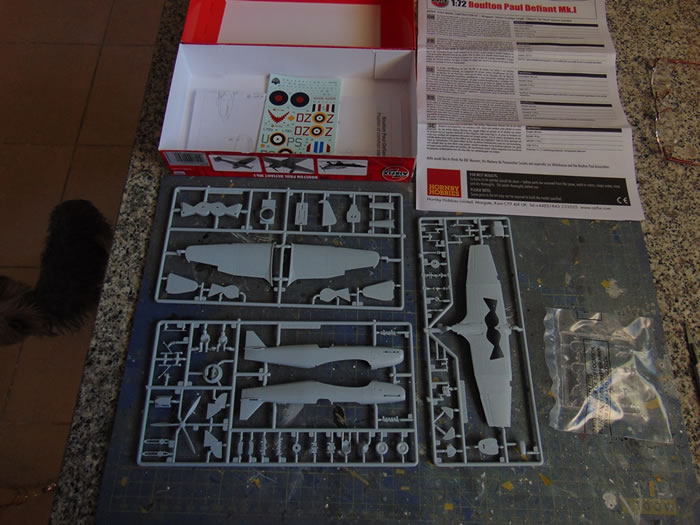
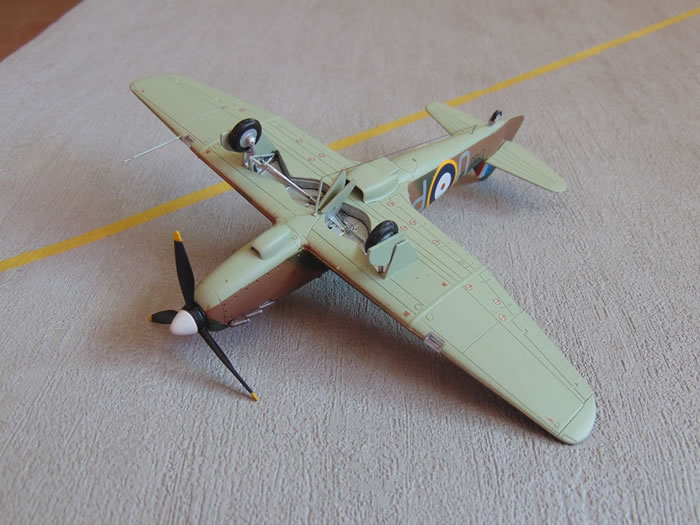
The decal sheet is comprehensive and covers two representative aircraft: one day fighter in brown/green/sky camouflage and the other a black night fighter:
-
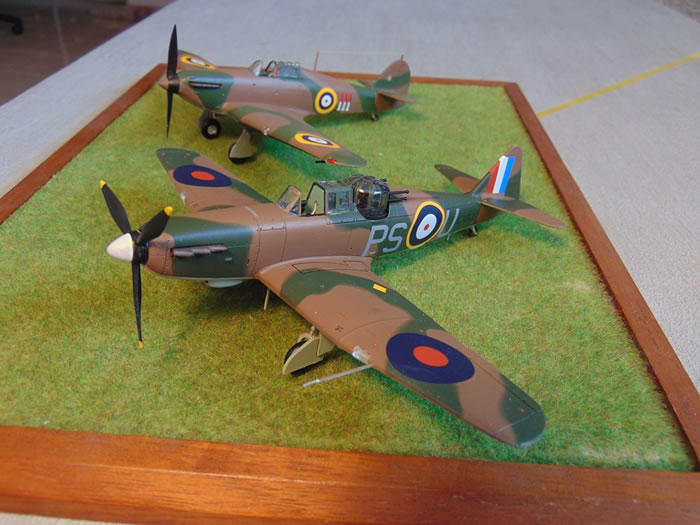
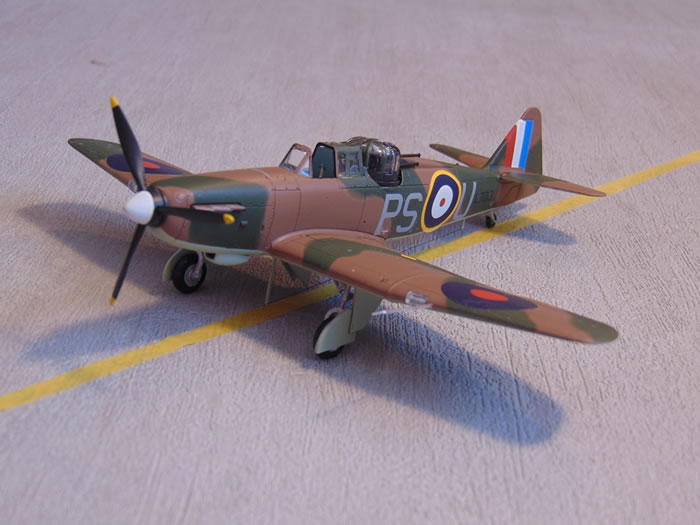
Day fighter: No 264 Sqn, RAF Martlesham Heath, July 1940
-
Night fighter: No 151 Sqn RAF Wittering, February 1941
Enough. Let’s get building!
Okay, first gripe: I know that Airfix is basically paint-maker Humbrol and they want to sell Humbrol paints but I can’t get them in Portugal where I live, don’t like enamels and prefer to use Tamiya or Gunze Sangyo if I can get them. So it’s necessary to refer to paint-equivalent charts. Here’s one: http://www.ipmsstockholm.org/colorcharts/stuff_eng_colorcharts_humbrol.htm. It’s still an irritant that Airfix do not tell you what the colours are. The main colour scheme mercifully includes the actual colour names but you already knew those, didn’t you… until you try to work out what ‘Beige Green ‘ is…
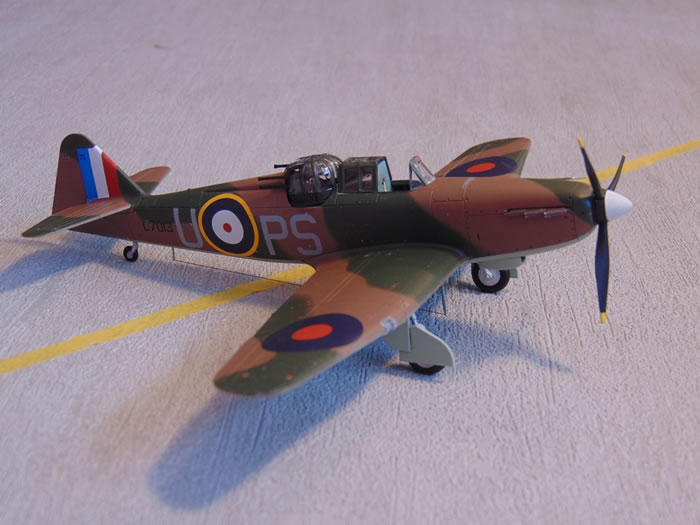
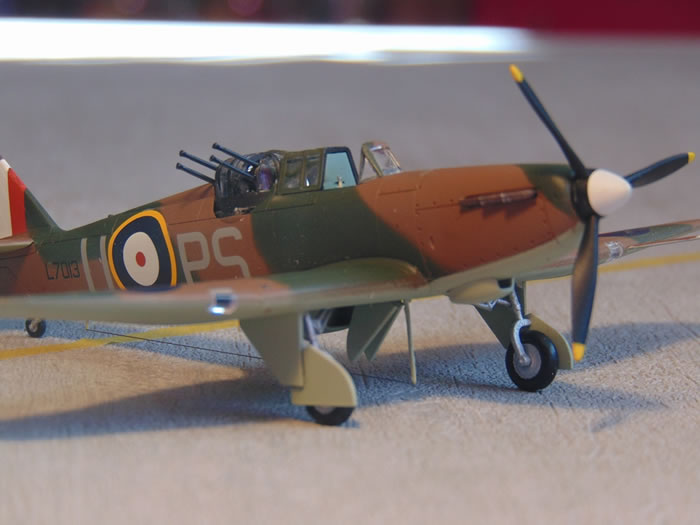
Construction starts with the office and this one is really nice because it includes sidewall detail as separate parts rather than moulding them into the fuselage sides. This is a realistic touch and makes the cockpit look correctly three-dimensional and makes any future resin replacement set rather superfluous. The cockpit goes together with precision and looks good; the instrument panel is a decal and I suppose that Eduard will do a p/e set which would look even better as the panel is quite visible. I added a pre-painted Eduard RAF WWII harness.
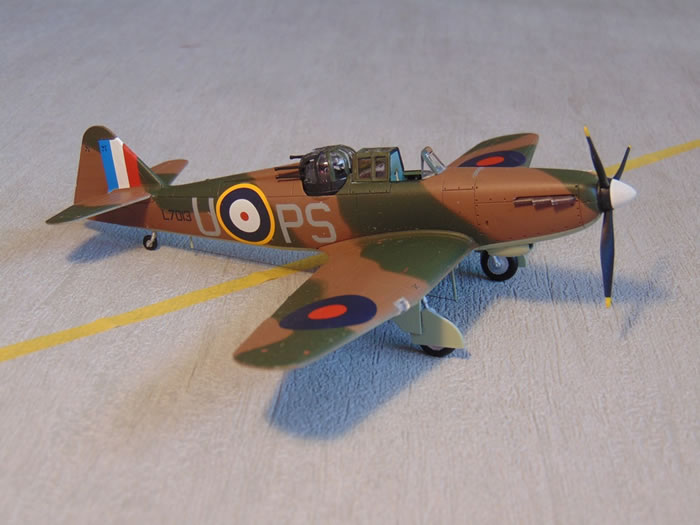
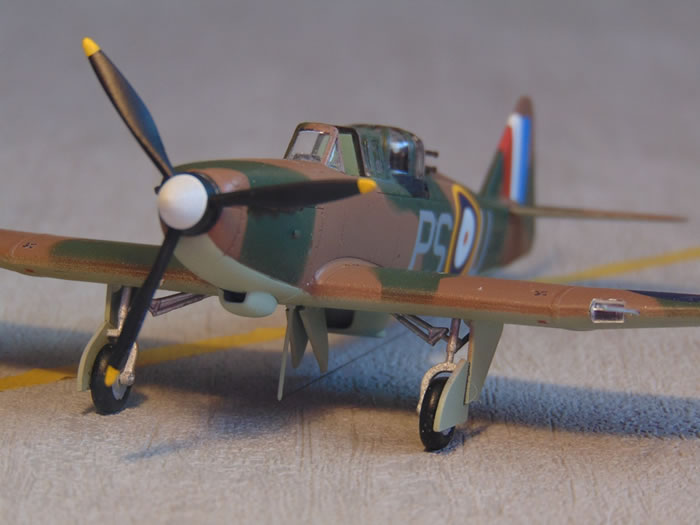
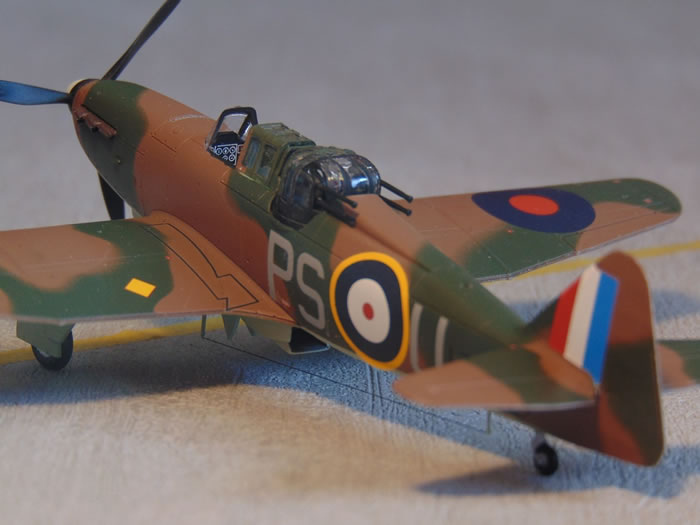
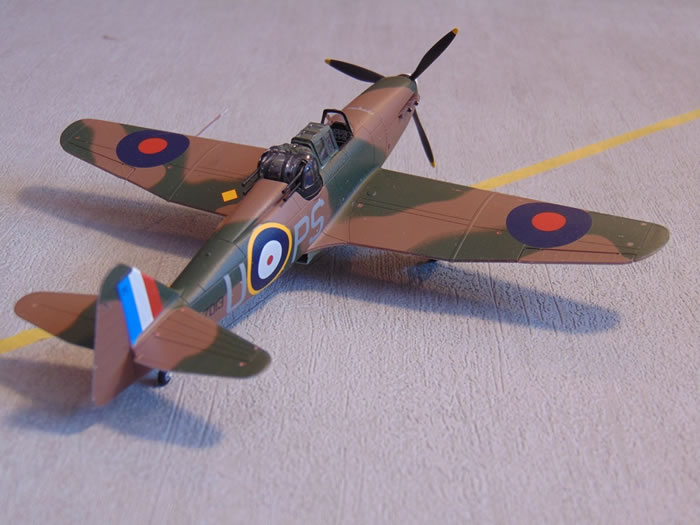
Once the fuselage halves are together, attention turns to the wings. The trailing edge could be thinner but the ailerons (moulded completely to the lower wing surfaces) look very good. I think that Airfix missed a trick here as they could have moulded the flaps complete with the upper wing surface, thus allowing a thinner trailing edge. The joint between the wing roots and the fuselage is invisible. Next you have to choose the configuration of the various fairings around the turret. Basically, there are two, the bridge between the front cockpit and the turret and the rear fuselage fairing, both of which are retracted when the gun is operating. I decided to have the fairings up and the canopy open. Note that if you want the fairing between the pilot and the gunner down, you cannot have the canopy open. The canopy parts are a little thick and the canopy framing a little heavy.
Construction proceeds pretty rapidly and before you know it you’re putting in the undercarriage; I tend to assemble as much as possible before painting to avoid sticking plastic to paint, which never works for long. There are a couple of miniscule undercarriage parts that defied me completely. It was difficult to see what they were (torque links I think) or how they were meant to fit. I lost one but didn’t lose any sleep over it and actually removed the other as it stopped the undercarriage door from fitting properly as I’d probably put it in the wrong position. I also added the undercarriage doors before painting but not the wheels which are weighted with flats so you need to get the correct one on the correct side. I thought I could force these in after painting.
The turret is a neat little assembly and it pops into place easily so that you can remove it for painting and you only need to add the transparency at the last stage. I didn’t add the tailplanes yet as it’s easier to paint without having to mask them. No filler was required anywhere and only a little fettling along the fuselage seams where I brush-painted some Alclad primer to make the seams disappear. There is a small lip at the wing leading edges between upper and lower but it takes only seconds to eliminate.
Painting
I use the Aztek A470 air brush with turquoise nozzle and sprayed the model with Alclad grey primer and microfiller to highlight any blemishes (there were none). I then used Tamiya colours XF-21 Sky, XF-52 Earth and XF-13 JA Green, masking the lower surface with Tamiya kabuki tape and the camouflage with Uhu ‘Patafix’ (like Blu-Tak but white) sausages to get the feathering between the dark earth and dark green. Strangely, the instructions tell you that the underside is ‘Humbrol 90 Beige Green’ which is bizarre as the correct colour is Sky Type S but I think that’s because it is not in the Humbrol range.
I applied a coat of Alclad ‘Light Sheen’ to protect the matt dark earth from any marking that could be caused by the Patafix before spraying the green, always a good precaution. I masked the canopy and turret glazing with kabuki tape, carefully cut with a new scalpel blade, although I’m sure Eduard will produce canopy masks…at least I hope so because the turret framing is a pain to mask. Alternatively, there is the forthcoming Peewit set: https://www.hannants.co.uk/product/PEE72017) which will make life easier. I followed the painting instructions for the colour demarcation. The turret appears to have the front part of its framing in dark green, the rear part in black with a black base. There is a real Defiant to look at in the RAF Museum so I assume that this is correct. Once everything was dry I sprayed it with Alclad’s gloss for the application of the decals.
Just a brief word about Alclad’s general finishes. They’re famous for their state-of-the-art metal finishes but they also now do a range of overall varnshes: matt, slight sheen, satin, gloss and ‘aqua’ (used for protecting the high reflective paints) plus the primers, grey and white. I’ve struggled for years to find reliable primers and general finishes (in particular, a good satin varnish) and had hit on Tamiya’s rattle-cans which are good but expensive. Alclad’s new general finishes are actually just as good but have the advantage that they come in BIG bottles (120ml…Tamiya paints are 10ml) and can be sprayed as they are already the correct consistency. On the model they give the correct sheen without giving any impression of depth, so you feel confident in applying multiple coats without seeing any build-up of thickness. Nice. They all work as advertised and I recommend them without reservation.
Having glossed the model it was ready for the decals. The decals are comprehensive and go on well. The only one that needed any decal setting agents was the walkway over the port wing root. The fin flash on the day fighter is curious because it has a lighter shade of blue than the roundel (pre-war light blue, I think) but I assume that this is intentional because both colours are on the decal sheet. I have one photo of PS-U which shows it in formation with others of 264 sqn and it does appear to have a paler blue to the fin flash but it’s not very clear. It also shows it sporting a non-standard 42” A1 roundel with a thinner yellow ring than applied to other aircraft of the same squadron and this is endorsed by some artwork in the old Ducimus ‘Camouflage and Markings No 8, that shows PS-U as of May 1940, so I think that Airfix have got it right, even though they’ve chosen an aircraft with a non-standard set of markings. The roundels of PS-U were probably standardised when the squadron moved from Martlesham Heath to Kirton-in-Lindsey in August 1940.
I applied an overall coat of Alclad Matte varnish to tone everything together. The final bits were the aerials under the fuselage, pitot and landing lights. Note that, because of the turret, there is no aerial wire on the upper fuselage, it is between the two aerial masts under the fuselage. The rear mast partially retracts when the undercarriage is down. Last of all, the canopy parts and turret are added.
Looking at the finished model, I’m pleased with it and found it to be an easy and relaxing build. My only minor criticism of the kit is that the canopy framing is a little on the clunky side and it would have been better to simply engrave it or make it only slightly prominent as on the new 1/72 Hurricanes. On reflection, I think my dark green is a bit too dark and next time I’ll lighten the XF-13 JA Green with XF-67 Nato Green.
Anyway, straight from the box to the shelf, this new Defiant is a little gem. My congratulations again to New Airfix. This kind of quality is normally only available at double the price and they have shown that they can maintain the standard recently set which will ensure that Airfix can retain its position at the top of the hobby model business. I am also pleased that Airfix are once again producing high quality kits at pocket money prices which might encourage more youngsters to take up the hobby.
Highly recommended!
Model, Images and Text
Copyright ©
2015 by Roger Hardy
Page Created 17 March, 2015
Last Updated
17 March, 2015
Back to HyperScale Main Page
|
 Home
| What's New | Features | Gallery | Reviews | Reference | Resource Guides | Forum |
Home
| What's New | Features | Gallery | Reviews | Reference | Resource Guides | Forum |