RS Models 1/72 scale
Airspeed Envoy
(Lynx IVC version)
by Roger Hardy
 |
Airspeed Envoy (Lynx IVC version) |

Hasegawa's 1/72 scale B-47E Stratojet is available online from Squadron
Kit: RS Models Kit No. 92102 - Airspeed Envoy (Lynx IVC version)
Price: £22.30 plus shipping available online from Hannants/
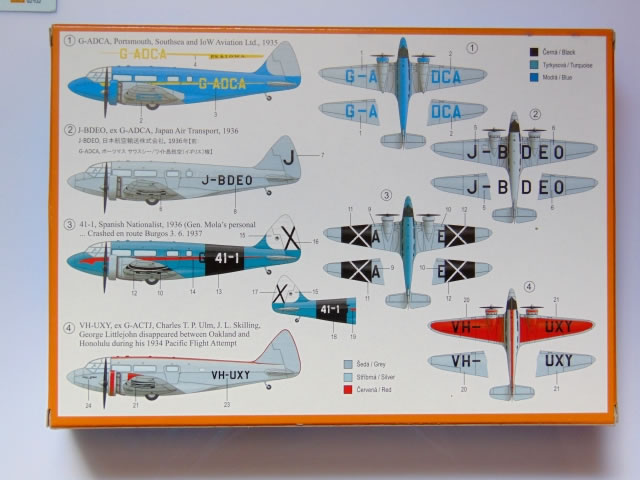
Decals: Four options
Notes: Injection moulded, straight-from-the-box
Background
The Envoy was designed by A H Tiltman and N S Norway (the Australian novelist, Neville Shute) as a twin-engined development of the earlier Courier. It was a twin-engined all-wood aircraft with a rearward retracting main undercarriage. The aircraft was built in three series, the Series I was the initial production variant (29 built) which had fabric covered wings and was not fitted with trailing-edge flaps. 13 Series II variants were built with split flaps and the Series III (19-built) had a ply-covered stressed skin wing and may have had more rounded tips. Each series of the Envoy was sold with a choice of engines including the Wolseley Aries, Armstrong Siddeley Cheetah V or Armstrong Siddeley Lynx IVC radial engines. Czech aircraft used the Walter Castor.
The prototype, G-ACMT, first flew on 26 June 1934 and the first production Envoy I, G-ACVH, flew in October 1934, being used as a company demonstrator. Export orders soon came; two aircraft went to the Ansett Airlines in Australia. North Eastern Airways and Olley Air Service in the UK also used the AS.6. In Czechoslovakia, the CSA ordered four AS.6 Envoy JC in 1937.
In May 1937 the King's Flight took delivery of an Envoy III and the aircraft received the registration G-AEXX and was painted in distinctive red and blue colours.
The Airspeed AS.6 Envoy also entered the Air Forces of different countries. In October 1936, the British Air Ministry ordered 136 Envoys for crew training. These further developed aircraft were given a new company designation as the AS.10 and entered RAF service as the Airspeed Oxford.
I was keen to make this one as I was the first person to issue a model of the Envoy, way back in the early 1990s. The company was called RugRatResins. Needless to say, this offering is a great improvement on mine!
(also see http://en.wikipedia.org/wiki/Boulton_Paul_Defiant )
The Kit
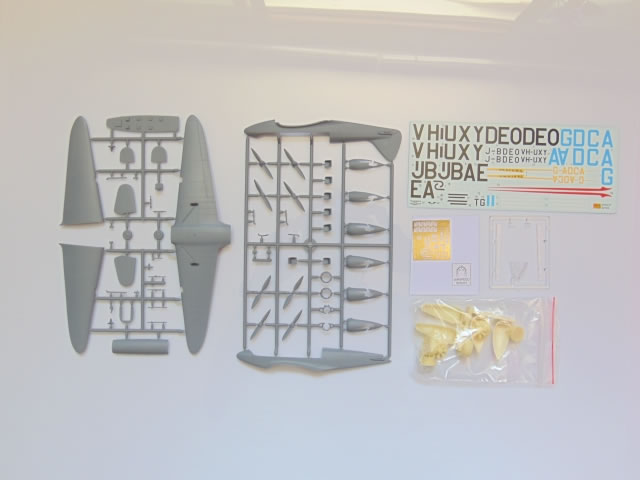
This Czech model is a limited run injection moulded kit with etched and resin parts. The plastic parts come on three sprues (one clear), the etched bits cover belts, engine pushrods, instrument panel and external details. Instruments are provided on a film in the style of Eduard. There is a comprehensive decal sheet for four civilian Airspeed Envoy Lynx IV C variants: UK, Japan, Spanish Nationalist, Australia. The Spanish option is for the aircraft in which General Mola was killed during the Spanish Civil War. The overall moulding quality looks good with a tiny bit of flash and the usual absence of locating tongues or pins that we see with limited run kits. It reminds me a bit of Classic Airframes kits; multimedia, soft plastic and delicate detail. There are, of course, various extraneous bits of plastic that have to be removed but these are obvious and this one is better than many limited run kits I’ve made.
This aircraft is available in four boxings covering the different engine and cowling options. I don’t want to nit-pick but I did a lot of research on this aircraft for my own kit and produced my own drawings. These kits cover a number of Series I, II and III aircraft but the Series I and II had fabric-covered wings whereas the Series III was ply covered. The kit wings are not fabric-covered and therefore only correct for the Series III. Looking at the four variants offered here, the PS&IOWA aircraft G-ADCA was a Series I, the Japanese variant, J-BDEO was a Series I, if made in Japan, although it’s not listed under Japanese production. General Mola’s aircraft was originally the prototype G-ACMT so was also a Series I. As an aside, the Spanish nationalist repaint shows the A of G-A on the port wing but an E on the starboard wing, showing that this had been fitted to an aircraft registered G-AE** (it was G-AEBV, a fabric-winged Series II). Incidentally, G-ACMT originally also had a more tapered tailplane but it was re-engined before going to Spain and it may also have been fitted with the later tailplane. The fourth option, VH-UXY, was originally G-ACYJ (not G-ACTJ as stated on the box artwork) and therefore also a Series I. In other words, all of the variants offered here are Series I and should have fabric wings. Incidentally, the easy way of telling a Series III from the others is that most of them were AS6J variants, powered by the Cheetah engine with the helmeted cowlings, so at least RS Models kit 92156 should be correct*. There is some opinion that the Series III wings also had shorter, more rounded tips. I refer you to http://britishaviation-ptp.com/airspeed_as6.html. If you want to do anything about the fabric wing, it means getting some .005 plastic card, scribing the ribs lightly on the reverse side with the back of a scalpel blade, then gluing the trimmed sheet to the wing using 5-minute epoxy. I didn’t bother; I’ll persuade myself that my aircraft was fitted with replacement wings!
*I researched RS Models kit 92156 for RAF Envoy P5528 and it doesn’t exist. However, P5628 does exist and is a Series III. Looks like another error.
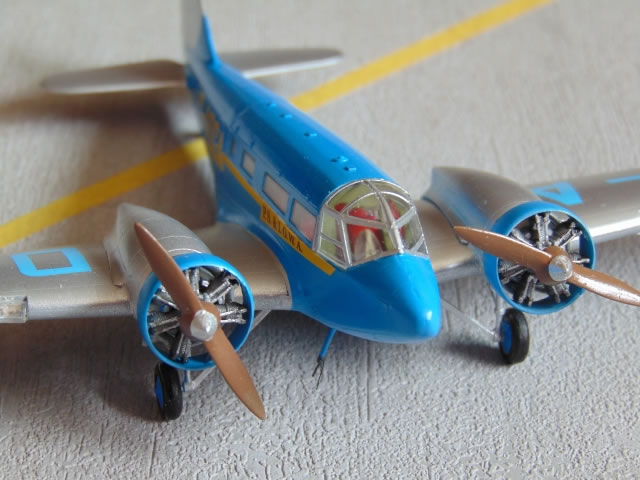
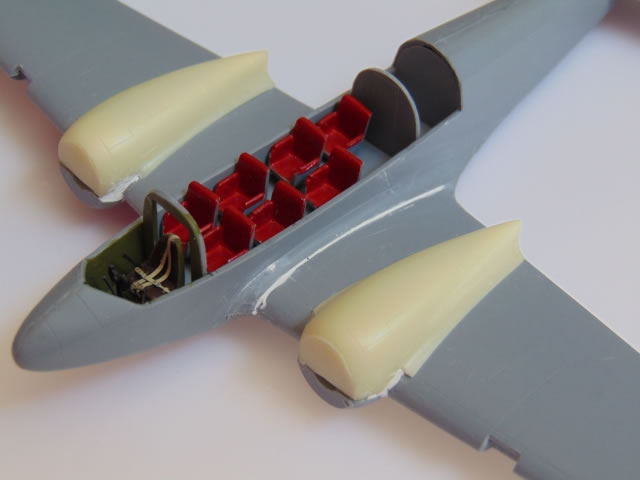
Construction starts with the cockpit which is nicely detailed with p/e parts and instrument panel film, although some of the p/e parts are too delicate to be useful or even to be seen. I used generic Eduard pre-painted seat belts but there’s nothing wrong with those provided in the kit except that they need to be painted and I’m too lazy! The colour instructions have you paint most of the interior ‘interior green’ which is normally applied to metal interiors; this aircraft is wood. There are no colour photos of Envoys so I had a look at the interior of the contemporary Dragon Rapide, and, yes, the cockpit was interior green and other details black. However, in the passenger cabin, light grey is the order of the day (= plastic colour) with the seats having grey frames and red leather upholstery. With the instrument panel in place in one fuselage side you will need to trim a bit off the front of the cockpit floor. I assembled the fuselage with its cabin and cockpit but only glued the cabin interior at the rear bulkhead to give some wiggle room for the joint between the pilot’s bulkhead and the canopy which must line up.
The next stage has you adding the transparencies and cockpit but….nah…I don’t think so. Every time I seal up a fuselage too early, I end up with dust and detritus on the inside of the glazing and can’t get it out. So, next is the wings. I fitted the one-piece lower wing then fettled the upper wings until they were snug. At this stage I also fitted the tailplanes with superglue as there are no location tongues to speak of. I then added the nacelles appropriate for the version I was modelling; there is a choice of two variants in plastic & resin. Incidentally, the instructions are in English but are misleading in places; for instance, when they refer to ‘camouflage’ what they mean is ‘colour scheme option’. The only clue to location of the nacelle parts is the hole in the wing for the wheel but they all lined up well. Mine didn’t quite match up at the front but I didn’t expect them to. The resin parts are secured by superglue. Now, the major assemblies are together and I can do some filling and filing. In fact there is little filling to do and I used Milliput which can be applied and smoothed when wet so that further filing is not necessary.
Whilst waiting for the Milliput to dry I did the engines. These are nice resin castings but you have to add the p/e pushrods which is a slow and frustrating process. They give you some spares, which is worth knowing! (Hint: it’s easier to leave the engines on the moulding blocks, glue the pushrod crankcase ends first then let them fall back to the rocker arms, then glue them there). The resin exhaust rings come away from the moulding blocks easily but are difficult to locate on the rear of the engine. The resin Townend Rings are a royal pain to separate from the moulding block and you need to be very careful as they are very thin and fragile. However, when all assembled, the engines are little beauties.

I decided to assemble the fuselage top and glazing so that it would be like a one-piece canopy. Be very careful that you get the indented window frames to the outside and the clear panel with the top of the door on the correct side! The side glazing needs a slight shave at front and back to get a perfect fit. The only problem then is the joint between the rear of the roof and the rear fuselage as there is stringer detail that needs to be retained. The problem with treating the glazing as strips instead of inserts is that it is very difficult to do anything about the joints between clear and grey plastic as anything will inevitably spoil the clear parts. I simply added some Micro Kristal Klear along the seams as it dries completely transparent. There will still be a slight lip between the glazing and fuselage on one side but this coincides with the top of the decal so may not be so obvious.
I trial fitted the engines and the next problem is that there’s nothing to mount them on. Or rather I should say that the diameter of the nacelle on the wing is the same as the inner diameter of the exhaust ring, so the engine floats in mid-air, hanging off the exhaust ring. Yet, the position of the engine and exhaust look to be right so I think that it’s just a mounting that’s missing. Fortunately, the kit provides an optional engine rear fairing (limited to VH-UXY, if you believe the instructions). I fitted these. Actually, I think this is an error in the instructions and that this part, No 37 must apply to all variants; there’s no other way of mounting the engines. Whether the front fairing, No 38, also applies, I’m not sure. The lower nacelle needs to be reshaped quite a bit so that the exhaust ring fits snugly (the unused alternative small ones might fit better…) and the engine will then sit nicely in the mounting.
Painting
I then masked the clear bits and made a late decision to add the undercarriage (less wheels) before spraying. This is because each undercarriage leg is a 4-piece item and I didn’t want to fiddle around with these small, delicate bits after painting. Also, it provides something for the model to stand on while the paint is wet. The wings and undercarriage are all silver and to fix the bits before painting removes the possibility of trying to glue plastic to paint, never very successful. The main undercarriage leg and diagonal go together well but it is difficult to know exactly where to place the wheel well ends of the retraction arms. In the end, I got them all in place but only by shortening them dramatically. Note that the main legs should be angled backwards so that they are vertical when the tail is down; the instructions are lacking in these details.
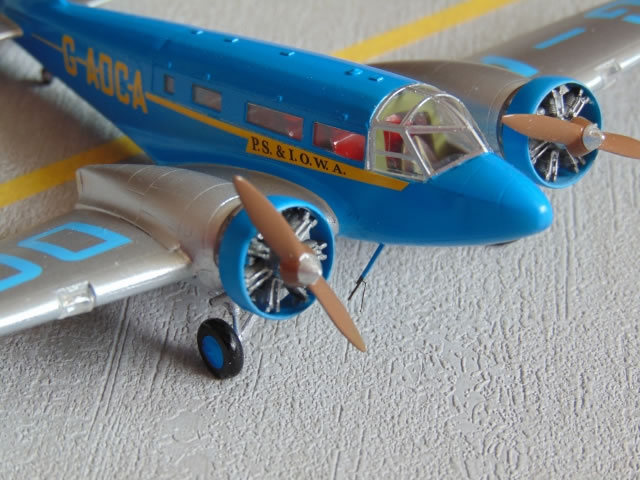
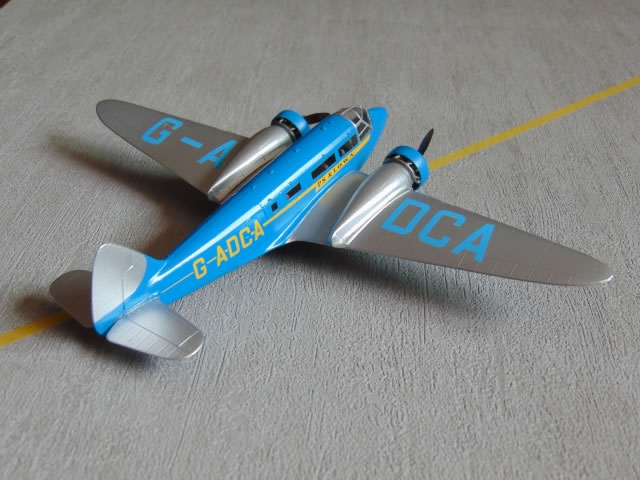
I primed it using Tamiya rattle-can surface primer and checked the joints and surfaces. I used Duplicolor car alloy wheel spray (nice bright finish) and Tamiya X-14 Sky Blue (gloss). The choice of blue is a little arbitrary because I am not aware of any colour photos of the PS&IOWA aircraft but all colour artwork shows a light to mid-blue and X-14 looks like a good match to me. Black-and-white photos show quite a light blue; certainly not a dark blue as shown on the box artwork. The kit decals provide wing registration letters in a blue that almost exactly matches X-14 so the choice was made for me.
Painting over and the aircraft unmasked, it was tie to add the engines and the last few items. The tailwheel is very fragile and is best left off until the model is finished. The wheels probably had blue hubs, they weren’t silver as shown in the box artwork. I painted the propellers wood colour rather than black (you get eight props to choose from…). There are a couple of tiny venturis that will ended up on the carpet. The Envoy was fitted with an external streamlined tube below the cockpit for a trailing aerial. This is provided as a part on the p/e fret (it’s too skinny – replace it!) but there are no instructions to fit either it or the pitot static which should go under the starboard wing about 2/3 of the way out. I added some MV lenses for the landing lights (the landing light covers don’t fit well at all and need fiddly trimming) then it was ready for the decals.
Decals
The decals were no problem at all and there are …joy of joys…no stenciled instructions! I split the long fuselage decals for safety and used Microset. The fuselage strip conceals the joint between the fuselage and glazing as I thought it would. The wing registration letters have the usual carrier film between them but these can be trimmed away if desired, although I didn’t and you don’t notice it. The light blue of the decals is a bit lighter than X-14 but I still think that X-14 is correct. I repaired the tailwheel for the third time and it’s now more superglue than plastic.
This makes into a really nice model of a pretty little light transport. It looks right, sits right and I’m very pleased with it. Apart from the ‘solid’ wing, it seems to be accurate and I recommend it to lovers of between-the-wars civil aircraft. I’m looking forward to doing a camouflaged RAF one next. A Series III. With a solid wing!
Model, Images and Text
Copyright ©
2015 by Roger Hardy
Page Created 30 March, 2015
Last Updated
30 March, 2015
Back to HyperScale Main Page
|
 Home
| What's New | Features | Gallery | Reviews | Reference | Resource Guides | Forum |
Home
| What's New | Features | Gallery | Reviews | Reference | Resource Guides | Forum |