Wingnut Wings' 1/32 scale
Fokker E. II
by Bruce Salmon
|
|
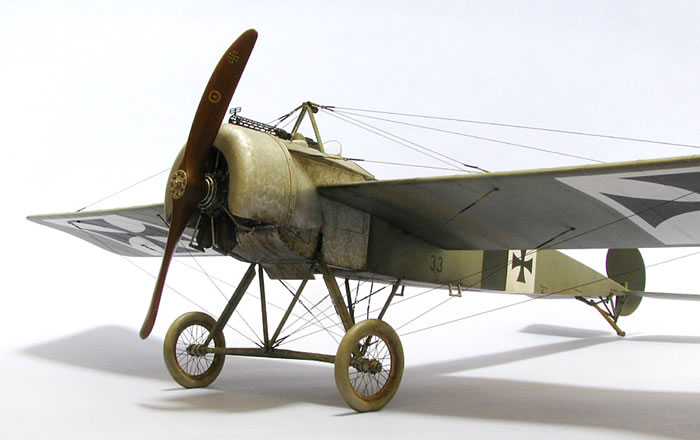
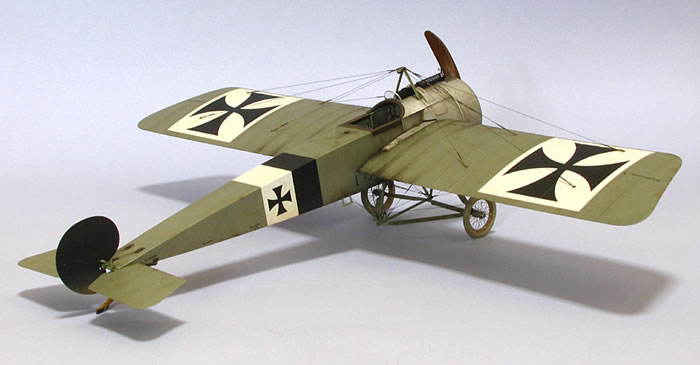
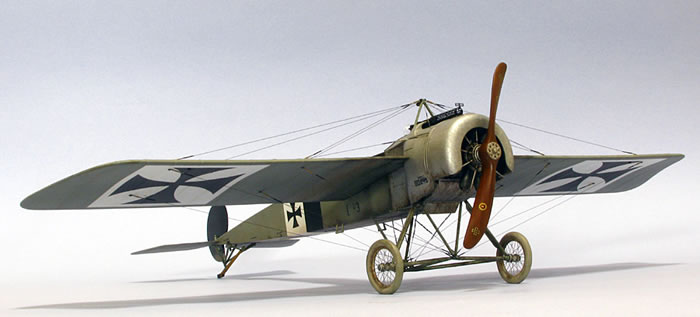
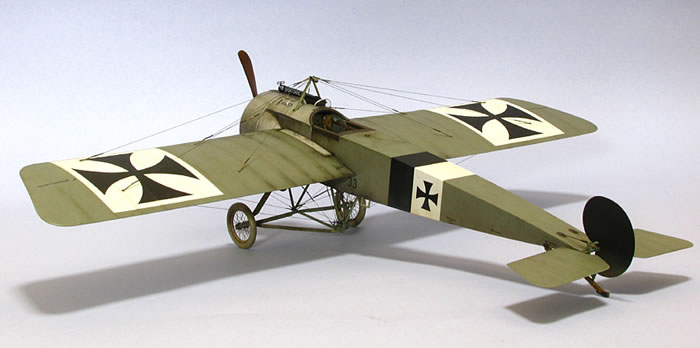
Fokker E. II
33/15 Feldfleiger Abteilung 9 Bavaria, January 1916 |

Tamiya's 1/32 scale Tamiya P-51D Mustang is available online from Squadron.com
Eindeckers have always been a favourite of mine. To me they epitomise the fragile nature of early aeroplanes with their fabric covering, frantic tangle of rigging wires and wing-warping technology. The bravery of the men who entrusted their lives to these contraptions a century ago cannot be understated.
Wingnut Wings has created a wonderful rendition of this famous aircraft and it is good to see that they listen to the gripes of modellers to make their products even better. Even so I decided it was necessary to purchase a few extra fruity bits to make the kit stand out even more.
Aftermarket Products Used
-
HGW Super Detail Set Fokker E.II / E.III 132107
- Scale Spokes SW32010 Fokker E.III Spoked Wheels 1/32
-
Gaspatch Turnbuckles: One End 1/32 (inserted into the wings) and Type C 1/32 - (1/48 scale Type C for the external control stick and cabane struts bracing cables)
-
Aviattic ATT32096 (Clear Decal Paper) WWI German / Austro-Hungarian Linen (Dark)
Breaking it Down
WWI aircraft can be quite complex creatures and following the kit instructions is not always practical as you have to take into account rigging and painting issues. Therefore you need to get familiar with the parts and work out a plan of attack before proceeding. Getting this process wrong could mean making things a lot more difficult and lead to much anguish. I usually build and paint parts in subassemblies where possible.
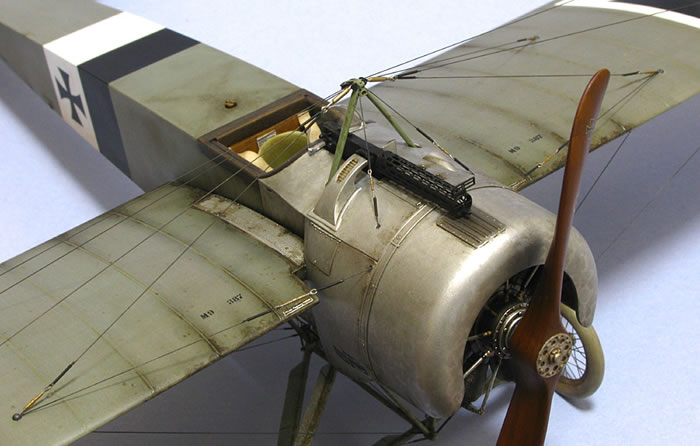
Engine
As with all Wingnuts engines this one is very nice but the seamline that runs through the middle of all the cylinders is hard to remove. I could have purchased a Taurus resin engine but considered it too pricey and too much work for the small amount of engine that would be on show. Instead I just sanded the seams as best I could and chose the best ones to be exposed at the bottom of the cowl. This means that I glued my engine in place and so consequently the prop won’t turn; a good compromise I think.
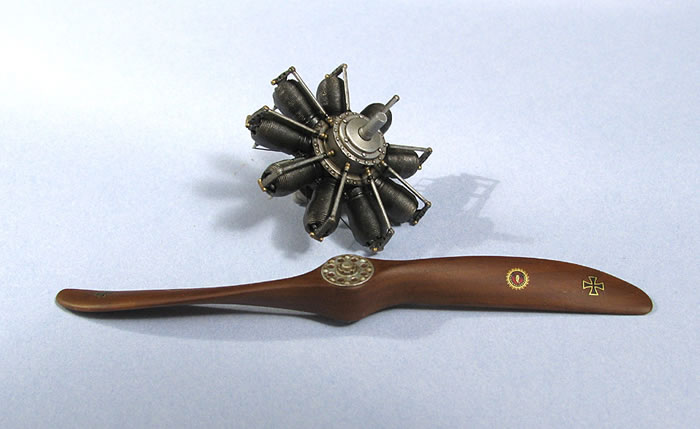
The Engine crankcase was sprayed with Tamiya X11 Silver / XF16 Flat Aluminium 50/50 and the cylinders in black. I then picked out the details with various colours including metallics using a fine paintbrush and finished up with the magic of several dirty washes using oil paints. Oil staining was done with a mix of Raw Umber and black oil paints. I over-painted some oil patches with Future to make them a bit more shiny and wet-looking.
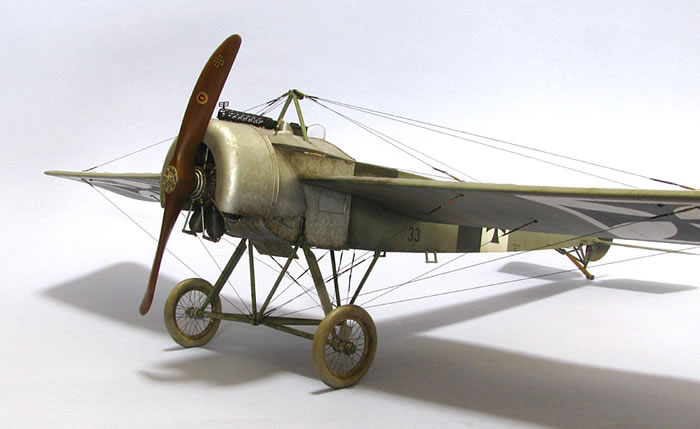
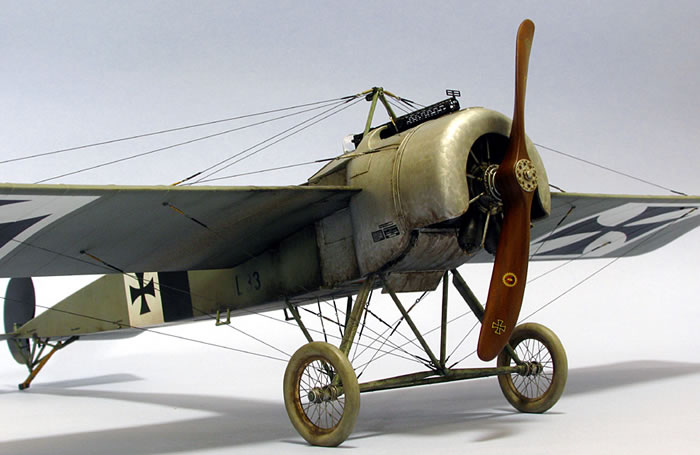
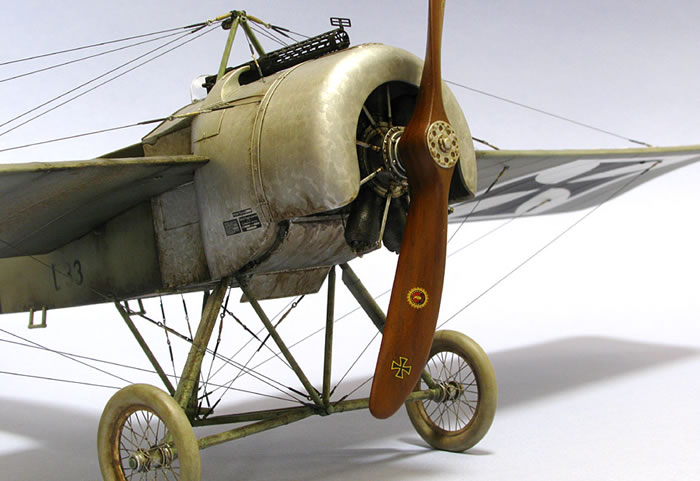
Propeller
The propeller was first sprayed with a light wood colour then masked and sprayed with dark wood. After removing the masking I oversprayed the whole with a thin coat of dark wood. Next I brushed on a streaky wood grain effect using raw umber oil paints and once dry sprayed with clear orange. The metal hub plate was brush painted in X-11 silver. A satin coat of varnish finished the process.
Light wood: 5 parts Tamiya XF59 Desert Yellow / 1 part Humbrol 133 Satin Brown.
Dark Wood: Humbrol 70 Brick Red.
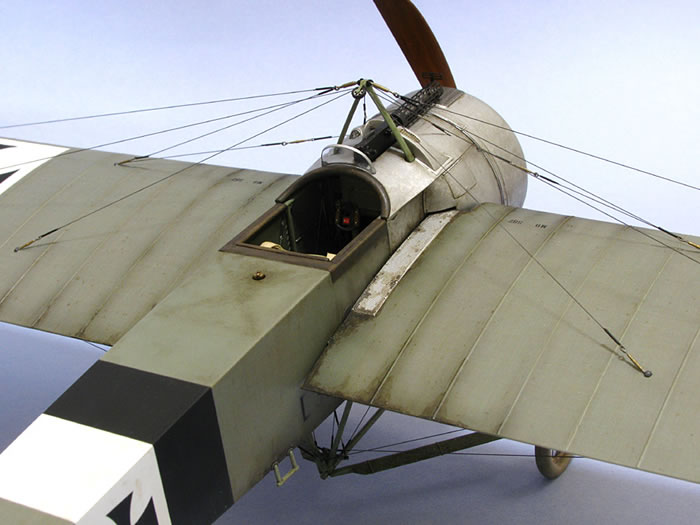
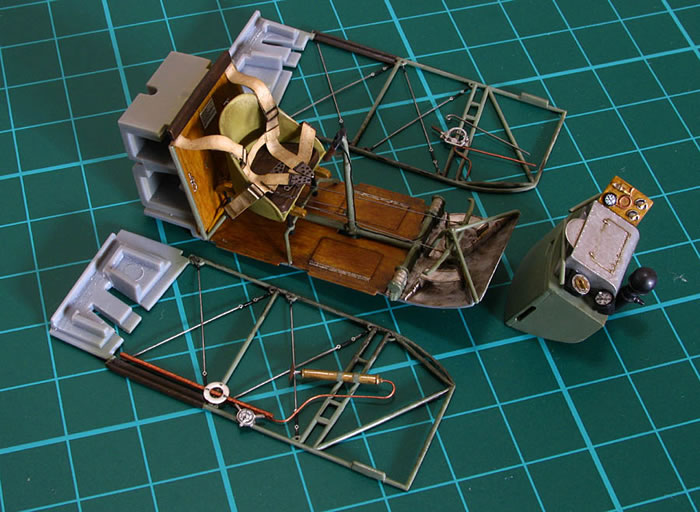
Cockpit / Fuselage
I must say that I’m not a fan of the Wingnuts assembly guide. To me the dark blue colour of the parts to use in each step make them difficult to see and some of the drawings are too small to determine proper parts placement. Even the use of an Optivisor proved not enough at times. Strangely I noticed too that the cockpit painting guide doesn’t include their PE parts in place. Also don’t bother with the cross bracing rigging that goes between the two side frames as the ammo box and instrument board interfere with it. Additionally it would have been nice if the seat itself was a separate part so you could attach it after rigging the controls. That said everything fits like a glove as we have come to expect.
I decided to only use about half of the HGW PE cockpit bits as the kit parts are good enough by themselves. Some divots were cut into the fuselage halves as adding the HGW PE bracing wire wouldn’t allow the halves to close fully. I also tried the RB Productions PE wood stencil for painting the plywood effect on the floor and back wall. It is quite nice but can be difficult to fit into small spaces and over various protrusions. I streaked on some oils to blend it together a bit better. Now is also a good time to practice the turned effect on the internal metal parts as they won’t really be seen much.
The HGW seatbelts are very nice although a little bit fiddly to assemble. I found that the PE was a bit thin and I broke some buckles (there are no spares) while trying to thread the straps through them. There was no tolerance in the strap width and they are quite a tight fit.
I painted the copper pipe coming from the air pump with the new AK Interactive True Metal Copper (AK454). This comes in a tube and is a slightly clumpy and waxy product that you can paint on with a brush over a coat of primer. I let it dry overnight then polished it with a soft cloth. All the lumpy bits smoothed out leaving a nice shiny “new” copper finish. I toned it down by drybrushing on some raw umber oil paint. The air pump itself was painted Alclad ALC 109 Polished Brass using a fine brush. Yes you can brush paint with Alclad but you need to stir it often and it flows quickly due to being so thin.
A big plus in WNWs favour is that, compared to their earlier kits, the instrument decals now fit their respective bezels perfectly with no protruding carrier film.
The cockpit was weathered first with an all over filter using AK Interactive Enamel Wash for DAK Vehicles (AK066) thinned 50% with turpentine followed up by localised Fuel Stains (AK025), Engine Grime (AK082) and then a bit of oil paint drybrushed on to blend things together.
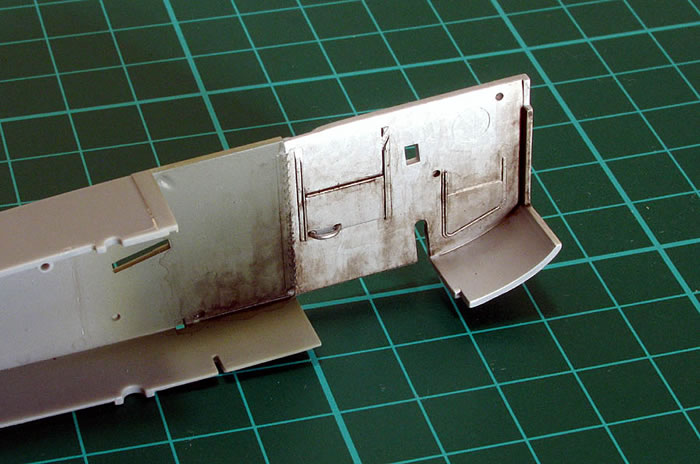
Now it was time to join the fuselage halves together. I always dry-fit everything first to check for any conflicts. It would appear that the curved front floor of the cockpit gets pushed upwards making the control wires go slack. However, if you glue it down to the corresponding curved fuselage bottom then the problem is solved. The fit was near perfect and it was time to commit to glue. The build was progressing so well in fact that it was overdue for some kind of unseen disaster...
First I glued the cockpit assembly to the left sidewall and dry fitted the right side taping them together to check for any alignment issues; all good. I then removed the right side, put glue on the cockpit and then put it all back together again. At the same time I glued the top fuselage seam with thin liquid cement and taped it all up tight. After a few hours of drying time I glued in the bottom fuselage lacing parts and the front firewall.
The next day the top join was filled with CA and sanded smooth. Later (after painting) sink holes appeared in some places along the seam which had to be filled and refilled several times. Liquid cement can be a real pain as it shrinks over several months causing sink marks to appear as if from nowhere. I don’t think I’ll use it to join fuselage halves again.
Next I thought I’d check the fit of the wings to make sure there was enough tolerance in the fit for easy assembly later on once I had finished painting them. Somehow the cockpit got out of square when gluing the fuselage halves together even though there are locating dimples for them. The left wing was sitting a little high while the right wing wouldn’t even fit in the hole. I could see that the cockpit was sitting down on the right by almost 1mm! So I carved out the top edge of the fuselage hole to get the wing in and once inserted it drooped by about 20 degrees. After much filing and sanding I had the wing at a stage where it could be glued level. What an absolute pain after being so careful.
WARNING: Dryfit your wings while gluing the fuselage halves together or there will be severe consequences. I didn’t see that written in the instruction guide anywhere. It should be..!
Wings
Other than the aforementioned alignment problems the wings are splendid. I did worry that the attachment tab was too small and being at the thin part of the wing wouldn’t support all that weight over the years and thus the wings would eventually sag. So I decided that I would beef up the cabane struts so that the weight would be supported by functioning rigging in this case using nylon monofilament.
To aid this I replaced the turnbuckles on top of the cabane struts with scratchbuilt ones made from brass wire and tube and the wing turnbuckle holes were drilled out to take the Gaspatch metal ones. I also replaced the control cable pulley with a PE one from the HGW set.
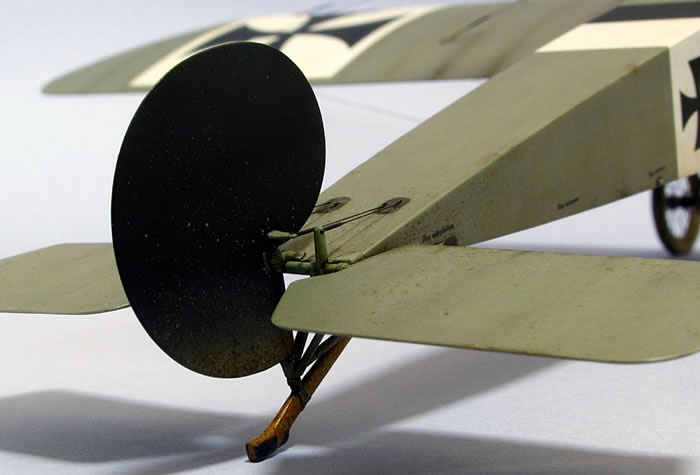
Tailplanes
I managed to snap my elevator in the middle while cleaning it up. Now essentially having two parts it actually made them easier to handle for painting. The rudder pivot point was trimmed to allow it to be offset to match the cockpit rudder bar and the control horns shortened slightly so that they don’t clash with the elevator control horns.
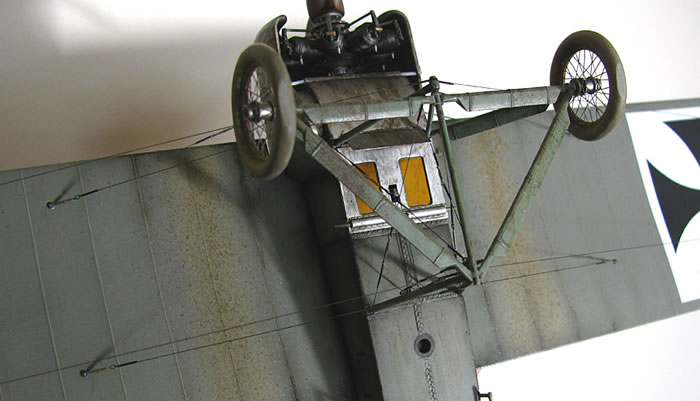
Undercarriage
At this point you should already have a comprehensive understanding of how the rigging works so you can figure out where you need to drill holes for your monofilament, if that’s your preferred method. I rushed ahead and consequently had to drill all the holes after the undercarriage was assembled and attached to the aeroplane. I painted all the Undercarriage metal parts with 1 part XF65 Field Grey / 4 parts XF2 White.
Wheels
I decided that I would spruce up the kit with a set of spoked wheels from Scale Spokes. This is an inexpensive brand and the wheels look impressive. The set comes with 2 wheels and various sized rubber tyres in natural rubber and black as well as a resin pair. There are no instructions and no references. A small PE fret contains parts to go somewhere on the hubs I presume but I left them alone. I don’t like the idea of using rubber so selected the resin tyres. These were not particularly well cast and full of air bubbles. To make them fit I cut them through at one point (where the flattened area touching the ground is) using a razor saw. I placed them over the rims, squeezed the ends together gluing them in place with CA. I then ran CA around the rims to lock it all in place.
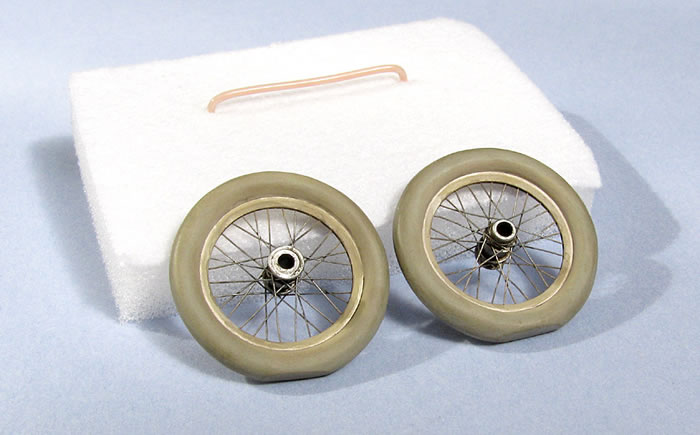
Once this was done the wheels are surprisingly strong and they even fit on the undercarriage perfectly. Even though the rims are not accurate it was still a great addition to the final look of the model. In my opinion this modelling product is very nice though a little undercooked. I painted the rims and spokes with Alclad aluminium and painted the tyres 2 parts XF19 Sky Grey / 1 part XF55 Deck Tan.
MG
The Spandau MG goes together easily and the PE adds greatly to its realism. I first annealed the PE then rolled it using a round punch on a rubber mat. I like to roll it tighter first with a smaller diameter punch so that the ends that join to each other get enough curve to them. Then I roll again with a larger diameter punch to bring it back to the correct size.
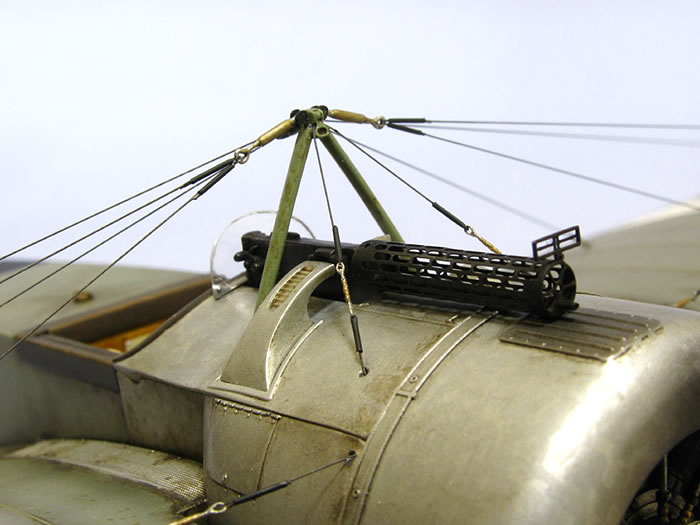
I spray painted mine with Humbrol Metal Cote 27004 Gun Metal then buffed it with an old fuzzy brush.
Painting
WWI aircraft lend themselves to painting and weathering before assembly as it can be quite difficult to reach many areas once they are glued together.
Firstly I painted all the metal parts individually with Alclad ALC101 Aluminium. I then created the turned effect by brush painting on some enamel XF16 Flat Aluminium thinned one to one with turpentine. It’s a good idea to first practice in areas that won’t be seen till you get the hang of it. I’m still not really satisfied with my results.
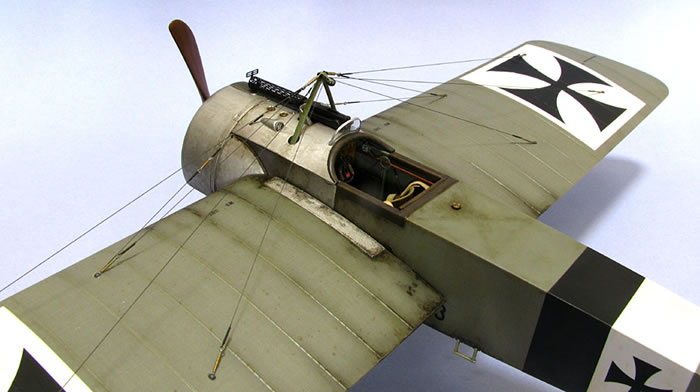
Next I painted the wings, fuselage and elevators Fokker grey. I had decided to try the Aviattic clear linen decals as I had never used them before. The Fokker grey had to be quite light as the decals would darken the whole colour once applied. I used 1 part XF22 RLM Grey / 1 part X1 Gloss White which was then post shaded with more white added. I then went back as far as straight XF22 for areas of the fabric that were stained with oil. Once dry I sprayed about 8 coats of X22 gloss acrylic varnish to seal everything ready for the decaling process.
Markings
The Aviattic decals come in a single A4 sized sheet so you have to cut them to suit your own needs. To achieve this I made paper templates of where the decals would go before cutting them out. I even did this as individual strips on the wings because I was worried that the thickness of the decals would obscure the fine rib details. I also decided to apply the large kit decals first just in case I ran out of the Aviattic linen ones and to compensate for any mistakes I might make.
I started with the fuselage crosses and had chosen decal option B - Fokker EII 68/15. Upon applying the decal I realised that something was very wrong. It didn’t match the profile drawing and the cross sloped forward at an angle approximating being horizontal if the aircraft was parked on the ground. All other crosses I have seen are horizontal to the in-flight position or centreline. I rushed to find some info hidden in the instruction booklet – there wasn’t any. I decided to err on the side of caution so pulled off the offending decal and threw it out. The only other scheme now available to me without changing too many things was option A - Fokker EII 33/15. Even here there were some tense moments as there are no reference points (aka panel lines) to assure correct alignment. I eyeballed the procedure leaving a slight overlap top and bottom. I repeated the operation on the opposite side but used dividers to make sure they were in exactly the same place. Application of the top and bottom decals then went ahead without a hitch. I really wish WNW would give us the option to paint our own bands and provide the crosses separately. The wing crosses are much easier and even come with cut-outs for the turnbuckle attachment points. It’s a pity they didn’t also have cut-outs for the transport lugs on the underside as mine crinkled up into a bit of a mess on that edge.
Now that the large kit decals were on it was time for the Aviattic linen. The decals weren’t as thick as I had feared but they certainly have some interesting characteristics. They are quite plasticy and stretchy and difficult to trim with even the sharpest of blades. When you apply Microsol they do soften but also shrink and if they happen to be covering a protrusion in the surface the shrinking can pull the decal off the surface. Also be very careful not to let Microsol sit in droplets on the surface as the acid will etch brown marks into the decal that can’t be removed. This aside they create a simply marvellous effect that you can’t easily recreate any other way. The linen I used effectively doubled the darkness of the paint so you need to be aware of any uncovered edges and you may need to touch them up with darker paint. Another couple of gloss varnish coats sealed everything then I added the small decals. It is good to see Wingnuts providing decals that have been partially worn away as this adds extra realism to the model. More varnish sealed in the small decals and I then attached the undercarriage, coaming and cowls - now weathering could begin.
Weathering
For ease the subassemblies were weathered separately. As with the cockpit everything got an all over filter using AK066 Enamel Wash for DAK Vehicles thinned 50% with turps followed up by localised application of AK025 Fuel Stains along the bottom edge of the fuselage, wing leading edge, walkway and trailing edge. This was then blended in with a flat brush with just the smell of white spirits on it. AK082 Engine Grime was cut with 50% turps and applied to further darken some areas. I also sprayed some X19 smoke around the metal parts and drybrushed oils for a more grubby appearance.
Next I gave the fabric areas an oil dot filter using Raw Umber, Payne’s Gray, Lamp Black, Yellow Ochre and Titanium White. I had never tried this technique before so did small areas at a time. It seemed to go well except that when I brushed over the Payne’s Gray and Yellow Ochre the initial dot would be left behind. It took some serious hard scrubbing with a Q-tip soaked in turps to remove them. I really have no idea what was going wrong.
Under-wing mud stains kicked up by the wheels were then applied. I first lightly sprayed a wide pattern of dried mud with XF57 Buff then a narrower strip with XF59 Desert Yellow. Next I splattered on mud starting light and wide with XF57 Buff then getting progressively darker and narrower using (AK Interactive Summer Kursk Earth (AK080), then Damp Earth (AK078), then Fresh Mud (AK016). The mud was flicked on by swiping a paint loaded flat brush across an old X-Acto blade. The more paint you have in the brush the larger the droplets and vice versa. Practice on some paper first to hone your skills.
Several coats of XF86 Flat Clear was then sprayed to seal in the weathering. XF86 isn’t a very good flat coat so I also used a 50/50 mix of gloss and matt Estapol house varnish to dull down the fabric while leaving the metal parts and wing roots shinier.
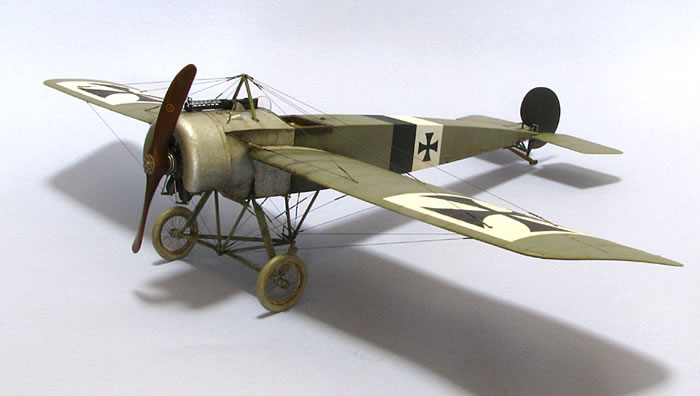
Rigging etc.
I must say that the WNW rigging diagram was overly difficult to follow. It took hours to figure out where they all the wires went and I needed the help of all the other photos in the instruction booklet to make sense of things. It would be nice if the wires were different colours to make them easy to follow and also show separate rigging drawings such as the undercarriage by itself without any of the other wing wires cutting through the picture; it just adds too much confusion.
I started with the undercarriage and attached all the monofilament that was needed to the initial anchor points first – that was the easy bit. Then I added the Gaspatch turnbuckles – still going well. Now just to thread through the opposite wire and tighten them up... GAH! The monofilament frequently gets caught up on the rough metal of the turnbuckles and won’t travel through the hole even when the tube is slid up the wire. This makes the wire go slack – a really frustrating result. It took ages to rig this small area but at least by using this method the wires are easy to replace and you can shrink them with heat much like you do with stretched sprue.
After I muddled through the undercarriage rigging I then rigged the underside of the wings. This was a somewhat easier affair as I had more space to work in. However, it still didn’t assist the process much with copious swear words required to appease the wrath of the rigging gods.
Next I flipped the model right side up and attached the cabane struts, MG and windscreen (BTW the HGW painting mask doesn’t fit the windscreen). I then suspended the model by the wing tips using two paint bottles. I let the fuselage weight sag the model thus raising the wing tips. Next I blocked up the undercarriage so that the tips were 1mm higher than the roots. Satisfied it wouldn’t sag any further while I was working on it I proceeded to rig the upper wing. Once done I removed the model from its perch and checked the wings for level – they were almost perfect. Lastly I tightened any sagging wires with heat and the rigging was complete.
The final things to do were to add the spoked wheels and propeller followed by some last minute weathering. This involved some AK Interactive Airfield Dust and Light Dust applied to the undercarriage, fuselage sides and bottom and a quick spray with their Pigment Fixer to stop it from rubbing off with handling.
Notwithstanding the problems I encountered this was an enjoyable build; Wingnut Wings kits keep getting better all the time. Hopefully you (and I) might learn from the blunders I made, enough perhaps to one day build another Eindecker - or at least get one for the stash.
Model and Text Copyright ©
2015 by Bruce Salmon
Page Created 28 August, 2015
Last Updated
28 August, 2015
Back to
HyperScale Main Page

|
 Home
| What's New |
Features |
Gallery |
Reviews |
Reference |
Forum |
Search
Home
| What's New |
Features |
Gallery |
Reviews |
Reference |
Forum |
Search