HK Models' 1:32 scale Meteor F.4
High Speed Silver!
by Rafe Morrissey
|
|
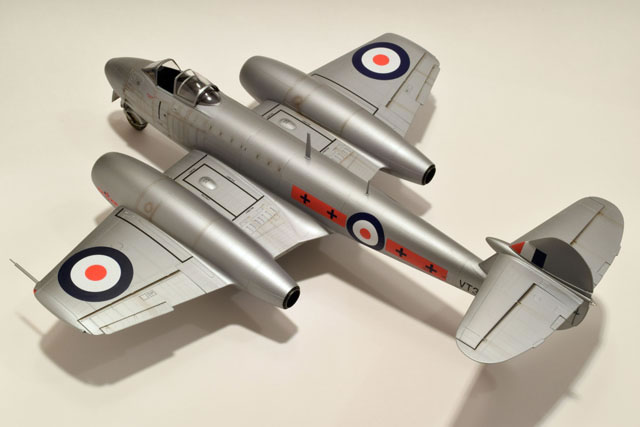
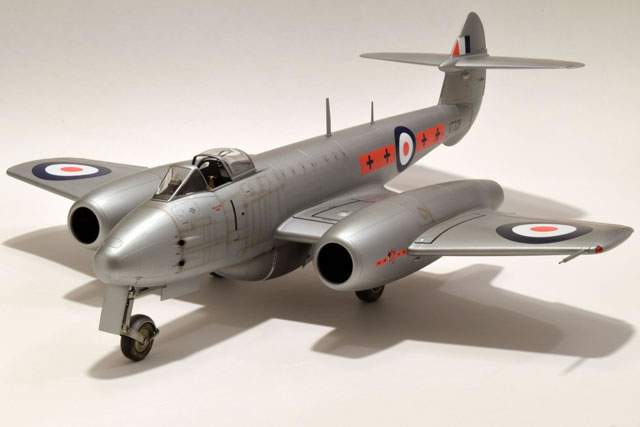
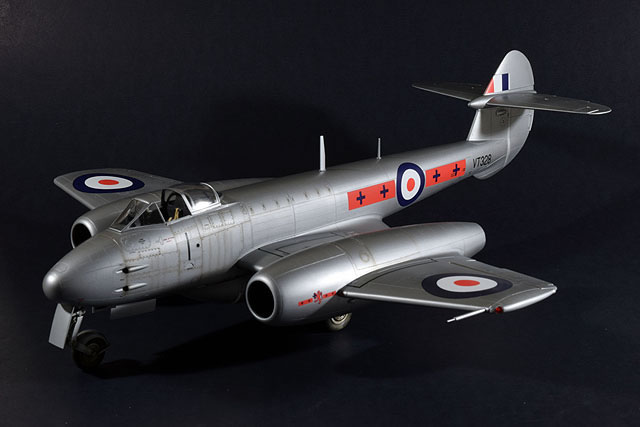
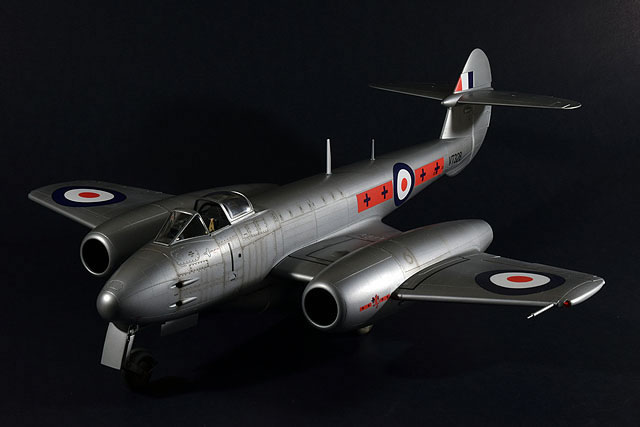
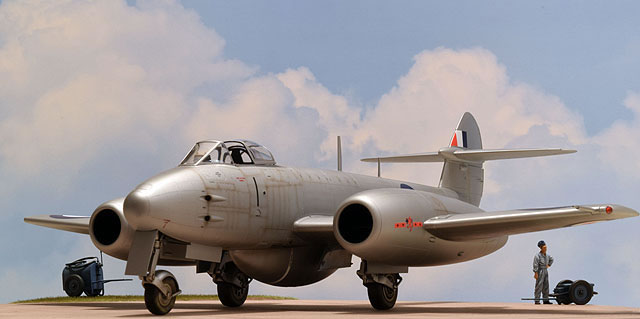
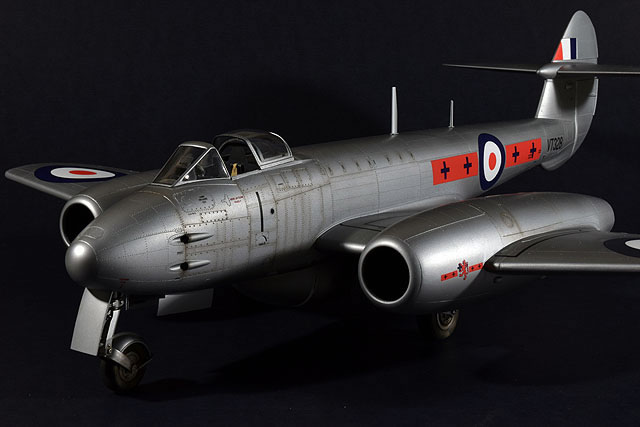
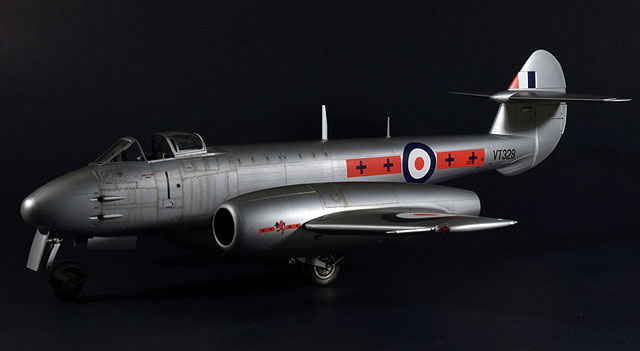
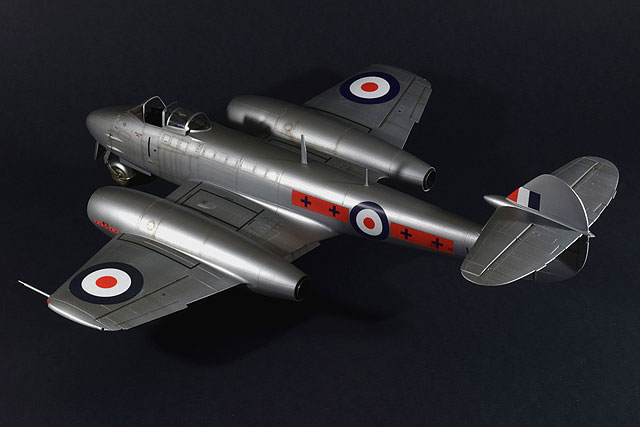
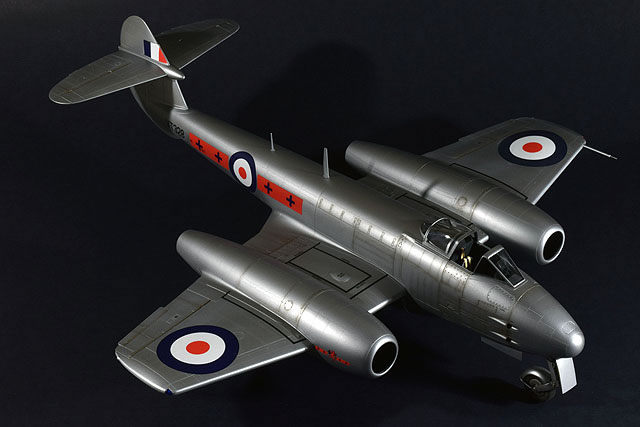
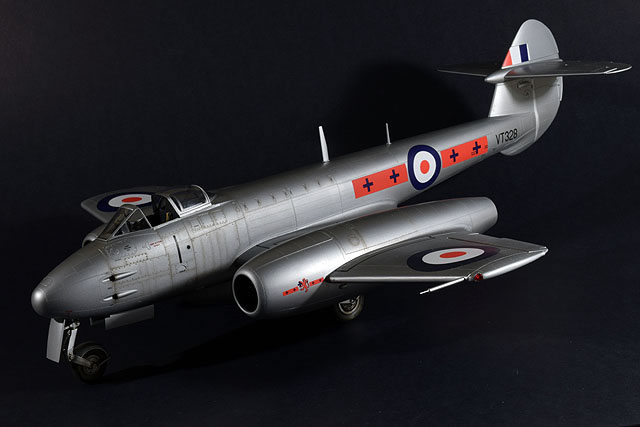
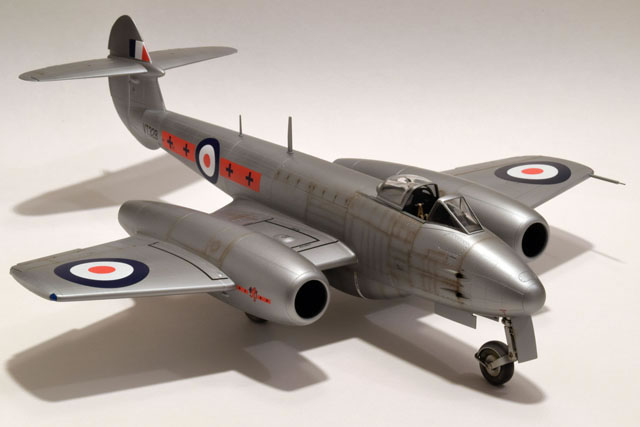
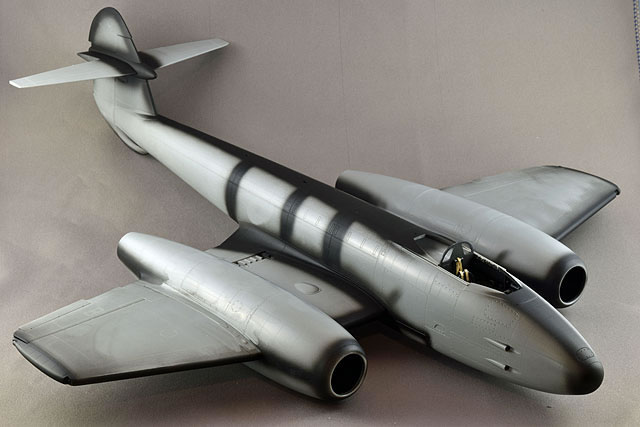
Gloster Meteor Mk.IV |

Revell's 1/32 scale Junkers Ju 88 A-1 is available online from Squadron.com
Every now and then it is good to get out of your comfort zone. Modelers tend to focus on particular subject area which is great in order to become an expert, but there is a great big world out there. That is why I was grateful for the opportunity to be asked to test Alclad II’s new ‘R.A.F. High Speed Silver’ and new single-action airbrushes on the 1:32 HK Meteor F.4. I have tended to focus on U.S. World War II aircraft and knew next to nothing about the Meteor. I was interested to learn about the development of this great aircraft and to gain an appreciation for how far ahead in jet design the British were. The combination of the unique aesthetic and impressive size made the HK Meteor an ideal subject for trying out the paint and airbrushes.
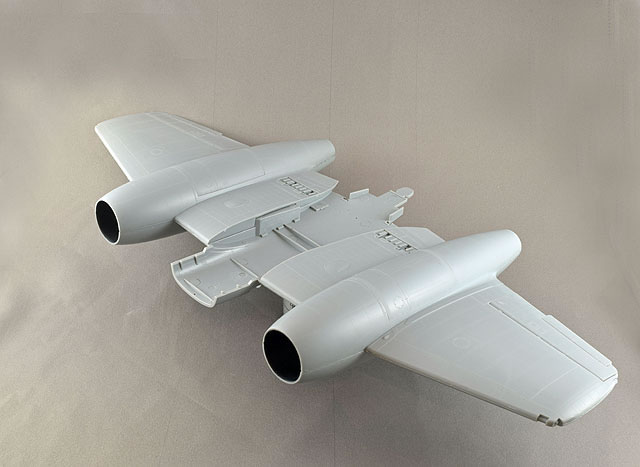
I am by no means a fast builder, so the prospect of taking on a 1:32 aircraft on a deadline was initially daunting. Upon examining the contents and doing some online research, however, I quickly discovered that the HK Meteor was the ideal subject. While many kits in this scale are over-engineered with complex internal assemblies that are not even visible, the HK Meteor stands out in its simplicity. At only 125 parts, it has a lower part count than many 1:48 scale kits, yet does not sacrifice detail or fidelity to the original aircraft.
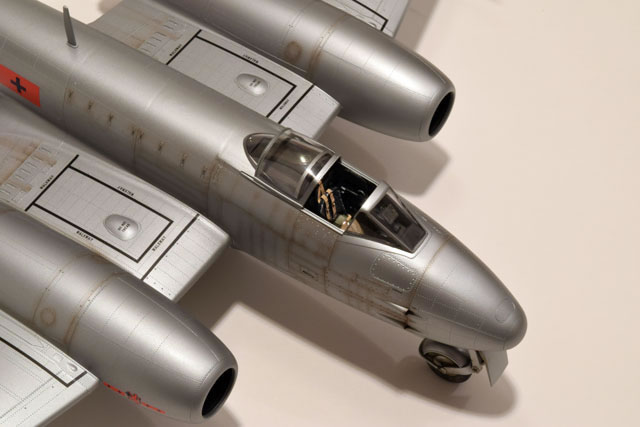
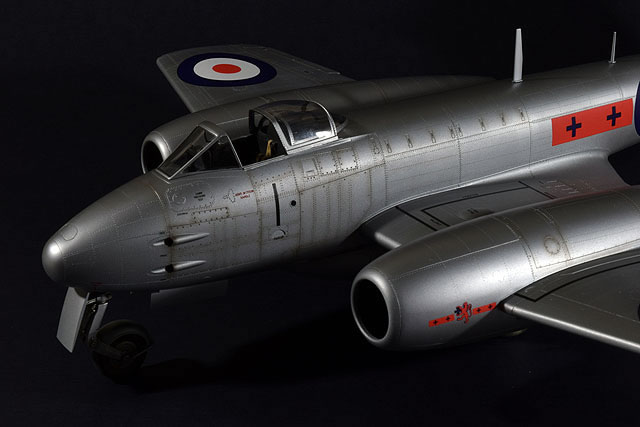
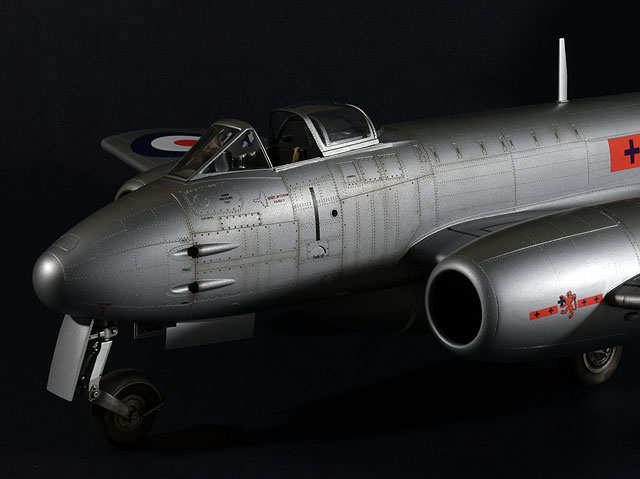
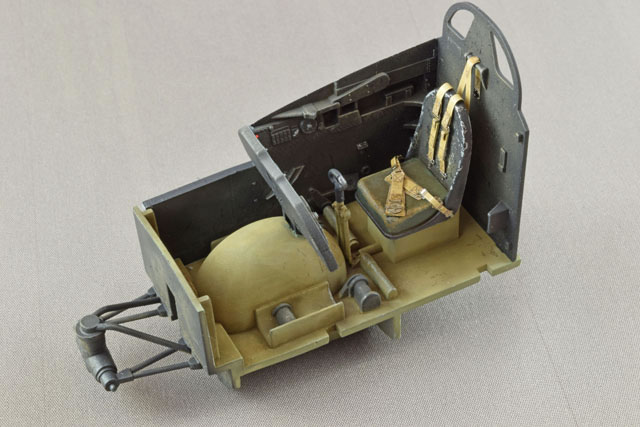
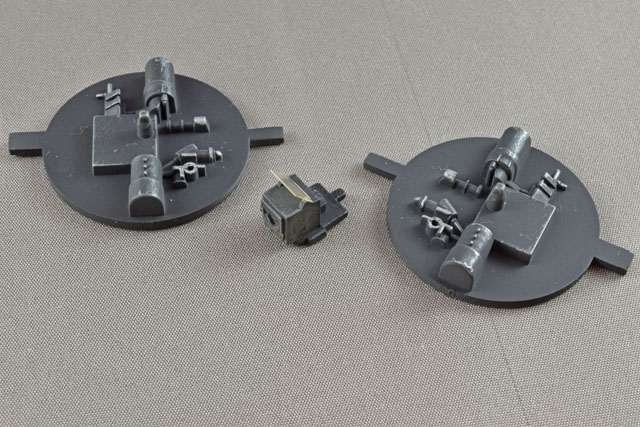
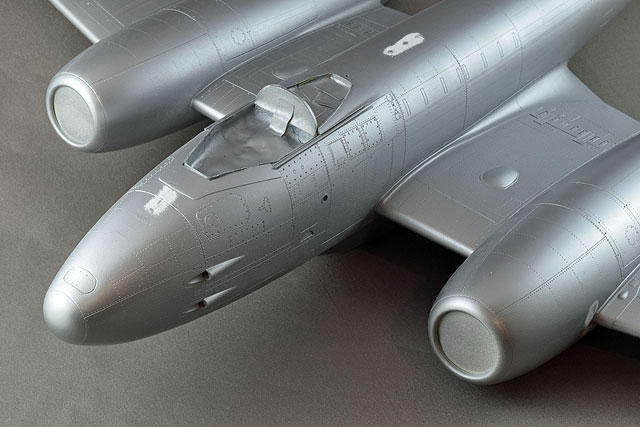
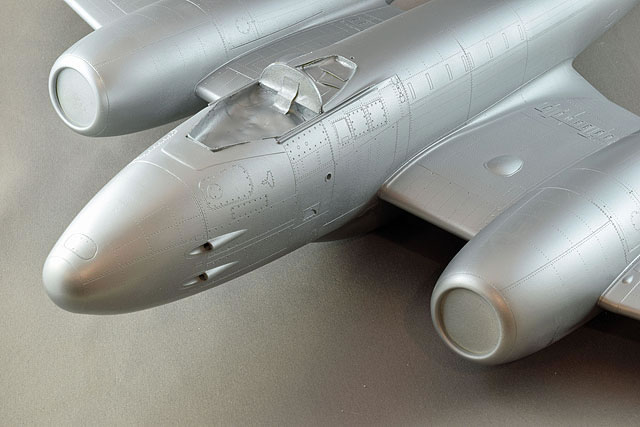
The kit provides a very nice cockpit and landing gear assemblies. Basically, if it is visible on a parked aircraft, it is provided in the kit but HK did not waste time and money on details like gun bays and engines. The kit does provide separate access panels for the engines so that an aftermarket engine could be displayed. The kit also provides separate control surfaces. A metal nose weight is also included as part of the nose gear bay assembly, ensuring that you will not have a tail sitter on your hands. The only area that could be improved is the decals which were not well printed and suspect in color value.
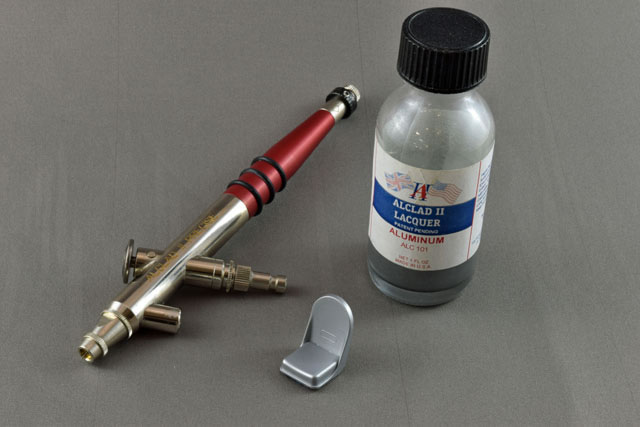
With the new Alclad II Accurate and Precise airbrushes in hand, I decided to tackle the cockpit first. One of the things I learned from collaborating with the manufacturer is that single-action airbrushes are optimal for applying their primer and finishes. In cooperation with Badger, they have produced two single-action designs that come with adapters for their standard bottle sizes which make cleaning and changing colors a snap. I used the Accurate to lay down a coat of Gray Primer and Microfiller to the cockpit parts. It delivered a very nice smooth, even coat of paint to the parts.

Next, I switched to the Precise which has a finer needle to apply a coat of Alclad II Aluminum to the seat. This airbrush produces a finer atomization of the paint that is ideal for laying down the metallic colors.
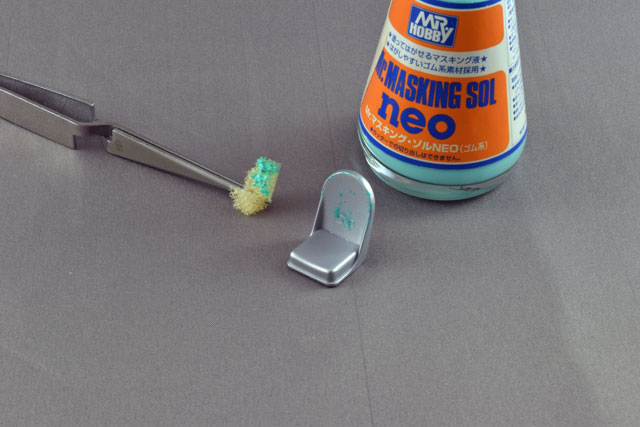
Following the aluminum coat I used a torn piece of foam to apply dabs of Mr. Masking Sol masking fluid to the seat back and edges. Finally, I applied a coat of interior black mixed from Tamiya paints. When dry, I removed the masking fluid by rubbing it off with a piece of tape revealing realistic chips.
A wash and some dusting with pastels from Tamiya’s Weathering Set A completed the seat.
The rest of the cockpit was painted with the same interior black mix and dry brushed with Testor’s gray enamel.
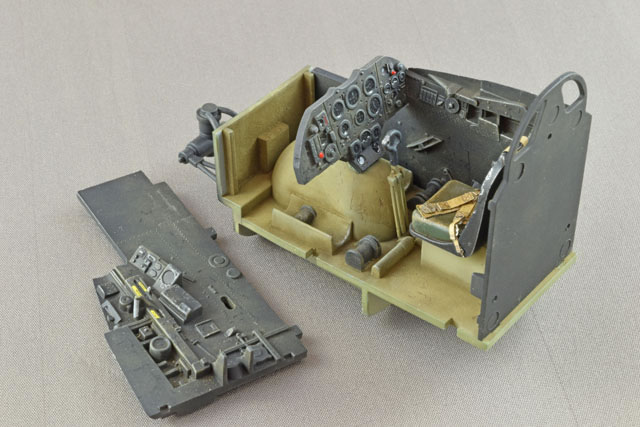
After a raw umber oil wash, I added chips with a silver Prismacolor pencil and applied the Tamiya mud and sand pastels to create a patina of wear.
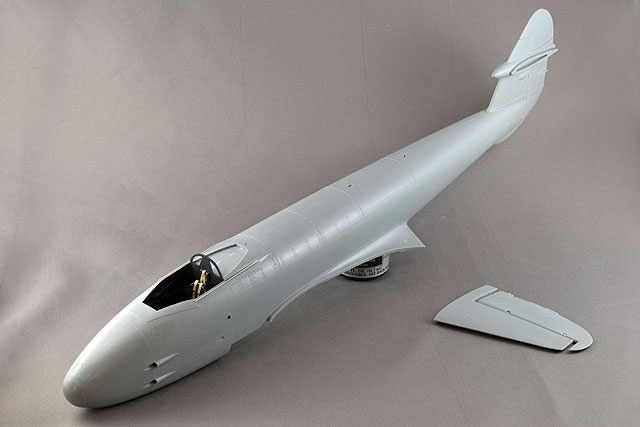
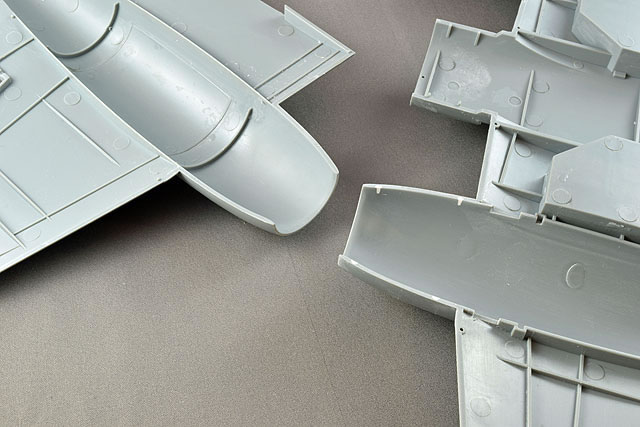
With the cockpit complete, it was time to move onto completing the airframe. The fit of the kit is pretty good, however, there are a number of prominent ejector towers on the inside of the mating surfaces on almost every part that needed to be clipped off. Also, the sprue attachment points are pretty thick and required careful cleanup.
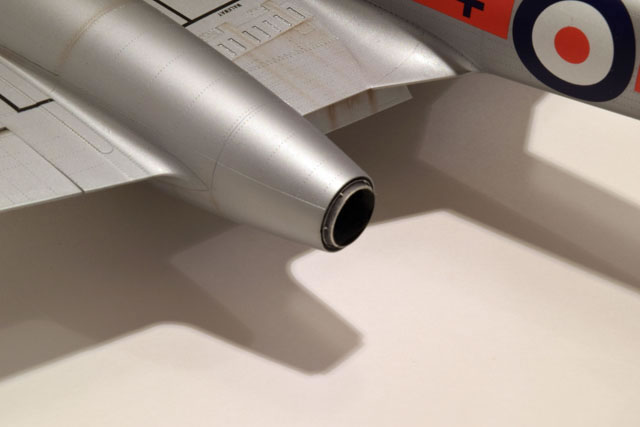
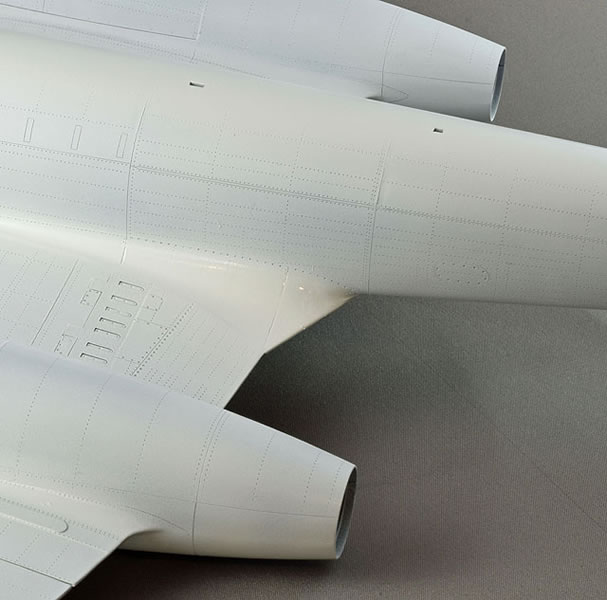
The wings pose a particular challenge in that there are seams on either side of the intakes that are impossible to eliminate on the inside. I considered cutting off the forward nacelles so I could finish the seams from the inside, but didn’t have time and was reluctant to run the risk on a commission model. Instead, I cut away the alignment pins and sanded the interior surfaces and mating areas for as perfect a fit as possible. When assembling the wings, I made sure to clamp the forward intakes tightly in perfect alignment and applied the glue from the outside so that no shifting or melted glue would seep from the seams on the inside. In the end, the intakes are in so much shadow that the seams are not noticeable even with an aluminum interior.
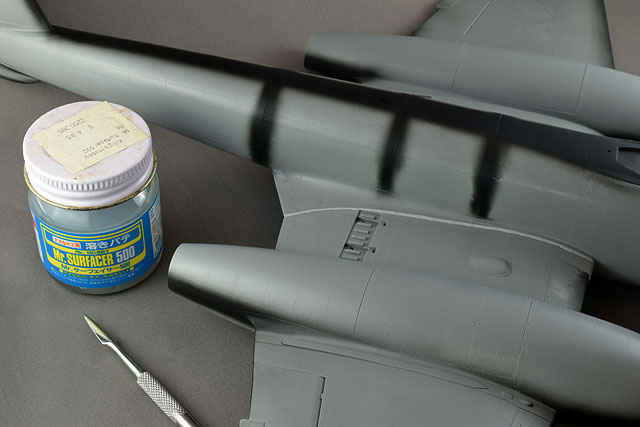
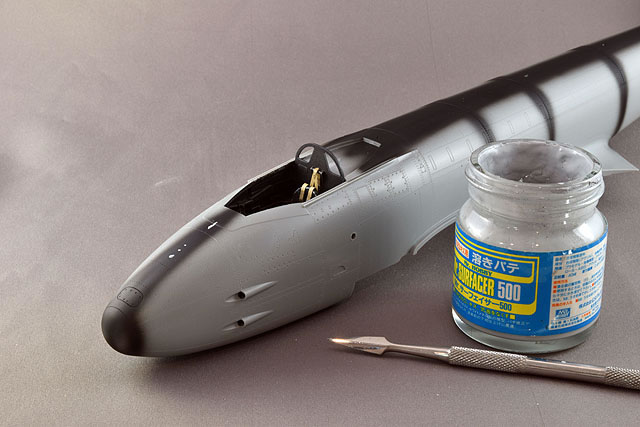
Finally, it was time to bring the wings and fuselage together. The fit was pretty good for a model this size, but I did need to apply filler on all the seams. I used a combination of talcum powder and Gorilla Super Glue for most areas. This combination dries immediately when hit with accelerator, yet sands easily leaving a smooth surface that can be scribed. I applied a thin bead of Mr. Surfacer 500 to the wing roots and was able to achieve a smooth transition.
I replaced panel lines and rivets on the top of the fuselage eliminated during sanding and seam filling with a Rosie the Riveter tool and an assortment of scribers. Dymo tape on top of Tamiya masking tape provided a useful scribing guide. I have taken to using ModelAir Flat Black paint from Vallejo to check seams. Despite the dark color, it reveals pits and missed seams very well.
Any imperfections were treated with dabs of Mr. Surfacer 500 and sanded and re-sprayed until all the seams were flawless.
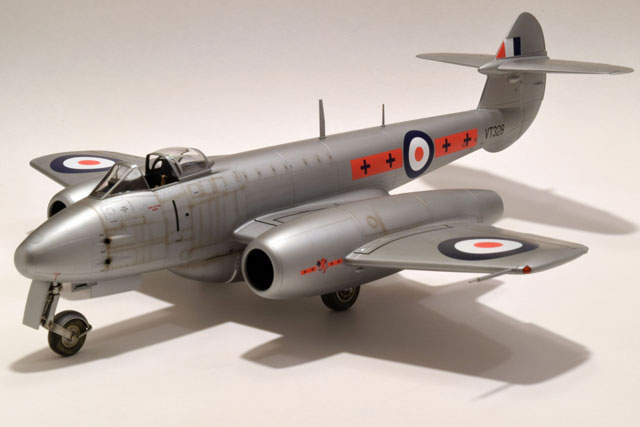
The landing gear on the kit poses an interesting challenge in that the wheels must be trapped between two halves of the struts and mud guards. I thought this might be difficult to accomplish due to the seams but was pleasantly surprised. The fit of the strut halves is exceptional and I elected to build up the struts and wheels as a single unit before applying any paint. I tried to squeeze out a small bead of melted plastic when fitting the struts around the wheels. This permitted me to later sand the seams without applying much filler. Once all the seam work was done, I sprayed the landing gear units with Alclad II gloss black base followed by Aluminum.
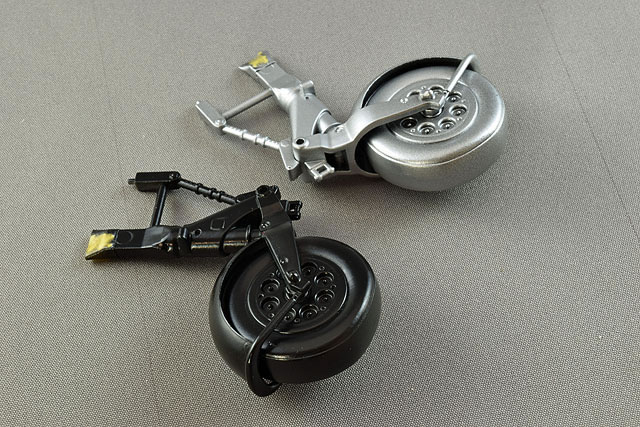
Later I hand brushed the tires with Polly Scale Flat Black with a bit of Red Earth added for a rubber look. There was just enough space between the mud guards and the wheels to fit a fine point brush to complete the painting. A raw umber wash and Tamiya Pastels completed the weathering process.
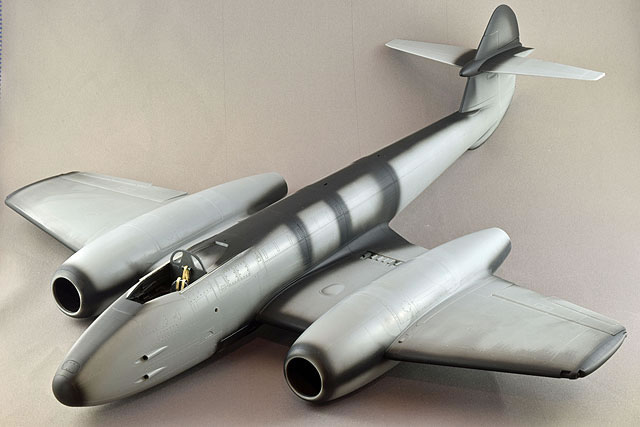
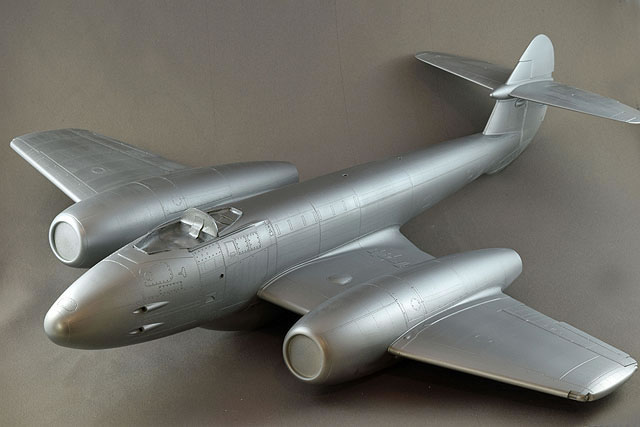
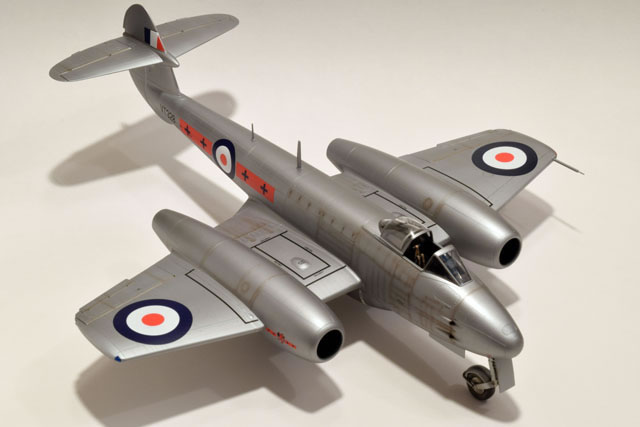
On one level, this was one of the easiest paint jobs I have ever done. One color, Alclad II R.A.F. High Speed Silver for everything. The particular scheme I chose from a KitsWorld decal sheet didn’t even have an antiglare panel. At the same time, any metallic color is unforgiving of any construction problems, so there was no room for error. Alclad II recommends using a primer for their finishes. I used their White Primer and Microfiller. I tested both gray and white and liked the look of the latter. Using the Alclad II Precise airbrush to see if it would spray the primers, I applied the white primer at about 20 psi. The paint has excellent opacity and covered the bare plastic and black seam areas for a uniform and slightly matte finish. The Precise airbrush sprayed the primer with no difficulty. I used 3600, 4000 and 6000 Micromesh sheets to polish out a few areas where sharp angles created a pebbled finish.

Priming also provides one last opportunity to identify and fix any lingering contstruction problems. In my case, I found a couple sink marks on the fuselage to wing fillets. I simply applied some Mr. Surfacer 500 to the spots and sanded with 400 and 600 grit sandpaper when dry. A respray with the white primer confirmed the marks had been successfully eliminated. Then it was magic time.
I have loved working with Alclad II lacquers ever since I produced the MasterClass Model Building Videos tutorial on their use. Their combination of realistic finish, quick drying time and durabilty is unsurpassed. The new High Speed Silver color is intended to replicate the aluminum lacquer used by the R.A.F. in the 50’s. It is also suitable for the aluminum lacquers used on U.S. Air Force subjects from the same period. The new color performed flawlessly as expected. All of their metallic colors are best applied at a low air pressure between 5-10 psi. The paint dried within a few minutes and conveyed a very convincing dull metallic finish that is distingushable from the shades intended to replicate bare metal.
Invariably, in spite of all the careful prep work, I always find issues whenever I apply metallic finishes. In this case some of the glue seams must have shrunk over time. With Alclad II, this is really not a problem. Breaking out the trusty Mr. Surfacer 500, I simply applied small dabs where needed.
Light sanding with 600 grit sandaper followed by a polish with 3600, 4000 and 6000 micromesh pads left a smooth suface ready for touch ups with the High Speed Silver. The Alclad II paints blend seamlessly between coats, so the repairs were invisible.
I applied a coat of Future (now Pledge Multi Surface Finish) to prepare the surface for the KitsWorld decals. The decals went on very well using the MicroScale system. When dry, I overcoated the decal areas with a bit more Future and then overcoated everything with Alclad II Semi-Matte clear finish.
Alclad II offers a variety of clear finishes with different amounts of matte effect and I really like the way this combination looked.
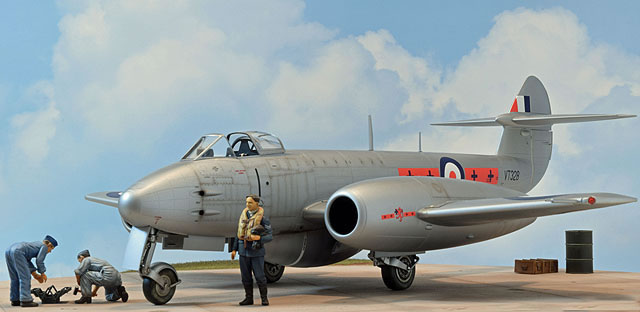
As with all my projects, I built and painted a figure to accompany the model. In this case I used one of the figures from the Master Box 1:32 R.A.F. Pilot set. I had never built their figures and was very impressed by the molding and detail on the figure. It compares very well with aftermarket resin figures.
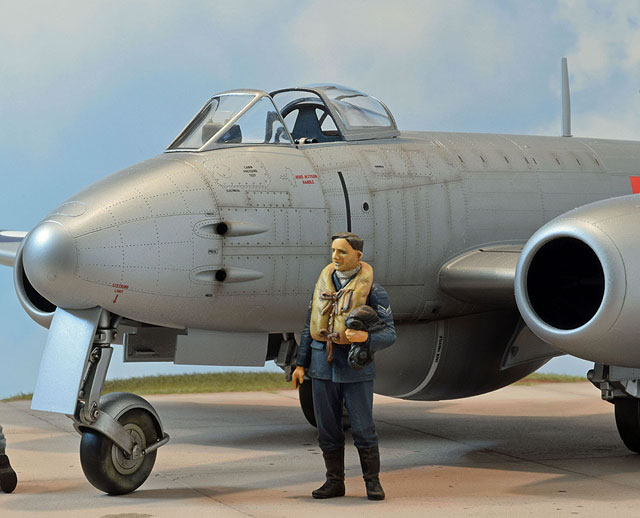
The fit of the figure was very good and minimal filler was needed. I utilized the “rapid figure painting process.” Briefly, this entails painting all elements of the figure with Vallejo acrylic paints over a primer coat of Mr. Surfacer 500. Next, each color is carefully dry brushed with a complimentary lighter shade from the Testor’s Model Master enamel range. Finally, a raw umber oil wash is applied all over the figure.
This process enables one to complete a good looking figure in a fraction of the time it takes with the traditional method of carefully applying and blending numerous shades.
Having the opportunity to build the HK Meteor was a tremendous experience. I can heartily recommend this kit to anyone and the Alclad II airbrushes and R.A.F. High Speed Silver to finish it. The airbrushes deliver a beautuful finish and the High Speed Silver color is authentic looking and forgiving of mistakes. HK’s 1:32 Meteor F.4 is definitely the silver lining in my display case!
Thanks to Alclad II for the kit and opportunity to test the Accurate and Precise airbrushes and primers and finishes!
Images and Text Copyright ©
2016 by Rafe Morrissey
Page Created 16 March, 2016
Last Updated
16 March, 2016
Back to
HyperScale Main Page

|
 Home
| What's New |
Features |
Gallery |
Reviews |
Reference |
Forum |
Search
Home
| What's New |
Features |
Gallery |
Reviews |
Reference |
Forum |
Search