WGr.21 for Fw 190

Eduard BRASSIN, 1/72 scale
S u m m a r y : |
Catalogue Number: |
Eduard BRASSIN Item No. 672099 – WGr.21 for Fw 190 |
Scale: |
1/72 |
Contents & Media |
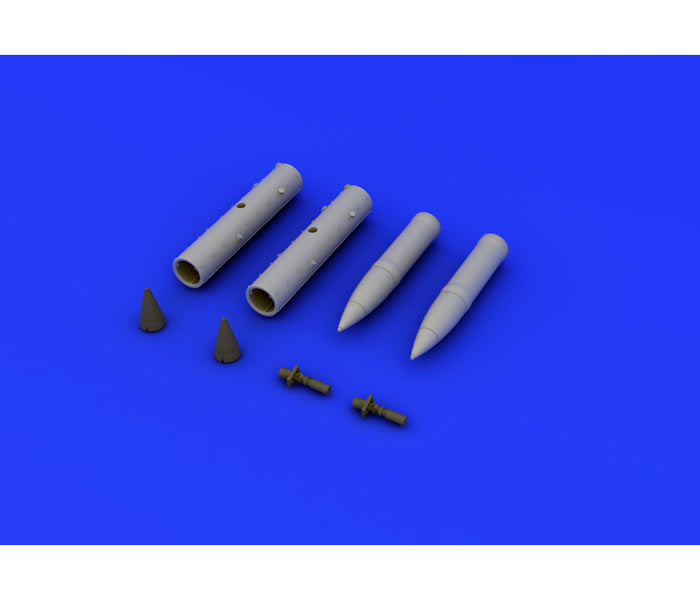
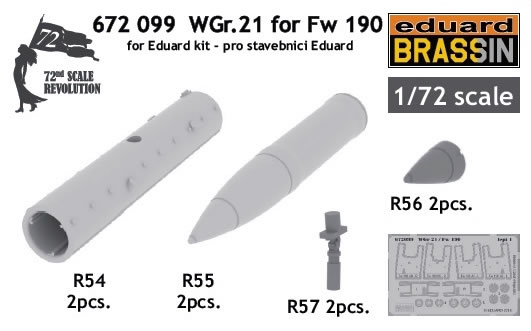
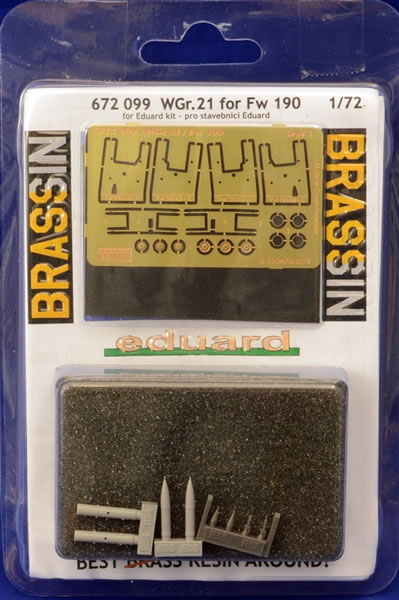
Eight resin parts and one PE fret of 16 parts (includes four templates and four spares) |
Price: |
Available on-line from these stockists:
Click for currency conversion. |
Review Type: |
First Look. |
Advantages: |
Scale finesse, quality, and use of drill templates. |
Disadvantages: |
Some delicate PE parts vulnerable to damage during assembly and finishing. |
Conclusions: |
This is a welcome set to compliment Eduard’s Fw 190A kits.
The drill template is a great idea, but the way the sway-braces mount using internal wing plates midway through model completion may cause as many problems as it designed to overcome. The fact is that there is no simple way to replicate the delicate mountings, and ensure simplicity of fit, without requiring the modeller to take extreme care during subsequent handling during the build. If this is of concern, the sway-braces could be cut from their mounting plate and fitted much later in the build; but with some fiddly alignment issues.
The option of loaded or empty tubes is nice to have, but the empty option will of course be lacking an authentic true see-through effect due to tooling limitations. I think most will opt for the armed option anyway.
Despite my apparent concerns, this is still a great set to add interest to your Eduard Fw 190A-5 or A-8, provided you are careful once it is fitted. I happily recommend it. |
Reviewed by Mark Davies

Eduard's BRASSIN 1/72 WGr.21for Fw 190 is available online from Squadron.com
The Werfer-Granate 21 rocket launcher, also known as the BR 21 (the "BR" standing for Bordrakete) in official Luftwaffe manuals, was a weapon first used by the Germans in mid-1943.
This weapon enabled the German pilots to attack their bomber targets from a safer distance of over a kilometre, where the risk of being hit was much reduced. While a single fighter's payload of two or four such rockets was extremely unlikely to score a hit, a mass launch by an entire fighter squadron (a Staffel of 12-16 aircraft) as it arrived to intercept the bombers would likely score two or three hits, about 15% accuracy. The rocket's huge blast radius also compensated for inaccuracy, and even a non-lethal hit on a bomber would perhaps cause it to take evasive manoeuvres that would drive it from the protection of its fellows.
These weapons were also sometimes used against ground targets from late 1943 onwards, such as in the Italian campaign 1943–44, the 1944 Normandy campaign and during the Ardennes Offensive.
Modified from the 21cm Nebelwerfer 42 infantry barrage rocket projectile and reconfigured for air-launch, the spin-stabilised rocket was propelled by 18.4 kilograms diglycol solid fuel, and the warhead weighed 40.8 kilograms. The Wfr. Gr. 21's projectile had a velocity of 320 metres per second and a maximum range of 1,200 metres. The rocket and tube weighed some 112 kilograms in total. A time fuse detonated the warhead at a pre-set distance of 600 metres to 1,200 metres from launch point, resulting in a lethal blast area approximately 30 metres wide.
Single seat fighters carried a single tube rocket under each wing, while the Zerstorer heavy twin engine fighters carried two under each wing. Operationally the weapon had several disadvantages; the launcher tubes produced significant air resistance and reduced speed and maneuverability and general performance. Unlike the firmly attached underwing conformal gun pods carried by many Luftwaffe anti-bomber single-engined fighters, the BR 21's tube launchers were jettisonable, and once the rocket had been fired the fighter could revert to a 'clean' profile.
Source: Wikipedia.
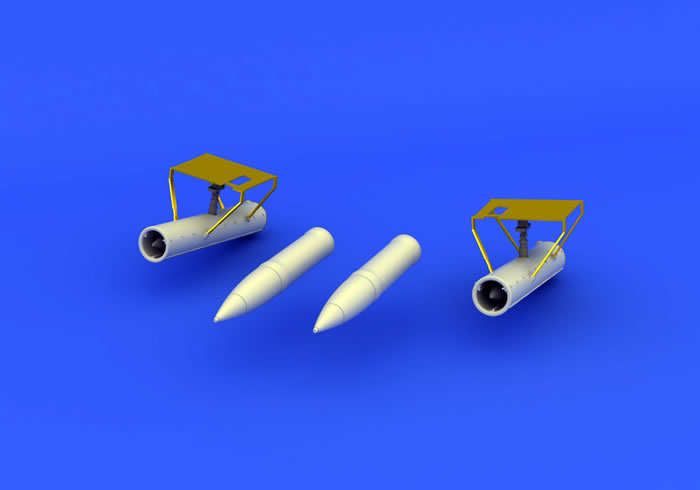
The pair of rockets and their launch-tubes comes attractively packaged in a blister pack with sponge cushioning.
Very clear instructions are included, with colour call-outs cross-referenced to the Gunze Aqueous and Mr Color paint ranges, and includes RLM codes. The instructions detail the finish applied to this weapon. A PDF copy of the instructions is downloadable from Eduard’s website.
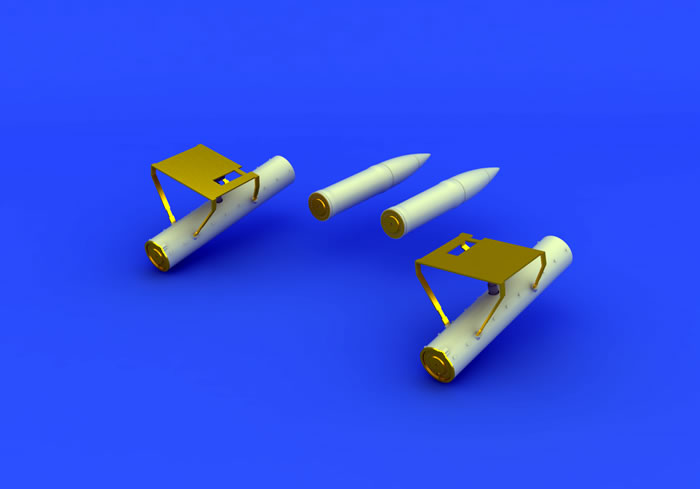
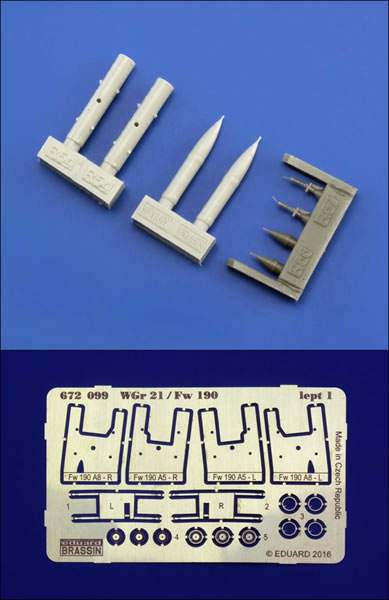
The casting of the resin parts and quality of the PE is excellent.
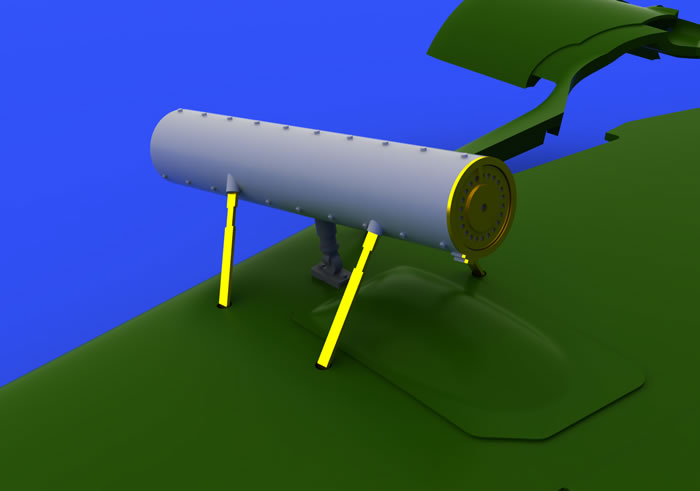
The set is designed for use with Eduard’s Fw 190A-5 or Fw190A-8 kits. The set includes PE templates to guide drilling mounting holes in either sub-variant’s lower wings; being designed to wrap around there leading edge and locate around either The MG FF or Mk 108 cannon bulges as applicable:
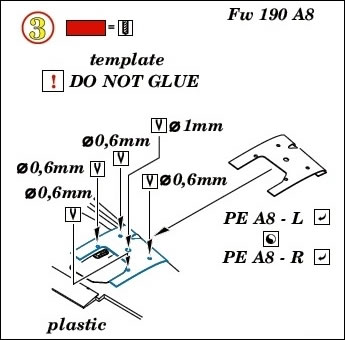
Once drilled, the mounting holes enable the four PE sway-braces that are attached to a flat plate to be inserted from inside the wing, as shown in the instructional diagram below:
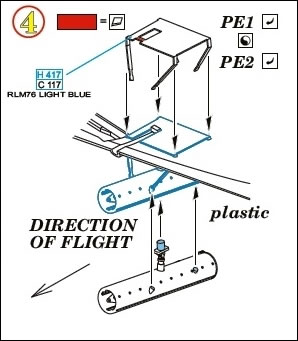
This presumably ahs the benefit of locating the sway-braces very firmly; and presumably at close to the correct angles. The obvious disadvantage is that the sway-braces must be fitted at a much earlier stage in finishing than most modellers would choose, and consequently will be extremely vulnerable during completion of assembly, painting and decaling.
If this is of concern, the sway-braces could be cut from their mounting plate and fitted much later in the build; but with some fiddly alignment issues. However, I would be inclined to fit a directed by the instructions and then make a small card box to go over each set of sway-braces and tape this to the wing to protect them from knock whilst further work on the model continues.
I suspect most modellers will leave fitting the launch tubes until almost the end of finishing. A small resin part represents the main coupling between the launch tube and aircraft wing.
The tubes offer the option of being loaded or empty. In the former case rocket nose-caps are inserted into the tube’s mouth, whilst in the latter’s the tube is left empty, although it’s mouth only hollow for the first few millimeters, so the blanking face will need to be painted matte black. A nice touch is the three guide rails are cast inside the mouth.
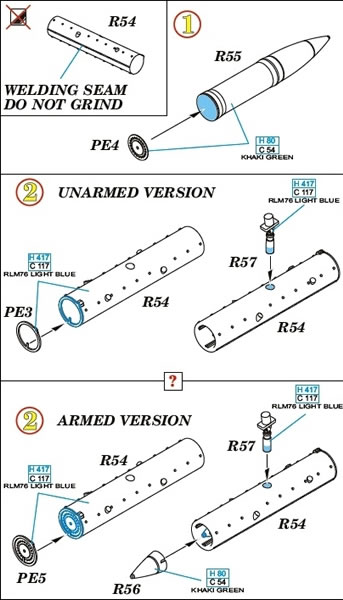
As supplied, the exhaust end is of course solid as it joins to the casting plug, which compromises realism somewhat, although there is an open PE ring to form the lip at this end of the tube. However, drilling this exhaust end out a little will improve things, but of course it is not practicable to have an unloaded tube than can be seen through like the original.
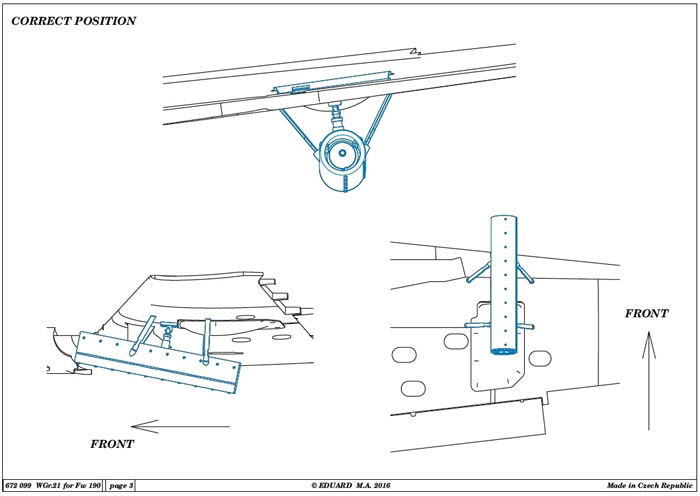
There is a three-view drawing illustrating the rocket tube’s correct configuration when mounted under the wing:
Two full rocket rounds are also supplied to compliment the empty tubes, as if ready to be loaded. PE discs with multiple holes for the base-plate of each rocket; if the armed option is selected, then a PE disc that incorporates the rocket base detail and tube lip fits to the rear end of each tube.
This is a welcome set to compliment Eduard’s Fw 190A kits.
The drill template is a great idea, but the way the sway-braces mount using internal wing plates midway through model completion may cause as many problems as it designed to overcome. The fact is that there is no simple way to replicate the delicate mountings, and ensure simplicity of fit, without requiring the modeller to take extreme care during subsequent handling during the build. If this is of concern, the sway-braces could be cut from their mounting plate and fitted much later in the build; but with some fiddly alignment issues.
The option of loaded or empty tubes is nice to have, but the empty option will of course be lacking an authentic true see-through effect due to tooling limitations. I think most will opt for the armed option anyway.
Despite my apparent concerns, this is still a great set to add interest to your Eduard Fw 190 A-5 or A-8, provided you are careful once it is fitted. I happily recommend it.
Thanks to Eduard for the samples and images.
Review Text & Images Copyright © 2016 by Mark Davies
except blue background images courtesy of Eduard
Page Created 19 June, 2016
Last updated
19 June, 2016
Back to HyperScale Main Page
Back to Reviews Page

|
 Home
| What's New |
Features |
Gallery |
Reviews |
Reference |
Forum |
Home
| What's New |
Features |
Gallery |
Reviews |
Reference |
Forum |