Polikarpov I-153 Chaika
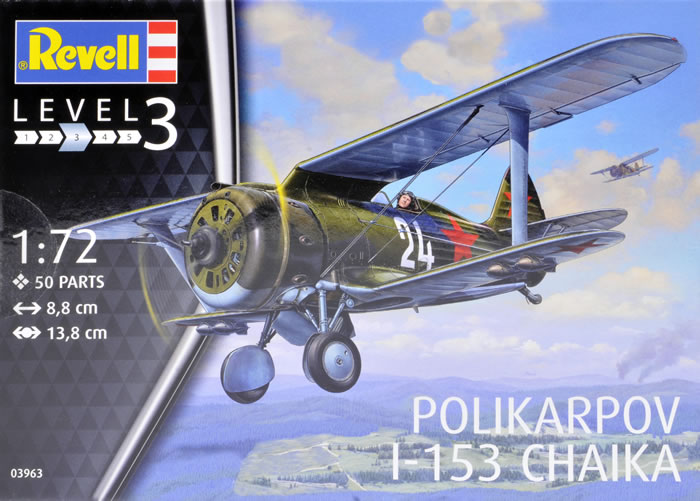
Revell, 1/72 scale
S u m m a r y : |
Catalogue Number: |
Revell Kit No. 03963 – Polikarpov I-153 Chaika |
Scale: |
1/72 |
Contents & Media |
One clear and 75 grey styrene parts, plus decals for one subject. |
Price: |
£4.99 plus shipping available online from Hannants
USD$11.95 plus shipping available online from Squadron
and stockists worldwide.
Click here for currency conversion. |
Review Type: |
First Look. |
Advantages: |
The best I-153 in 1/72 scale, very nice surface detail, very fine detail parts, essentially accurate in outline, builds well, great value. |
Disadvantages: |
Most are minor issues – Not suitable to represent late production M-63 powered machines OOB, under-sized instrument panel, narrow seat, incorrect windscreen shape, missing rudder hinge-line, no exhaust pipes, questionable carb-intake shape, and wheel-well shape issues. Also, the inexplicable deletion of the kit’s cockpit framing from the instructions. |
Conclusions: |
This first look has picked few holes in this kit, but most are minor issues that can either be ignored or easily fixed. None prevent me from rating this as the best I-153 kit in ‘The One True Scale’.
Essentially accurate in outline, with lovely surface detail and some very fine small parts, it has much to commend it; especially as build accounts suggest it assembles very well.
A missing rudder hinge-line and no exhaust pipes are hard to understand tooling oversights by ICM, as is the incorrect windscreen shape. Equally confusing is Revell’s decision to delete the kit’s internal cockpit framing in their instructions.
The kit best represents an early production M-62 powered example, which raises questions regarding the use of the very delicate RS-82 rockets and their launch rails. There are various other small points concerning the carb-intake, wheel well shape, and undercarriage doors; but I think most people will opt to live with these.
In some ways this first look has been harder than some I take. This is because I’m a fan of ICM’s hand-mastered I-15 kits detail and accuracy, whereas the I-153 is a CAD mastering, so I was looking for differences in kit design; I also had good references and was able to include an apparent expert’s opinion of the kit.
Don’t be put off by this critique, the kit is very nice and a good basis for a superb model with just a bit of extra work. The low price of Revell’s boxing at 25% less than ICM’s leaves some spare to pay for Quickboost’s exhausts at least, whilst Hasegawa’s is a twin-pack costing around four times as much. (But to be fair, these other brands offer more decal options than Revell.)
Perhaps not as faultless as might have been hoped for, it is nonetheless a very nice kit that improves on all that have gone before. Hasegawa and ICM kits can be hard to find in some markets, so Revell’s boxing of the same kit will be welcomed given this brand’s wide-reaching distribution.
I highly recommend this kit in any of its brand boxings, but favour Revell’s for best value. |
Reviewed by
Mark Davies

Revell's Polikarpov I-153 Chaika is available online from Squadron.com
In 1937 the Polikarpov design bureau carried out studies to improve on the performance of its I-15 and I-15bis biplane fighters without sacrificing maneuverability, as Soviet tactical doctrine was based on a mix of high performance monoplane fighters (met by the Polikarpov I-16) and agile biplanes.
Early combat experience from the Spanish Civil War had shown that the I-16 had problems dealing with the Fiat CR.32 biplanes used by the Italian forces supporting the Nationalists, which suggested a need to continue the use of biplane fighters, and as a result, Polikarpov's proposals were accepted, and his design bureau was instructed to design a new biplane fighter.
Polikarpov assigned the task to the design team led by Aleksei Ya Shcherbakov, who was assisted by Artem Mikoyan and Mikhail Gurevich (who would later set up the MiG design bureau).
The new fighter, designated I-15ter by the design bureau and I-153 by the VVS, was based closely on the design of the I-15bis, with a stronger structure, but was fitted with a manually retractable undercarriage to reduce drag. It reverted to the "gulled" upper wing of the original I-15 but used the Clark YH aerofoil of the I-15bis. The four 7.62 mm PV-1 machine guns of the I-15bis were replaced by four ShKAS machine guns. While still rifle-calibre weapons, these fired much faster than the PV-1s, (1,800 rounds per minute rather than 750 rounds per minute) giving a much greater weight of fire. The new fighter was to be powered by a Shvetsov M-62 an improved derivative of the Shvetsov M-25 that powered the I-15 and I-15bis with twin superchargers.
The I-153 first saw combat in 1939, during the Soviet-Japanese Battle of Khalkin Gol in Mongolia. The Japanese Nakajima Ki-27 proved a formidable opponent for the I-15bis and I-16, but was more evenly matched with the I-153, which retained agility inherent to biplanes while featuring improved performance.
While the overall I-153 performance was satisfactory, some significant problems were revealed. Most troublesome was the absence of a firewall between the fuel tank mounted in front of the cockpit and the pilot. Combined with strong draft coming in through the wheel wells, fuel tank fires invariably resulted in rapid engulfment of the cockpit and severe burns to the pilot. In addition, the M-62 engine suffered from a service life of only 60–80 hours due to failures of the two-speed supercharger.
Stalin's purges in the 1930s resulted in a tremendous lag in Soviet aircraft at the beginning of World War II. Although the new Yak-1 and LaGG-3 fighters were entering production, on 22 June 1941, the bulk of VVS was equipped with the obsolete 1930s designs including a large number of I-153. Even as late as 1942, there were attempts to reinstate production of I-153 and I-16 to fill the shortage of fighter aircraft.
Source: Wikepedia.
Previous 1/72-scale I-153 Kits
Rareplanes released a vac-form I-153 in 1970, but this kit is now only of interest to collectors and die-hard vac-fanatics.
By far the best known I-153 kit is the venerable Heller offering from 1975. This kit has been re-boxed by Aurora, Modelist, and SMER, who in turn provided it for re-boxing by Hasegawa. No doubt there have been others too. The kit has several accuracy issues as well as being rather dated in style and the amount of detail provided. AER Moldova released a kit closely based on Heller’s, and with similar faults, whilst their kit has in turn been re-boxed by Parc.
Another readily available kit is by A-Model from around 10 years ago. It is one of their earlier offerings with rough limited-run moldings, lots of flash, and is inexplicably less accurate than the older Heller kit. It has been re-boxed under the Military Wheels brand where it comes with a kit of a Soviet AS-1 starter-truck.
A detailed accuracy assessment of the Heller, AEE Moldova and A-Model kits can be found here.
Maquette and Bum have released I-153 kits which I suspect are Heller re-boxes, but I cannot comment with any certainty as to the origins of these two brands’ Chaikas.
ICM released a modern tooling of the I-153 in 2104, and this has since been re-boxed by Hasegawa and Revell. It is the Revell issue that is the subject of this first look.
Acknowledgement
I have been an avid aviation and modelling data-baser for 19 years now, and usually check my references for reviews and build articles relating to the kit I am taking a ‘first look’ at. This approach provides a backdrop to measure my own views against, as well as highlighting various points; whilst build articles give me some idea of how well, or otherwise, the kit goes together.
In this case my list of references included a very thorough build article and critique of ICM’s I-153 by Konstantine Malinovski, in the November 2015 issue of Scale Aviation Modeller International magazine.
Konstantine is obviously an I-153 expert, and I found his article most helpful on several points I would otherwise have overlooked. I highly recommend his article to anyone for whom building the ICM/Revell/Hasegawa kit is a serious business. If you wish to model a late model M-63 powered I-153 the article is especially useful, as it seems the kit most closely represents an early M-62 engined machine, whereas Konstantine also explains what needs to be done to model a later M-63 powered example.
I have also used some excellent walkaround images of an I-153 restored by NZ’s Alpine Fighter collection. I have no idea where I obtained these from and am using them without permission. My thanks to the owner for sharing them somewhere on the www, I will of course remove them from this article if requested to do so by the owner.
The Contents
Revell’s re-box is a close-fitting end-opening box, unlike ICM’s quite large top-opening one, as the original main sprue is cut in half; leaving two sprues to fit Revell’s box. They come packed in a single re-sealable cellophane bag, with the clear sprue further enclosed in a small bag of its own. The decal sheet and its talc are enclosed within the folded instructional booklet.
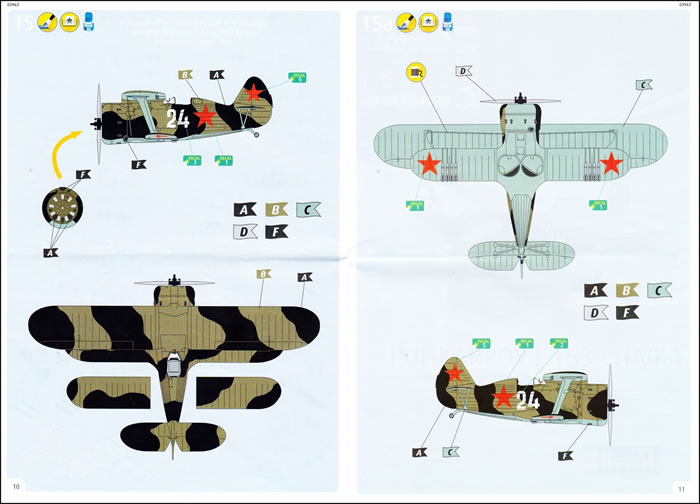
The instructions are a pleasing improvement in style over the cheap and hard to follow rubbish Revell has been providing with its kits for years. The new style instructions are easy on the eye, and printed in colour on reasonable quality paper. They include a parts map and have clear enough assembly diagrams with colour call-outs linked to Revell’s own paint range. The colours and markings diagram gives four-views over two pages printed in colour, and a is huge advance over Revell’s old cluttered monochrome drawings.
Change in Tooling Technology
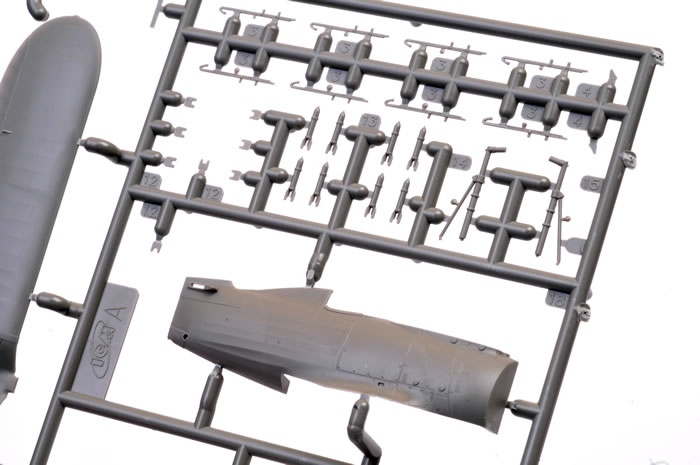
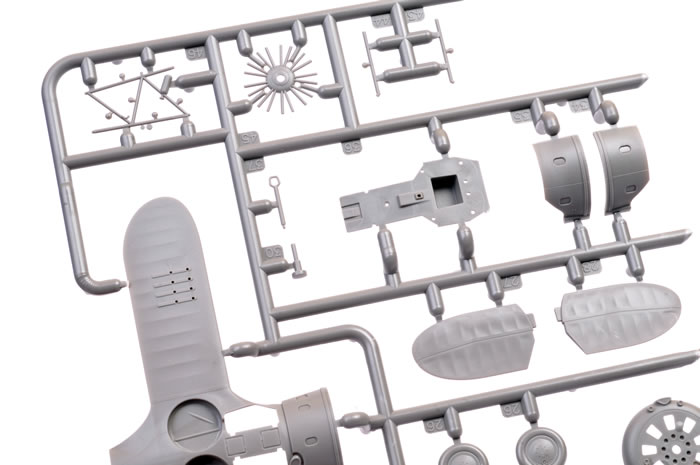
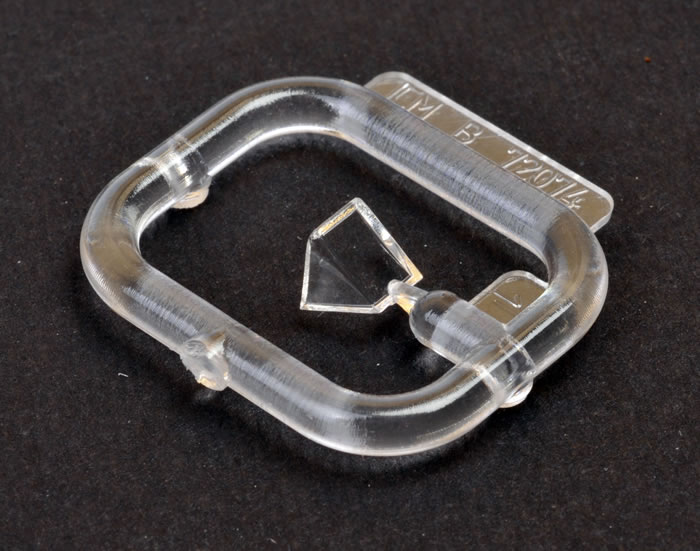
I understand that this kit was ICM’s first produced using CAD technology. The molding is crisp and clean, and includes some very fine parts; whilst the sprue gates are quite narrow. The single clear part, a small windscreen, is excellent quality too. Initial impressions are that we have an entirely modern and excellent kit, and whilst true in many respects, there are some surprising omissions and compromises; but more on these later.
In a recent review of Revell’s re-box of ICM’s He 70 I noted that Revell boxing’s parts were superior to the original ICM parts which suffered from some sink-marks. I have also made the same comparison for the two brands’ I-153 kits and can find no difference in quality and, unlike my He 70 comparison, the type and colour of styrene used seems identical too.
I think that many of ICM’s kits are unsurpassed when it comes to realistic and true to scale surface detail in 1/72 scale. In fact, being so true to scale is almost a curse, because some of the detail will be lost to all but the lightest of paint coats, and definitely from any sanding. Once you’ve laid eyes on ICM’s Ki 27, I-15, or TB-2, for example, you will never regard a Tami-edu-gawa 1/72 kit as being in the same ball-park for surface realism. If you are interested, here is link that illustrates their He 70 kit master being produced.
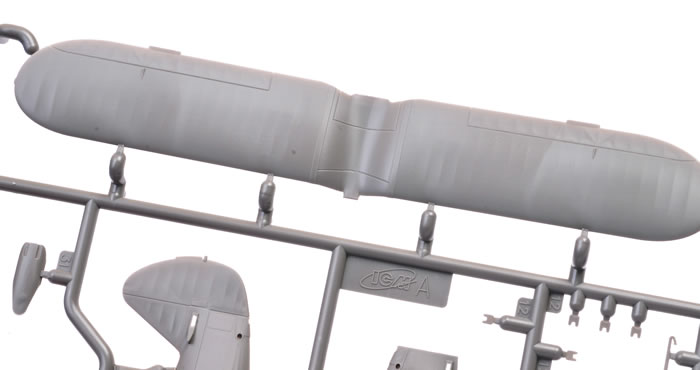
In the past I think ICM used epoxy, or more likely a metal-spray epoxy tooling (to prolong its life), in order to capture the exquisite detail of their hand-made masters. Their new I-153 is a CAD designed metal tooling, and in consequence lacks some surface detail subtleties of their earlier kits. However, the detail is still equal to the any leading brands I can think of in terms of finesse, whilst executed with the precision that CAD makes possible. The fabric covered structure effect is excellent on the wings and fuselage, although perhaps a smidgeon overdone on the tailplanes. The metal paneling is extremely delicate with fastener detail included, and the wheel hubs have some very fine bolt detail indeed.
I feel that the move to CAD-developed tools will deliver a precision of fit superior to previous ICM releases, with detail that initially appears to give little away to the earlier mastering process. I think the majority of modellers will prefer this tooling development change by ICM.
Cockpit
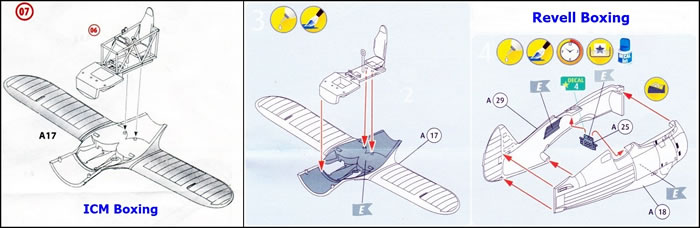
Cockpit detail as provided on the sprues is fairly comprehensive. It consists of a floor (whose reverse side includes the main fuel tank and forms the undercarriage bay), seat, control column, rudder pedals, and instrument panel. This last item is designed held in place by a surrounding cage representing the original aircraft’s tubular frame structure.
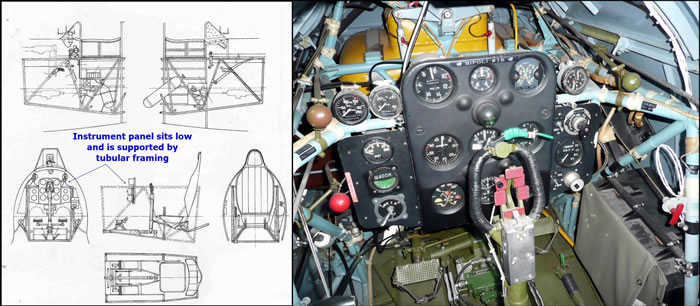
At least, that is the case with the ICM boxing. Revell’s boxing blanks out the four cage parts on its parts map, and omits them altogether in the instructions, instead indicating that the instrument panel should be fixed directly to the top-inner surface of the fuselage; which means the panel will sit too high.
I have not read build review that report a fit problem with the cage, so perhaps Revell opted to leave it out as being too fiddly an assembly for younger builders; who knows?
Regardless of why Revell dropped the structural parts, all is not well with the proportions of the cockpit detail, in part due to the decision to include the tubular cage. This is because the thickness of the fuselage halves and the tubular a cage have squeezed the available interior room well below scale dimensions. The seat and instrument panel are is the most affected parts as a result. The seat pan is very narrow and elongated and backrest far too slender, almost the opposite in fact of the original as comparison of the kit part to ICM’s I-15 seat (hand-mastered), and a drawing from an I-153 manual shows:

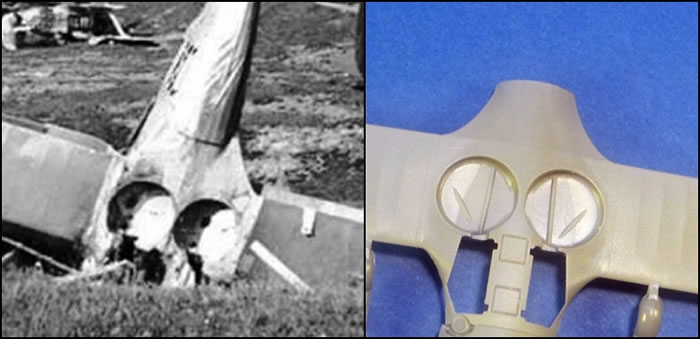
The instrument panel is simply undersized as this comparison to ICM’s I-15 and Yahu’s replacement I-153 panels shows:
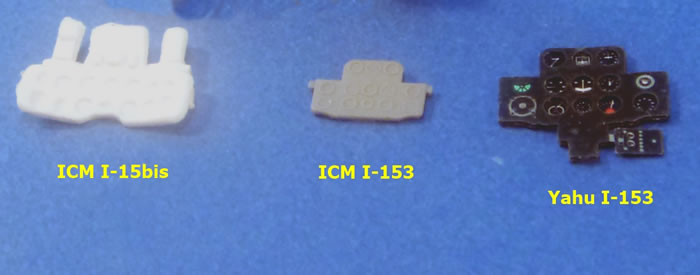
Revell does provide a decal to represent the instrument faces; something the ICM boxing does not do; but this advantage counts for little given the undersized nature of the part.
It would have been better to have represented the tubular structure integrally with the fuselage halves, leaving more room for a properly proportioned seat. ICM’s I-15 kit has a very similar cockpit, but these hand-mastered toolings have far more realistic proportions and manage to include separate cockpit framing. This perhaps illustrates that what looks OK on-screen in a CAD program can struggle to rival a real 3D item in the hand when trying to capture realistic proportions. Despite these concerns, I think most modellers will happily accept the cockpit detail as provided, and little will be seen anyway. Besides, you can effectively solve the problem by inserting a pilot figure!
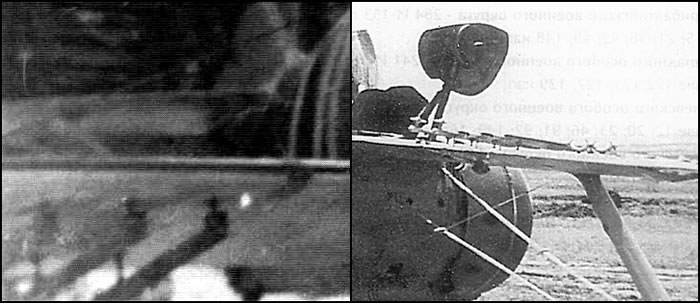
One omission which would be impossible to injection mold accurately as a kit part is the PAK-1 gun-sight (the image below shows one fitted to an I-16)…
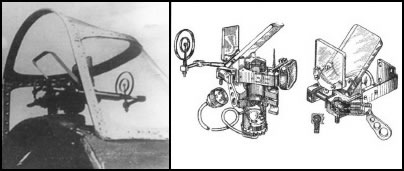
I feel this is a worthwhile detail to add, and one is available as a resin & PE item from North Star Models, or a slightly less detailed example from Quickboost.
The windscreen is a good quality clear piece, albeit unavoidably a little thick due to the limits of injection molding; but sadly, it is also the wrong shape as the comparison below shows…
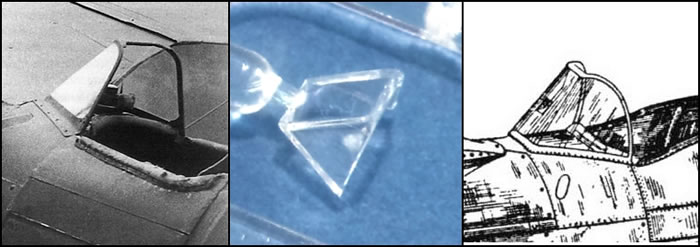
It should be easy enough to file the top to a more representative shape, but even better option would be to cut and fold one up out of clear plastic sheet.
Enough time spent on the cockpit I think!
Fuselage & Engine
The fuselage halves hold one surprise, and that is that ICM forgot to tool a hinge-line between the rudder and tailfin on its starboard side! This is obviously easy enough to fix, but suggests a rush to market and/or poor design checking.
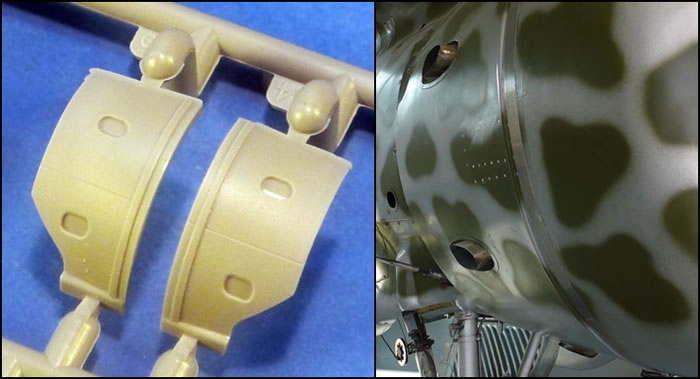
Similar problems have afflicted the engine cowling which is formed from three circumferential parts (one integral with the lower wing), and the shuttered face with shutters moulded open, which my reading indicates an early style face. The circumferential parts have indentations where the exhaust pipes exit on the real plane, but no pipes are provided! These are quite noticeable, and will really need to be added. Fortunately, this should be fairly easy task to accomplish, or you can purchase ready-made exhausts by Quickboost, or they can be scratch-built from tube sliced at an angle and inserted into the drilled out cowl.
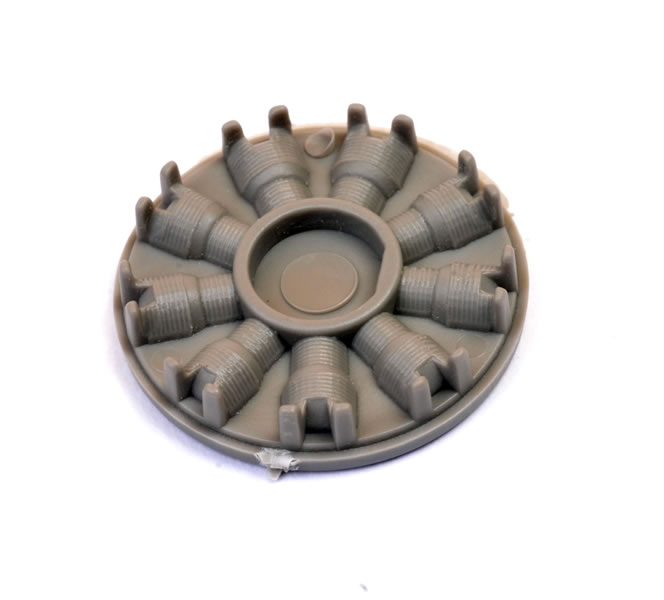
A more than adequate engine with separate and slightly over-scale pushrods is enclosed by the cowl, although this will be almost unnoticeable through the small cowl-face openings.
Another possible weakness of the cowl is the carburetor intake which looks either too shallow or too short depending on the type it is supposed to represent. There seem to have been at least three; and possibly four styles, which I shall refer to as elongated, deep, restored and triangular. This probably reflects early or late engine types, the 1,000hp M-62 and 1,100hpM-63 respectively, although very early I-153’s had a 775hp M-25V engine. The kit part most resembles the ‘restored style’, which is also quite similar to the ‘elongated style’…
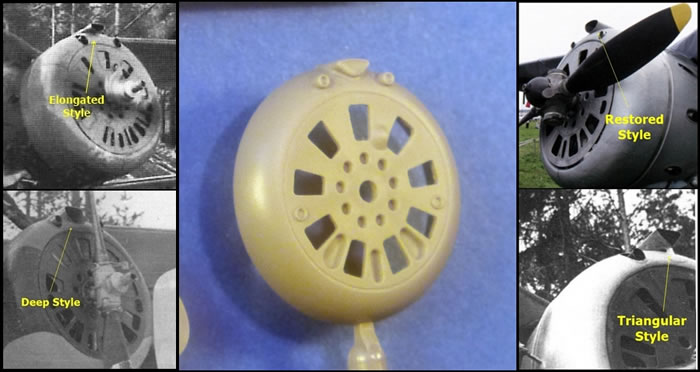
I do not know enough about the I-153 other than to advise checking references if the kit’s carburetor intake bothers you. Konstantine Malinovski describes the intake as being too small and to angular. Alternatively, you can buy a replacement cowling and exterior detailing set by SBS Model, or a replacement cowl and engine by Kora (the SBS set looks to be better quality for the same price).
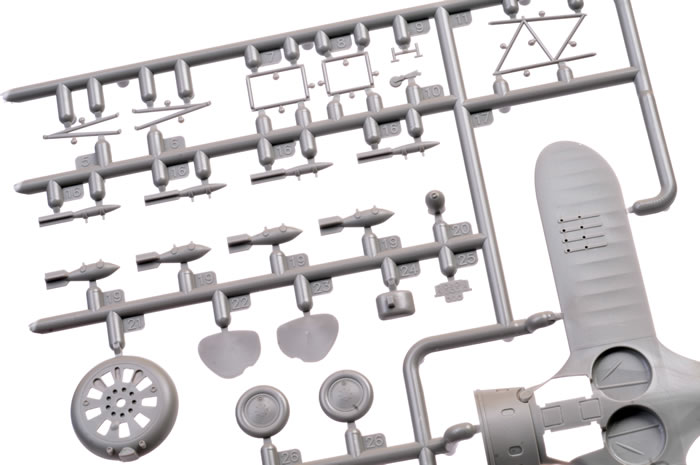
The AV-1 prop consists of four parts; the blades and hub, two counter-weights, and the dome cover. The blades are reasonable in appearance, although Konstantine Malinovski suggests replacing the prop with one from ICM’s earlier Polikarpov kits. Alternatively, you can replace with one of two styles from Quickboost if you are unhappy with the kit item.
Wings & Undercarriage
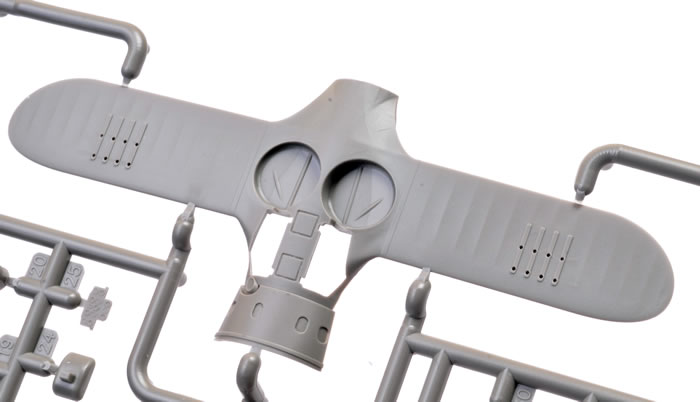
Both upper and lower wings are one-piece moldings with fine trailing edges. The two interplane struts that locate firmly into the wings using substantial tabs. This aspect, and the absence of cabane struts thanks to the upper gull wing, means assembly is no more demanding than a monoplane kit.
The tailplanes are also each one-piece items with very fine trailing edges, and are braced by finely molded v-struts. Perfectionists may wish to drill a hole through the rudder and insert a torque-tube linking the two elevators as per the original (the SBS exterior set mentioned earlier includes a replacement resin rudder with this feature)…
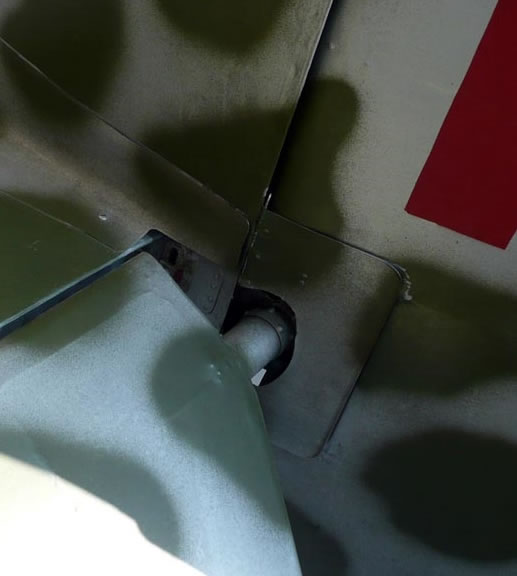
The bottom wing also incorporates the wheel wells. Unfortunately, these are molded as perfect circles, whereas the originals were slightly out-of-round and more Siamesed where they meet at the fuselage centerline than the kit’s are…
I suspect that most will live with the kit’s representation; after all, who looks underneath a model once it is in the display cabinet?
The undercarriage legs and wheels are nicely done; the doors are detailed and as thin as can be reasonably expected of injection molding, although perhaps a little thick for perfectionists. The kit’s wheel doors are completely flat, whereas the originals had a subtle curvature.
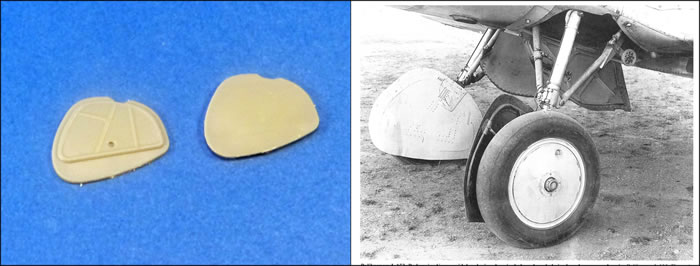
I suspect most can live with them as supplied, but taping them to a suitable diameter cylinder and heating with hairdryer may help their appearance. The easiest fix is to leave the doors off, since many wartime photos show them removed in service.
Weapons (or what made me look into this?!!)
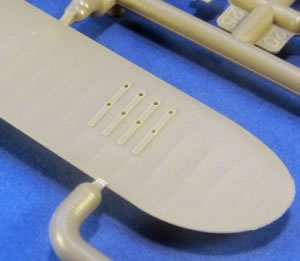
The kit has a choice of weapons to mount under the lower wings. There are four each of two bomb sizes, and eight RS-82 rockets with their launch rails. These are all superbly well molded, with the rockets and rails being as fine and delicate as you would expect resin & PE aftermarket replacements to be.
Konstantine Malinovski advises that the weapons pylons attachment points molded into the lower wings were not a feature of early I-153’s and should be removed…
Squadron’s ‘Polikarpov Fighters In Action Pt.1’ advises that all I-153’s could carry bombs, or be equipped to carry rockets; whereas Wikipedia says only 400 late model I-153’s had metal plates fixed under their wings to accommodate the rockets. Wydwnictwo Militaria’s ‘#222 Polikarpov I-153’ supports this figure, and has plans showing an M-62 powered (therefore early) I-153 carrying bombs or rockets. Konstantine Malinovski wrote that late I-153’s equipped with rockets had plywood plates to protect the wings in place of bomb-racks. Protective plates are not really apparent in the images I have checked, and I think can probably be ignored in 1/72 scale...
Confused yet? I know I am! My best guesses are:
-
Remove the molded strips for early M-62 powered examples
-
Fit bombs if you want to regardless of version.
-
If you want rockets remove the molded strips and play safe by modeling a late M-63 powered example to carry them.
After-Market Goodies
There is a plethora of aftermarket accessories and decals designed to compliment this kit from Aires, Inscale, Kora, LF Models, Owl, Printscale, Quickboost, SBS Model, Yahu and no doubt others.
Colours & Markings
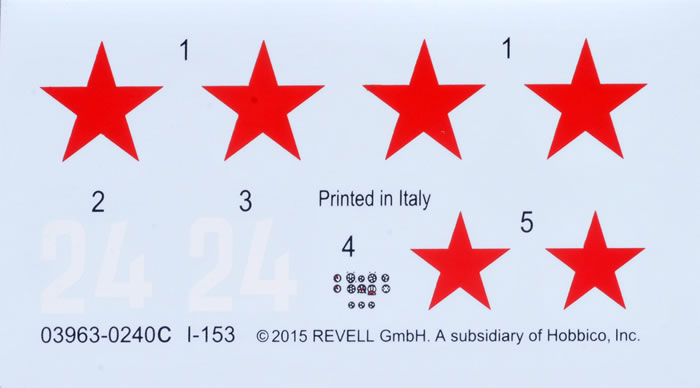
One scheme is provided with the kit, ‘White 24’, flown by Captain K.V. Soloviyev, of the 71st Fighter Regiment, Baltic Fleet Air Force, Lavansaari, in the summer of 1942.
The matte-finish decals appear well printed in terms of registration and colour density, but my experience of Revell decals suggests they can be prone to silvering, so a very high-gloss base is recommended.
This first look has picked few holes in this kit, but most are minor issues that can either be ignored or easily fixed. None prevent me from rating this as the best I-153 kit in ‘The One True Scale’.
Essentially accurate in outline, with lovely surface detail and some very fine small parts, it has much to commend it; especially as build accounts suggest it assembles very well.
A missing rudder hinge-line and no exhaust pipes are hard to understand tooling oversights by ICM, as is the incorrect windscreen shape. Equally confusing is Revell’s decision to delete the kit’s internal cockpit framing in their instructions.
The kit best represents an early production M-62 powered example, which raises questions regarding the use of the very delicate RS-82 rockets and their launch rails. There are various other small points concerning the carb-intake, wheel well shape, and undercarriage doors; but I think most people will opt to live with these.
In some ways this first look has been harder than some I take. This is because I’m a fan of ICM’s hand-mastered I-15 kits detail and accuracy, whereas the I-153 is a CAD mastering, so I was looking for differences in kit design; I also had good references and was able to include an apparent expert’s opinion of the kit.
Don’t be put off by this critique, the kit is very nice and a good basis for a superb model with just a bit of extra work. The low price of Revell’s boxing at 25% less than ICM’s leaves some spare to pay for Quickboost’s exhausts at least, whilst Hasegawa’s is a twin-pack costing around four times as much. (But to be fair, these other brands offer more decal options than Revell.)
Perhaps not as faultless as might have been hoped for, it is nonetheless a very nice kit that improves on all that have gone before. Hasegawa and ICM kits can be hard to find in some markets, so Revell’s boxing of the same kit will be welcomed given this brand’s wide-reaching distribution.
I highly recommend this kit in any of its brand boxings, but favour Revell’s for best value.
Revell model kits are available from all good toy and model retailers. For details visit www.revell.de/en, @RevellGermany or facebook.com/Revell

Review Images Copyright © 2016 by Mark Davies and Brett Green
Review Text Copyright © 2016 by Mark Davies
Page Created 4 May, 2016
Last updated
4 May, 2016
Back to HyperScale Main Page
Back to Reviews Page |
 Home
| What's New |
Features |
Gallery |
Reviews |
Reference |
Forum |
Home
| What's New |
Features |
Gallery |
Reviews |
Reference |
Forum |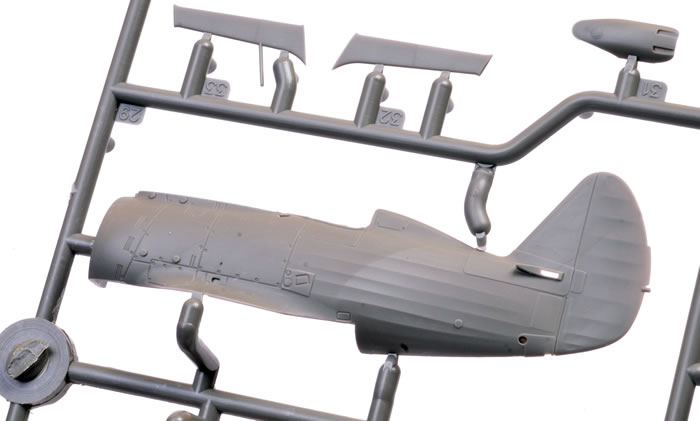