Tamiya's 1/48 scale
Kawasaki Ki-61 Hien
by Ron Petrosky
|
|
Kawasaki Ki-61 Hien |

Tamiya's 1/48 Ki-61 Hien is available online from Squadron.com for only $41.99!
Historical Background: “Ron and Modeling the Tony Through the Ages”
I am a big fan of the Tony from way back. Inspired by a Profile Publications issue on the aircraft, the first one I built was the Revell 1/72 kit back in the 60s (great box art of a Tony over Mt. Fuji by Brian Knight! Revell’s Oscar, Zero, Frank! Modeling Nirvana!). As far as I know it was the only kit of the Tony available in the US at the time. When I came home after the service in 1970 and began getting all the latest techniques described in Scale Modeler I built another 1/72 Revell Tony but sanded all the over-scale surface detail off, faired the canopy in with the fuselage using modeling putty, sanded and polished the canopy, masked the frames and used aftermarket decals to represent and aircraft of the Akeno Flying school. Looked pretty good! Later, I obtained a 1/32 Revell Japan Tony which I never built and still have in the stash so I can’t say much about it. An Otaki 1/48th Tony with great surface detail followed which now is somewhere in the place that all built models go after you no longer remember what became of it! Let’s call it model Valhalla.
The 1/32 Hasegawa Tony was a revelation! I built that as Major Kobayashi’s mount and it was eventually purchased on EBay by a collector. More recently was another Hasegawa 1/48th Tony built as commission for a friend. A much better 1/48th kit but closed canopy, lack of cockpit detail, shallow landing gear wells, stalky landing gear, and doubtful spinner to nose contours, etc., left something to be desired to my eye.
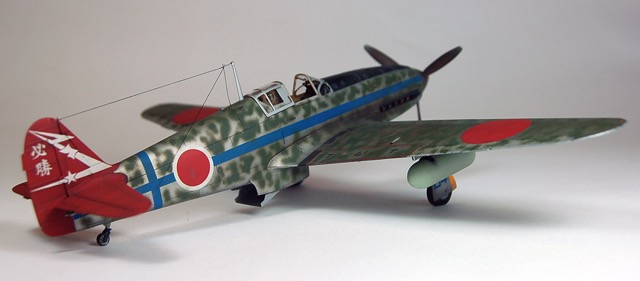
My Hasegawa 1/32nd KI-61 Hei with 20mm Mauser wing cannons and much sought after by pilots, Kobayashi’s A/C.
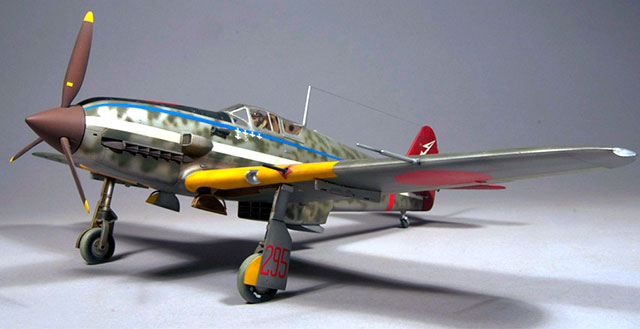
The Hasegawa 1/48th Tony built as a commission. Yellow drop tanks! Yeeesh!
Tamiya's Kit In The Box
Enter the brand-new Tamiya Ki-61-Id Hien (Tony). Couple Tamiya’s really amazing kit engineering and fit with a level of accuracy and detail that surpasses any other Tony in any scale and you have a 1/48th kit that is probably the last word on the Tony. My poor 1/32 Revell Me 109G-6 got put on the back burner again! In fact, the 1/35th Takom Tiger that took the Me’s place got moved back in the production line as well!
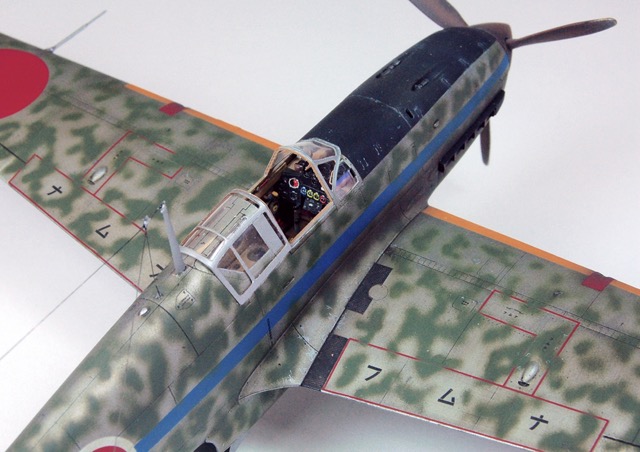
I was really taken with the Tamiya’s Tony cockpit! Although I dressed things up a bit with Eduard’s etched set and steel seatbelts, a very convincing, highly detailed cockpit can be obtained using the stock kit parts. Again, the cockpit is the best Tony “office” in any scale. If you decide you want to show that cockpit detail off, Tamiya has engineered an ingenious way, with optional parts, of building either an open or closed canopy that looks very realistic especially in the open configuration. An excellent seated pilot figure is also an option (by-the-way, the pilot figure has his oxygen mask securely on which you’d think was odd at sea level, taxying or preparing for takeoff, but my references show photos that this was indeed the case in some instances (Probably a radio mic in the mask).
The completed airframe shows an attention to accuracy that results in an “aerodynamic finesse’’ that captures the graceful lines of Japan’s only wartime production in-line engine fighter better than any other kit of this aircraft in my opinion. I’m not the type to get out the parts and start comparing them to drawings and getting the old red-line Illustrator drawing tool engaged on my MAC (As Dorothy in the “Wizard of OZ” might have said, “Lions and Tigers and Fatal Flaws, Oh My!”). I wouldn’t know which drawing was accurate to start with anyway! But if you look carefully at a bunch of photos of the aircraft, and a few sets of drawings, hold the model in similar views, you get a “gut sense” of how the model compares to the real thing. Unscientific I know, but as a trained artist I trust my “informed, intuitive observation” more than a bunch of conflicting “empirical” data. I also trust that Tamiya (at least) have access to more information than I do. While I have great respect for the effort of those that cut a kit into more pieces, or add more pieces, than come in the box to correct perceived inaccuracies, the intuitive method works for me and I can survive minor inaccuracies .
Fit of all the parts is faultless. I used no filler at all on the model and used Tamiya’s extra-thin cement to bring everything together. The rear fuse spine is an insert that joins along panel lines and there is no “fuselage halves glue joint” on the spine to sand and panel lines to re-scribe. Every time you think “Uh oh! ‘going to have to use some putty here” you are pleasantly surprised once the parts are assembled and the glue join disappears. The same kind of approach is taken for the top of the engine cowling. The bottom half of the wing is one part from tip-to-tip so dihedral is set accurately and aligns on the fuselage along panel lines again. Very little sanding was required. The radiator sides are parts assembled on the fuselage sides and all that is required is to place the assembled radiator and air flow “blinds” into its slots and place the cover over that. I did have to sand the bottom joint where the fuselage halves come together fore and aft of the wing and re-scribe the panel lines.
Have you ever attached a clear landing light or wing tip light cover and find that the darned things don’t fit and have to be sanded down to conform to the wing? Not the landing light cover in this kit! Just to repeat…. kit engineering and parts fit are amazing and I think that building a Tamiya kit (or AMK MiG 31!) is mandatory every once in a while, so you can experience the unbridled joy of a truly trouble free build!
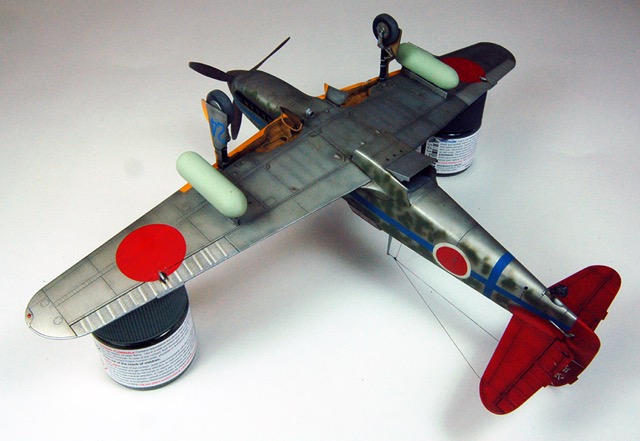
Not having any of the replacement wheels available now, I did file a flat section on the Tamiya parts a bit (maybe too much) so there’s some feeling of weight to the model.
Eduard Photo-Etch
At a contest many, many years ago, I remember a lady with a magnifying glass examining my Tamiya Wespe entry and overheard her say, “look George, there a folded map and binoculars in this model!”. Not sure George was his name or if “George” was mightily impressed, but to me the visual focus of an armor model is in the place where the crew operates and lives in the vehicle which makes open topped vehicles an especially good armor modeling subject for me. With airplanes, it’s in the cockpit which is why I most often go for the open canopy option. Anything I can do to make this area more visually interesting is a “must-do” task. Eduard’s color photo-etch is something I very often purchase simultaneously to enhance a cockpit as they are a way to create much more realism and visual interest relatively quickly and easily. I have no qualms about using any ready-made product that eases my work load, reduces the stash faster and enhances a stock kit.
On the down-side the Eduard parts for some of the levers and controls for the Tamiya Tony are very one-dimensional compared to the Tamiya injected parts, so, after folding and attaching one I decided to leave the rest of these parts on the Eduard frames. The Eduard landing gear covers and radiator airflow replacement parts looked like a curved bending and folding nightmare so I also decided to utilize the Tamiya parts as well as they look just fine as is (I’m still recovering from the installation of the Eduard engine cooling petals on the AMK MiG-31!). I did remove/cut the rear radiator flap area from the Tamiya part and substituted the folded Eduard replacement part in the dropped position as seen in so many on-the-ground and in-the-air
photos of the Tony.
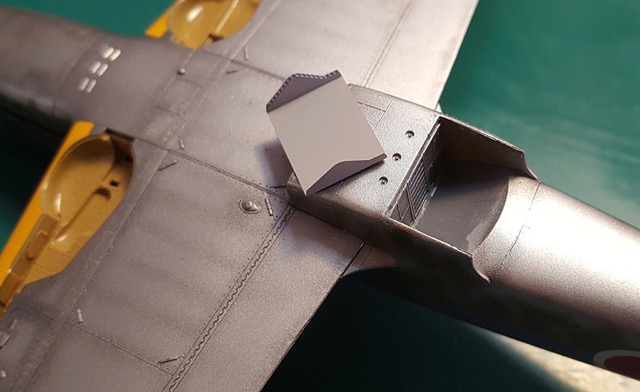
The radiator flap area was removed and Eduard’s photo-etched replacement added in the dropped position.
Lastly, I used Eduard’s hollow engine exhausts to replace the Tamiya’s parts.
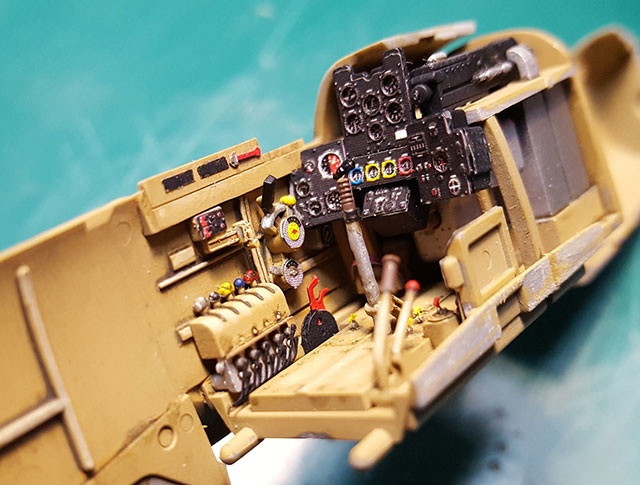
The Tamiya cockpit with Eduard photo-etch. See the “fake” looking 2D levers on the left side!
Painting, Markings and Base |
Some Marking Decisions
A couple of points of interest before getting into the final finishing of the model. Although I have some old Aeromaster Tony decal sheets I purchased two sheets of Lifelike decals from Victory Models for the Tony. I don’t usually like using kit decals and having my model look like thousands of other models by the same manufacturer. As it happened I did use one of the Tamiya schemes, more on that later. Lifelike Sheet 48-004 (R) 244 Sentai Pt 2 was worth the expense If only for the notes on Tony colors. These decals are made in Japan the research that has gone into the interior and exterior paint notes are worth the price of admission alone. As a single example, I had painted the ailerons grey-green against Tamiya’s call outs for flat aluminum as the JAAF grey-green is shown in all my references. Lifelike confirms Tamiya’s instructions. There are FS callouts for various interior and exterior colors and a small dissertation on the interior grey-green that faded to a khaki-tan or sand brown that is the color Tamiya calls for. No yellow drop tanks either! Japanese Sentai crews confirm the were “Grey”. There’s much more about camo fading, type of paints used, etc., on the KI61 and the KI100.
Another interesting point is Lifelike’s mention of the “Ichikawa Tony” with the clover leaf on the fuselage that I have been wanting to do for some time. Turns out that this was a scheme that in all likelihood was applied by American personnel at the war’s end! The author speaks about the clover leaf as not having the same cultural meaning as in the western tradition and the victory marks placed on the cowl position, not typical of Japanese positioning, as part evidence.
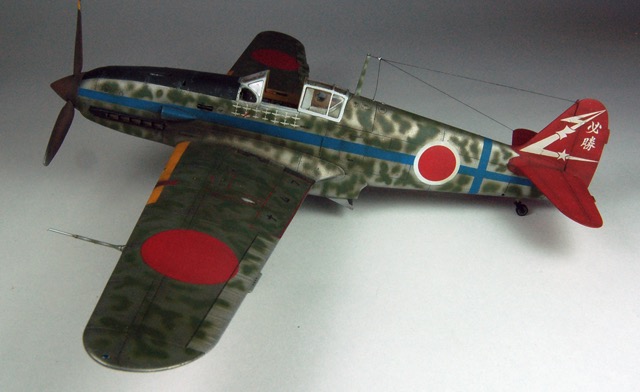
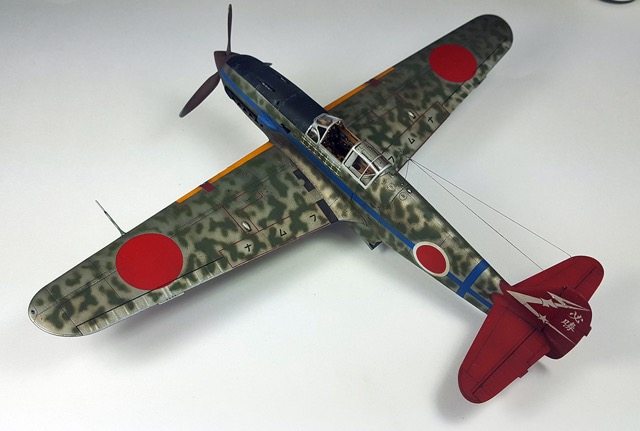
Anyway, I started to think the Tamiya folks doing the decals and painting instructions for the kit knew what they were doing and that any self-respecting Tony fan has to have a 244th Sentai aircraft in the collection. I decided to finish the model as Lt. Shunzo Takashima’s mount included on Tamiya’s sheet and use that cool venturi device on the left side of the fuselage. This aircraft s/n 4424 was previously Major Kobayashi’s aircraft and the victory markings are his. Takashima flew this aircraft on a suicide mission on May 28th 1945 against US Navy ships with the 159th Shinbu-tai. The 244th had transferred some of its KI-61s to this unit after converting to Ki-100s. (This information regarding Takashima’s A/C taken from reference #1.)
Preliminary Painting
Time to get out my trusty Paasche H-I airbrush attached to my CO2 tank! I first sprayed the exterior parts with Alclad’s flat grey primer. I then applied a coat of Alclad’s Aluminum. An uneven, blotchy, silvery kind of look ensued that turned my fingers silver when I handled the model. I figured it was the flat primer and the Alclad soaking unevenly into the primer so I got out the very fine sanding cloth and polished everything down and resprayed. Same problem started to appear! What the _____! (Heck!) I then tried a brand-new bottle of Alclad Duralumin and the finish was beautiful! Note to self: Alclad can be contaminated or go bad, test before
using! I then sprayed Tamiya semi-gloss black randomly over and inside panel lines and applied a second coat of Alclad Duraluminum over the black pre-shade.
Nice subtle uneven aluminum
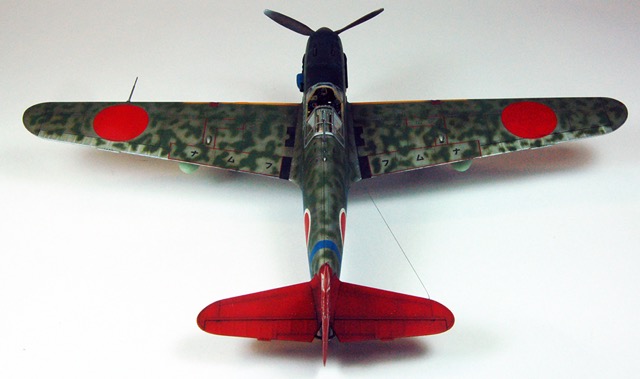
look! The red tail and black anti-glare panel and wing walk-ways were masked off and painted (no lifting of the Alclad after pulling the masking off!). After that I gave the airframe a couple of coats of future prior to decaling.
One thing I did notice was a tendency for the Tamiya canopy masks to lift off at the edges during painting. I was careful to avoid handling the adhesive side as much as possible. I ordered and replaced a couple of these masks with Eduard’s new masks for the kit and had no problems with lifting afterward.
Decaling (or as Brett would say, "deckling")
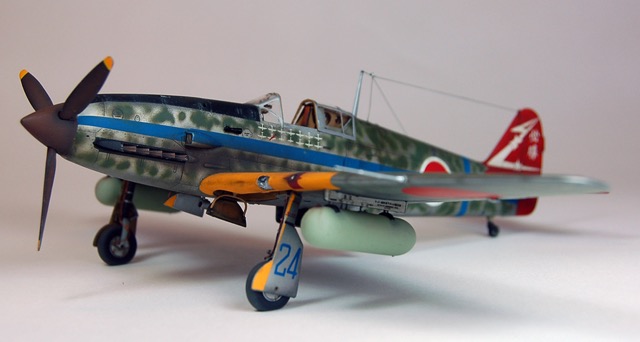
Usually, I will at least paint the yellow ID panels, any color stripes, propeller tips on a model but I decided to use the Tamiya decals for everything as the colors looked spot on to my eye and it would simplify painting. I have to say that if I was impressed with the kit itself I was equally impressed with the decals. Everything fit exactly, decals were tough and easy to position but snuggled down into the panel lines and around curves, using Champ’s decal set, with ease. An example is the small decal designed to fit around the supercharger intake to unify with the fuselage stripe. I thought, “no way, it will wrinkle up and I’ll have to sand it off and paint it”. I put it in place and folded as best I could around the duct. With some softener applied I took a break and when I returned it had conformed perfectly to that compound curved surface, no wrinkles, no bubbles!
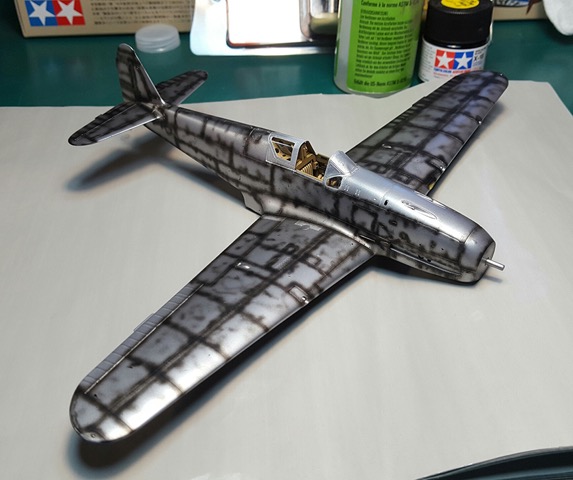
I only placed the decals that the green mottling would be painted around to simulate the sequence of the painting of the original. I would add the stenciling later.

Tamiya Tony ready for mottling. The scary part!
Final Painting, Assembly and Decals
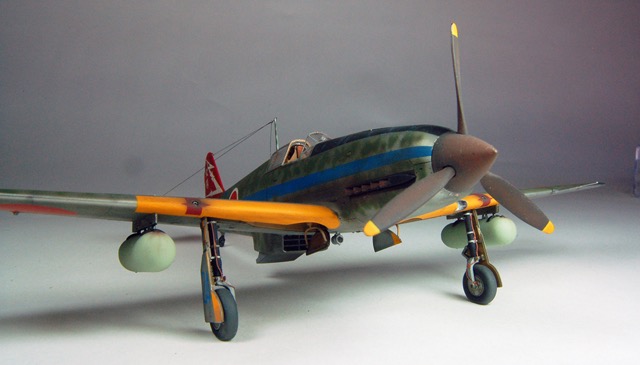
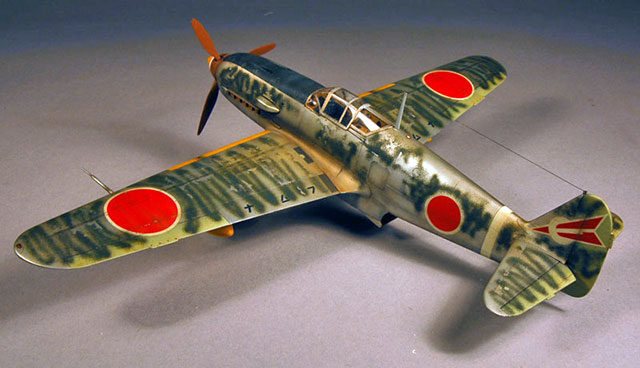
Next came the daunting task of painting the mottling over the natural finish and around the markings. Again, I used my Paasche H1 along with one of my remaining bottles of Aeromaster #9092 “Japanese Army Dark Green” (miss these paints!) which is a dark olive green. I used the paint right out of the bottle with no thinning. I would get a good thin paint line and then have to open the needle, clear a blockage, adjust the spray to a thin line again and paint three or four mottles…. repeat until all done. Not as bad as it sounds and no danger of pulling a dual-action needle too far back and blowing paint in a huge blotch! If you make a mistake, or overspray, a Q-Tip and some mineral spirits and Aeromaster paint wipes clean off the Future coat. I tried to follow the “Intent” of the Tamiya 1/48th painting and marking drawings of Lt. Takashima’s aircraft. I was pretty pleased with the final result. Looks like (fictitious) aircraft painter extraordinaire Corporal Akihiro Honda’s work!
Another layer of Future over the mottling and final application of the remaining decals with another future coat only over those only. I then sprayed the dark green over the “walk here” red lines where they ran over the mottling and sprayed future over those touch ups as well. After the final Future coats dried for at least a day I sprayed all the parts and airframe with Testor’s Dullcoat and let that dry for two days. A mix of burnt umber and black oil paint (Windsor and Newton) was painted in all the panel lines and around raised surface features. I let this dry for 10 minutes and wiped it back in the direction of the airflow with a mineral-spirits dampened rag. This technique causes the paint in the recesses to darken those lines but the residual thin coat of the oil paint acts like a dirt/dust streaking filter, unifying the paint scheme. The Dullcoat is necessary for this filter to remain on the model where a gloss coat would cause the filter to be completely removed. Exhaust stains and a final coat of Dullcoat and Finis!
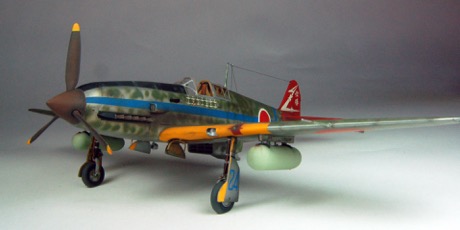
I attached the propeller, landing gear and doors, oil cooler, venturi, tail wheel, exhausts, aux fuel tanks and pylons, antenna mast, pitot and magic mending thread antenna wires, some pastel dirt and wear and the model was complete.
This Tamiya Tony is mine and the Tamiya 1/48th P-38L will be placed right next to it! (Hope springs eternal! Next year?)
All I can finally say is what Brett has said, “What a fabulous kit!”
References:
-
Kawasaki Ki-61 Hien Ki-100, Kagero Monograph #3058, Leszek A. Wieloczko, Ó2014,
ISBN 978-83-64596-15-5
-
Kawasaki Ki-61 Hien in Japanese Army Airforce service, Richard M Bueschel, Ó1996, Shiffer Military History, ISBN 0-7643-0069-5
-
Army Type 3 Fighter “Hien” Famous Airplanes of the World #17, Author unknown, Ó1989, Bunrindo Co. Ltd., ISBN 978-4-89319-014-7
-
The Kawasaki Ki-61 Hien, Profile publications #118, Rene Francillon Phd., Ó1966, Profile Publications Ltd., No ISBN identification. The year after my high school graduation, horses and buggies!
-
KI-61 and Ki-100 Aces, Aircraft of the aces #114, Nicholas Millman, Ó2015, Osprey Publishing, ISBN 978-1-78096-295-5
Model and Text Copyright ©
2017 by Ron Petrosky
Page Created 30 May, 2017
Last Updated
30 May, 2017
Back to
HyperScale Main Page

|
 Home
| What's New |
Features |
Gallery |
Reviews |
Reference |
Forum |
Search
Home
| What's New |
Features |
Gallery |
Reviews |
Reference |
Forum |
Search