Special Hobby 1/32 scale
Hawker Tempest Mk.II
by Roger Hardy
S u m m a r y |
Item No. |
Special Hobby Kit No. SH32054 - Hawker Tempest Mk.II Hi-Tech |
Contents and Media: |
120 parts in grey resin; 16 photo-etched parts; acetate film; decals. |
Scale |
1/32 |
Price: |
£79.30 from Hannants and other retailers |
Review Type: |
Full build review |
Advantages: |
Excellent moulding; crisp surface textures; high level of detail; effective use of multimedia; long-desired subject. Full gun bay detail provided. |
Disadvantages: |
Nose assembly is too wide; limited powerplant and installation detail inside engine cowling. |
Recommendation: |
Highly recommended for modellers with a little experience. |

Revell's 1/72 Shackleton is available online from Squadron for only $35.99!
This kit was reviewed in the box for Hyperscale by James Hatch, so no point repeating it all here:
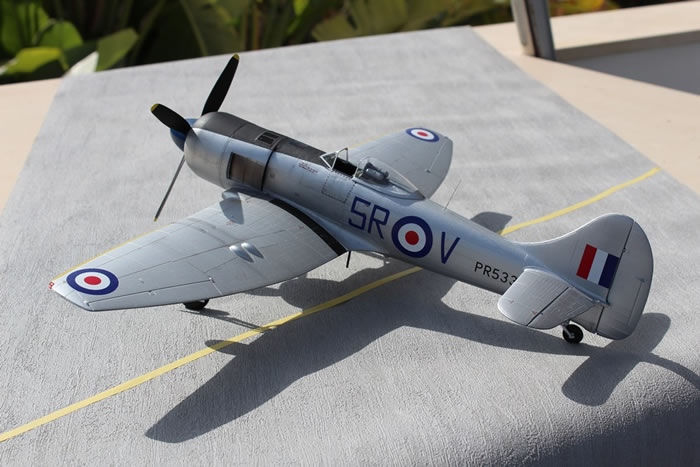
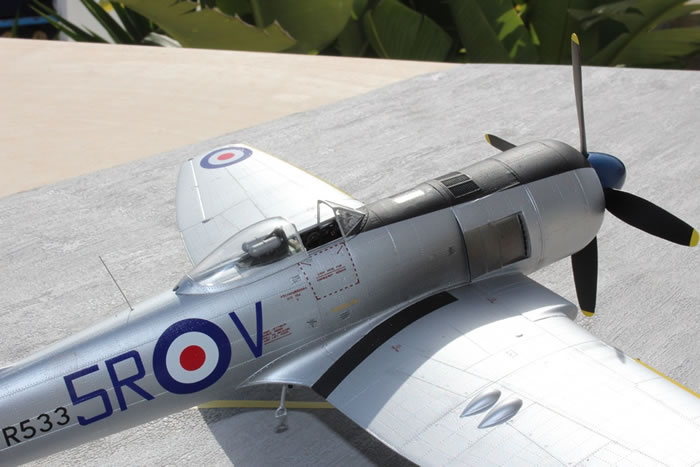
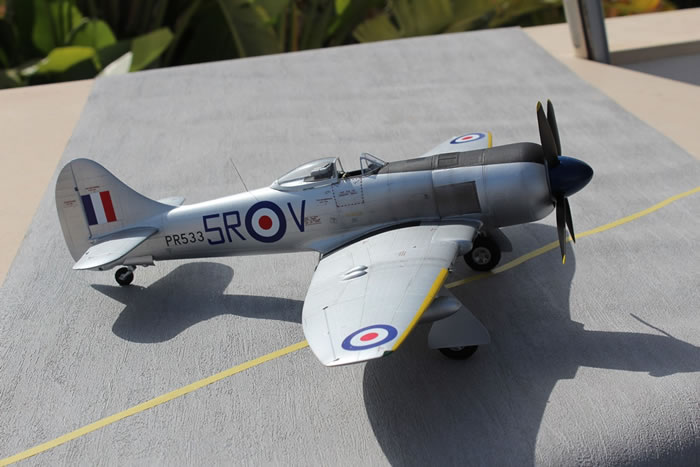
I like 1/32 scale and it’s easier on my old eyes! I much prefer the look of the Tempest II to the Mk V (it looks too much like a Typhoon, a rather ugly device) but it’s very much a post-war machine so I resolved to do the all-silver version on the decal sheet as I’ve had enough of drab camouflage and I also like the optimistic peace-time brightness with normal red, white and blue national markings. It was the RAF’s last piston-engined fighter apart from the DH Hornet but only remained in service until 1948, so its career was very short-lived, being replaced by the first jets, Vampires and Meteors. Many were gifted to India and Pakistan on their independence. I’ve done one of these before in 1/48 scale by kit-bashing a Monogram Typhoon and Hobbycraft Sea Fury and it won its class at Telford many years ago …1992 or 93 I think; there must have been no competition! I also decided on the Eduard p/e set for the cockpit because I like the pre-painted detail of panels and instruments in this scale but the kit provides these as decals which look perfectly good.
The instructions are comprehensive, clear and fairly unambiguous, although I know that some others have had problems with them. You need to recognize the difference between ‘info’ and instructions. The info is there to help but doesn’t actually mean you to do that there. Duuhh. Although this is a limited run model you can’t tell by the quality of the surfaces which have lovely subtle engraved lines and flush rivets. Where do you do notice it is in the larger moulding gates, a little flash and some prominent ejector pin marks (none where they can be seen), all of which need a bit more cleaning up that in mainstream kits.
Cockpit
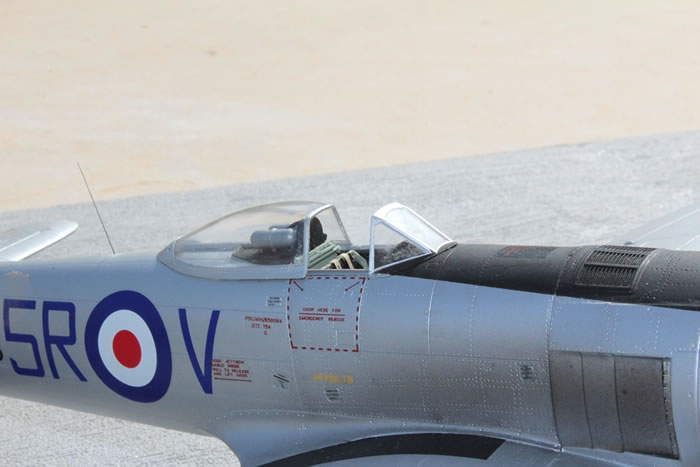
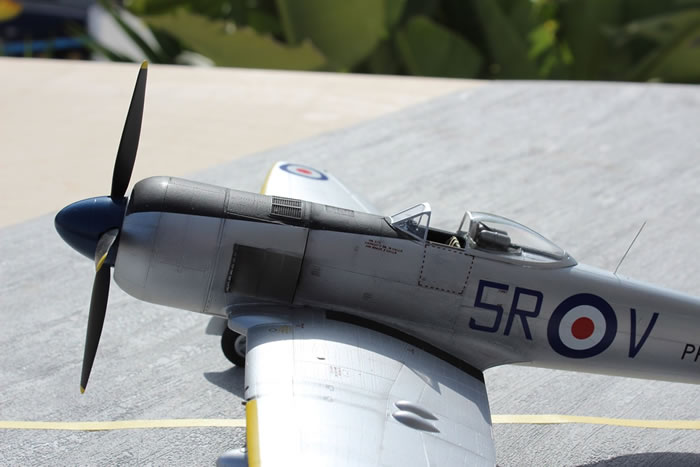
The cockpit provided is really well-detailed, goes together nicely and looks good when done, although mine was enhanced somewhat by the Eduard set (I used the one for the Mk V as the Mk II set was not available at time of writing), but the kit parts are very good and most people will be happy with them. The whole assembly looks messy, cluttered and three-dimensional, just like all British fighter cockpits of the period. No wonder pilots were happy to fly Mustangs! Incidentally, I’ve seen photos that compare the Eduard instrument panel with that supplied (decal instruments) and it’s difficult to decide between them. Where the Eduard set really scores is in being pre-painted with lovely detail, and there’s really no way that you can better this by hand. BTW, don’t fit the gunsight until the model is almost finished, just before you attach the windscreen; you’ll certainly knock it off.
There is one stage in the assembly of the cockpit insert where everything seems to come together at once and you feel like a one-armed paper-hanger but take your time, assembly a couple of sub-assemblies and let them dry before adding more, and all will be well. The detail is mind-numbing and it took me three days just to do the cockpit insert. Special Hobby provide fabric seat belts (which I’d never used before, made by HGW) with little p/e buckles which have to be threaded on. Even at 1/32 scale this is extremely fiddly work; those whom the gods wish to drive mad, they first get them to assemble some fabric seat belts! Actually, you soon find the best way to thread the p/e buckles onto the belts. Basically, you cannot hold both so it’s best to put the belt on your work surface upside-down and bend up the end, then you can drop the p/e buckle onto the it. Easy! Being fabric, they drape more naturally, so maybe I’ll try them again with some Wingnut Wings models.
Although this is a short run model, it has locating pins and holes for them but I would recommend drilling out the holes to a slightly larger diameter as they are mostly under-size, though those on the main assemblies (wing and fuselage) are the right size. This also applies to square locating pins. For, instance, if you don’t do this with the instrument panel, it will stand too high and make it difficult to get the cockpit insert to fit inside the fuselage. Always check the fit before gluing.
Even though the kit comes with some lovely resin parts for the gun bays, I decided to leave them closed because it reduced the necessary surgery (there’s no ‘thinning’ where the doors are meant to be cut out and the wing plastic is thick) and I’m not that keen on ‘diorama’ set-ups. I’ve seen photos of the gun bay installation and it looks very good indeed so maybe it’s worth the effort.
Wings and General Assembly
When assembling the wings, the first thing you do is add the boxing-in of the wheel wells. Be aware that the instructions show you views from above and below which can cause confusion. If you see stringers, you’re looking from below. If you don’t see stringers, you’re looking from above at the wheel well sides fixed to the lower wing. Make sure you get these parts located accurately because they determine the gap into which the cockpit insert goes and also the location and angle of the main undercarriage legs.
The instructions advise you to install the canon fronts. I would put it in the inner ones not the outer ones which will be knocked off. Install them right at the end.
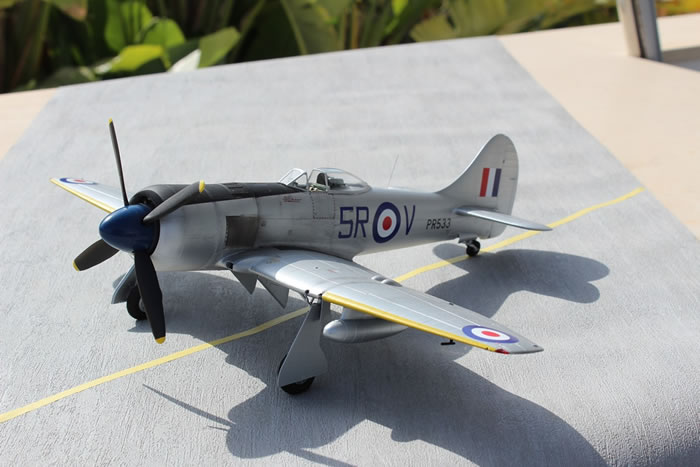
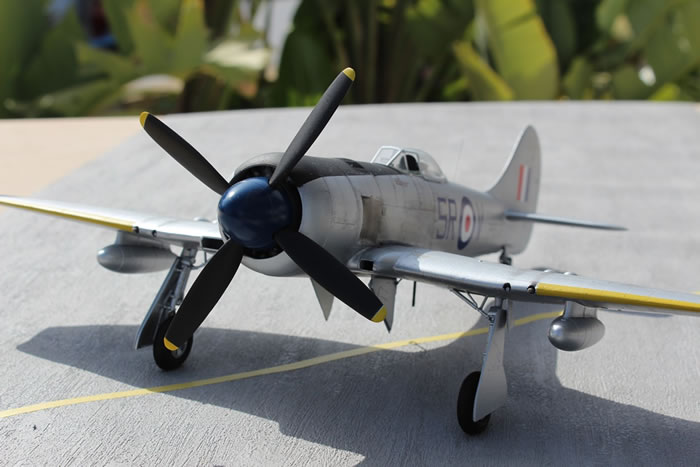
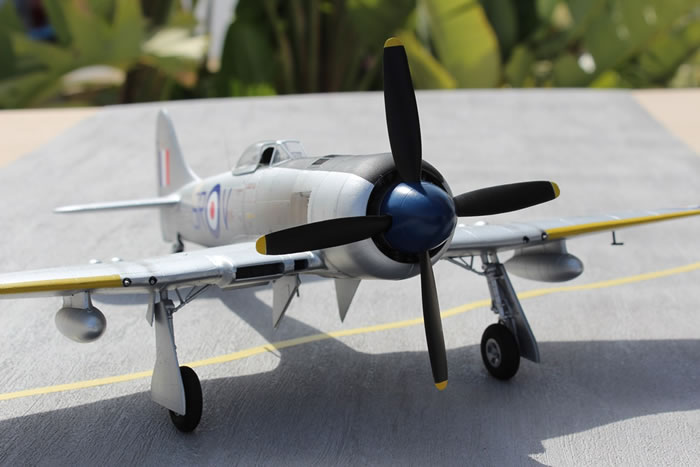
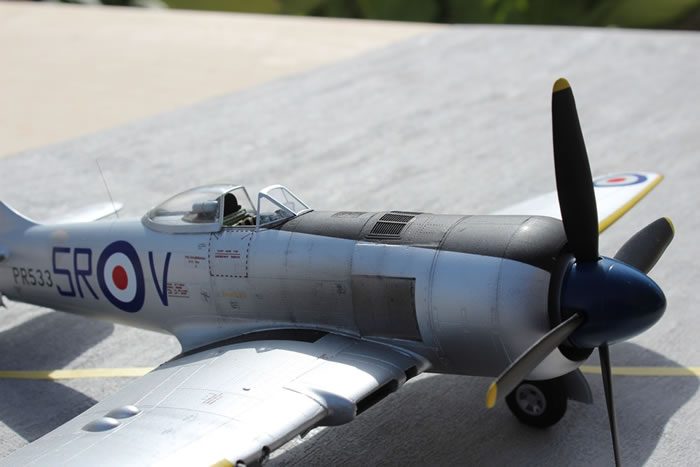
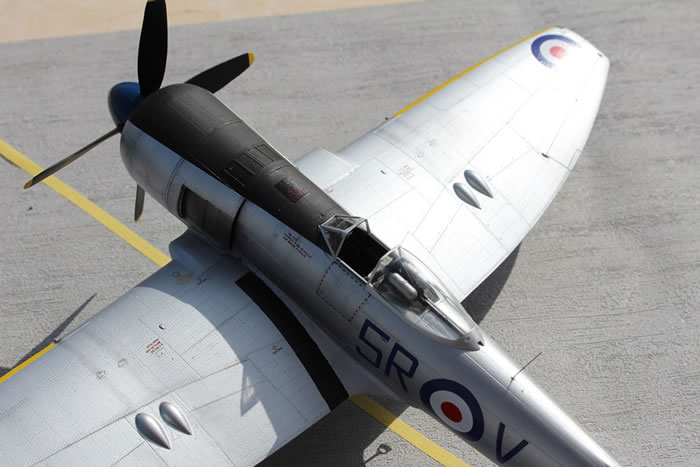
The wings go together well but when the time comes to connect the radiators, wings, fuselage and nose, it all starts to look a bit alarming. Don’t worry; the wing goes on first and the fit is good. I then attached the leading edge radiators and let them set. Then I tried the radial nose. Now, we have a problem because it’s too wide; not by much, but enough, maybe a millimetre. I found that by squeezing it, it fitted in OK but this gave me a slight mismatch on the lower surface but whether the real aircraft had this, I don’t know. I ended up with a slight step on the upper fuselage as well but nothing that can’t be fettled. Don’t worry that the cross-section of the rear of the engine nacelle at the fuselage sides doesn’t match the fuselage. Remember that the Tempest wasn’t designed for a radial engine and the real aircraft has this mismatch as well; this part is actually a cooling flap in any case and is moulded closed, although it’s often seen open on the ground. There is no internal detail behind the cowling so, if you decide to open these flaps, you’ll need to add something (I feel a cottage industry set coming on…). However, if you choose to make the nose fit by trimming the width between the leading edge intakes, you may end up with too much of a mismatch here, check photos. I elected to have the mismatch on the lower surface which no one really looks at and the cowling may well stand proud of the lower fuselage for cooling, I can’t confirm that from photos, however. The top of the cowling has large and prominent cooling louvres and this is another missed opportunity because it’s crying out for a photo-etched replacement…but then you’d need to have some visible detail behind it. I’d rather have had a properly detailed engine installation than those gun bays.
It was at this point that I realized that I’d forgotten the engine front…damn! I managed to get it in by cutting it in half and wiggling it into place. Many modellers will be surprised to see the low level of detail here, but, in reality, you don’t see much of the engine, deep inside the cowling behind that big spinner, but you can see it and this is an opportunity for the cottage industry to add something nice. I know that it’s not that visible but there is a disparity between the incredible detail in the cockpit (much of which cannot be seen either) and the paucity of detail inside the engine cowling.
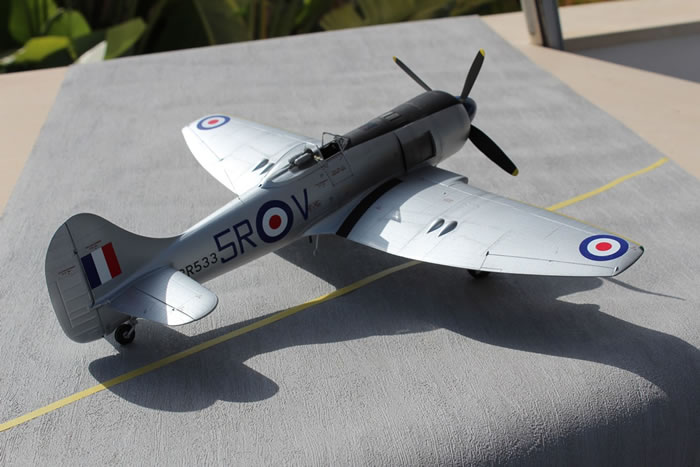
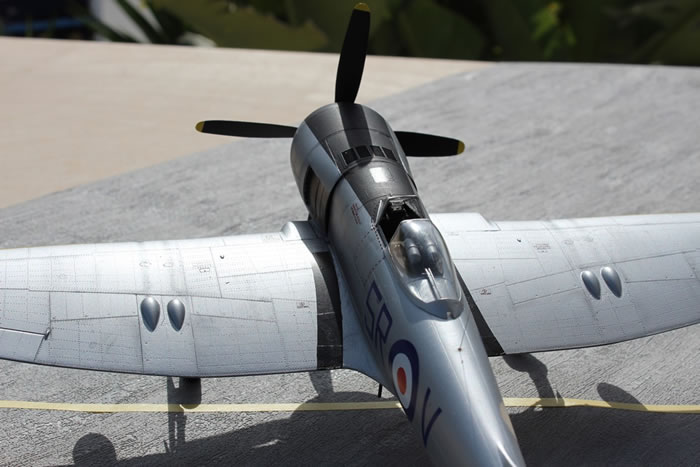
Now that the wing, fuselage and nose are together, I noticed that the wing centre-section has a little anhedral whereas I thought that it should be flat. Initially I suspected that it was due to me forcing the cockpit insert into place but I saw this on SH’s Facebook page for the Tempest…scroll down a bit…(https://www.facebook.com/specialhobby/) and I guess it’s a feature of this kit but whether it’s right or not I leave it to you to judge. I suspect that the wing section changes along the centre-section so that the main spar may be level but the leading edge and trailing edge have slight anhedral. When you’re checking, only believe photographs; GA drawings are often inaccurate! For me, the evidence is not clear. Whichever way you look at it, this model will need a bit of filler here and there. I used Milliput.
Undercarriage
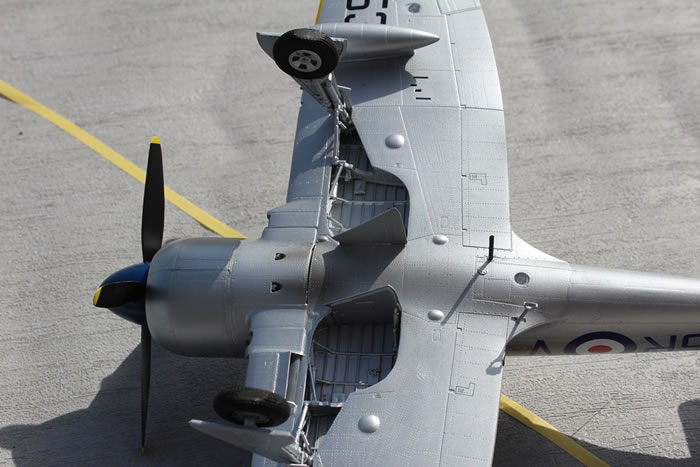
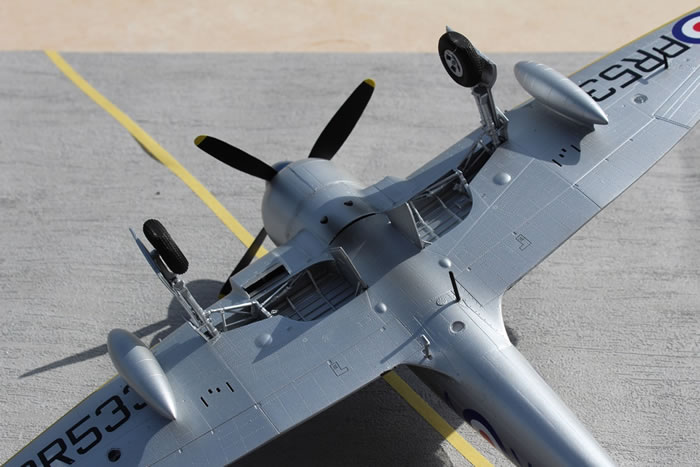
The instructions tell you to paint the wheel well interior green. As my aircraft is silver (painted silver, not natural metal) I was not convinced by this as I know that jet aircraft of the same vintage (‘high speed silver’, Meteors, Vampires) had silver wheel wells. However, there is photo evidence to show that either could be correct. Another source says silver gear doors but medium sea grey wheel wells, so yer pays yer money and takes yer choice! Anyway, I wanted to assemble the undercarriage before painting and silver seemed the easiest option as I could concentrate on sticking plastic to plastic rather than to paint and everything can then be sprayed silver at the same time. Just lazy, that’s me. The entire undercarriage assembly is a work of art, incidentally. At first sight it looks frighteningly complex but everything slots together perfectly. Just follow the instructions and all will be well… except don’t fit the retraction jacks for the inboard undercarriage doors until you are ready to fit them as you’ll certainly break them both within minutes. I did; they are very fine and difficult to repair.
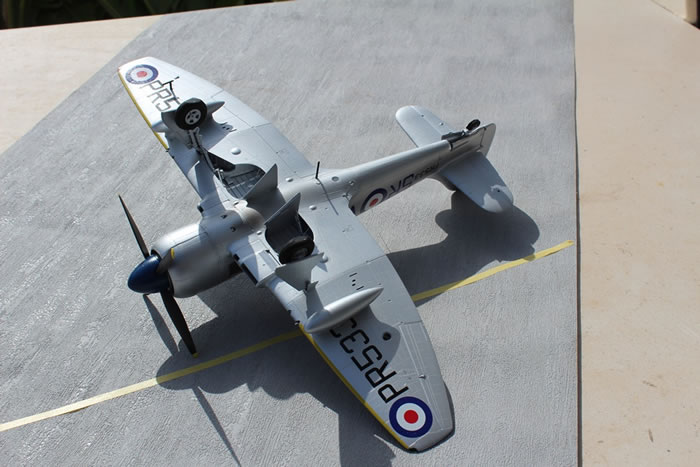
I decided to use the long-range tanks. The fairings are moulded in clear plastic but I cannot work out why. There are meant to be some decals but I couldn’t find them, so I just painted them all-silver. You have a choice of 4 sets of wheels, 2 resin and 2 plastic, all with flats moulded in. One of the resin sets has deep tread which I decided to use. One of the plastic sets is significantly larger than the others (and with five spokes-the others have four) so I’m not sure what they are intended for as they look too big to fit into the wheel wells.
Painting
I masked off the canopy using the black vinyl masks that come with the kit, then sprayed the whole model in Tamiya rattle-can grey primer. The instructions advise that the silver finish should be Alclad ‘Aluminium’. Personally, I think this is a little too dark (it’s great for natural metal) and elected to use ‘White Aluminium’ instead although I also added a little aluminium here and there for variation. Remember that these aircraft were painted silver and weren’t natural metal. The colour scheme is simple, the only complication being the blue spinner, black anti-dazzle panel, yellow leading edge strips and the exhaust area which I did in a mixture of Alclad exhaust manifold and duraluminum and I sprayed this freehand down the fuselage for exhaust staining. Incidentally, the painting instructions for this scheme show a lot of the black anti-dazzle panel as having been worn away at the front of the cowling. I didn’t want to do this so decided that it was probably perfect once, so that’s what my model looks like!
Decals
The decals are by Eduard and are nice but very thin; thinner than I’m used to but not as thin as Sword. You can apply the small ones with a brush but the larger ones should be handled carefully, very wet, transferring the decal directly from paper to model with no messing. They seem to wrinkle a bit when they go on but smooth out on drying. Be careful that you don’t allow any decal to fold back on itself because you’ll never sort it out. Also, remember that if you’re doing this silver scheme, the underwing serials go under the tanks; I had to cut mine away as the tanks were already fitted.
It’s when you think you’ve finished that you realise that there are no decals for the wing walks. I’d decalled the model by then so didn’t want to mask the model again because the masking tape tends to remove decals. Anyway, I found some old decals that were about the right size, made a template, cut them out and pieced them together. Obviously, it would have been better to have sprayed them when I was doing the anti-dazzle panel.
Finishing Touches
I found that the vinyl canopy masks left some glue residue when removed and I definitely prefer Kabuki take. I removed the residue with surgical spirit and this was OK as I’d used Alclad silver which is not affected by alcohol. Be careful if you’re using acrylic paints! The little lights, aerials and pitot finish off the job. The kit has a whip aerial as a p/e part which is a nice touch because I would normally make one from stretched sprue; the lifetime of my little aerials can sometimes be measured in minutes so it’s nice to see something more robust. I added a little weathering using the new Humbrol weathering powders, applied by stiff brush. These are nice because, if you over-do it, you can wash them off.
It’s big, it’s bad, it’s ugly…well, not as ugly as a Thunderbolt. It’s British, after all!
I was slightly concerned that such a simple scheme on a large model would look boring but the light catches nicely in the engraved panels and also highlights the flush rivets, so it looks rather good. I’m happy with the dihedral as well: the finished model looks fine to me, though you may disagree.
Overall, this was a pleasant building experience and has resulted in an impressive model to be proud of.
I’d recommend it to modellers with a bit of experience but there are no real difficulties in putting this one together; it’s far better than most other limited run kits I’ve made. It took me about a week.
Thanks to Special Hobby for doing, in 1/32 scale, an aircraft that has hitherto only been done in 1/72. I hope it does well for them and that they can be encouraged to tackle other esoteric subjects. Now, how about an accurate 1/32 DH Hornet?
Model, Images and Text
Copyright ©
2017 by Roger Hardy
Page Created 17 March, 2017
Last Updated
17 March, 2017
Back to HyperScale Main Page
|
 Home
| What's New | Features | Gallery | Reviews | Reference | Resource Guides | Forum |
Home
| What's New | Features | Gallery | Reviews | Reference | Resource Guides | Forum |