Wingsy Kits 1/48 scale
A5M2b Claude Early
by Andrew Garcia

|
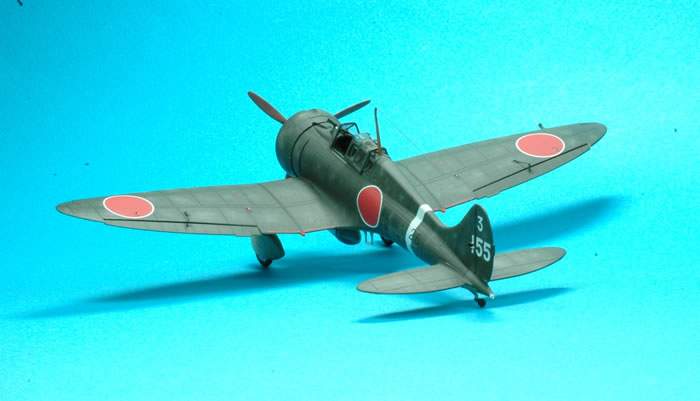
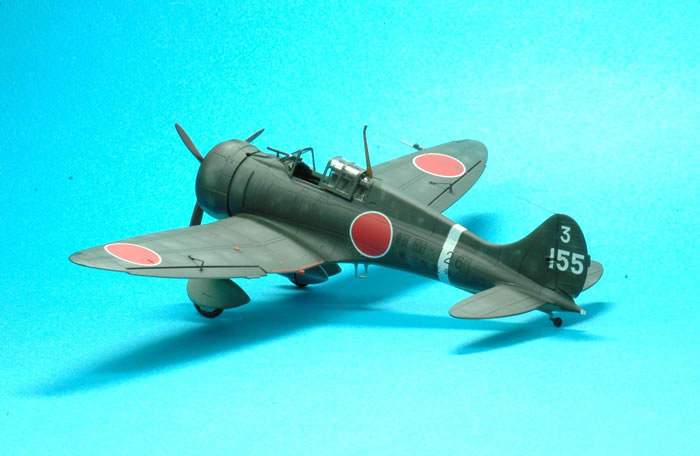
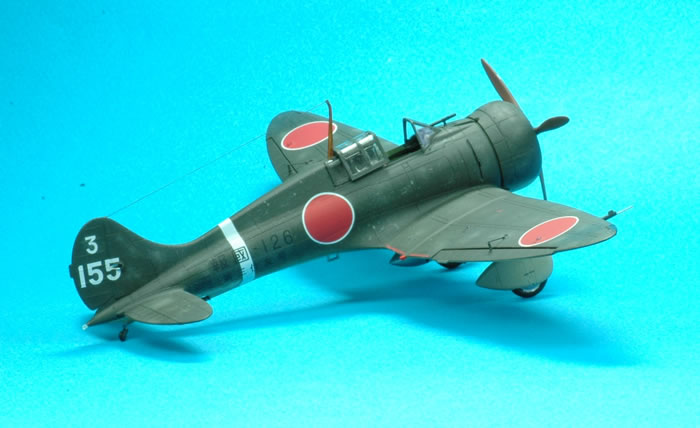
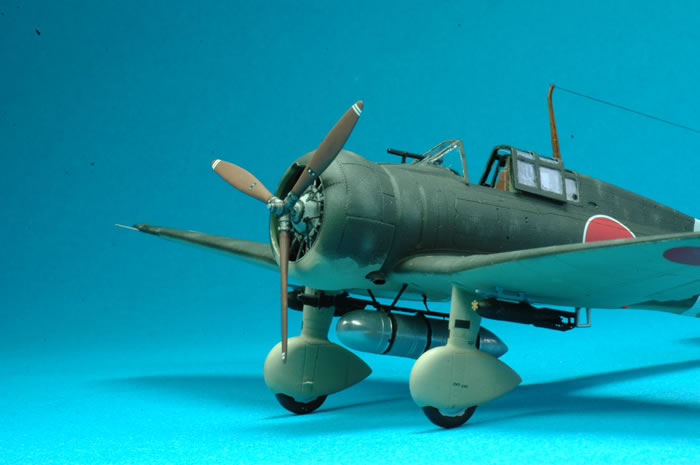
Mitsubishi IJN Type 96 carrier-based fighter II A5M2b “Claude” [early version] 12 Kokutai, China 1938 airframe 3-155
|

Hobby Boss's 1/48 F4U-7 Corsair is available online from Squadron.com
Summary
- Wingsy Kits 1/48 Kit No. D5-03 A5M2b Early Version with kit decals.
- Attention to detail in moulding and components with superb fit – it’s a state of the art kit.
- Etched metal fret provides unique detailing enhancing to the kit plastic parts.
- Eduard FE857 Seatbelts IJN Fighters STEEL used in lieu of kit etched metal belts.
- No canopy masks are provided but Eduard masks would have been most welcomed. The enclosed canopy version has a green-house window appearance that would greatly benefit from an Eduard Mask release.
- An overall superb kit highly recommended to all even if you are not an A5M fan.
- Historical A5M Claude airframe photos courtesy of Russian WWII photographic aviation archives intelligence photos taken from a captured airframe photographed by USSR military intelligence.
History:
For those unfamiliar with the Mitsubishi A5M, I’ve included the introduction from Brett’s review here. “The Mitsubishi A5M, formal Japanese Navy designation Mitsubishi Navy Type 96, was a Japanese carrier-based fighter aircraft. It was the world's first monoplane shipboard fighter to enter service and the direct predecessor of the famous Mitsubishi A6M "Zero". The Allied reporting name was Claude.
The aircraft entered service in early 1937, and soon saw action in aerial battles at the start of the Second Sino-Japanese War, including air-to-air battles with the Republic of China Air Force's Boeing P-26C Model 281 "Peashooters" in the world's first aerial dogfighting and kills between monoplane fighters built of mostly metal.
An A5M from the aircraft carrier Akagi in flight with an external fuel tank (1938 or 1939) Chinese Nationalist pilots, primarily flying the Curtiss Hawk III, fought against the Japanese, but the A5M was the better of almost every fighter aircraft it encountered. Though armed with only a pair of 7.7 mm machine-guns, the new fighter proved effective and damage-tolerant, with excellent maneuverability and robust construction. Later on A5Ms also provided much-needed escorts for the then-modern but vulnerable Mitsubishi G3M bombers.
The Mitsubishi team continued to improve the A5M, working through versions until the final A5M4, which carried an external underside drop tank to provide fuel for extended range. The A5M's most competitive adversary in the air was the Polikarpov I-16, a fast and heavily armed fighter flown by both Chinese Air Force regulars and Soviet volunteers.
Air battles in 1938, especially on 18 February and 29 April, ranked among the largest air battles ever fought at the time. The battle of 29 April saw 67 Polikarpov fighters (31 I-16s and 36 I-15 bis) against 18 G3Ms escorted by 27 A5Ms. Each side claimed victory: the Chinese/Soviet side claimed 21 Japanese aircraft (11 fighters and 10 bombers) shot down with 50 Japanese airmen killed and two captured having bailed out while losing 12 aircraft and 5 pilots killed; the Japanese claimed they lost only two G3Ms and two A5Ms shot down with over 40 Chinese aircraft shot down.
104 A5M aircraft were modified to accommodate a two-seater cockpit. This version, used for pilot training, was dubbed the A5M4-K. K version aircraft continued to be used for pilot training long after standard A5Ms left front-line service.
Almost all A5Ms had open cockpits. A closed cockpit was tried but found little favor among Navy aviators. All had fixed, non-retractable undercarriage. Wheel spats were a feature of standard fighters but not training aircraft.” The version in this review is the less popular enclosed cockpit version.
What’s the difference between the A5M2b “Claude” [early version] also known as Model 2-2 and the A5M2b “Claude” [late version]? The early version introduced the enclosed cockpit which was used for the first time on a Japanese military airframe. The enclosure was often removed in the field as a “field modification” and then later changed on the production line thus leading to the “late” version with a return to the open cockpit which was externally very similar to the final A5M4 version, Model 2-4.
The Kit
Wingsy Kits is a Ukrainian model company and recent contributor to the plastic model market, with their first releases being the 1/48 scale A5M Claude family. Brett Green reviewed two Wingsy Claude releases in June 2018 with the Wingsy Kits 1/48 # D5-03 A5M2b Early Version reviewed on 7 June 2018.
http://www.hyperscale.com/2018/reviews/kits/wingsyd503reviewbg_1.htm
Brett confirmed the kit was comprised of 74 parts in grey injection moulded plastic; five clear parts; 48 photo-etched metal parts; one printed clear acetate film; with markings for four aircraft.
I have purchased and built both the recent A5M4/A5M2b Wingsy and Fine Molds “Claude” releases, as well as the Classic Airframes (“CA”) A5M4 and A5M4-K many years ago. Both Wingsy and the new release Fine Molds A5M4 (Fine Molds does have an old Claude release FA-1/FA-2/FA-3 series dated 1991 - 1992) are both very nice kits. You will be very pleased building either kits. In no way are my comments meant to diminish the excellent efforts of the Fine Molds or Wingsy A5M2b & A5M4 kits because they are beautiful representatives of the state of the art in well researched injection moulded plastic. I bought and built them both and they are superlative. Wingsy is, as Brett Green mentioned, a surprise kit in his 7 June 2018 in box kit review.
I never expected such a superb level of excellence in a first release from anyone so Wingsy did shock me with its quality. It reminds me of the impact Trimaster had in the 1990’s. They, Wingsy, nailed it with a complete modeling package! It was a pleasure just to look over the Wingsy sprues and kit contents in the box. It was a delight to build too. When I built the Fine Molds A5M Claude kits I found them to also be superb models with slight differences compared to the Wingsy release. After building both I would not hesitate to say I preferred the Wingsy kit as being a bit better. I’ll note a few of the reasons why I would give first place to Wingsy with the Fine Molds kit coming in a close second place. There’s a definite difference in components and moulding so there is clearly no intellectual property poaching going on. They both did their independent homework and are sure to please most modelers making it a challenge to shed some light on the often asked question of “Which kit is better – Wingsy or Fine Molds?”. They both turn out to be beautiful models and are enjoyable builds. After a thorough review of the references and builds of several of these kits, in my opinion Wingsy did get the top score. I did notice Wingsy kits were higher priced than the comparable Fine Molds version but you do get added finesse in every area, such as etched metal parts that are an integral part of the build. I like to use etch but rather than removing a nice 3D plastic part and replacing it with some hard to bend and place fiddly piece of etched metal Wingsy employed it for increased detail.
The build of the Wingsy Kits 1/48 # D5-03 A5M2b Early Version was delightful. I followed the kit instructions leading to a complete cockpit tub and engine ready to be mated to the fuselage halves. The kit building instructions list paint colors using the Gunze Sangyo “Mr. Color” paints and Aqueous “H” colors from Gunze. I prefer using the Gunze “H” Aqueous paints but since they are no longer imported into the United States this can present some problems to U.S. based modelers. The Mr. Color line is available from several on-line retailers and local hobby shops in the USA.
I found the use of my standard plastic glue, Testors Cement # 3502, to be ineffective with the Wingsy kit plastic. This glue is MEK (Methyl Ethyl Ketone) based and would not give me the usual strong bonding. I have occasionally seen on Hyperscale and other modeling websites questions mentioning the unusual inability of solvent glues like Testors to work as expected. The comments indicate using them with said kit provides weak or poor joins in newer release styrene kits. Perhaps there has been a change to the formulation of styrene or plasticizers used in the plastic or even regulatory petrochemical materials changes affecting model kit materials? The comments usually indicate the styrene is more flexible and has a waxy feel or appearance but the standard solvent glues are not working as they used to. I was able to use Tamiya Extra Thin Cement # 87038 as the alternative bonding agent. It worked flawlessly. Some parts, such as etched to plastic bonds were glued using cyanoacrylate gap filling glue as well.
You have a choice of two approaches to the kit instrument panel. A traditional well detailed plastic instrument panel with very well printed (better than Fine Molds) instrument decal results in a beautiful instrument panel. I chose to use the plastic and decal approach in this build saving the very nice etched and clear acetate alternative for an old 1990’s release Fine Molds Claude kit build. The Wingsy etched was easy to work with and definitely added some amazing details to the cockpit area. For example, the engine controls throttle and mixture levers etched metal parts were easy to paint and apply. The kit was designed to use them rather than the sometimes unfortunate experience of removing some kit plastic content only to find the etched doesn’t quite fit or results in a flat looking 2D replacement for a 3D component.
The instrument decal conformed to the kit plastic and with some Micro Sol applied followed by drops of Future gloss on the individual dials. I was satisfied and very pleased with the resulting fine looking instrument panel. The colors on the Wingsy decal are much better than that of the Fine Molds instrument decal. The Wingsy kit had very thin carrier film which was much better than the thick and inflexible Fine Molds decal. My only deviation from the OOB kit approach was to use the Eduard FE857 Seatbelts IJN Fighters STEEL used in lieu of the kit etched metal belts. The kit etched were correct in size and had excellent definition details. I just liked the Eduard belts finer color painting which is much better than I would get with my own hand brush applied painting of these components. The restraint is a two material components using canvas for the main belt with a smaller sized leather strap. The Eduard color etched makes a fine representation of the canvas with leather accessory strap so I went that route instead. Once dry the cockpit was inserted into the kit fuselage halves.
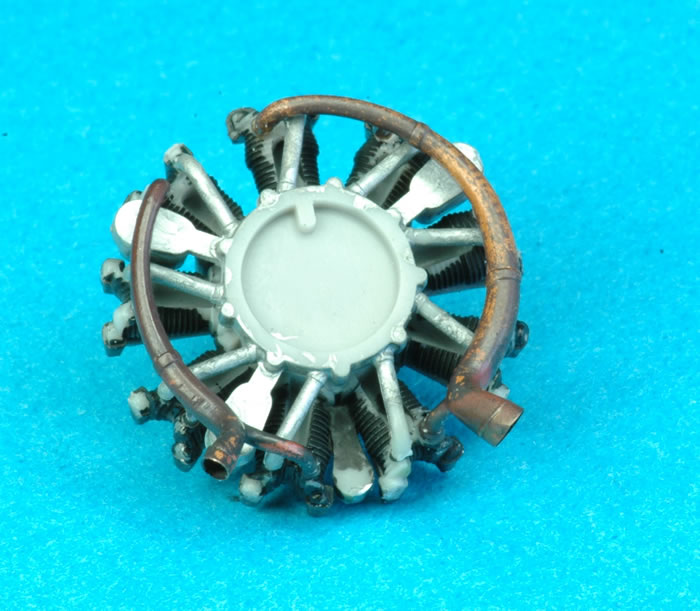
Once the cockpit and fuselage were joined I completed the engine assembly. During this phase I noticed there was an additional inlet opening compared to the Fine Molds A5M engine. I also substituted the Wingsy optional hollow real metal exhaust similar to the Moskit hollow metal exhausts. The Wingsy optional accessory exhaust, D6-01 pipes, are made by Rexx. The Wingsy hollow metal exhaust appear to be the best solution since the actual rusted and burned pipe color of the D6-01 pipes is similar to the stained metal look on the actual exhaust. The metal optional pipes are thinner and the hollow part is much better to scale as well. You can use a Dremel to hollow out the Wingsy plastic exhausts and paint them as you usually do with other kits to remediate this area if you wish.

Thin wall metal exhaust by REXX
Exhaust
 DSC_0019y exhaust.jpg)
 DSC_0024.jpg)
I chose not to incorporate the etched metal part PE9, which is the cowl interior bracing rods on the actual aircraft, in the # 10 assembly step. I saved this part and included it after all painting was compete since I needed to mask the engine area for painting the fuselage/cowl colors and feared damaging the very fine etched metal part. It went into the cowl without any damage and without great effort so I was happy with this decision. This component is missing in the Fine Molds kit and in my opinion one of those really nice and correct fine detail enhancements that come with the OOB Wingsy kit.
 DSC_0052.jpg)
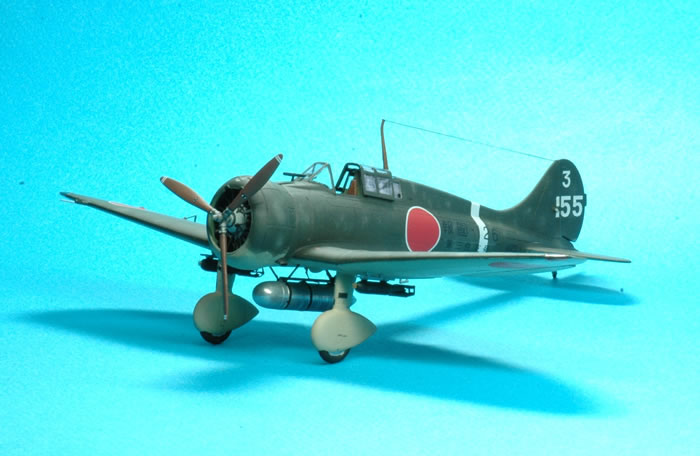
There are a number of small components, some optional or depending on the version you want to have that appear in steps 11, 12, 13, 14, 15, 18 and 19. Again, this is where Wingsy gets some well-deserved bonus points for additional components not found in the Fine Molds kit and superior fine detail of these additional components. Etched metal tie down cleats on the spats and wing undersides – check! Transparent wing tip lights, clear tail light part G8, underwing bombs with etched metal components, pylons and components for the external gun camera and correctly detailed drop tank components are all there. They don’t just look good in an in box review, they are superb once attached. I even noticed the dimple for where the fuel hose goes into the drop tank and where the hose enters the fuselage was provided so I opened the holes and with some black fishing line added the drop tank fuel line to this build. The only material change I made was modifying the part # D22 pitot by cutting off the front portion and substituting some fine metal guitar wire to get the effect I wanted. The kit part was fine but I liked the look of doing this change for personal satisfaction reasons not an inadequacy in the kit component.
This is what the actual wing tip lights look like on the A5M Claude. Note they are two parts with a center metal strip on the actual airframe.

Wing Tip Lights
 DSC_0040.jpg)
 DSC_0049.jpg)
 DSC_0053.jpg)

Drop Tanks
Before starting the construction I read the kit instructions and placed notes on areas I wanted to enhance existing kit details or consider alternative building approaches. One of them was to perhaps not use the PE10 and PE11 etched aileron hinges and trim tab hinges. The plastic components used by Fine Molds worked well, looked OK and did not get damaged since they are “good enough” in scale yet thick enough to withstand my clumsy handling of parts during construction. So, I initially had a bad feeling about using the etched parts for aileron detailing. I was wrong. I glued PE10 and PE11 etched aileron hinges on using cyano-gel glue and they are there today. I like how they look and in my opinion are more to scale than the plastic components from the Fine Molds kit.
When building a Claude you should find some reference photos for your chosen airframe since the artists painting or instruction profiles sometimes are in error on some of the finer details such as is there an antenna mast used or did this airframe keep the carrier landing tail hook? Overall, I know Wingsy used the high definition photographs taken by a Soviet photographer of a captured Claude taken during the 1930’s conflict between Japan and the former Soviet Union. Some superb black & white photos were taken and preserved by Soviet military intelligence photographers. Those photos are available from Russian archives but not readily available on the web. To me they are the ultimate modeler’s source. The ones I saw for the Bf-109B for example were stunning. I saw some of the A5M photos and they confirmed Wingsy was right in their CAD drawings and were able to incorporate some small details that are not on blueprints or recent drawings for the A5M Claude family. One of my big take-a-ways from looking at these photos was having a clear picture showing the wingtip formation lights. They are not one piece components but are two separate halves, a top half and a bottom half linked by a metal strip in the center. Again, one of those small things incorporated by Wingsy into their kit but glossed over by others. Another was did the Claude have Swiss cheese holes in the pilot’s seat as does the A6M Zero? No, it does not. There are no holes in the A5M Claude pilot’s seat. The pilot’s seat photos taken from several angles is clear about this and corroborated by drawings in the references I used.


I have about ten built Claude’s in 1/48th scale all in natural aluminum or foil aluminum finish. I finally have a non-metallic Claude in my collection with this build! I used Gunze H336 Hemp for the underside and Tamiya XF-61 Dark Green for the topside colors. Testors chrome silver was used for the shiny metal parts. The antenna mast, part A9 is wood on the actual aircraft. It was painted Tamiya buff, followed by burnt umber oil paint applied with a stiff bristle brush for streaking the burnt umber and finished with Gunze transparent yellow to simulate a wood effect. A bit of Tamiya panel wash was added to the final finishing steps. The clear coat was Future floor wax followed by a final Testors # 1160 Dullcote Lacquer coat.
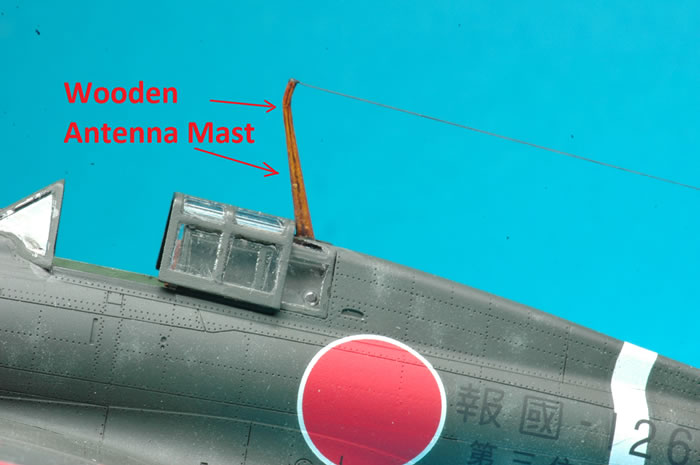
Wood Antenna Mast
I prefer to use Eduard canopy masks but at the time of this build there were none for this kit. I used my usual canopy masking material which is Scotch transparent tape. After masking and painting the canopy parts the tape adhesive separated from the transparent tape backing resulting in a very difficult to remove mess. I have had an occasional problem with some transparent tape adhesive sticking which required some effort to remove but never experienced having the entire adhesive stick like cyano glue to the kit transparency coming off of the backing tape when I removed the masks. I washed it with several detergents, scrubbed it with a toothbrush, and even used a toothpick to try to remove the adhesive with little success. I spoke to the household cleaning supervisor (my spouse) and she recommended using Goof Off Remover. It did not work and ruined the transparent parts. That ruined the transparencies because it melted the plastic. They were no longer transparent so I tried to sand them with tri-stick sanding stick and dip them into Future. It failed and Vitaliy Barannik from Wingsy Kits helped me obtain replacement transparency parts. Thank you Vitaliy! So be forewarned DO NOT USE transparent scotch tape for masking on your Wingsy transparent parts.
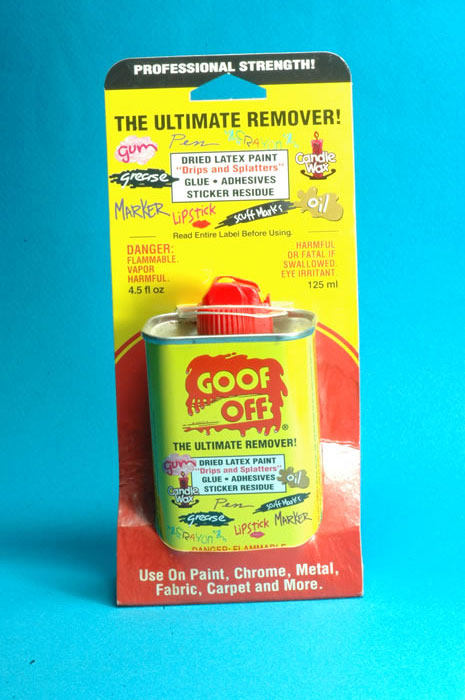
Goof Off Remover
I was not an A5M Claude fan at all before starting my Claude project. I did buy some 1/48 scale Claude kits over the years but was not sure I liked the aircraft. Since I did not want to miss out on the precursor to the A6M Zero, I added them to the stash. I saw the A5M series as an archaic and inconsequential airframe out of ignorance. After seeing the Lifelike decals reviewed in Hyperscale releases 48-053, 48-054 and 48-055, I took a closer look at the Claude. I acquired a few Wingsy and Fine Molds new release A5M Claude’s, bought a few more references and some web browsing later started this project. This really has been some unexpected modeling fun! It is a very interesting airframe with a lot of technological innovation for its time period and lots of colors & markings to delight any modeler.
Although I plan on using the Lifelike decals on my next builds of the A5M Claude I used the kit decals in this build just to see how they perform. They look painted on and show all the underlying rivet detail. They were outstanding and after comparing them to the nice Fine Molds recent release decals I found the increased detailing Wingsy provided, such as many more decals including a more comprehensive stencil package for example puts Wingsy in the number one position when it comes to the overall and segment specific ranking of 1/48th scale A5M Claude’s. The Wingsy kit provides marking options for four airframes compared to two similar markings in the Fine Molds release. I used option # 1 on the decal sheet, a fighter from the 12 Kokutai, based in China during 1938.
Kit Comparison Specifics and Summary |
Wingsy Strengths
1. Wingsy etched metal that comes with the kit actually does give added detail especially in the cockpit area. It enhances rather than requires removal of the 3D plastic parts as aftermarket etched usually requires. Components like the Wingsy throttle console with etched levers is exquisite due to its etched parts. The Wingsy interior engine section cowl bracing for example is a fine etched detailing component that is omitted or non-existent from the Fine Molds kit. No etched metal at all comes with the Fine Molds Claude kits. Wingsy etched is unpainted so its appearance or your end use depends on your skill painting etched metal parts. My actual build tested whether plastic moulded movable surface actuators, Fine Molds parts A2, are better to place and retain on the Fine Molds kit vs Wingsy etched parts PE10/PE11. Wingsy turned out to be much better in fine detailing using etched parts PE10/PE11 which are small, very thin, finely etched parts representing the aileron actuators. It was not a big challenge to properly position them. I did not lose them with an accidental contact after they were attached with cyano gel glue. I did not have any attachment problems with the Fine Molds plastic parts which do look good once attached and painted because they fit into small grooves that enhanced their retention. Separating the Fine Molds aileron control rods part from the sprue though is a challenge and you also have to file the attachment stub which is on the thin rod portion.
2. Wingsy has two types of landing gear speed pants “spats”, one with a partially exposed wheel (parts D7+D5 and D17+D19) that appears in some period photos of the Claude. This is very good since some markings require the partially exposed wheel version. There is a slight size difference between the Wingsy and Fine Molds spats. Any difference in length or depth on the spat causes a visible difference in the spat appearance making it look clumsy or streamlined to most viewers when viewed side by side. I think Wingsy nailed the spats look based on my photo comparisons.
3. Wingsy has outstanding box packaging. For those who stack kits in their stash this one will not get crushed! This is a big plus for those with many kits. Fine Molds uses a standard Hasegawa like packaging, which is a good box but not meant to be stacked very high or it will show “shelf wear” AKA crushing.
4. Wingsy gives a choice of two cockpit instrument panel media – either all plastic with a decal or a layered transparent film with an etched panel surface like the old Eduard etched instrument panels. The plastic has an excellent, well detailed and clearly printed instrument decal that looks like an Eduard color etched panel when the dials are treated with a decal solvent like Micro-Sol and topped off with individual drops of clear gloss. If you use a Yahu A5M instrument panel you might just use the left-over instrument panel component in a Classic Airframes A5M Claude kit. If you did not know this, that there is a superb Yahu color instrument panel available for the A5M and if you really want to go deluxe in your build take a look at the Yahu product. In my opinion the Wingsy kit components should satisfy most modelers because they do look superb when properly applied.
5. Wingsy has clear parts for wing tip lights. Mine did not have the sink marks reported by some reviewers. They look very good when properly painted. It is a big improvement in appearance over the Fine Molds wing tip lights which are just outlines on the wing tip plastic.
6. The boarding step is provided by Wingsy in part F7 but there is no boarding step with the Fine Molds kit. It is noted by Fine Molds as a you can “make from wire” step on the Fine Molds kit suggestion. Small point - the actual aircraft boarding step is not a big deal since you can just omit it from either kit since they both have it outlined in the kit plastic but Wingsy has it well moulded and thus is better.
7. Although Wingsy has very well done petit “rivets” for added subtle detailing (Yes, as Brett said “think Eduard” refined rivets) Fine Molds has a very interesting fine surface texture that might provide the multi-panel metal reflection on NMF airframes with a very thin paint surface. That was my biggest surprise when I looked at the Fine Molds kit up close in the box. However, after building several Fine Molds A5M Claude’s the surface finish does not translate into a different panel surface under a coat of paint – even thin metallic paints like Alclad or under aluminum foil. Fine Molds is a simpler kit, with a lot less parts but not at all lacking. Fine Molds does have parts B20/B21 which look like they could be small doors that drop down for ease of pilot cockpit entry and egress for the enclosed cockpit version of the A5M2b but I think they are just for the sliding canopy option. Wingsy did not have these doors or the panel outline for them – probably because they were not necessary because Wingsy dedicated the mould for just this version with a three part open canopy approach.
8. Wingsy provides movable moving surface parts (ailerons) for the wings, parts B1/B2 but no flaps. Fine Molds has a choice of flaps up or down but no movable ailerons.
9. Wingsy has an excellent cockpit with etched parts for levers. Fine Molds has a two part sidewall construction, parts B15/B16, permitting easier painting and deeper 3D effect. The A5M has a very tight cockpit so much of the detail is hard to see after construction is completed. That’s a shame since both kits have fine cockpit details. What you can see is excellent but it is definitely better on the Wingsy kit. Kudos to Wingsy for such a fine, highly detailed and easy to assemble cockpit.
10. Wingsy has a choice of four markings options versus only two for Fine Molds kit FB20 release. I feel Wingsy is a clear winner with better detail and thinner decals giving a painted on look when dry. The Fine Molds decal would easily move or be positioned when applied because it is thicker with a thick transparent carrier film. The Wingsy decal is thin and may stick upon contact so it required some solution like saliva to allow it to move and be positioned when applied or with care to ensure it goes exactly where you want it to be on the initial decal placement. Choices in markings are slightly in favor of Wingsy with more choices of markings in the kit (four versus two). The Wingsy instrument panel decal is much better than Fine Molds rendition. It has better definition of the instrument detail with some color and with setting solution the Wingsy decal melts onto the kit plastic instrument panel for a very accurate look with no clear carrier problems. The Fine Molds decal has a thick carrier film requiring a setting solution such as a Micro Sol solution application, multiple applications of Micro Sol in my builds to get it to conform to the plastic detail. Even then I had to cut away some of the Fine Molds carrier film to improve the final appearance.
11. Wingsy has a nice, but unpainted etched seat belt. Fine Molds sells an optional (i.e. separate not provided with the kit component) plastic seat belt. I prefer to use the pre-painted Eduard IJN Navy seat belt steel version release since my hand painting is not as good as Eduard’s paint process.
12. Wingsy has more ordnance (i.e. bombs and exterior gun camera) than Fine Molds. Wingsy provides the underwing gun camera and pylon as an option. Fine Molds does not have this optional detail (it did in the 1991 – 1992 A5M1 – A5M2 releases as white metal parts). See Koku-Fan FAOW # 27, 1991-3 A5M Claude page 60 for a photo of IJN airframe maintenance workers looking at the underwing gun camera device. The Wingsy bombs are amazingly detailed with etched metal components including the brass front and rear bomb fuses – in etched brass so you won’t have to paint them!
 DSC_0019.jpg)
13. Wingsy has correctly provided two open spent shell casing ejection chutes under the fuselage. Fine Molds had this correctly done on their 1991 A5M Claude releases but for some reason just have this area closed and just marked off with an etched panel line rather than the more accurate opening in their recent releases. You can paint the area to make it look like a black opening but again this is a bit hard to perfectly paint whereas the better Wingsy solution makes it part of the plastic.
 Cockpit DSC_0045.jpg)
14. Wingsy has a more delicate and in scale pitot but I am not sure the shape is 100% accurate but close enough – just my opinion! The Fine Molds component rod and tip (part A23) is a bit too thick but it does have the small box shaped component that attaches to the wing edge whereas Wingsy has an almost rod shaped rear portion. I replaced the Wingsy and Fine Molds pitot front tip with fine guitar wire to get an improved look and a more durable part that withstands “accidents” much better than the kit plastic part. You could also use very small metal tubing such as the Albion Alloys product for the replacement tip.
15. Does the A5M4 have an antenna wire? I think so based on the photos and drawings in my references (see page 42, diagram # 9 in Maru-Mechanic). Fine Molds fail to call this out or show it in the painting diagram, which is the need to run an antenna wire such as E-Z Line (Elastic Polymer Rigging Material) or your favorite fishing line or wire to represent the antenna wire. However, the radio was sometimes deleted to save weight or because they worked very poorly. One of the A5M2a decal choices in both Wingsy and Fine Molds is an airframe with the antenna mast deleted. The Maru-Mechanic reference drawing is very helpful in understanding how the antenna mast itself is an active part of the aerial with the wire running inside the fuselage from the bottom of the antenna mast. The mast itself is made from wood with the wire running inside into the fuselage. There is a small glass resistor just before the vertical fin where the antenna mast is secured. The wire goes directly into the mast unlike Allied aircraft antennas where the mast is not an active component but just an extension piece holding the antenna wire away from the airframe.
16. The OEG telescopic gunsights are equal on both kits. They both have the second support bar inside the cockpit molded as part of the cockpit coaming. It is interesting to note the early Ka-14/A5M airframes telescopic OEG sights did not pass through the front windscreen glass but terminated outside. Wingsy does have the analog gunsight deflection calculator which is a tube with a crank on the right side top area of the instrument panel (parts D8 with etched PE6 crank handle in assembly step 1 ) – now that’s what I call detailing – and it’s OOB!
17. Wingsy has better detailing for the tie down turnbuckle or cleats on the landing gear spats and under the wing surfaces parts PE7 and PE23. Etched Parts PE7 (see step 18) are attached to the spat. Fine Molds has this as part of the spat plastic molding on parts A14 and A18 but it is not as well detailed as Wingsy’s etched metal approach.
18. The engines are both finely detailed but I noticed Wingsy included the oil cooler inlet duct which may be missing from the Fine Molds plastic.

References:
-
Air Enthusiast Vol 19 A5M Claude pages 26 to 43.
-
Japanese Fighters 1921 - 1945 No. 3 (1991)
-
Koku-Fan Famous Aircraft of the World #27 1991-3 A5M Claude
-
Maru-Mechanic # 28 5-1981 A5M Claude
-
Maru-Mechanic # 49 11-1984 A5M Claude
-
Mushroom Model Magazine Special No. 6107 Mitsubishi A5M Claude (2003)
-
Model Art # 272 Camouflage & Markings Imperial Japanese Fighters in WWII
-
Shinkigensha SKG31142 How to make the A5M & Ka-14 (2013)
Text and Images Copyright ©
2018 by Andrew Garcia
Page Created 18 December, 2018
Last Updated
18 December, 2018
Back to
HyperScale Main Page

|
 Home
| What's New |
Features |
Gallery |
Reviews |
Reference |
Forum |
Search
Home
| What's New |
Features |
Gallery |
Reviews |
Reference |
Forum |
Search