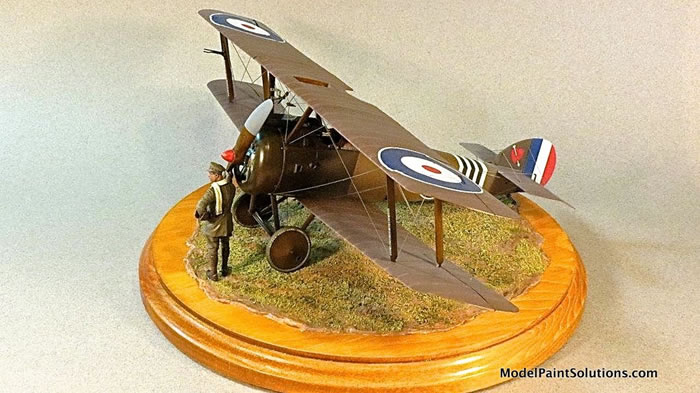
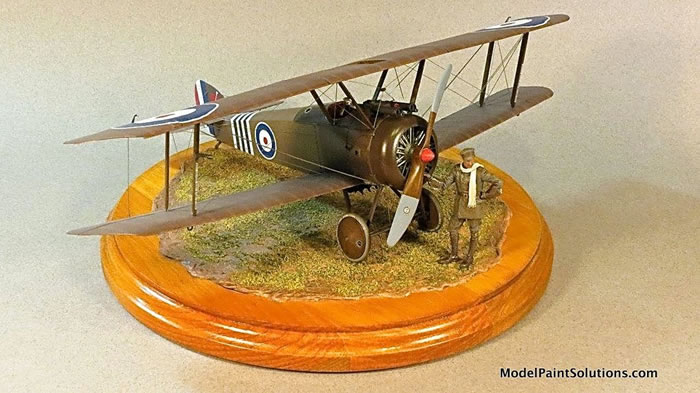
Wingnut Wings' 1/32 scale
Sopwith Camel (Clerget)
by Tim Nelson


Hobby Boss' 1/72 P-61A Black Widow is available online from Squadron.com
I’m a committed 1/72 builder (or should be committed) when it comes to aircraft modeling. My main interests are civil aviation between the wars, and experimental / research aircraft of all eras. I do occasionally dabble, however, in World War I subjects.
I’ve been following the efforts of Wingnut Wings since their debut about 10 years back, and have marveled at kits shown to me by others. The upcoming November 2018 centenary of the end of the Great War got me thinking about treating myself to at least one Wingnut Wings kit experience, accepting on a temporary basis that I would have to tread into my previous No Man’s Land of 1/32 scale. The fact that one of our local Seattle clubs, NorthWest Scale Modelers, would stage a World War I display in The Museum of Flight lobby added to the motivation.
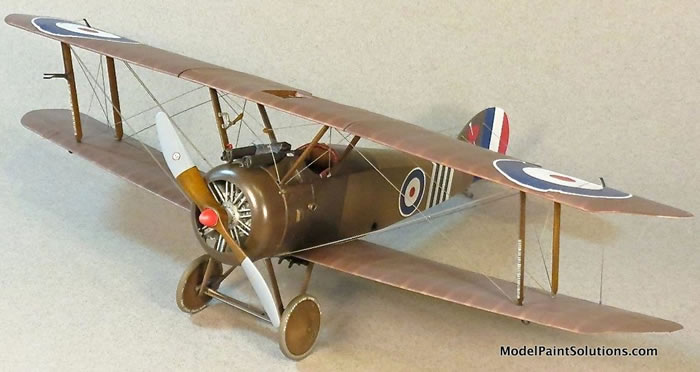
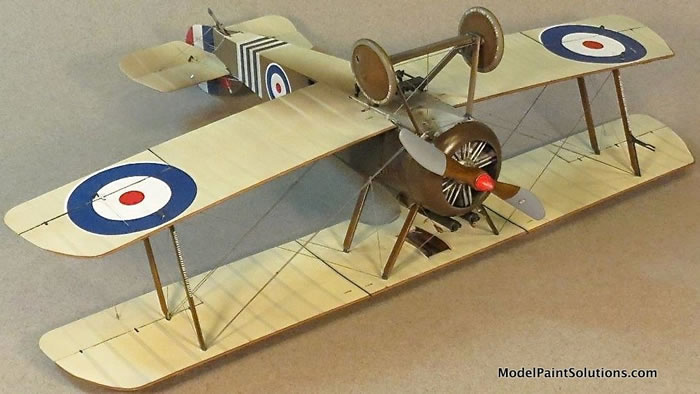
The next question to ponder was what subject? Thinking back on my 2016 trip to the UK, and inspiration found at Hendon and the Shuttleworth Collection, I began to focus on British types. What better choice than the iconic Sopwith Camel, the most famous and successful of all Allied fighters? That choice made, the next choice was which Camel? Wingnut offers several Camel/engine combinations and I elected to build the single most accomplished Camel of all, William Barker’s B6313, one of the configurations offered in kit #32074.
History
The Sopwith Camel owns a rightful place in the pantheon of great aircraft. Along with the SE.5 and French SPAD S.VII & S.XIII, it gained air superiority for the Allies over the Western Front in mid-1917. Designed for two synchronized Vickers machine guns, it addressed the biggest shortcoming of its predecessors, the single-gunned 1 ½ Strutter, Pup and Triplane. It flew with multiple engine types in a variety of roles, including a naval version, which pioneered aircraft carrier operations. Its concentration of mass around the pilot, combined with strong rotary engine gyroscopic effects, made it a tricky aircraft to fly, but in the hands of a skilled pilot it was most formidable. The Camel accounted for more aerial victories than any other Allied type.
Hailing from Manitoba, William George Barker is the most decorated soldier in Canadian history. His military career began in late 1914 as an enlisted man. Sent to France in late 1915, he soon became a Royal Flying Corps BE.2 gunner/observer and officer. In late 1916, he began pilot training and proved to be an aggressive airman and excellent marksman. After a stint as an observer pilot, he was assigned to 28 Squadron in September 1917, where his year-long Sopwith Camel odyssey began. Flying mostly in Italy, with 28, 66, and 139 Squadrons successively, Barker took B6313 with him, a highly unusual thing. Following reassignment as a training commander in England in September 1918, he worked his way to France for a further taste of combat. He was awarded the Victoria Cross for his epic engagement with 15+ Fokker D.VIIs over the Western Front on October 27, 1918, while flying a Sopwith Snipe and receiving grave injuries, which almost proved fatal, he downed four enemy aircraft. He ended the war with 50 official victories, including aircraft and balloons. Barker never fully recovered from his injuries, but he pursued an aviation business and military career in postwar Canada. He was tragically killed at the age of 35 while demonstrating a Fairchild KR-21 in 1930.
Barker’s Camel B6313 is the most successful aircraft in Royal Flying Corps / Royal Air Force history, with 46 aerial victories credited to it at Barker’s hand. It is likely the most successful single combat aircraft of all time in any service, and certainly not likely to be surpassed. This storied Camel was unfortunately not preserved and was unceremoniously broken up when retired.
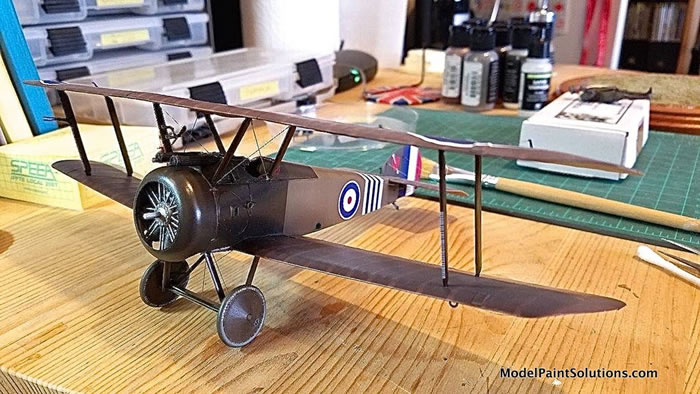
My build targets B6313 when Barker was assigned to 139 Squadron. The aircraft is often shown in profile art with a black nose and decking, but this is likely a trick of light and photography. Contemporary accounts describe a PC10 gloss applied in these areas, similar in color to the basic PC10 fuselage but darker to the eye due to gloss and reflectivity; thus recommends Wingnut and I followed suit. Barker’s Camel received new wings in March 1918 following a deadstick landing accident, and was completely repainted in July 1918 when transferred to 139 Squadron. Wingnut suggests either PC10 (a greenish brown) or PC12 (a reddish brown) for the wings and I opted for PC12 to expand the color palette of the model a bit. Given that these colors varied significantly in the field, and with rapid fading and wear, I don’t think it’s a stretch.
The Kit
Numerous detailed in-box reviews can be found on the web so I won’t repeat those observations here, but confirm that the Wingnut Camel is a gorgeous kit, lovingly presented, and accompanied by a thoroughly researched instruction manual that is a work of art all by itself. The Ray Rimell guidebook to the kit (see References) is a highly useful companion.
I was initially put off by the large number of ejector pin marks but after embarking on the build, I realized they are all strategically located to not be visible in the finished model. I thus did not bother to fill any of them. This is another example of thoughtful Wingnut attention to detail.
Wingnut kits go together well, but definitely require time and attention to do them justice. The instructions are very thorough, but not necessarily in optimum sequence when painting is considered. Carefully review the instructions and consider which areas need to be painted in advance and which can be deferred. I painted almost everything in advance of final assembly.
You must choose from the start which configuration you’re going to build because it will affect numerous decisions along the way. In the case of Barker’s Camel, there were several unique features:
-
Decking around the guns was cut away significantly, especially on the port (left) side
-
The Aldis tube sight was removed
-
A “red devil” talisman was mounted on the starboard Vickers gun, thoughtfully provided in photo-etched brass
-
The aileron cable inspection windows on each wing appear to have been painted over
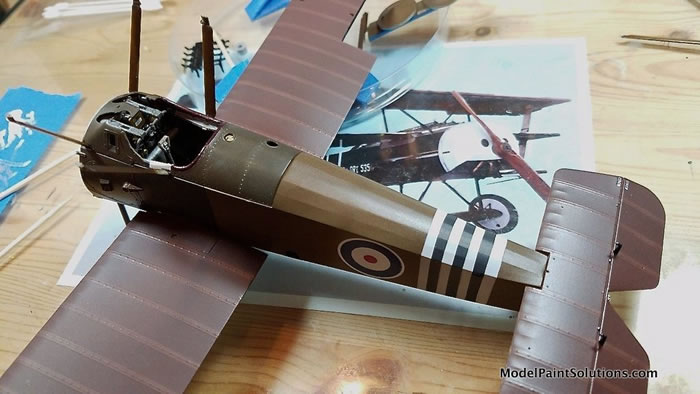
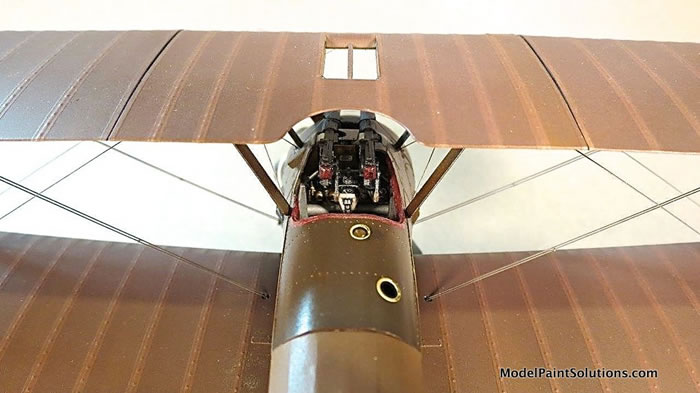
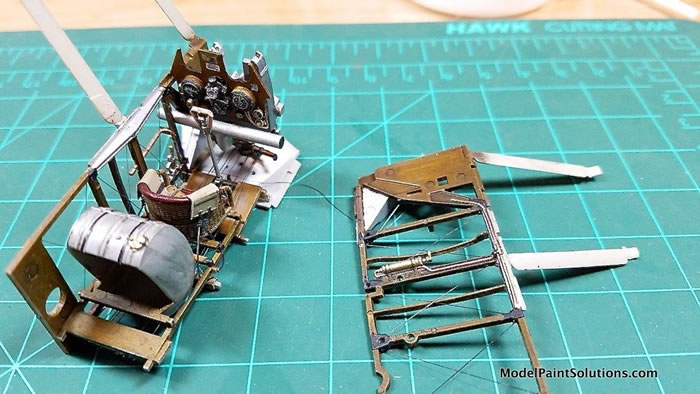
The cockpit assembly is its own miniature kit, accounting for the lion’s share of the kit part count.
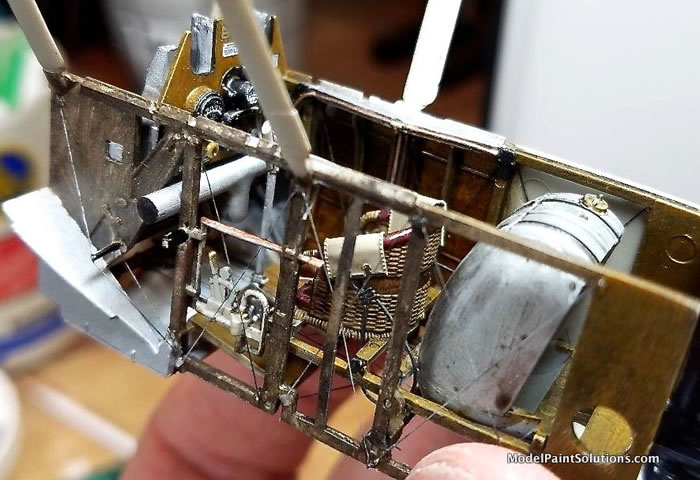
It’s a gorgeous piece of work, but much of it will be obscured in the completed model; however, you’ll know it’s there. Internal rigging was done with Uschi “Rig That Thing” Standard line.
Painting, Markings, Rigging & Finishing Touches |
I always look forward to getting past basic cleanup (of which there is very little here) and assembly, and moving on to painting. I have recently transitioned from many years of solvent-based painting to acrylics, and have adopted the delightful Mission Models Paint (MMP) line as my paint of choice.
My Camel strategy was to follow Wingnut recommendations but there were still decisions to be made: 1) interpreting Wingnut Tamiya/Humbrol callouts into an equivalent Mission color or blend and 2) choosing colors where the prototype coloring itself is not definitive. For the former, Wingnut’s inclusion of equivalent FS number is a handy reference – and given that these colors have been debated for years and varied in realization, some “Kentucky windage” is appropriate.

For the latter, the MMP choices and blends I used were as follows:
-
Primer: Tan (MMS-006)
-
Wicker (for pilot seat): 33% each Brown (MMP-002), Yellow (MMP-007), and White (MMP-001)
-
Padding (pilot seat and coaming): 67% Rotbraun (MMP-012), 33% Red (MMP-003)
-
Clear Doped Linen (CDL): German WWII Elfenbein (MMP-082)
-
PC10 Light (fuselage): 75% U.S. Army Olive Drab (MMP-026), 25% Rotbraun (MMP-012)
-
PC10 Gloss (cowl & decking): 67% U.S. Army Olive Drab (MMP-026), 33% Brown (MMP-002), plus a dot of Blue (MMP-048) and Red (MMP-003) (i.e., purple) for a bit of further darkening
-
PC12: Rotbraun (MMP-012)
-
Battleship Grey: Medium Gray (MMP-072) plus a skosh of Blue (MMP-048)
-
All bare woods: Yellow (MMP-007) or Orange (MMP-005) undercoat followed by hand-brushed raw umber oil paint
-
Engine metallics: exhaust manifold Silver (MMM-006), cylinders Duralumin (MMM-005), pushrods Alclad II White Aluminum. A wash of 40% Future, 40% water, 10% Brown (MMP-002), 10% Black (MMP-047) was applied to the cooling fins of the cylinders (this was noted in the Rimell Camel book, and works very well for this kind of use.)
A gloss coat of Pledge Floor Gloss (PFG, famously known as “Future”) followed in preparation for decal application. All of the above was airbrushed with a Harder & Steenbeck Infinity airbrush with 0.4 mm tip (with the exception of mottling discussed below, applied with 0.2 mm tip).
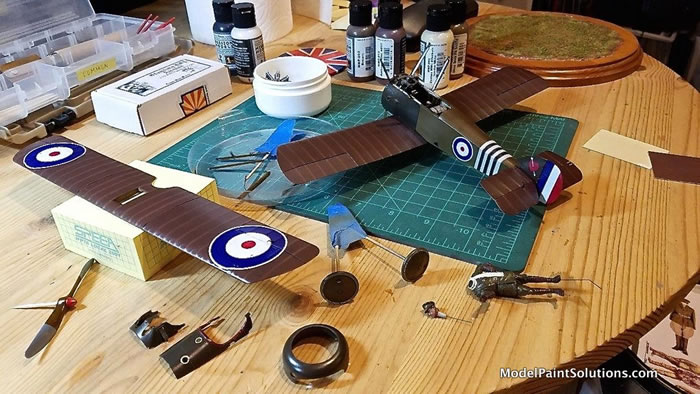
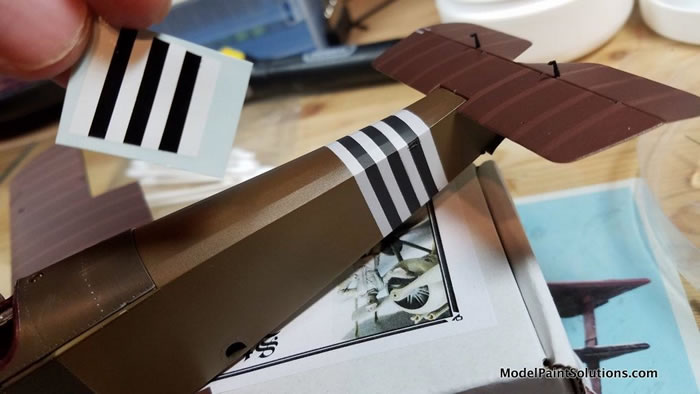
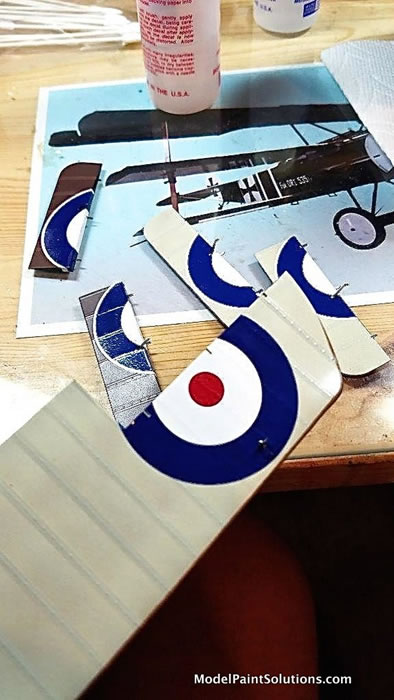
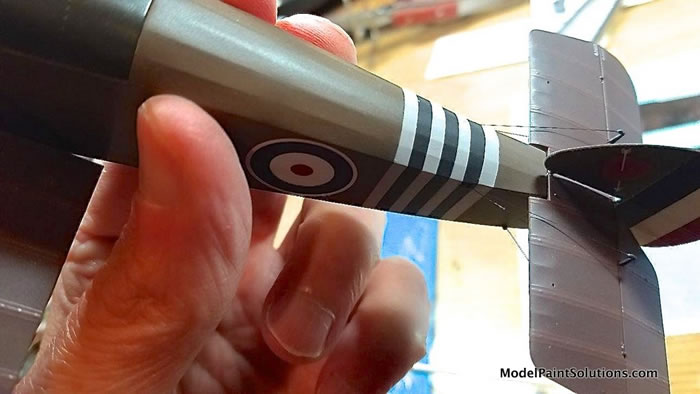
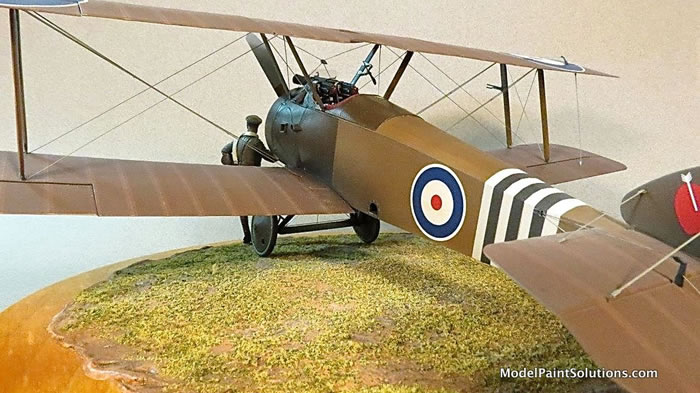
The Cartograf printed decals in general are superb. They incorporate exceptionally accurate cutouts where appropriate to fit irregular kit features. I elected not to use the fuselage stripe decals; I didn’t see how they would ever conform to the elevator control line orifices, so I painted the stripes. I did have trouble getting the large wing roundels to lay down without bubbles. It required several iterations of hobby knife incisions & Micro Sol applications before the roundels sued for peace.
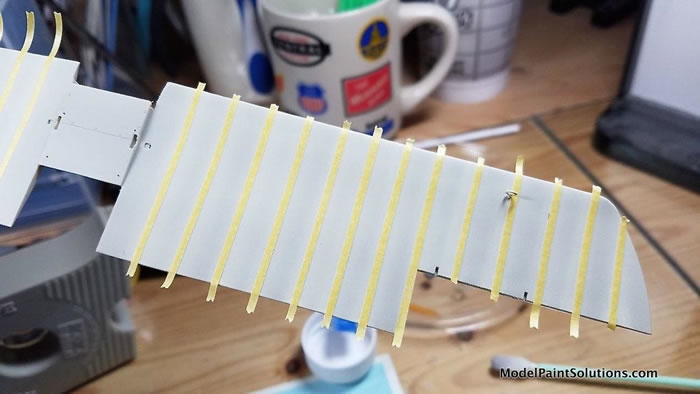
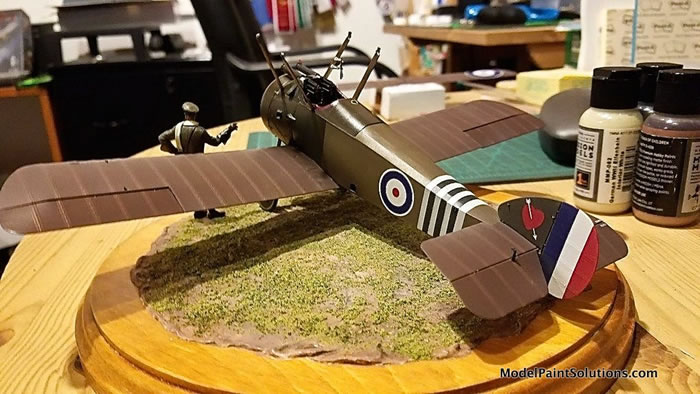
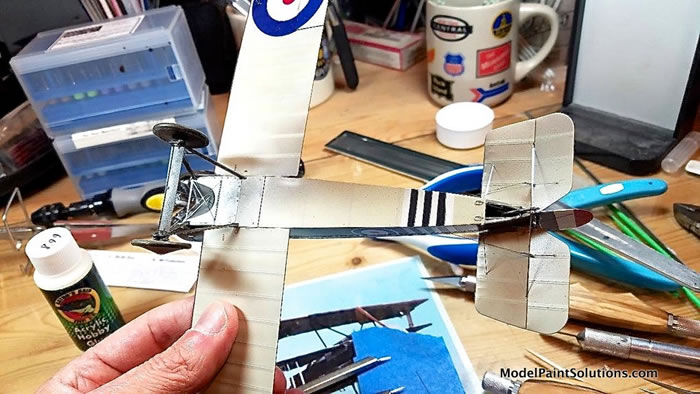
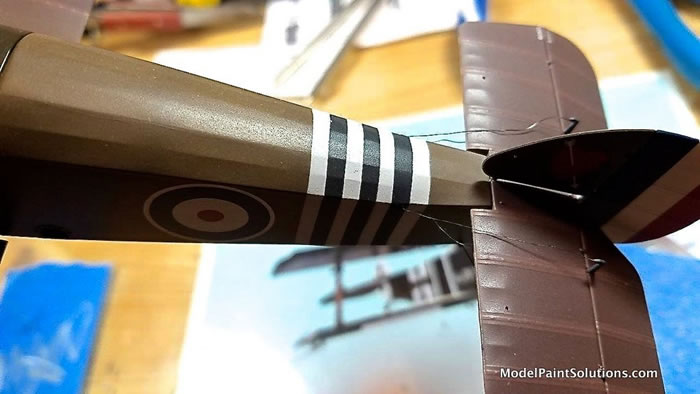
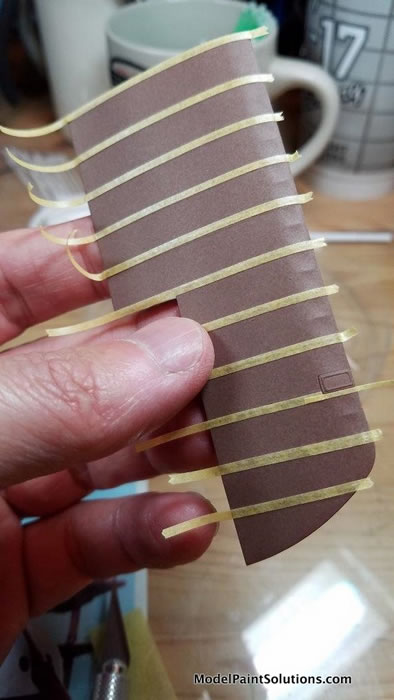
This model was an opportunity to apply more weathering than my usual civil subjects. However, photos of the prototype in July 1918 show a clean and well-maintained bird. Nevertheless, I dirtied it up where Camels tended to get messy; wing undersides, overall dusting, and general engine exhaust with castor oil staining. I did a bit of subtle preshading on the fuselage, although WWI subjects rarely exhibit much of this look. A little brown mottling on the wing undersides brought out an understated distressed look in the CDL which would follow. Rib tapes were enhanced by masking after the initial paint passes, then completing the painting. Thin Transparent Dust 1 (MMW-006) blended things together. A thin mix of heavier brown/black was airbrushed in the wake of the Clerget exhaust, which tended to fling soot and castor oil along the underside, with a bias toward the port side due to engine rotation. A coat of Vallejo Satin was applied for appropriate sheen, carefully avoiding the glossy cowl & decking).
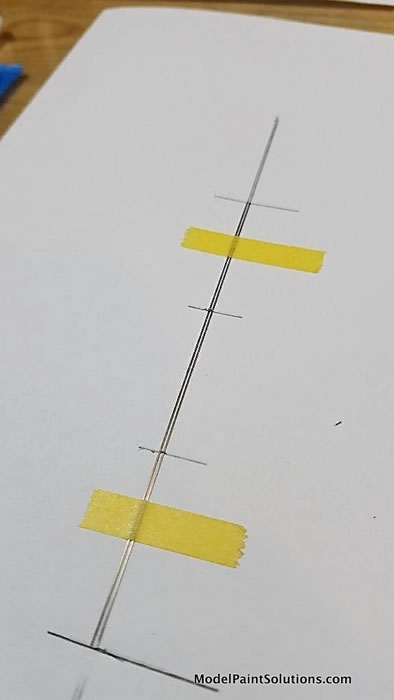
Now we come to that dreaded moment in almost every WWI build, when you must finally go “over the top” and face rigging the model. Rigging is certainly easier in general in 1/32 scale than 1/72, simply due to greater size and working “elbow room”. There are many ways to rig, depending on the characteristics of the prototype, and how much intrinsic strength the model possesses. The key in any rigging effort is to carefully study the prototype, identify and prepare anchor holes, and work PATIENTLY from the inside-out. Wingnut thoughtfully molded in many anchor recesses on the Camel, so I only added some depth and clearance (and remove paint buildup in places) to a few points to increase my margin for error.
For control lines, which connect cockpit controls to control surfaces, you generally have many choices. On a model, this rigging is “cosmetic”, so you may use fine steel wire, the ceramic “Wonder Wire” product (which I have not used), or anything else that will hold a straight line without putting stress on delicate control horns. For the Camel, I opted to use the “Rig That Thing” standard size line sold by Uschi van der Rosten. It is very fine, and has an amazing property of contracting dramatically under heat; you can attach the line with CA glue at each end with liberal slack, and let the heat pull the line straight (I use a Bic lighter(!) well below the model, or a hair dryer). It is naturally black but can be tinted with a silver Sharpie. It has little strength, so it won’t pull off control horns when you heat it – but this same characteristic makes it unsuitable for models, which require the structural strength that rigging provides.
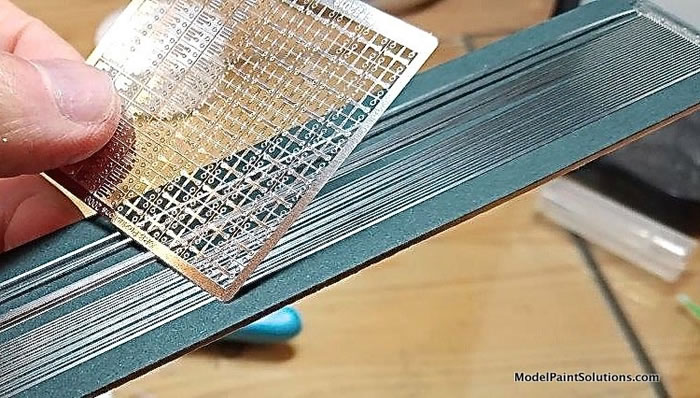
The assembled Wingnut Camel has plenty of natural structural rigidity when the top wing is attached, so that allows consideration of rigging that best “looks the part.” In their instructions, Wingnut recommends EZ Line but I opted to take Ray Rimell’s advice and acquired the 2 appropriate types of RB Productions streamlined RAF wire in photo-etched steel; 2BA (for secondary bracing) and ¼”BSF (for main wing bracing). I also obtained their terminals intended for use with these wires. The wire is flat, which in 1/32 scale gives a convincing airfoil look that would be otherwise missing. It is a little challenging to use; the wire must be cut to length (use dividers, and err on the side of long), then iteratively refined as needed to fit.
For the double flying wires, it’s best to pre-fabricate the dual wires before installation; you can use small segments as the lateral spacers. Each end is then secured with thin CA; I use the slick Looper (2.0) tool and Bob Smith glue to do this task. The RB terminals are meant to be folded in extreme origami fashion into a three-dimensional block, but here again I agree with Mr. Rimell that the look is overscale; I detached one side of the terminal to apply flush to the exterior of the wire at the ends. This looks appropriate to my eye (and is an aspect of WWI aircraft that can be gleefully ignored in my usual 1/72 scale).
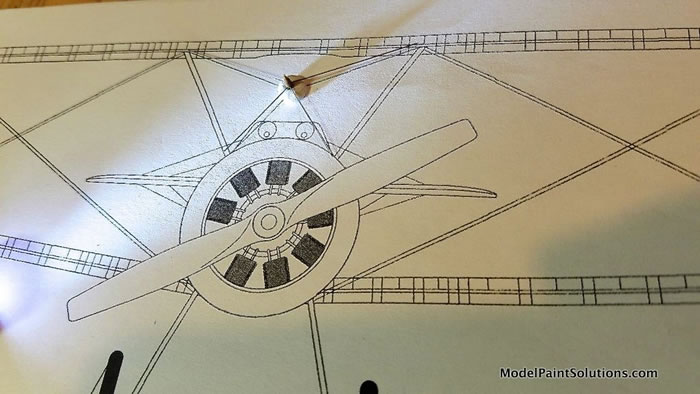
The ”acorn” assembly between the cabane struts was fabricated using the “Rimell Method”, by attaching the 4 flat wire lengths on top of a 1/32 scale drawing, then installing the completed assembly after the windscreen was installed.
Since the RB wire is metal, it contracts and expands at a different rate than the plastic model. When the model is cold, I’ve noted a bit of bowing in the wire, which disappears at room temperature. This behavior could be minimized by securing only one end of the wire and letting the other end float, but I’d be a bit paranoid about the wire staying in place.
After rigging, a bit of carefully targeted satin clear was airbrushed to knock down any eye-catching stray CA gloss, and tone down the metallic sheen of the RAF wire.
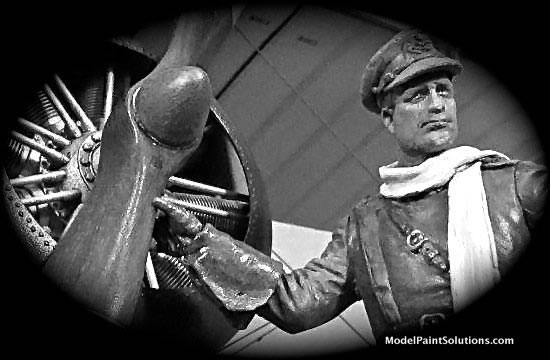
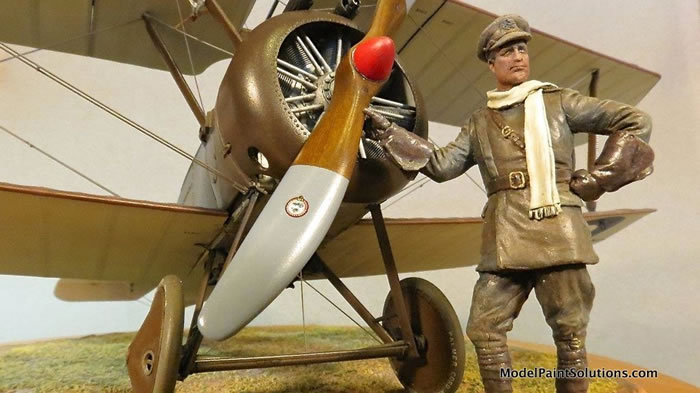
The Figure
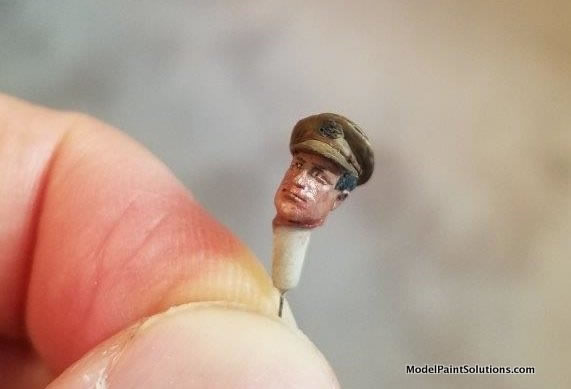
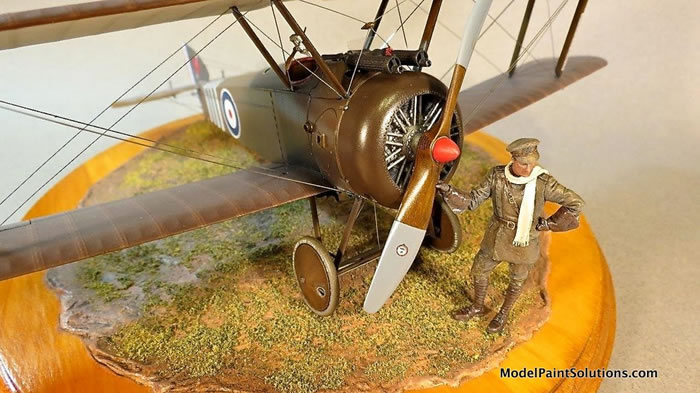
Figures do much to bring a model to life. “William Barker” in the completed model presentation is actually a generic “RFC Standing Airman” figure from Copper State Models.
The figure is terrific in execution, with fine details throughout, and essentially zero casting flaws. My experience with figures is limited to 1/72, where you can get by with base color, wash, maybe a dry brush – and call it good. 1/32 requires more subtlety and detail so I went to work with a set of AK flesh tones and Mission Models greens for the rest.
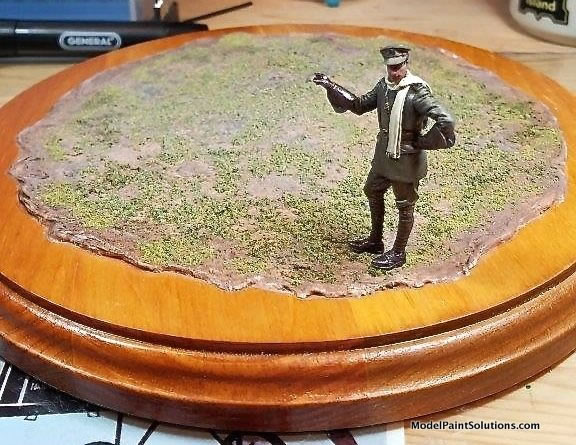
Basic approach is straight out of Shep Paine. It’s my first larger scale figure and a bit crude, but I was satisfied with the result. There are many book and online tutorials for figure painting, but there’s no substitute for grabbing one and trying things out. Just do it. Barker and Camel were mounted to a simple wooden base with pins.
The groundwork was made with lightweight spackle, Mission browns, and Woodland Scenics grasses. The modeling guns then fell silent.
I can now say from personal experience that the accolades for Wingnut Wings are well deserved. This kit was brilliantly designed and a joy to build (except for perhaps the RAF wire installation process). I recommend it without hesitation to anyone with a bit of experience and patience – you will be richly rewarded.
That said, I do have a few minor quibbles:
- Fit tolerances are so fine (an excellent quality in general) that any perturbation of part geometry easily leads to fit issues. Generally, you want to remove paint from mating surfaces anyway, but I encountered challenges getting the fuselage to close around the finished cockpit assembly, and in fitting the upper fuselage decking. It was a bit of work to get these assemblies to bend to my will.
- The instructions for cutting away gun decking to reflect Barker’s Camel were a bit vague on the port side. The needed modifications could be pieced together from photos, but this particular aspect was less certain than the usual Wingnut instructions, and required a little scratchwork of the rexine padding in that area. I like to use plain old Elmer’s white glue for leatherish coaming effects; after painting, it has subtle surface texture, which achieves the desired look.
- Multiple clear windscreen parts are provided to reflect the different Camel configurations. Unfortunately, the appropriate version for Barker contained a hole for the Aldis sight, which Barker had removed. This left me needing to scratchbuild a suitable replacement windscreen from clear “viewfoil” stock and a styrene base.
- I didn’t notice until after completion of the build that the small wing and tail “B6313” stencil decals are actually printed as “B3613”. Too late to fix in my case, and something only apparent to a knowledgeable eye at very close range, but be advised.
The above gripes are very minor in the big picture. I would have none of these comments for a 1/72 WWI build due to low expectations. Wingnut Wings has set the bar very high and that is the context that must be emphasized. I applaud the folks at Wingnut with gusto for raising the state of the modeler’s art.
I thoroughly enjoyed my Wingnut Camel experience. My aircraft wheelhouse is still 1/72 but I could be convinced to tackle another Wingnut treasure. The new kits keep coming, and some sold-out subjects are now being reissued with very attractive pilot figures. We’ll see what the future holds!
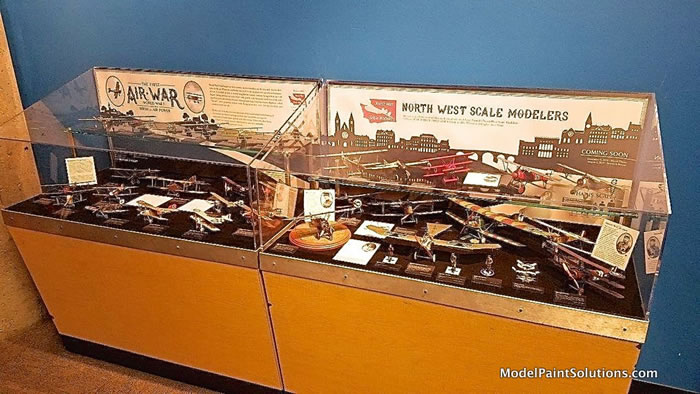
This model and others are on display at The Museum of Flight in Seattle, Washington through December 6, 2018.
References
-
British and Empire Aces of World War 1 (Aircraft of the Aces), Christopher Shores, Osprey Publishing
-
Sopwith Camel Aces of World War 1 (Aircraft of the Aces), Norman Franks, Osprey Publishing
-
Building the Wingnut Wings Sopwith Camel, Ray Rimell, Albatros Productions
-
William Barker, VC: The Life, Death and Legend of Canada's Most Decorated War Hero, Wayne Ralph, John Wiley & Sons
-
Sopwith Camel, Wikipedia
-
William Barker, Wikipedia
For more on this review visit Modelpaintsolutions.com.
Text and Images Copyright © 2018 by Tim Nelson / Model Paint Solutions
Page Created 4 December, 2018
Last updated
4 December, 2018
Back to HyperScale Main Page
Back to Reviews Page

|
 Home
| What's New |
Features |
Gallery |
Reviews |
Reference |
Forum |
Search
Home
| What's New |
Features |
Gallery |
Reviews |
Reference |
Forum |
Search