AMP's 1/48 scale
Kaman HUK-1 Huskie
by Jon Bryon

|
Kaman HUK-1 Huskie
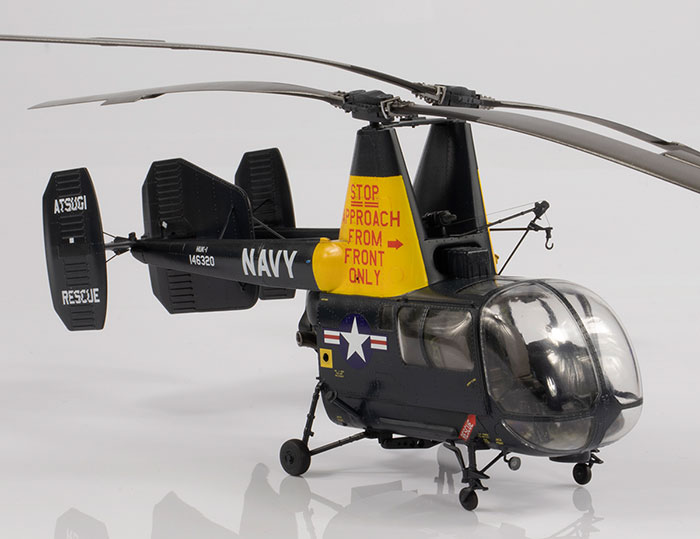
US Navy, Japan 1962
|

When I received this kit and opened the box, my first thought was, ‘Wow, these parts are small…’ followed by, ‘…and there are a lot of them’. Ordinarily, it would be added to the stash and I’ll probably get round to it in 20 years or so, but I am getting older, and the thought crossed my mind that maybe this would be beyond me when I’m in my early 60s. And then the thought occurred to me: maybe it’s beyond me now? And so I decided to build it in 2020, just to see how my ageing eyes and dexterity would cope with a small model made up of a lot of very small parts.
First impressions are fantastic. This is a limited-run kit, but the surface detail is excellent, the sprue gates are small and everything is provided: PE and masks included. Some of the engine components are well-moulded in resin. Coupled with an excellent choice of subject, I had high hopes for my first AMP kit, but was also aware that first impressions can be misleading. There are around 150 plastic parts plus the resin and PE, which for a model about the size of a 1/72 WWII fighter (excluding the rotors) is a lot.
The headline summary is that this kit was the most fun I’ve had putting a model together in ages. Sometimes models become a bit of a chore because they end up as a series of problems to solve and it takes a certain amount of energy to want to address them. With this kit, the quality of the fit constantly surprised me (there are caveats to this below) and so I found myself always wanting to spend a few more minutes at the bench just to see if the next parts would go together as well as what I’d just done. They did.
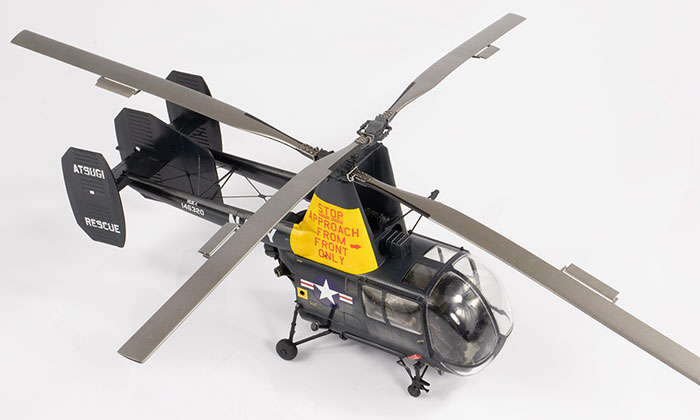
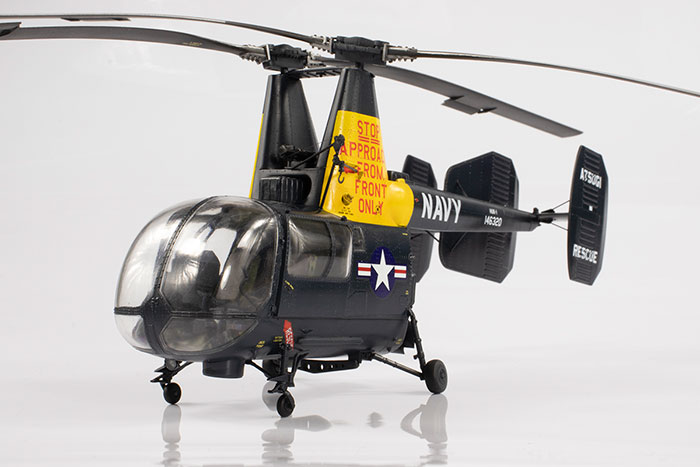
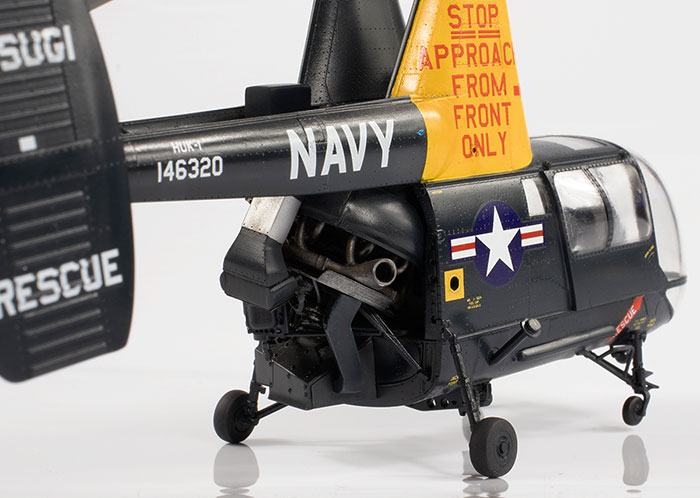
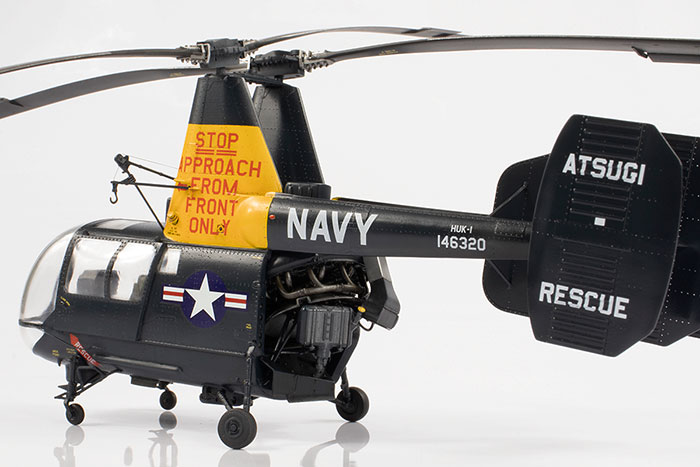
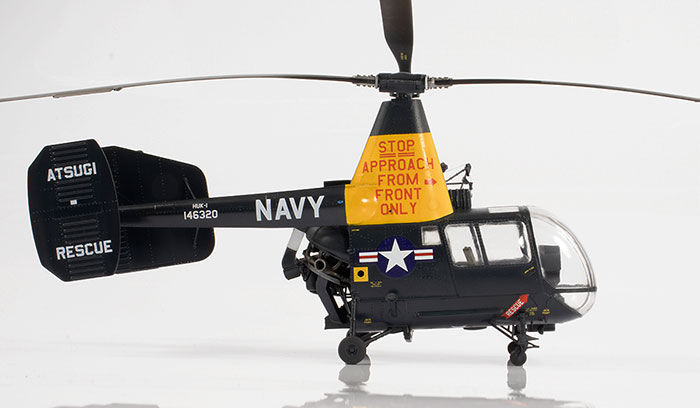
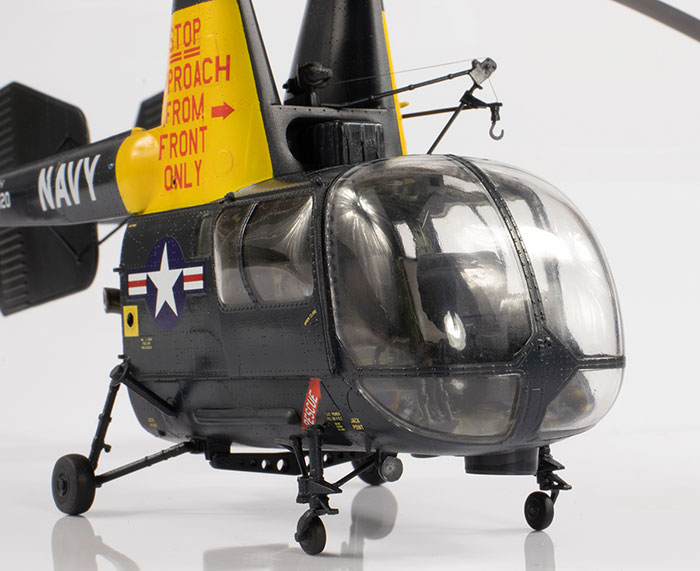
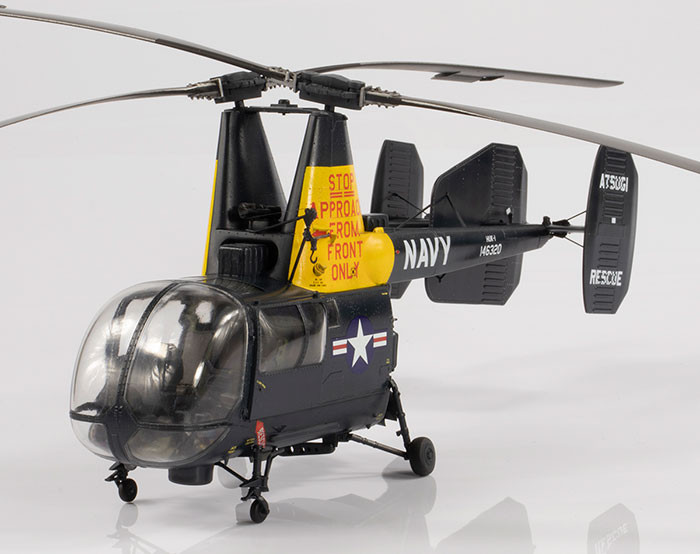
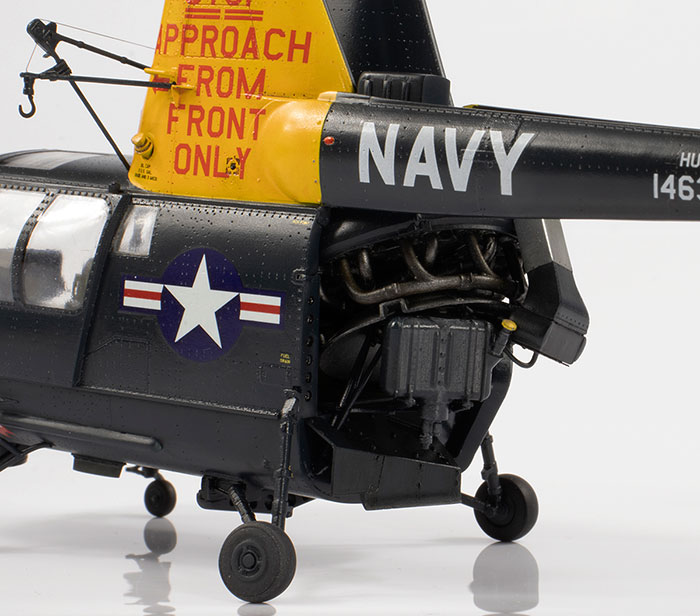
Whilst I’d been aware of the Huskie for a long time, these early piston-powered versions were largely unknown to me. The way the engine fits in the rear fuselage makes it look like it’s burst its entrails; combine this with the unique rotor system, twin booms and huge tail and I think it’s a pretty interesting looking aircraft.
The cockpit is quite complete but the seats appear to be missing shoulder straps. Were I making this model again, I would not install PE parts 1, 17, 18, 24 and 26 until after the cockpit floor was installed in the fuselage.
It was in putting the interior together that I learned what I think is the general rule for this kit: the parts fit very well if you clean them up properly, or in some cases, adjust the tabs by which they join. In this regard, it’s a bit like a very good vacform kit: some work is required to prepare the parts, but once prepared, they will go together well. This demands a lot of dry-fitting to get the best out of the fit. If something is not going together well in this model, then keep cleaning the parts up and dry-fitting and it should all work.
The corollary to that is that understanding the instructions thoroughly will be of immense help. You definitely need a plan. There are some mistakes – such as PE part 41, which is shown as attached to the wrong part, and PE parts 35 underneath the horizontal tail surfaces (they need to be fitted after parts C5 and C4). In other areas you will find a better sequence to put the parts together – e.g. C24 is better attached to B2 first, rather than C23. Look far ahead in the construction sequence because this is a complex kit.
Of course, I failed to fully take my own advice, and didn’t notice the collective that needed to be fitted into the cockpit until it was too late…
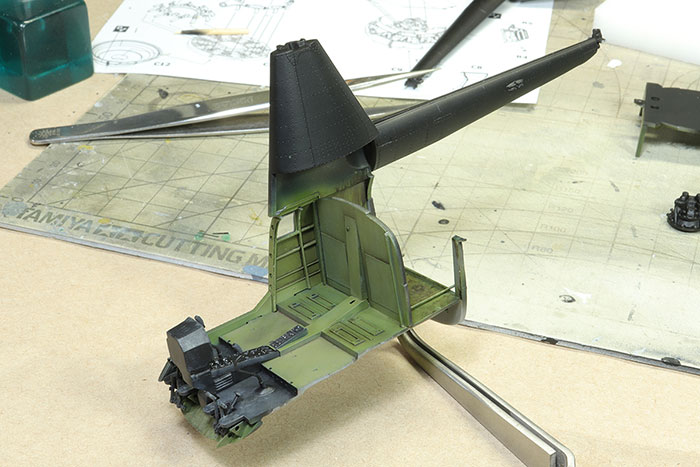

There are two main weak points in this model for me. The first is the puzzle of how to put the fuselage floor, sides, and two overlapping roofs together around the cockpit. I don’t think there is a best way to do it. In the end, I attached the cockpit to one of the fuselage sides. I then added the upper roof followed by the lower roof. This caused the front of the roof to slope down to much, and it ended up about 2mm lower than the canopy line. This appeared to be a disaster:
The roof could not bend up as it’s a large and very rigid piece of clear plastic, so the only solution was to cut apart the join between the lower roof and the big front intake with a Tamiya flexible PE saw:
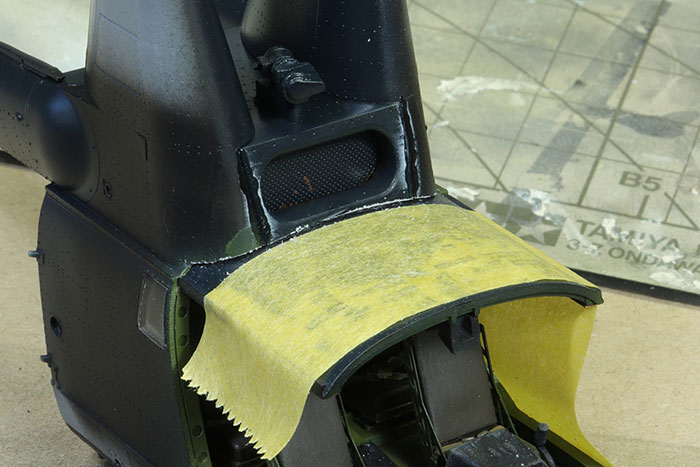
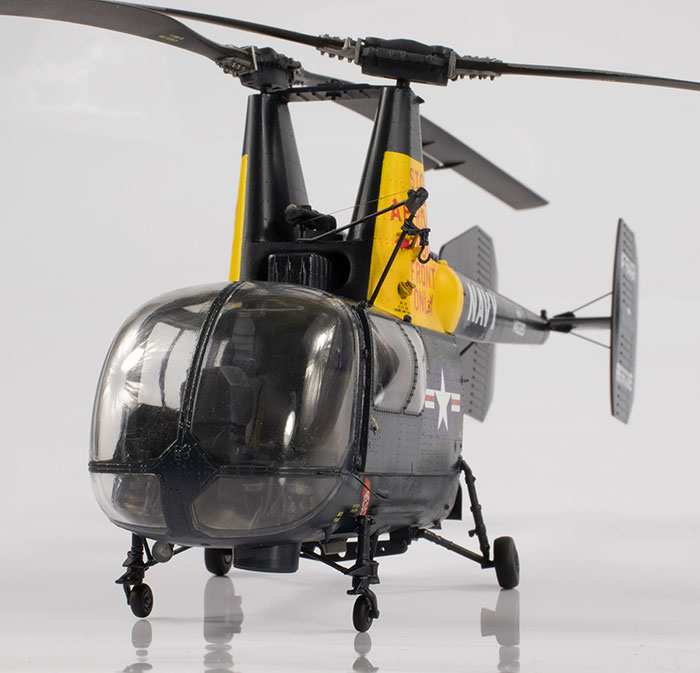
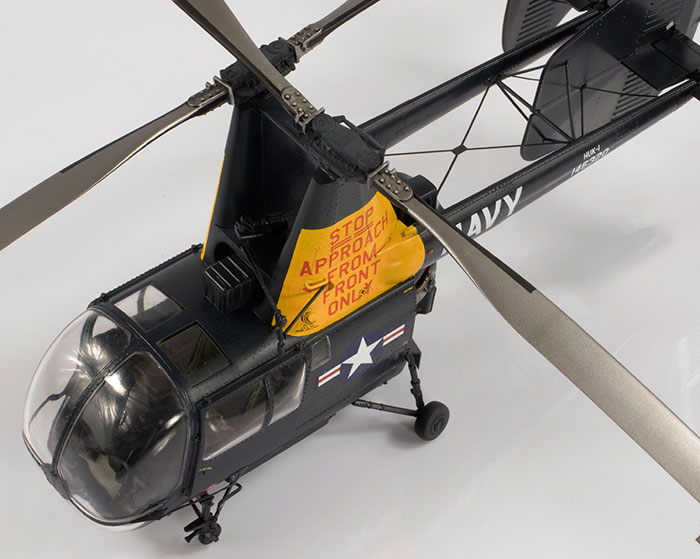
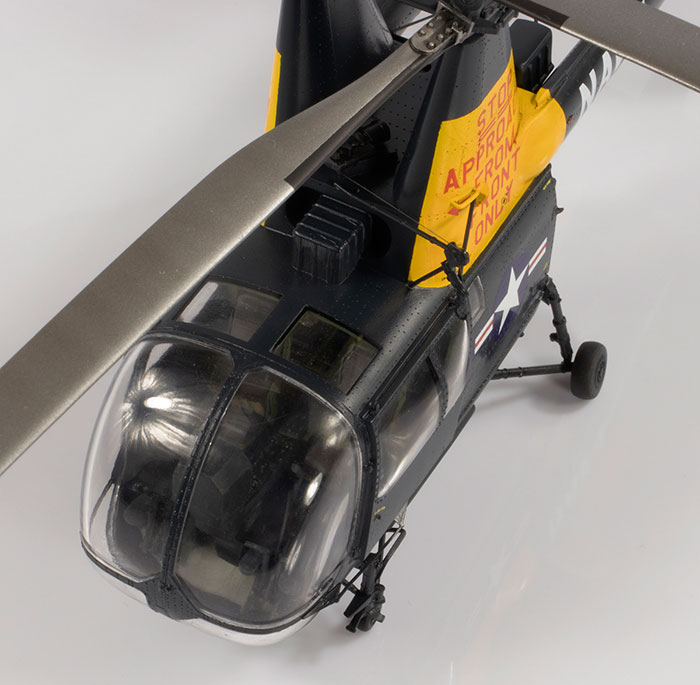
This created space for the roof to be moved up and then meet with the front frame to which the front canopy joined. Once I’d done this, the fuselage went together very easily. There is a slight lip with the front windscreen being a little proud of the fuselage, but that is prototypical as the perspex was riveted onto the fuselage, not faired in. If anything, it should be far more prominent to match real life.
Speaking of rivets, these are nearly all represented as recessed in the kit. This is inaccurate and they should be raised. As the model was going together much quicker than I anticipated, I gave serious consideration to adding raised rivets with Archer transfers. In the end, I decided against this as they are not that prominent in photos of Navy Huskies.
The second main weak point of the kit is the clear parts. These fit very, very well and are nicely moulded, but they are not very clear. Polishing did not really help as the flaws seem to be largely internal. Moreover, the clear parts are thick. This would be my single biggest request to AMP: please improve the clarity of the clear parts!
The front windscreen is moulded in two halves, which is intimidating. However, the fit is excellent. The real thing was also split in the same place as the port windscreen could open outwards like a large door.
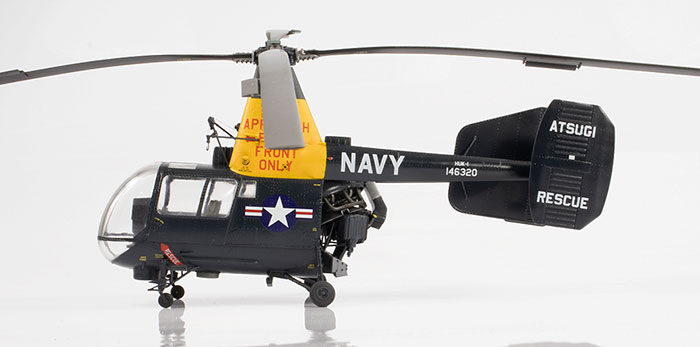
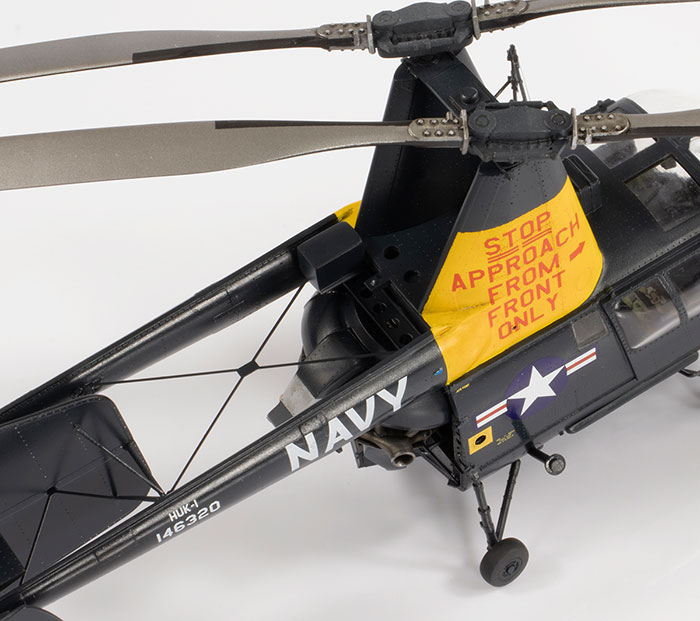
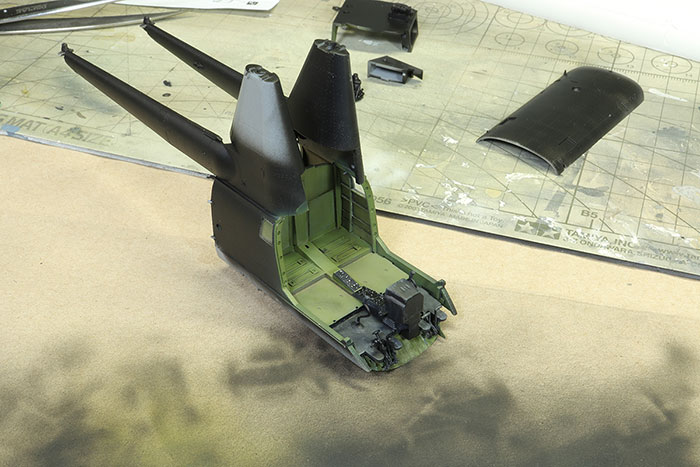
My general approach to building this model was to address seams as I went along and apply paint much earlier than I usually would. So the fuselage booms, for example, were assembled as in the instructions, cleaned up, and then primed and painted in Mr Color 365 Gross (sic) Sea Blue. The same was done for the two roofs, all prior to the fuselage going together. This was because some areas, like between the rotor mast housings and between the twin booms, were going to be very difficult to access later on.
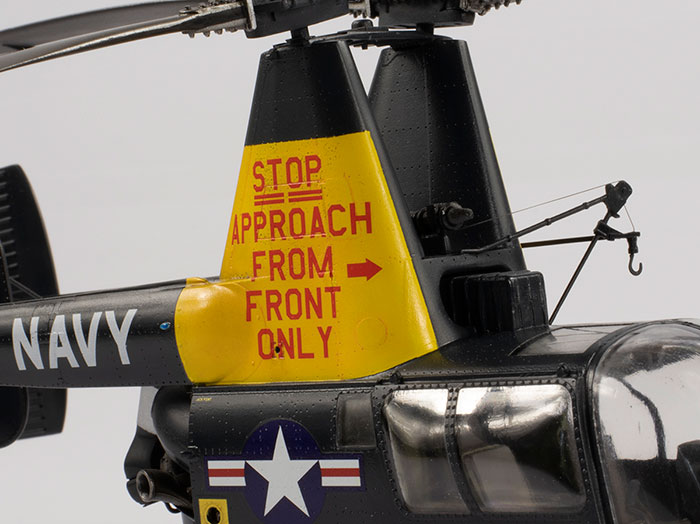
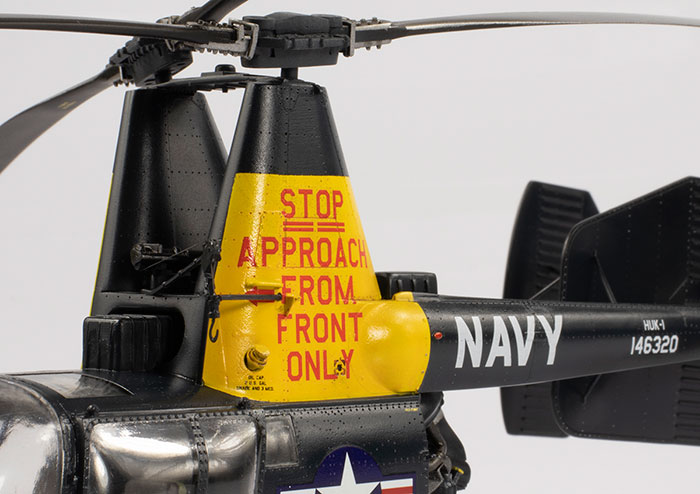
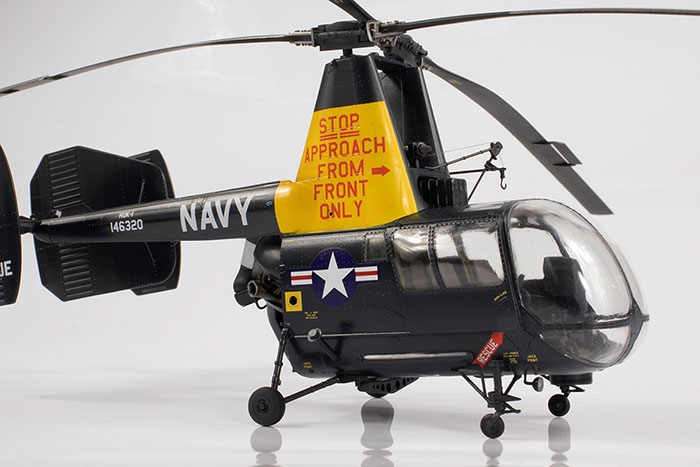
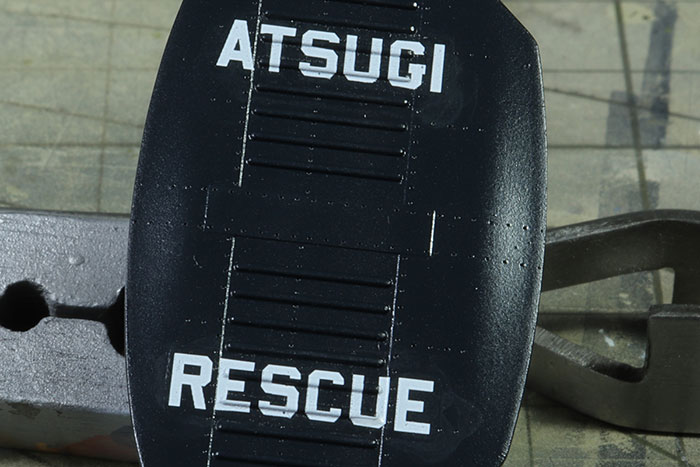
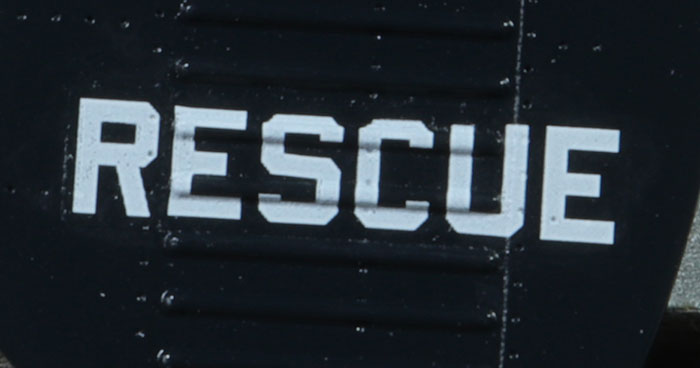
The tail was another assembly which was very complex and completed in its entirety before being attached to the finished main fuselage. I even applied the decals before assembling the tail as putting them on the completed item would have been very challenging. The kit decals are very nice and went down beautifully over the GSB. I used my method of leaving the decal floating on top of a large puddle of Mr Mark Setter and just walking away – no touching, pressing, cotton bud, etc. About 3 hours later the decal still looks horrible and the temptation to tamp it down with a cotton bud is immense, but leave it overnight and it looks like this:
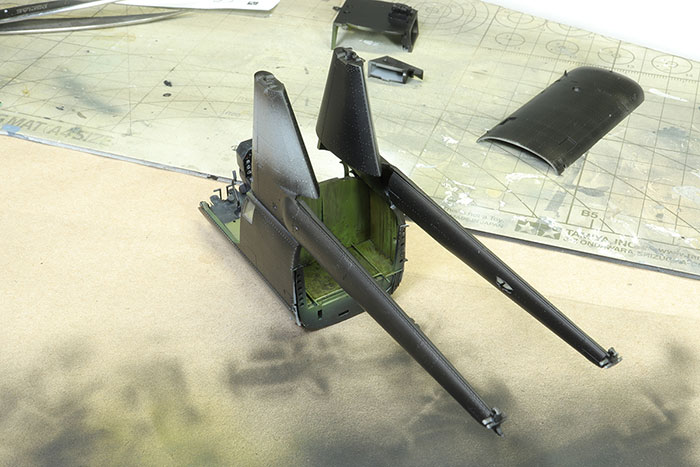
In this way, the model was constructed in a modular fashion, comprising the main fuselage, the rotors, the tail and the engine. These were all kept separate until the very end, although constant dry-fitting as I went along helped to prevent any surprises. The tail booms in their natural state are splayed too far apart, and when it came to attach the tail assembly between them, I first dealt with one side, let it set, and then clamped the booms together so the other side was in the correct place.
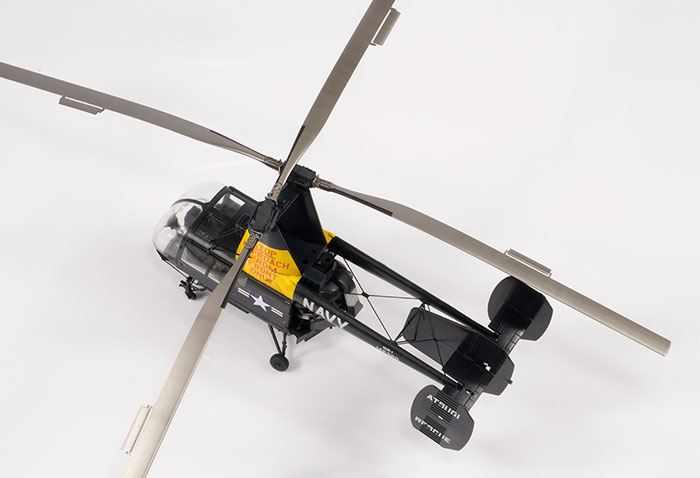
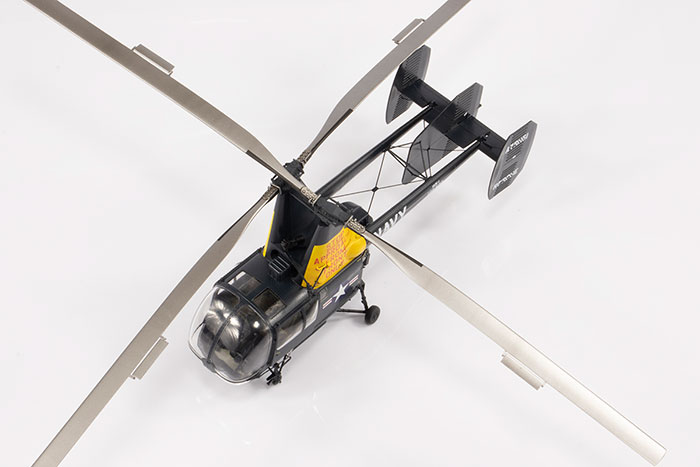
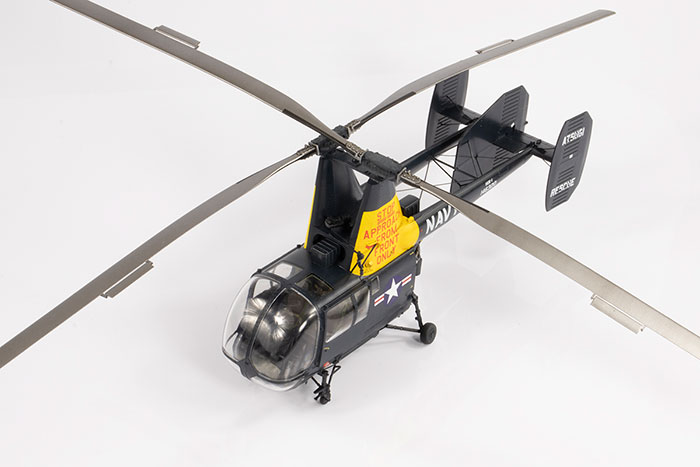
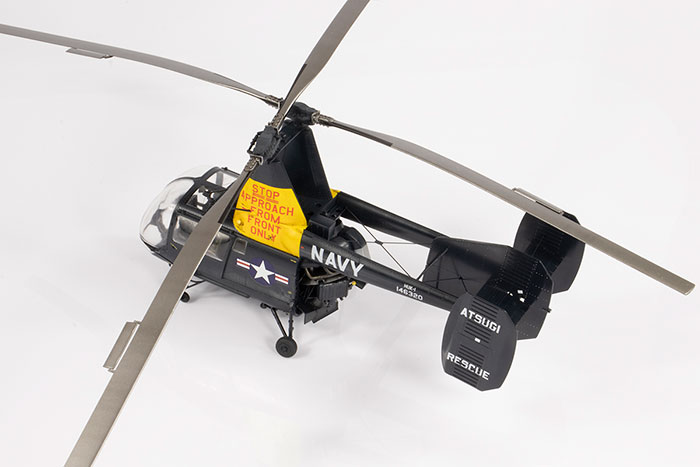
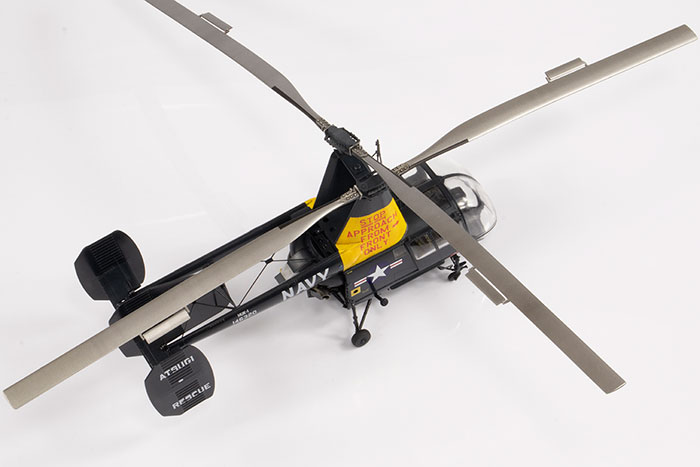
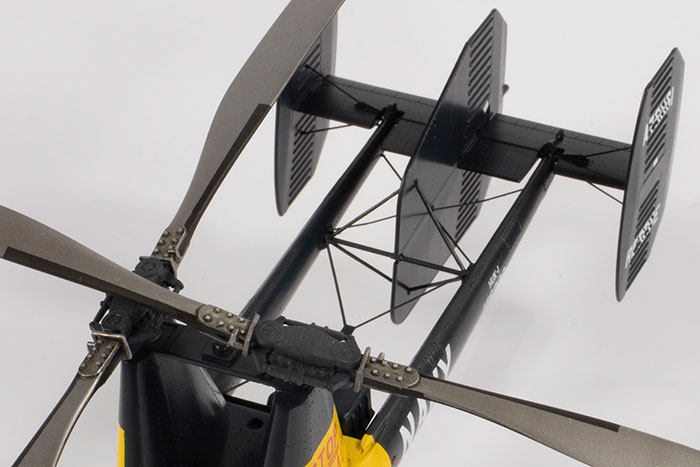
The rotor blades are a little confusing and you need to double check everything to make sure you don’t get the main blades muddled up; it’s easy to do. I had to study pictures carefully to make sure the correct completed rotor assembly was put in the correct rotor mast mount. The servo-flaps fit quite well if you carefully clear out their locating slots. I did not bother with the PE in this area as I didn’t think it was worth it.
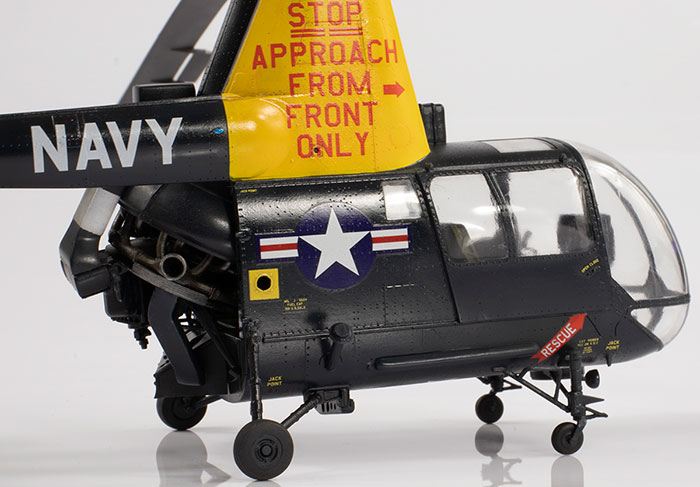
The rear wheels are quite frustrating as they comprise two halves and two separate hubs. The hubs are too thick and don’t fit within the tyres very well at all. This is definitely one of the weaker areas of the kit and Mr Surfacer 500 was required to try and eliminate the gaps between the tyres and the rims.
AMP provide markings for a green Marines HOK-1 and a blue US Navy HUK-1. I am very partial to any Gloss Sea Blue scheme and thus that was the natural choice for me. References for this machine are fairly easy to come by on the internet, but all of the photos I could find were in black and white and so the details are hard to make out. Furthermore, a lot of my colour choices around the engine and rotors are conjecture based on colour photos I could find of green Marines Huskies.

There are a couple of photos of HOK-1s from Atsugi which helped determine which kit parts I needed and which could be omitted. Given the caveats of the images being black and white, small, and from a limited number of angles, I think the following can all be missed off for the airframe I was modelling:
-
C25 (hoop-shaped aerial on the roof)
-
B10 (what I take to be a large sensor housing under the fuselage)
-
D22 (the vertical wire aerials at the front of the canopy)
-
PE21, 28-30 and E25 (wire aerial up the centre of the canopy)
-
PE5 – at least on the starboard side (some kind of bracket)
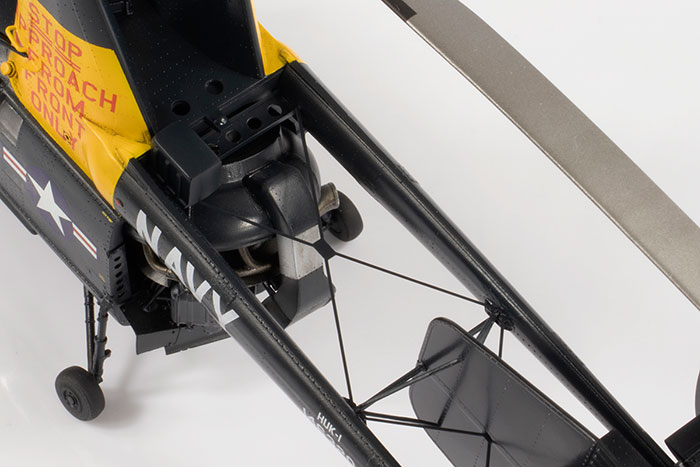
In addition, I think there should be a light (on some photos, more than one) mounted near the undercarriage. I used the spare part provided in the kit. There is also a box missing from where the port tail boom meets the port rotor mast housing. I fabricated something that looked sort-of-right from a Bf109 gun breech (I think), but again lack of photos mean this is representative rather than accurate. Navy HUK-1s often had some kind of half-cylindrical linear feature underneath the rails for the sliding doors. I replicated this using some cut down F-4N antennae from the spares box. They’re too wide, but better than nothing.
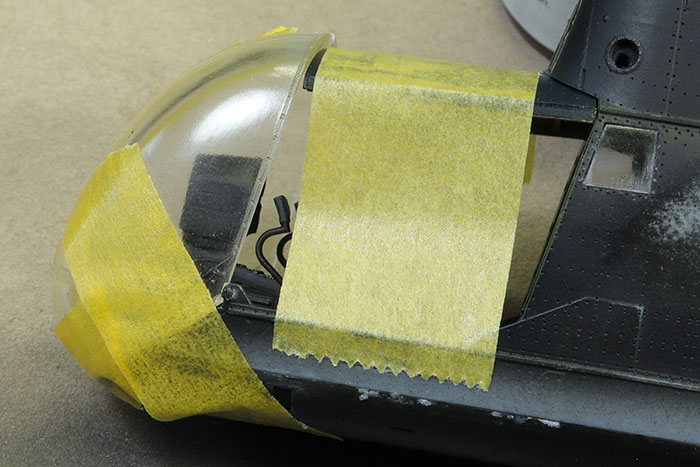
The kit comes with vinyl masks provided. The sheet contains each mask and a mirror image, I assume intended to mask the inside as well as the outside. However, no guidance is given for what mask goes where, it’s very confusing, and the vinyl does not cope at all well with the compound curves of the windscreen and side windows. I scanned it, traced it, and cut out a mask using Tamiya masking sheet on my Silhouette cutter.
The yellow was primed with Mr Finishing Surfacer 1500 White and then sprayed in Mr Color 329 Yellow with some variation from MRP RAF Marking Yellow. The blue is Mr Color 365, which used to come only as part of a set, but now is available on its own. This is excellent news as I think it’s a great match for GSB and airbrushes beautifully.
I barely weathered the main body of the helicopter as GSB is very hardy, but I did spend some time with oils and some Lifecolor Tensocrome products (which I hate and still don’t understand how to use) in the engine area and engine bay. The final finish is a mix of polished paint, natural paint and some matt varnish to try and get a patchy look.
I didn’t like the kit-provided national insignia as I think the stars are slightly off-centre. I replaced them with some from a generic Furball sheet. The kit decals are thin and well-printed; they settled into the surface detail without any problems. I applied them directly to the paint.
The undercarriage is complex and it is important to get all four wheels touching the ground. By the time it came to install it, I had confidence in the design of the kit that all the parts would just fit. And they did! I started with the front legs to make sure they were nice and square, followed by those to the rear. When cleaning the parts up, I stupidly snapped one of the front leg braces that also functions as a step into the cockpit, and then launched it into space with a pair of tweezers when trying to fix it. I searched high and low and couldn’t find the part, so fixed it very crudely with a length of small diameter Evergreen rod.
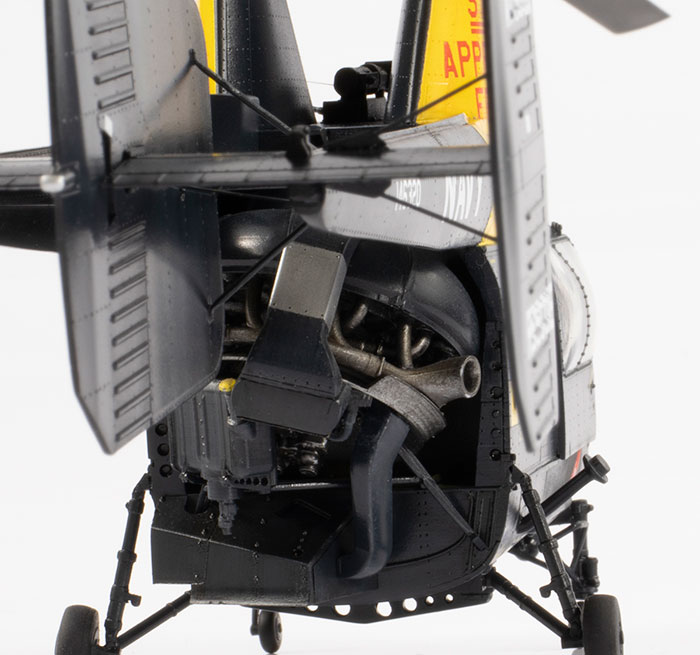
The engine is a bit of a challenge to install, and I did it after the undercarriage but before the tail. My method was to cradle the fuselage upside down in my hand and attach the engine to its peg with Tamiya Extra Thin, which allowed plenty of time for adjustment. Before the glue set, I added the two engine bearers; my life would have been made much easier if I’d drilled out their attachment holes a little. This allowed the orientation of the engine to be set. I then immediately attached the square-section ducting that joined the engine to the fuselage. It’s a bit of a juggling act, but very doable.
I added the tail assembly as the last major component. To be honest, I was dreading it a bit as the booms were a bit too far apart and the horizontal tail surfaces need to be trapped between two plastic pieces in addition to the fragile bracing between the booms. AMP did not disappoint. The bracing slotted in perfectly and when added with some superglue brought the booms to the correct distance. The ends of the booms were trapped between the horizontal tail surfaces, clamped and joined with Tamiya Extra Thin. Everything was square and fitted beautifully. I had, of course, test-fitted everything and made sure every tab was sized to fit in its respective hole. The main PE bracing drops into place, but the two smaller sections to the rear are more fiddly to install. Armed with patience and plenty of time, they fit as designed, though.
The winch was added right at the end and is probably the most stressful part to add. The parts have some locating tabs but no holes. I tried drilling some, but did not really get the geometry right. I added some elastic thread used to represent the cable from the motor to the pulley. The front door PE hinge did not fit very well and I got superglue in the wrong place. This is probably the part of the finished model I’m most disappointed with.
Kaman’s unique intermeshing rotor design means you can’t just have the two blades at any orientation you like. Photos show that when one blade is aligned with the length of the fuselage, the other should be roughly perpendicular to it.
If you’re wondering (because I was before I started), although the engine and tail sit behind the rear wheels, no nose weight is needed.
Compared the real thing, there are still a few inaccuracies. Huskies had a variety of window styles in the sliding doors, and the frames on this model are a bit heavier than on the Navy helicopters. The rear wheel hubs are correct for some Huskies, but this HUK-1 had a much simpler style which I did not replicate. Some of the engine detail compares very well with a Marines HOK-1 I found some good photos of, but again there were some minor differences between airframes and mine is not fully accurate. Parts PE9 are not properly etched on the PE sheet and cannot be used. I see from various sprue shots online that my kit is not the only one to suffer from this problem.
This is the best ‘limited-run’ kit I’ve ever built. Except I feel it’s time for that label to be retired. Maybe we should be thinking about ‘resource-rich’ and ‘resource-poor’ manufacturers rather than the ‘limited-run’/’mainstream’ dichotomy. I mean, as I understand it, AMP are a pretty small operation releasing kits of niche interest and seem to do this on fairly limited resources. Tamiya, Airfix, Revell, Italeri, Eduard, etc., seem to be much larger operations with big distribution networks and thus plenty of resources. But this AMP kit is way better – by every measure – that the 2011 1/48 Airfix Seafire I built a year ago, or the 2013 1/48 Revell Tornado I finished in 2016, or the Italeri 1/48 H-21 Shawnee I have in my stash. Yes it has its rough areas (there is a small amount of flash on some parts; some parting lines; some surface blemishes) but it is remarkably complete, moulded in a very nice plastic to an above-average quality, and has an abundance of high-quality detail.
So there you have it: a challenging kit, a difficult kit, but one that was an absolute pleasure to put together if you have a good plan. I have several AMP 1/48 helicopter kits in my stash and look forward to building all of them. What I would really love is an HH-43B (or F), the turbine-powered USAF variant of the Huskie, which had a different fuselage, tail and engine. That essentially looks like a different aircraft with little in common with the HUK-1, so my hopes are not high, but you never know…
For more articles like this, please visit my website at www.jonbryon.com
Text and Images Copyright ©
2020 by Jon Bryon
Page Created 16 November, 2020
Last Updated
16 November, 2020
Back to
HyperScale Main Page
|
 Home
| What's New |
Features |
Gallery |
Reviews |
Reference |
Forum |
Search
Home
| What's New |
Features |
Gallery |
Reviews |
Reference |
Forum |
Search