Tamiya 1/48 F/P-51D Mustang
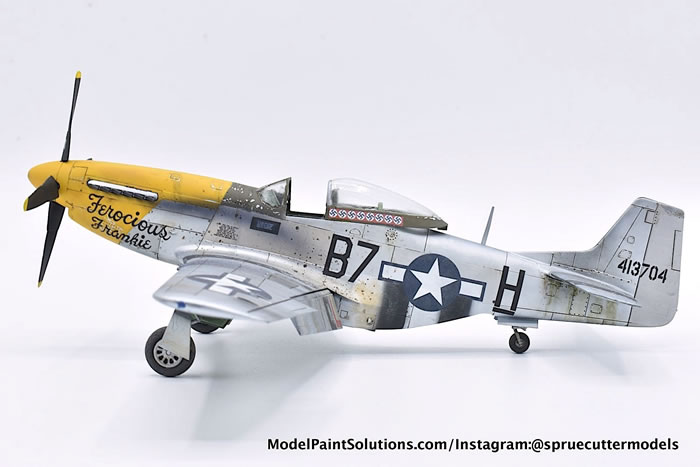
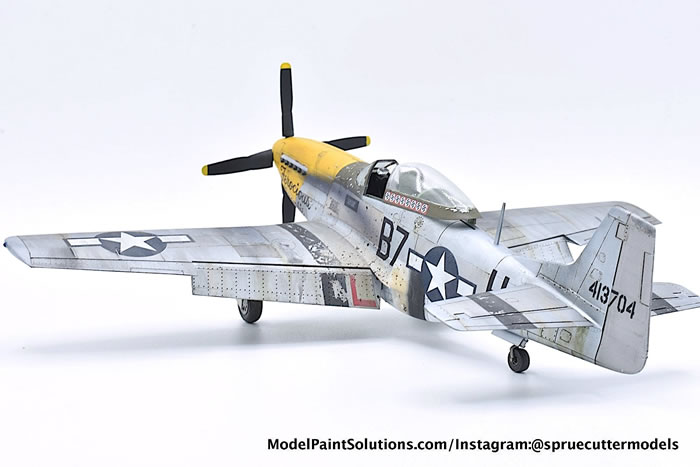
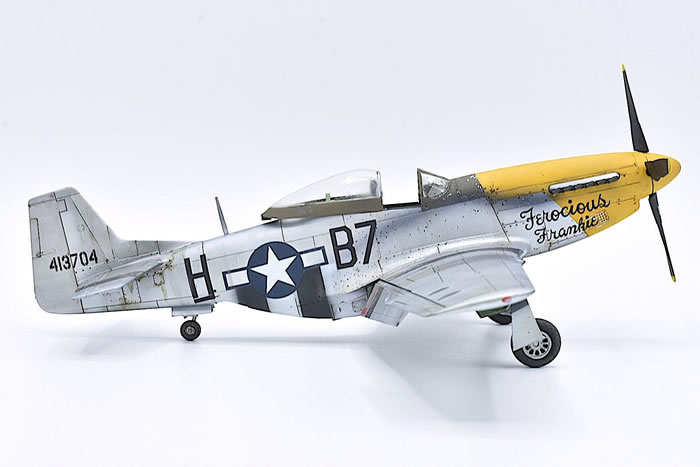
Ferocious Frankie
by Mat Mathis

Next up on the bench for me was the Tamiya 1/48 F-51 Mustang (kit #61044). I picked the kit up from the Military Miniatures Society of Illinois show in Schaumburg, IL in October 2021 for $10-–couldn’t pass it up. This was going to be a Christmas present for my brother. I knew that I wanted to “back date” it to a P-51D. I told him I’d build him a P-51 someday because our grandfather was the operations clerk for the 361st Fighter Group. So it was decided: a P-51D from the 361st Fighter Group.
With that airtight logic, I set off to find the scheme I wanted to do. Luckily, there’s a fair amount of 361st FG decals available on the market. I settled on a set for “Ferocious Frankie” from DRAW decals (#48s-P51-138). While this set is designed for the modern-day Ferocious Frankie, I knew it would be easy to use reference photos to come up with the wartime paint scheme. Aside from this set of decals, I planned to build this kit right out of the box. All that was left to do was to get crackin’!
Having built this kit once before (albeit a different boxing of it) I knew that I was in for a simple build. There are not many pieces in the box, there’s not many steps in the process, and everything fits together like a charm. While it’s “old Tamiya” not “new Tamiya,” it still falls together with little-to-no issues. As an aside, this kit is in my top 5 for kits to recommend to beginners.
Once the pilot’s office was built and painted (more on that part later) the fuselage was closed, wings constructed and put into place, horizontal stabilizers applied, and Bob’s your uncle; we had a Mustang. After a cursory look to see if any filler was needed (none was), I started in on cleaning up all the seams. I then fired a test shot of Alclad Black Primer and Microfiller across all the joins with my trusty Harder and Steenbeck fitted with a 0.4mm needle/nozzle at 20psi. After a final clean up we were ready for full primer and paint.
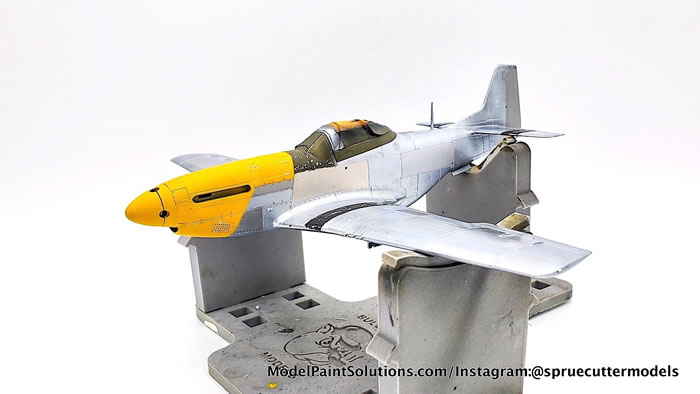
Before we get into the full paint scheme, we need to touch on the cockpit. Generally speaking, I tend not to spend too much time on a cockpit unless it’s going to be a piece for a competition. This was no exception. I painted everything a Tamiya interior green (thinned to about 30% paint) with my Harder and Steenbeck Evolution with a 0.2mm needle/nozzle at around 12 psi, picked out the control panels in black and added a bit of color to some of the knobs and switches (admittedly using not a single reference photo). After this, I threw on an Ammo Green/Brown wash, did some dry brushing with aluminum, and called it good.
After construction was completed and the seams were cleaned up, I brought out the Harder and Steenbeck once again and sprayed everything with Alclad Gloss Black Base. I let this sit for roughly 24 hours to fully cure before hitting it with the aluminum for the natural metal finish. Normally, I would use Alclad aluminums for a NMF but this time around I decided to give the AK Interactive White Aluminum for the base a try. I applied this with the AK Interactive Basic Line airbrush at about 15 psi, straight from the bottle.
A brief aside on the differences between Alclad and AK Interactive metallics. The AK interactive metallics are much more forgiving when it comes to applying in terms of accidentally flooding the surface with paint; however, they are a thicker paint and takes longer to dry than Alclad, as the lacquer diluent isn’t as “hot.” The AK interactive also seems to cure a bit harder than Alclad. As the build was progressing and masking was needed, I did not have any instances of peeling paint and I’ve had that happen with Alclad.
After the White Aluminum was sprayed and had sufficient time to cure, I picked up my trusty Infinity and went back to pick out different panels with some differing shades of aluminum. For this step, I ended up using Alclad Chrome, Airframe Aluminum, Duraluminum, Steel, and Semi-Matte Aluminum as well as AK Interactive’s Dark Aluminum. I thoroughly enjoyed this step. A small amount of input for a large amount of output. The build really started coming to life!
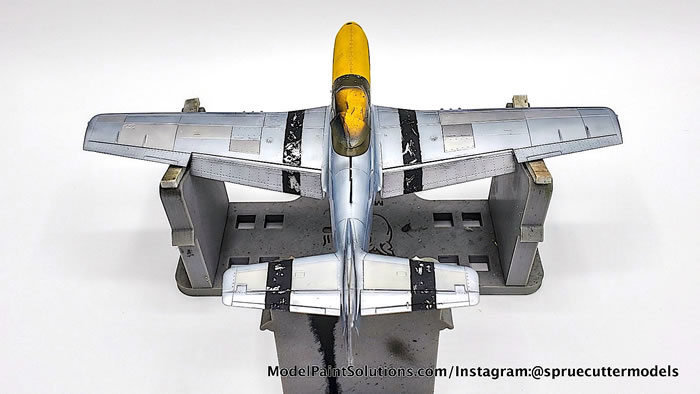
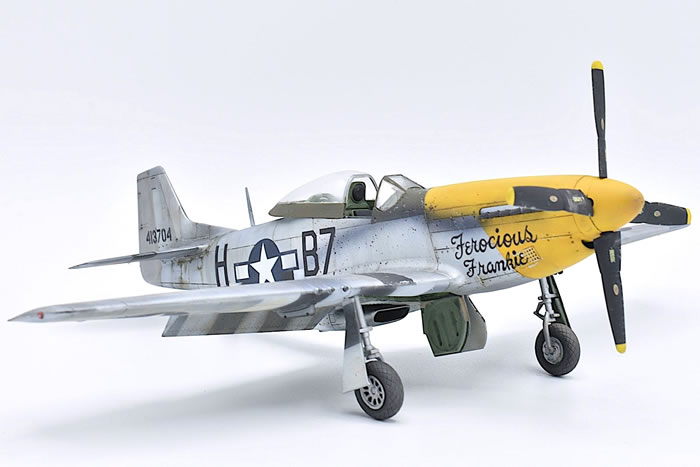
After the shading was done, it was time to lay down the invasion stripes on the fuselage and underside. After some careful masking I whipped out the Tamiya paints thinned to about 30% with Mr. Leveling Thinner (hooray unicorn tears!). Next, I masked off the identification bands on the wings and horizontal stabilizers. Before spraying the paint here, I used some Ammo Chipping Fluid by spraying a couple light coats and allowing it to dry fully. Once dry, I went back with the Tamiya acrylic. The next day, I dampened a brush with some water to activate the chipping fluid and began removing paint, based on my main reference photo.
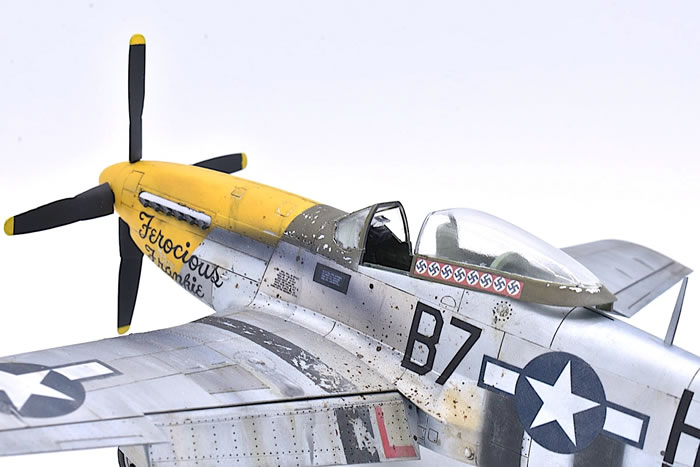
Finally, it was time for the pièce de resistance – the yellow nose. The 361st Fighter Group’s paint scheme was very distinctive in that they all had varying degrees of yellow noses, from just the spinner to the full engine cover. “Ferocious Frankie” was interesting in that there were two airframes with the same name. The first had only the spinner in yellow and the second had the full nose in yellow. As my reference photo had the latter, I masked off the full nose and then sprayed some pink – yep, pink.
But why pink, you may ask? Enter a little bird named Brian (Instagram:@bro_builder), who is an excellent modeler and dabbles in everything from aircraft to Gundam. He mentioned to the fellows over at the Plastic Model Mojo podcast that if you lay down a warm pink base under yellow it helps to keep the final result warm and bright, while if you used a darker pink, it cools off the yellow. In addition, it helps with the transparency of yellow and helps to fix issues with flooding the area you’re painting.
I decided that I was going all in to try my hand at this technique, and I can say that I’m completely sold. I think the results speak for themselves. It was the smoothest looking yellow I’ve ever sprayed, and the hue was just about perfect, in terms of what I was looking for. I’ll certainly be using this technique for all builds in the future. I highly recommend giving it a try.
By this time, all painting was complete, and it was time to move into some decals! But first, I grabbed the Harder-Steenbeck with a 0.40mm tip one last time and sprayed VMS Supplies Gloss varnish at about 20-25 psi.
This was my first time using DRAW decals and there was certainly a learning curve involved in using them. In fairness, the instructions say that they do not go on like “normal” decals. This is because they are printed using a Next Generation DIGITAL Silk printing process rather than a traditional decal printing process. DRAW Decal specializes in civilian aircraft and some of the more underserved military subjects like tankers, cargo planes, and some oddball aircraft; however, they have quite a selection of P-51 decals as well. On their online shop, they have no less than 1,695 sets of decals on offer–-and they never run out of stock because they print on demand.
While using these decals, I found that they were not able to be moved very easily once they were placed on the model. Even after trying to get some water and MicroSet under the decal, they didn’t want to move very easily. Once this hurdle was tackled and overcome, the rest went on like a charm and I was really pleased with the results. They are very thin decals, so they settle into every nook and cranny. Despite the issue early on, I think that I would use them again – I’m just not sure which of the 1,694 other sets I should get!
Decals done and then it was time to move into weathering. I decided that I would go outside my comfort zone a bit more to push my weathering techniques on this one, while keeping true to my main reference photo. I recently purchased the Ammo How to Paint Bare Metal Aircraft Solutions Book in anticipation of this build and one that I had planned for January. While I already “know how to paint” the aircraft, I mainly purchased this for the weathering steps. Along with this book, I purchased many of the products mentioned inside to go along with it.
The first step I took was to do a pin wash along the panel lines and other recessed areas of the model. Because this was a pin wash, there was not much excess to remove with a cotton bud. Once the pin wash was fully dry, I started in with the Ammo Oil Brushers in Gunmetal, Silver, and Matte Aluminum. In using these, I applied random dots across a small section of the model and then streaked them slowly with a brush dipped in odorless thinner. From here, I kept working in the metallic oils in to blend them together. Once the oils were fully dry, I used a similar technique on very specific areas with the Ammo Streaking Brushers in areas where grime and leaks could theoretically build up. As the majority of the model is not visible in my reference photo, a lot of artistic license was taken here.

After this, it was time to really focus in on my reference photo. Some effects that were needed to re-create this photo were accomplished earlier in the build – namely, the chipping along the identification stripe. It was now time to lay down a little bit of dust on the wing root area, where it was commonplace for the pilot and maintenance crew to walk. Next, I thinned Abteilung 505 oil with odorless thinner to a wash consistency and flicked oil onto the model with the brush and a toothpick. The next step was to add a bit more streaking and grime and then it was time to add some exhaust staining. To achieve this, I decided to use my Harder and Steenbeck Infinity again with the 0.15mm needle. I used Alclad exhaust smoke to create a stain that I was, ultimately, not all that thrilled with, in terms of how heavy it came out. It’s something that I can live with, but it’s certainly something I’d like to have a “do over.”
The last step was to add some Vallejo Fuel Stains on the fuel caps. Once that was dry, I used VMS Matte varnish to even out all of the finishes and to give the metal a nice dull finish to match the weathering.
All in all, I was very happy with the way this turned out – and I won’t even get to keep this one to look at. Ultimately, on Christmas Eve, it found its way to its new home (i.e. my brother’s house). This was the second time that I built this kit and it certainly won’t be the last. Sure, there are other P-51s out there that I will build too, but this kit can’t be beat in terms of simplicity and detail. It’s good for a slammer build and could easily be knocked out in a weekend if you set your mind to it – say there’s an idea… At any rate, it gave me great joy to push myself on this one. Now, it is time to refine those weathering techniques to make them a bit more subtle on the next one!
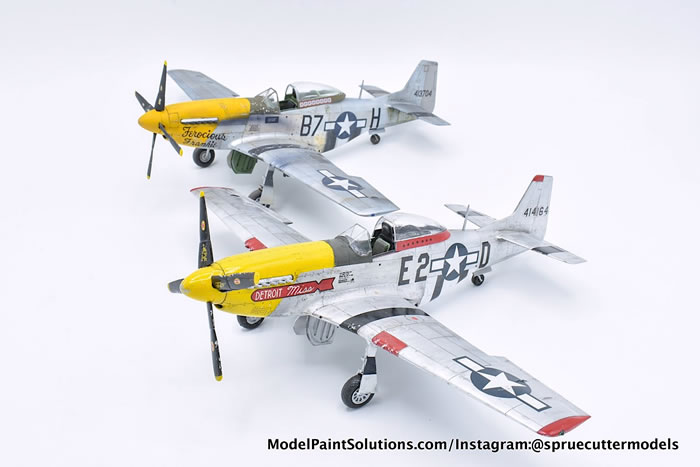
As a little bonus, I’ve included some extra photos of my first real build after starting the hobby; the same Tamiya 1/48 Mustang (this time the 8th Air Force boxing) in Detroit Miss markings. Surprise, another 361st Fighter Group build! Detroit Miss was built just about two years ago. It’s interesting the differences. I hope you enjoy seeing them side by side!
Cheers!
Mat
Instagram: @spruecuttermodels
For more on this build visit Modelpaintsolutions.com.
https://modelpaintsol.com/builds/tamiya-p-51d-ferocious-frankie-61044
Text and images copyright ©2022 by Mat Mathis.
Text and Images Copyright © 2022 by Mat Mathis
Page Created 11 March, 2022
Last updated
11 March, 2022
Back to HyperScale Main Page
Back to Reviews Page

|
 Home
| What's New |
Features |
Gallery |
Reviews |
Reference |
Forum |
Search
Home
| What's New |
Features |
Gallery |
Reviews |
Reference |
Forum |
Search