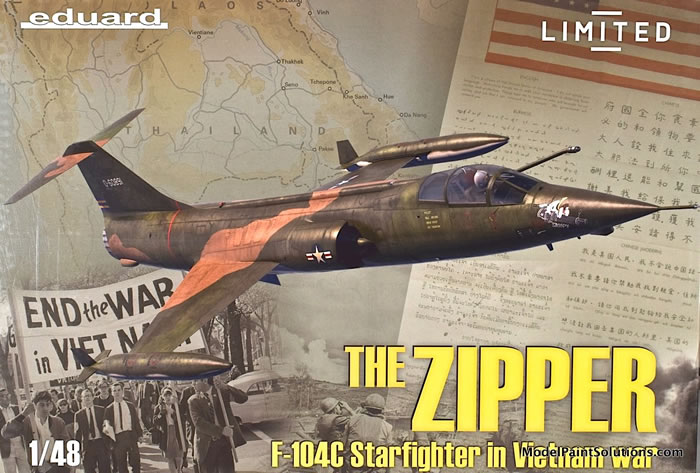
The Zipper
Lockheed F-104C Starfighter
in the Vietnam War
Eduard, 1/48 scale
S
u m m a r y : |
Description and Item No.: |
Eduard Kit No.11169 - The Zipper Lockheed F-104C Starfighter in the Vietnam War |
Contents and Media: |
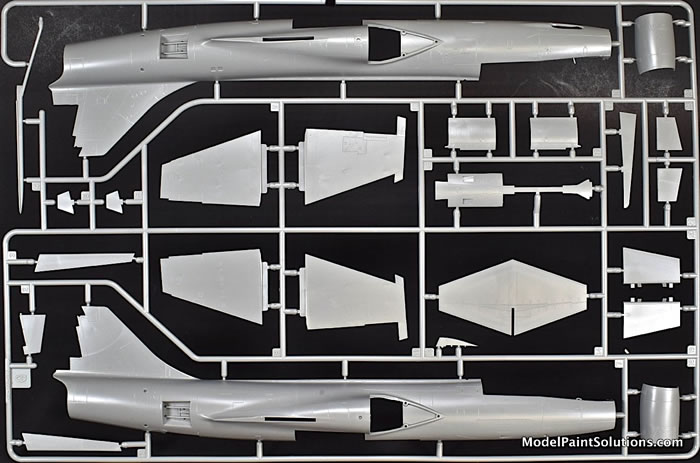
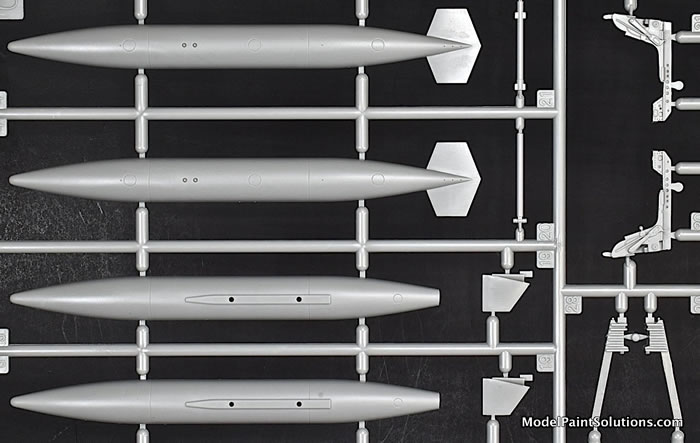
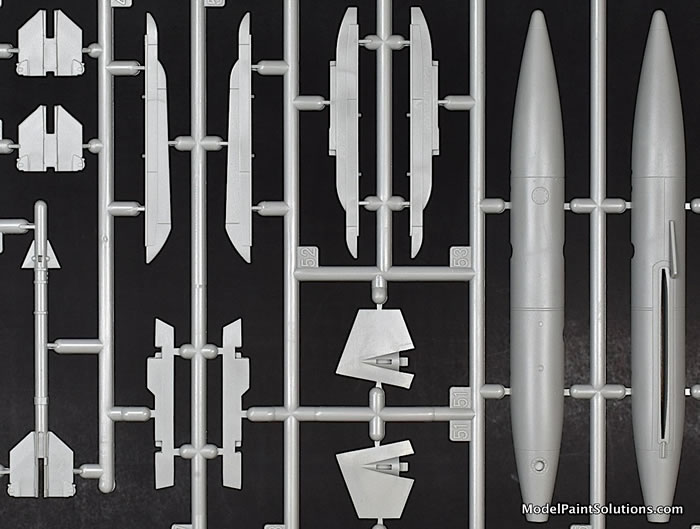
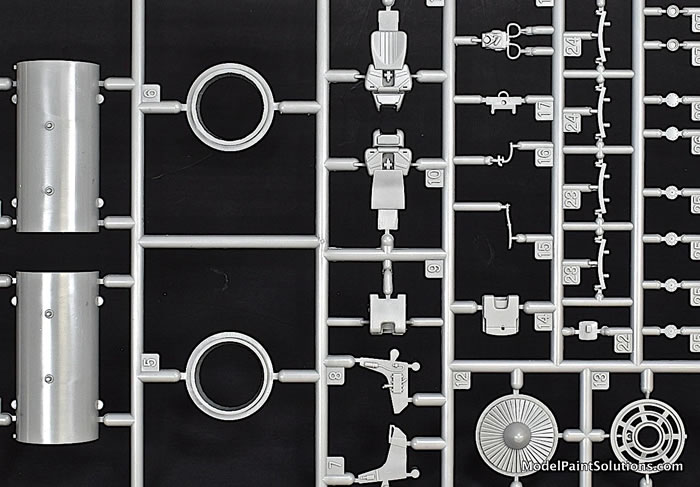
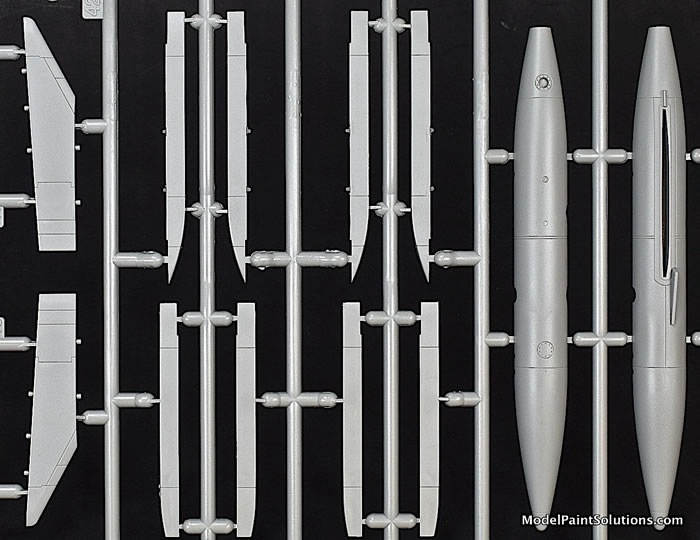
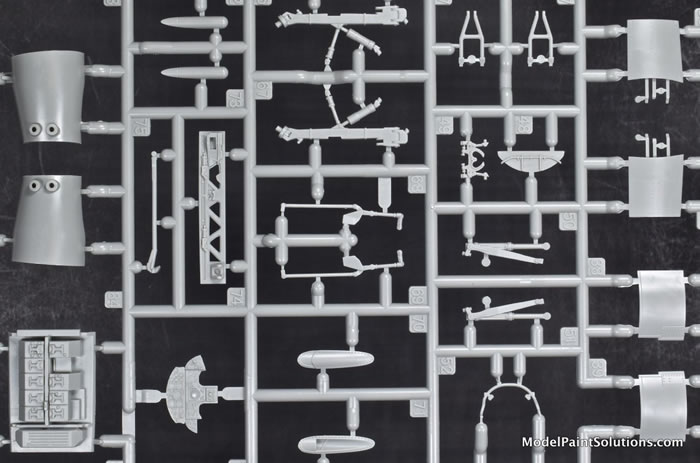
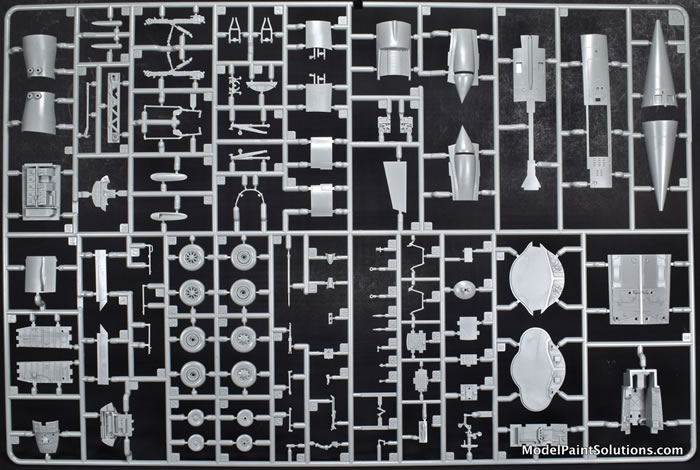
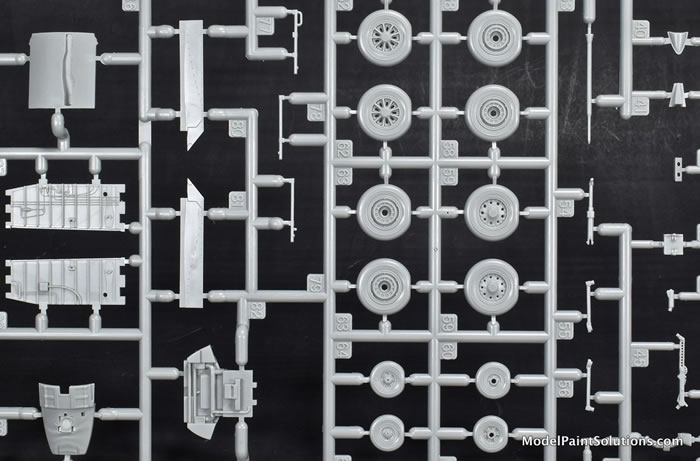
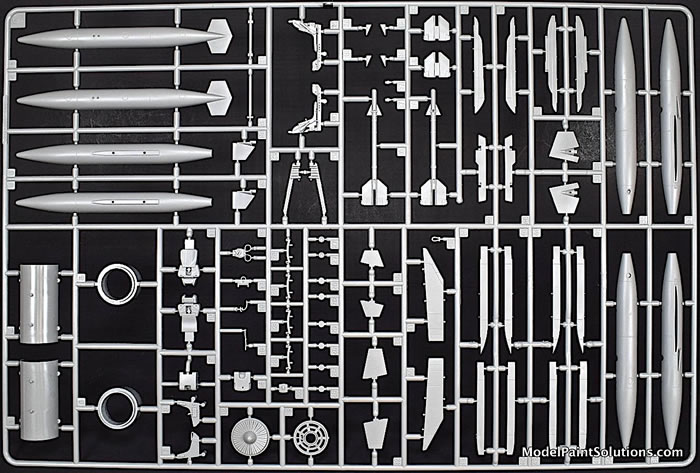
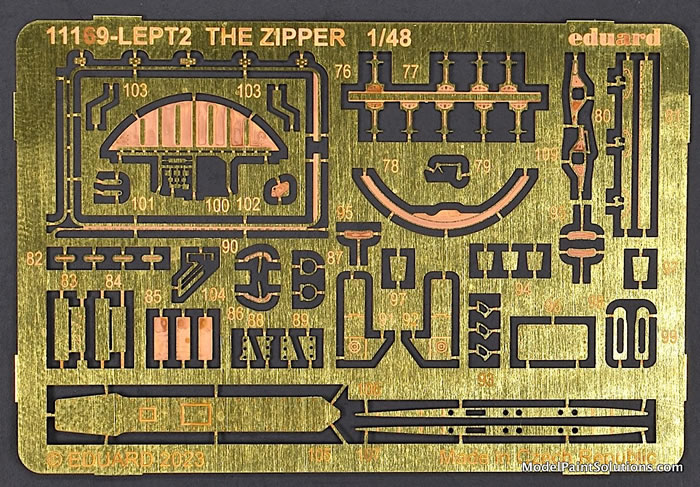
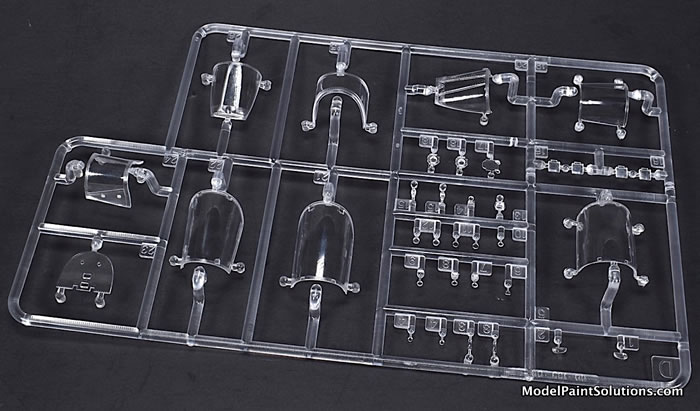
Three sprues with 193 parts in grey plastic, 35 clear parts (not all are used), 2 photo-etch frets (one brass, one color), 9 resin parts, and 2 decal sheets with markings for 7 aircraft with complete airframe stencils. |
Price: |
USD $69.95 plus shipping available online from Eduard
GBP 34.99 plus shipping available online from Hannants |
Scale: |
1/48 |
Review Type: |
First Look |
Advantages: |
This boxing provides the very nice Kinetic F-104A/C augmented with color photo-etch (seat harness and cockpit), an Eduard Brassin ejection seat and Brassin wheels, a resin antenna, die-cut painting masks, and decals covering 7 colorful airframes that served in the Vietnam War. Seriously, what’s not to like? |
Disadvantages: |
Um... |
Recommendation: |
Highly recommended for those with a little experience. |
Reviewed by John Miller

The Lockheed F-104 Starfighter is an American single-engine, supersonic air superiority fighter, which was extensively deployed as a fighter-bomber during the Cold War. Created as a day fighter by Lockheed as one of the “Century Series” of fighter aircraft for the United States Air Force (USAF), it was developed into an all-weather, multi-role aircraft in the early 1960s and was produced by several other nations, seeing widespread service outside the United States.
Vietnam War
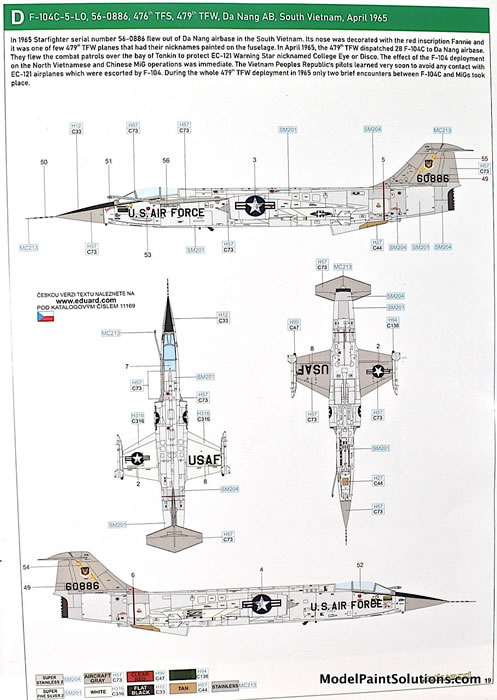
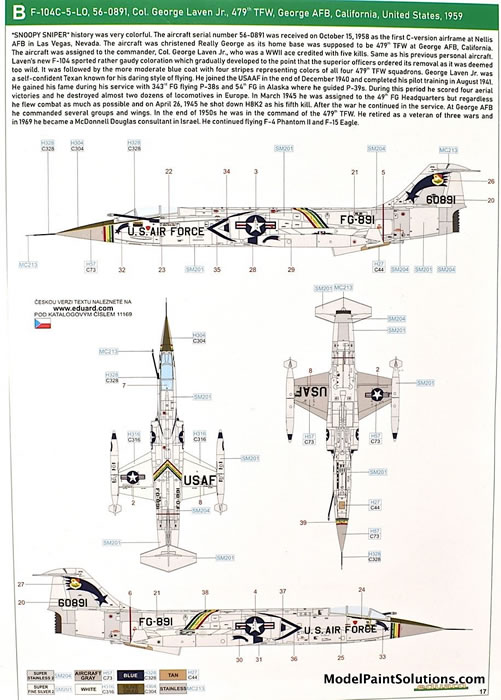
The F-104C entered service with USAF Tactical Air Command (TAC) as a multi-role fighter and fighter-bomber. The 479th Tactical Fighter Wing (TFW) at George AFB, California, was the first unit to be equipped with the type, in September 1958. Commencing with Operation Rolling Thunder, the Starfighter was used both in the air-superiority and air-support roles. On April 19th, 1965 the 476th Tactical Fighter Squadron (TFS) of the 479th TFW arrived at Da Nang AB to help protect US F-105 Thunderchief fighter-bombers against MiG-17s and especially MiG-21s that were beginning to be flown by the Vietnamese People’s Air Force (VPAF). The F-104 was also deployed extensively as a barrier combat patrol (BARCAP) protector for the EC-121D Warning Star airborne early warning aircraft patrolling off the North Vietnamese coast. The F-104s were successful in deterring MiG interceptors and performed well as close support aircraft, though they were largely uninvolved in aerial combat and recorded no air-to-air kills during the conflict. The North Vietnamese were well aware of the F-104s performance, and the 479th TFW's pilots felt that the MiGs deliberately avoided engaging them. Twenty-five MiG kills were scored by fighters controlled by EC-121 Big Eye missions, and their Starfighter escorts played a vital role in ensuring their safety.
From the first F-104 deployment in April 1965 to December, Starfighters flew a total of 2,937 combat sorties. These sorties resulted in the loss of five aircraft, one from the 476th TFS, which deployed from April to July 1965, and four from the 436th Tactical Fighter Squadron, which deployed from July to October 1965. One incident on September, 20th claimed three F-104s when Captain Philip E. Smith strayed into Chinese airspace and was shot down by a Chinese Shenyang J-6; two more collided in mid-air while searching for Smith's missing jet. No losses were reported from the 435 Tactical Fighter Squadron’s first deployment from October to December 1965.
Starfighters returned to Vietnam when the 435th Tactical Fighter Squadron re-deployed from June 1966 until August 1967. During this time F-104s flew a further 2,269 combat sorties, for a total of 5,206. F-104s operating in Vietnam were upgraded in service with AN/APR-25/26 radar warning receiver equipment. One such example is on display in the Air Zoo in Kalamazoo, Michigan. During the second deployment, an additional nine aircraft were lost for a total of 14 F-104s lost to all causes in Vietnam. In July 1967, the Starfighter units transitioned to the McDonnell-Douglas F-4 Phantom II.
(Text and Pics Edited from Wikipedia)
https://en.wikipedia.org/wiki/Lockheed_F-104_Starfighter
Introduction
There are sufficient years behind me that I remember seeing F-104’s fly at the MacDill Air Force Base Open-Day Air Shows of the mid 1970’s. Yea, I’m old… But, I do loves me some Starfighter; what a sleek, svelte airplane and yet one more brilliant design from the mind of Kelly Johnson. F-104’s are not often seen wearing the US Vietnam-era, tri-color scheme of greens and tan so it was with some excitement I saw this boxing on the shelf of my favorite hobby shop, Skyway Models. Once I checked out the airframes covered by the kits decals, I knew it was coming home with me. Great Googly-Moogly! This kit is going to build into a gorgeous model. Keep ‘em coming, Mr. Eduard!
The Kit
The lidded box we’ve come to expect from this manufacturer is adorned with some very nice art depicting a tri-colored F-104 and some compelling black and white pictures from the the Vietnam era. Inside are three sprues with 193 parts in grey styrene (not all are used), 35 clear parts (not all are used), 2 photo-etch frets (one brass, one color), an Eduard Brassin ejection seat, Brassin wheels/tires, a resin antenna, and 2 decal sheets with markings for 7 aircraft and complete airframe stencils. Wowza!
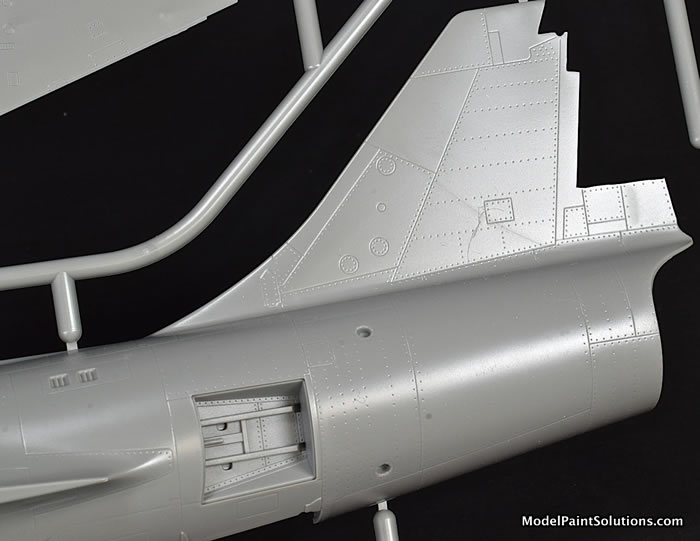
The plastic components are from Kinetic. That being the case, there is little-to-no flash, the inscribed surface details are crisply rendered and scale-appropriate.
Kinetic makes some beautifully detailed kits and their F-104A/C is a fine example of their artistry. A full review of the Kinetic F-104A/C can be found here.
https://www.hyperscale.com/2021/reviews/kits/kinetick48096reviewbg_1.htm
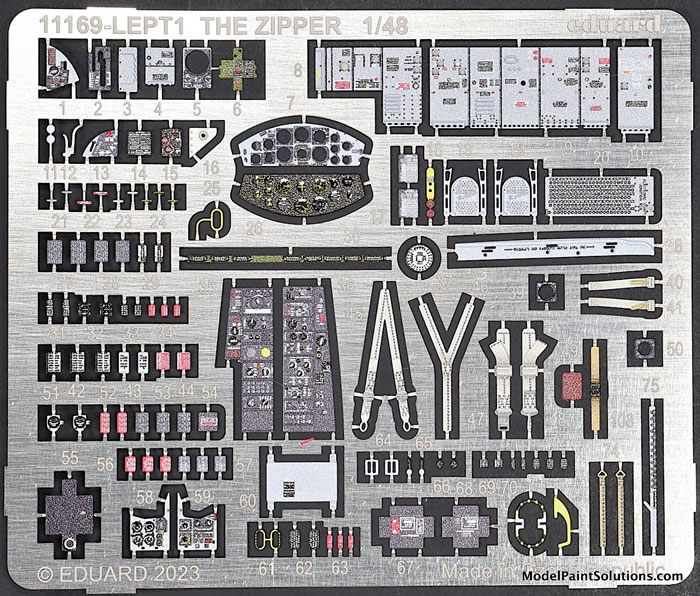
Engineering and construction are conventional so assembly begins with the cockpit, where the nicely molded Kinetic parts are augmented with photo-etch rudder pedals. Colored photo-etch parts, provided for the the main instrument panel and side panels, will result in a very detailed cockpit when assembled.
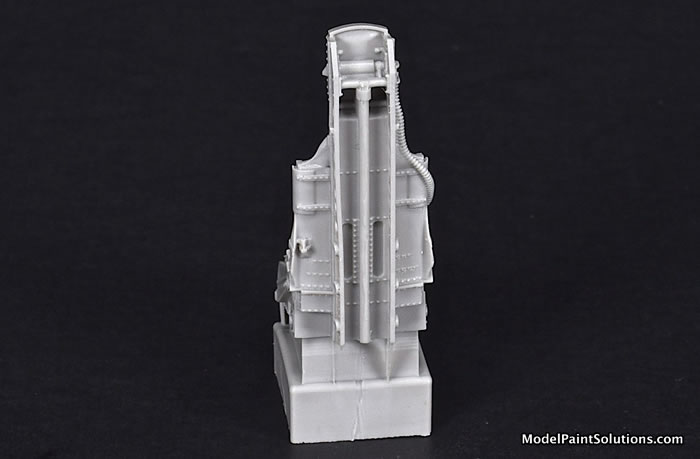
The Brassin seat is a beautiful model in and of itself. The F-104 used multiple versions of the same basic ejection seat, each differing in small details like the placement of handles, placard, etc.
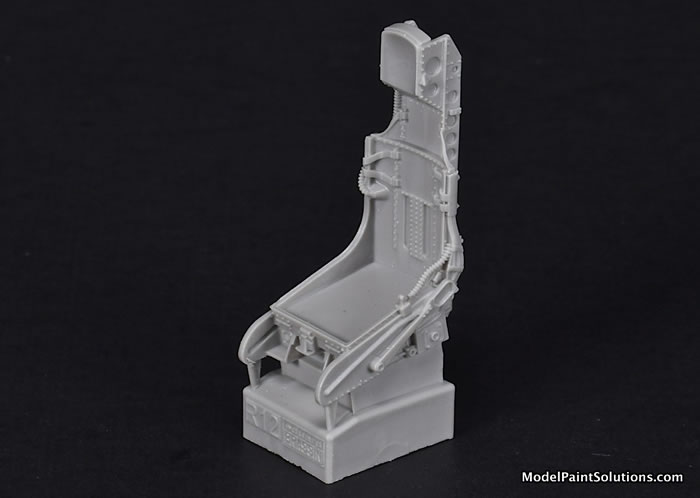
The Brassin seat has parts for assembling multiple versions, many of which are scheme specific as denoted in the instructions. That being the case, you’ll have to decide which scheme you’ll be putting on your Starfighter early in the build.
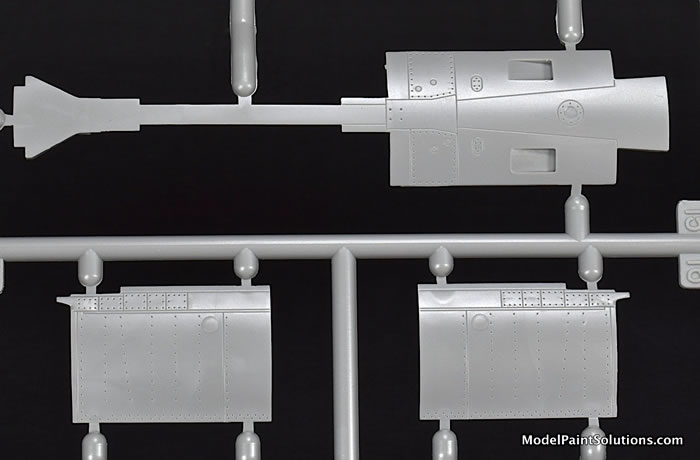
With the Brassin seat installed in the nicely detailed cockpit tub, the instructions turn to the assembly of the engine tail feathers and nose wheel well. Here the molded-in details of the Kinetic kit really shine. Next up is the main gear wheel well and like the nose gear well, the molded-in detail will look awesome under paint and a wash.
Once the cockpit tub along with the nose- and main-wheel wells are trapped in between the fuselage halves, an enormous amount of photo-etch detail is added to the avionics boxes directly behind the cockpit.
The cockpit and avionics area are going to look very convincing when assembled and I suspect, will be the focal point of the build.
Next up are some belly panels, multi-part engine intakes, the single-piece horizontal stabilizer, nose cone, and windscreen. The windscreen, like all the clear parts in the kit, is crystal clear and crisply molded with scale-appropriate framing.
The nose gear well, the main gear wells, and wheel well doors are beautifully molded and full of detail. Each multi-part gear leg is augmented with photo-etch parts making for a very detailed assemblies. Here too, the abundant detail will “pop” under careful painting and a wash.
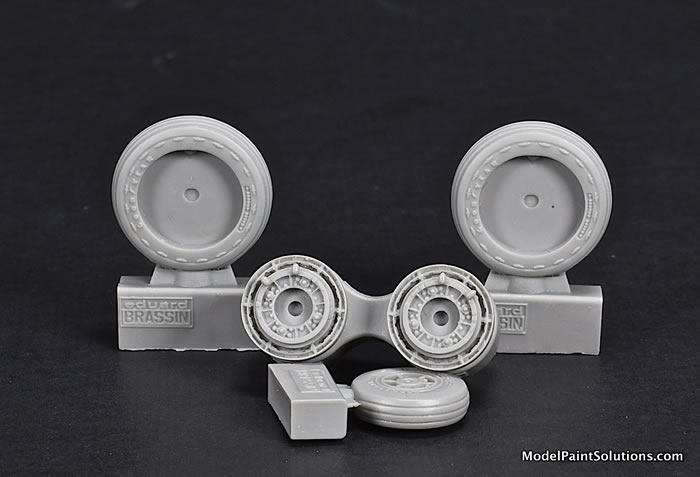
The Brassin wheels/tires are beautifully cast with scale-appropriate tread. The casting lug on each tire is positioned to produce a slight flat area with removal thereby replicating the appearance of weight. In addition, the main wheels/tires have separate inner wheel hubs. This design combined with the die-cut masks will making painting the wheels/tires an easy job.
Next up are those stubby wings; each composed of main halves with crispy rendered surface details. The wing leading edges and flaps are all single parts. Note that the builder is given the option of posing the flaps either up or down. Similarly, parts are provided to pose the speed brakes on the aft fuselage open or closed; very nice.
After the assembled wings are added to the fuselage, the builder is given the option of posing the rear canopy/avionics panel assembly in the open or closed position. With all the beautiful detail provided for this area, I’ll be posing mine in the open position inviting inspection. Note that the inner face of the avionics panel is augmented with 8 additional parts (some photo-etch). This area will look stunning once assembled.
Should you choose to display your Starfighters canopy in the open position, a really impressive amount of detail that includes levers and placards is provided for the canopy sills. The inner frames of the main canopy are augmented with multiple photo-etch parts including rear-view mirrors that are scheme-specific so check your instructions carefully here.
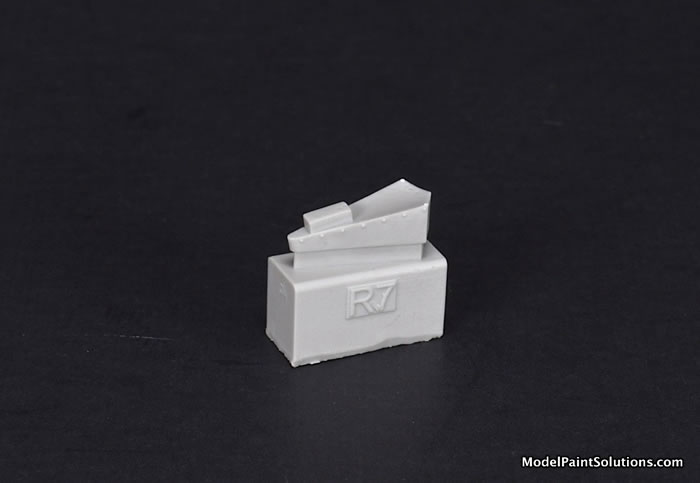
Turning downwind to final now. The exterior of the fuselage, particularly the lower nose of the F-104, was studded with multiple blade antennas and other small details. Keeping with the amazing level of detail throughout the model, this area is augmented with a multitude of photo-etch and resin antennae that will look awesome once assembled.
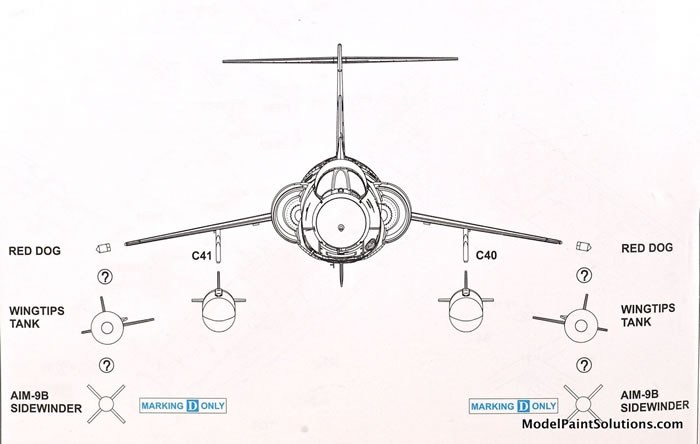
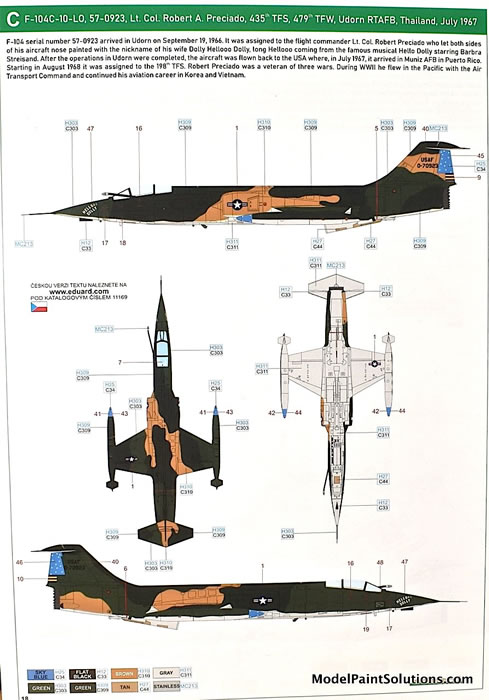
To finish up your F-104, the kit provides 2 inboard underwing tanks, 2 wingtip tanks, and 2 “Red Dog” wingtip attach points for AIM-9B Sidewinders (also provided). Note the Sidewinders are appropriate for only Scheme D, which is natural metal with particularly colorful markings. A loadout diagram showing the appropriate placement for each is provided.
Markings
The decals, printed by Eduard, are crisp with good registry and color density.
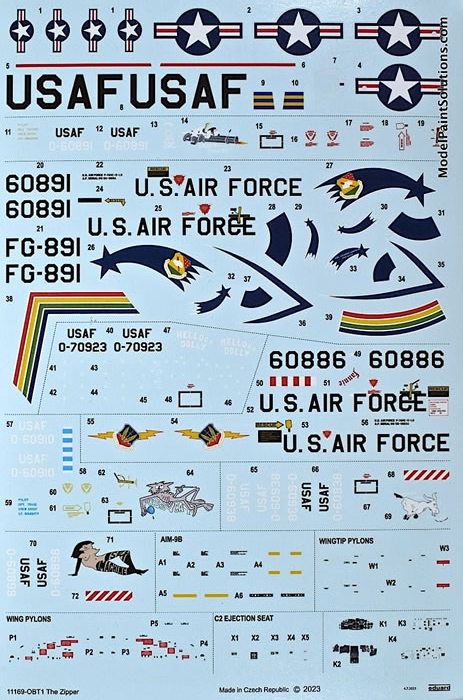
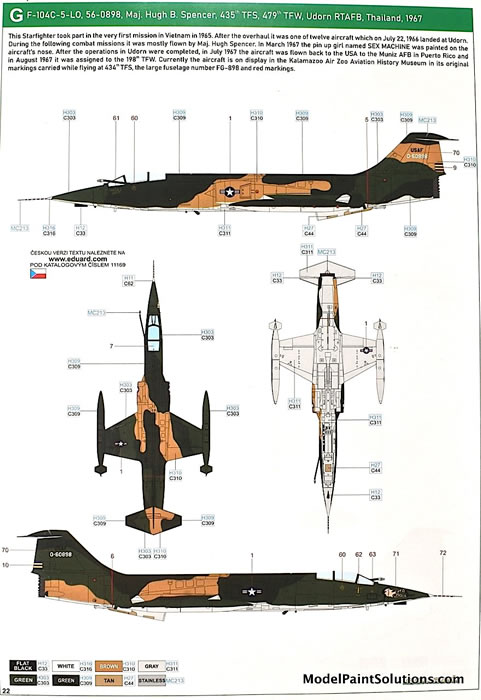
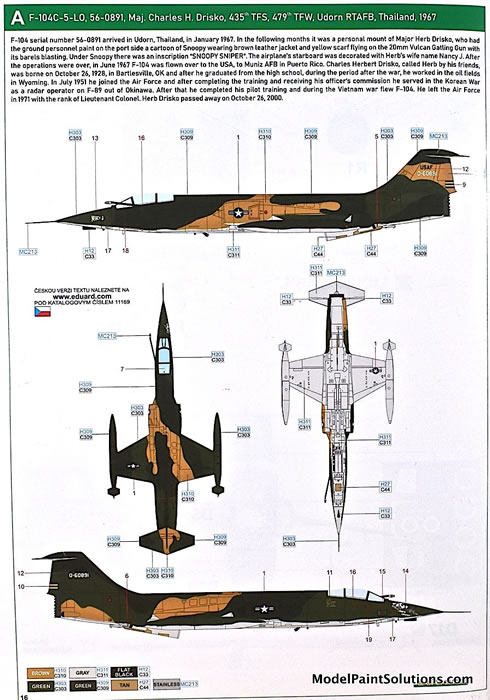
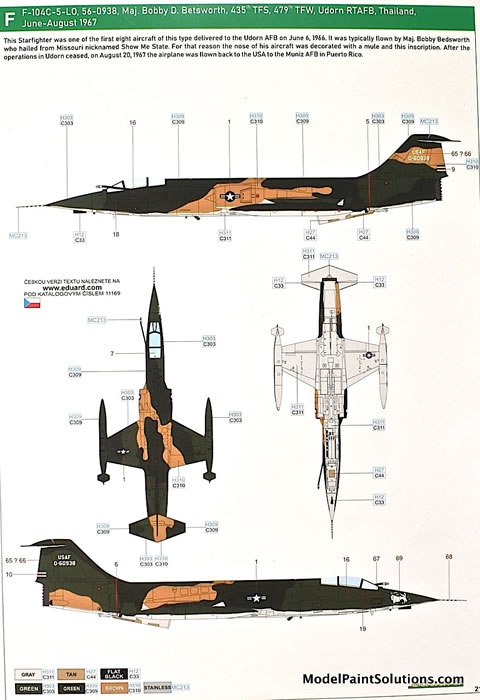
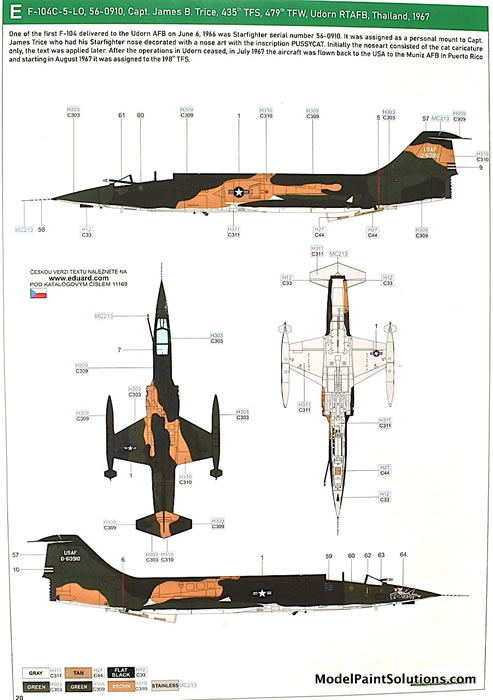
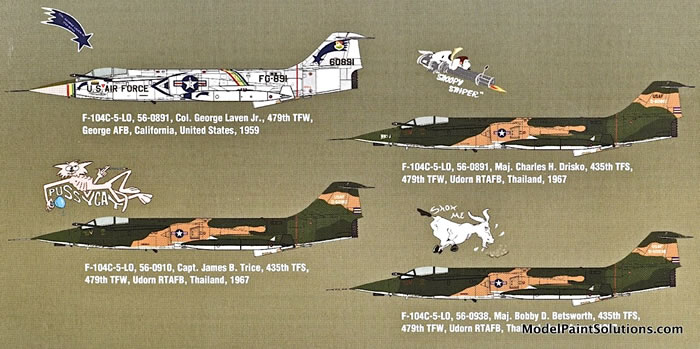
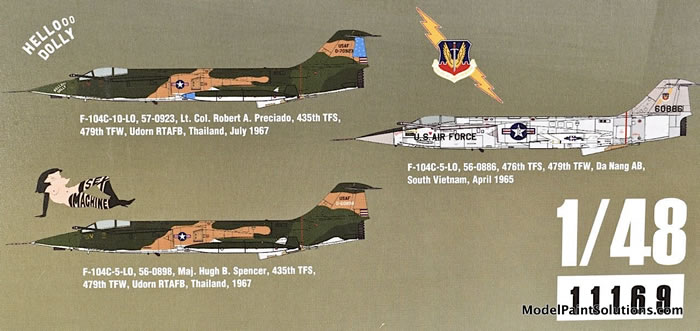
Markings for 7 airframes are provided; 5 are in the trim-color Southeast Asia scheme of greens and tan and 2 are natural metal. All of the schemes are quite colorful.
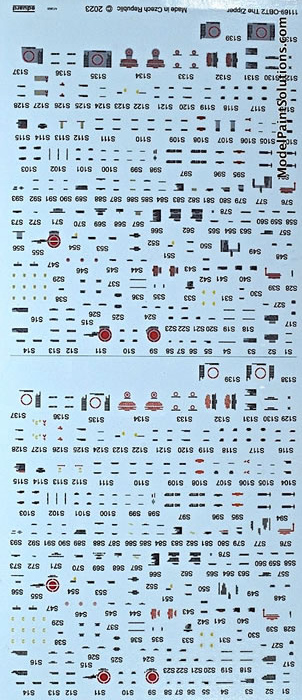
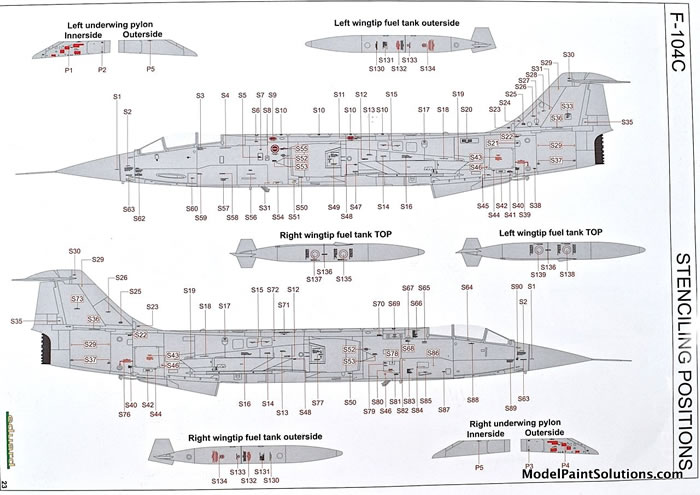
What’s truly impressive about the kits decals are the airframe stencils. In addition to being crisply printed, there is an abundance of them along with a detailed placement guide provided in the instructions.
The stencils, in particular, will make the completed mode a real head-turner. Excellent!
Uh... Wow!!
It’s hard to hide my exuberance over this kit! I’m guessing you may have picked up on that but here’s why: the styrene (both grey and clear) is crisply molded with an abundance of scale-appropriate detail. Combined that with the photo-etch, color photo-etch, resin ejection seat, resin wheels/tires, and amazing decals, and it’s hard to find something to complain about. I see no “red flags” in the instruction sequence whatsoever.
Some experience modifying styrene parts (main instrument and side panels) for photo-etch overlays would be handy but, even that job isn’t anything someone sufficiently patience couldn’t handle the first time out.
Highly recommended!!!
Cheers!
__J
For more on this review visit Modelpaintsolutions.com.
https://modelpaintsol.com/reviews/eduard-f-104c-in-vietnam-11169
Review Text and Images Copyright © 2023 by John Miller
Page Created 31 August, 2023
Last updated
2 September, 2023
Back to HyperScale Main Page
Back to Reviews Page

|
 Home
| What's New |
Features |
Gallery |
Reviews |
Reference |
Forum |
Search
Home
| What's New |
Features |
Gallery |
Reviews |
Reference |
Forum |
Search