 Home
| What's New |
Features |
Gallery |
Reviews |
Reference |
Forum |
Search
Home
| What's New |
Features |
Gallery |
Reviews |
Reference |
Forum |
Search
|
|
|
Sturmjäger
Part 2 by Mike Millette
As it turned out, Red 19 was the first aircraft I decided to build, but ended up the last of this trio to start construction. This was due to a couple of circumstances, one a function of conflicting reference material and the other, a function of my not paying attention to the reference material I had.
Red 19 was my first choice, of the Sturmjägers, to build. It had been in my mind to do a model of this aircraft for quite some time. There is a picture of the right side of this aircraft that has shown up in several books that shows a rather unique style of mottling that I thought might make an interesting challenge. Rather than the usual "spot" style of mottling, this is more like "strings". This picture also shows the early JG300 RVD band (in rust/primer red) but no II Gruppe bar. Other photographs show the opposite side of the aircraft with a lightly applied standard "spot" mottling with a II Gruppe bar but no RVD band. Resolving this dilemma caused the delay in starting this kit. In an effort to resolve the paint scheme dilemma, I posted a question to Ruy Horta's "12 O'clock High" website. Jerry Crandall was kind enough to respond and resolved many of my questions.
The inscription "Kolle Alaaf!" has been identified in several sources, including Bernd Barbas' book, as carnival shout and in other sources as a war cry but I never knew what it meant until I asked a friend of mine from the city of Cologne. She confirmed that it is a carnival cry meaning "Cologne is Alive!" in a local dialect. This seems to make sense. It also seems an appropriate inscription for a young fighter pilot defending the skies over his home.
Initially I had chosen the Hasegawa kit for this project. Rather surprisingly, the kit went together very quickly (an anomaly for this family of kits as many can attest to!). In fact it went together so quickly that it wasn't until I had all the major assemblies together and had glued the appliqué armor to the sides that I went and rechecked my references to start painting. It was then that I was reminded that Red 19 didn't carry the extra armor! I will refrain from repeating my thoughts at that moment but this would probably be a really good time to introduce my new modeling mantra: "Take your time, check your references". Did I mention check your references?
The DML kit is for the most part the same as the Hasegawa kit or any of the Trimaster family of 190s. It has all the "fit" idiosyncrasies typically associated with this family of kits, the most noteworthy being the engine cowl to wing joint. My kit also had an array of stray bumps and scratches that indicates a mold that has been worked hard over its lifetime. These can be cleaned up fairly easily, but they certainly contribute to the less than friendly building characteristics of the kit. That having been said, once the fit of the parts has been sorted out, it finishes up into quite a nice looking model. Conversion Unlike the Tamiya kit, this one was much easier to modify. The reason for this is that the Cutting Edge replacement parts for the wing fit the inserts in the wings of the Trimaster family of 190s perfectly. Since the inserts provide a very clean "edge" it was possible to scribe right on the edge and have the cutout in the wing line up pretty close to perfectly with the replacement resin parts. Admittedly it took quite a few strokes with the Xacto knife to go all the way through the wing, but once this was accomplished, clean up was a snap. Everything lined up very nicely and it didn't take too much putty to make the joints disappear.
Markings for this aircraft are covered on 2 Aeromaster decal sheets, 48-232 "Sturmjägers, part II" and 48-061Fw 190 "Butcher Birds Pt II". The markings for this aircraft on sheet 48-061are almost entirely incorrect. The "19" is too square and the "Kolle Alaaf" inscription is too large and incorrectly colored. Aeromaster did a much better job with the release of 48-232. The instructions show the left side of this aircraft with the earlier, simpler paint scheme and the II Gruppe bar. The instructions were followed for the wing and tail, as these appear to have been similar even after the repaint.
Although Red 19 carried the flatter canopy of early Fw190's, the pulley didn't work and the antenna wire constantly banged on the spine of the aircraft when the canopy was opened. This required a convincing "sagging antenna" technique that was unnecessary for either of the other two kits. This was accomplished using invisible thread that was "trained" to take a slight curve using the back of an Xacto blade. Subsequently, I have had pretty good luck with stretched sprue for this application, but this doesn't look too bad for a first try.
I suppose the fogging of the Future is something I could get around using a less aggressive decal solvent. The real killer though is dust. No matter what I do I can't seem to suppress all of the dust in my work area. I have sprayed the air and walls with water but, as soon as the airbrush starts, the dust comes for my models like zombies in a bad horror movie. Working with the gloss enamel, I am able to rub out the dust particles using 1000 grit sandpaper (wet) and toothpaste. This didn't work with Future. On Red 19, the Future just stripped away in chunks rather than feathering nicely like the enamel paint. This, more than anything, has convinced me to stick with the clear enamel for gloss coats.
Problems with the clear coat aside, this was a pretty fun model to build. The lower "hassle factor" of the conversion, vs. Red 1, was offset slightly by the basic kits idiosyncrasies. Starting all over after gluing the armor on the Hasegawa kit was kind of annoying, but overall I'm quite happy with it and it is my favorite of the three 190s. Several months after this kit was completed, I purchased Peter Rodeike's "Focke Wulf Jagdflugzeug, Fw 190 A, Fw 190 Dora, Ta 152 H" and Alfred Price's "Focke Wulf Fw 190 in Combat". Both of these books indicate that Red 19 was a straight A-8 rather than an A-8/R2. I don't have photographic confirmation that this is true, but if so, it means that this aircraft carried 4-20mm cannon in the wings rather than the 2-20mm/2-30mm mix of the A-8/R2. After all that effort it would almost seem a shame.... almost.... not to correct the kit. Then again, maybe I'll just build another one someday. This time I'll get it right the first time! References See Part 3 Model, Images and Article Copyright
© 1999 by Mike Millette Back to HyperScale Main Page Back to Features Page |
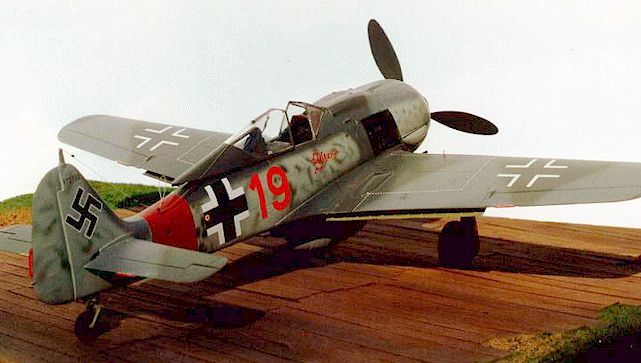
 Red 19 was
the regular aircraft of Unteroffizier Ernst Schroder. Configured as an A-8/R2,
it carried the outboard cannon of the Sturmjägers but not the extra armor. This
made it a bit more lively in the handling department than many of the aircraft
in the Gruppe, but also more vulnerable.
Red 19 was
the regular aircraft of Unteroffizier Ernst Schroder. Configured as an A-8/R2,
it carried the outboard cannon of the Sturmjägers but not the extra armor. This
made it a bit more lively in the handling department than many of the aircraft
in the Gruppe, but also more vulnerable.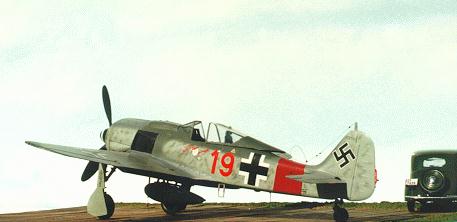 It seems
that Red 19 started off with a fairly standard mid war paint scheme, the
previous tactical number had been painted out (possibly with RLM 75) and the
"19" applied. This scheme also carried the II Gruppe bar but no RVD
band. Sometime in November 1944, the aircraft was partially repainted and the
"string" mottling was applied. The RVD band was also applied at this
time as was the "Edelgard" inscription on the right side but no II
Gruppe bar was added. "Kolle Alaaf!" was retained on the left side.
It seems
that Red 19 started off with a fairly standard mid war paint scheme, the
previous tactical number had been painted out (possibly with RLM 75) and the
"19" applied. This scheme also carried the II Gruppe bar but no RVD
band. Sometime in November 1944, the aircraft was partially repainted and the
"string" mottling was applied. The RVD band was also applied at this
time as was the "Edelgard" inscription on the right side but no II
Gruppe bar was added. "Kolle Alaaf!" was retained on the left side.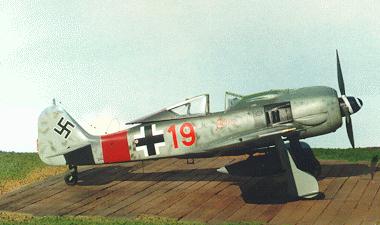 Off I went
to my local hobby store only to discover that they were completely sold out of
1/48 Fw 190 kits except for a lone DML A8/R11 Nachtjager kit. Embarrassed at my
mistake and in a hurry to fix it, this became the new basis for my Red 19
project. The essentially complete Hasegawa kit was set aside, soon to become
Black 8.
Off I went
to my local hobby store only to discover that they were completely sold out of
1/48 Fw 190 kits except for a lone DML A8/R11 Nachtjager kit. Embarrassed at my
mistake and in a hurry to fix it, this became the new basis for my Red 19
project. The essentially complete Hasegawa kit was set aside, soon to become
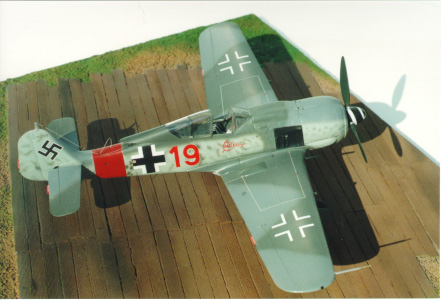
Black 8.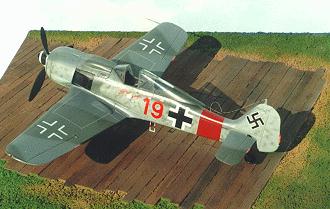 The squiggle
mottling on the fuselage took me four tries to get it the way I wanted it.
Paint, check it against the references (I'm learning), sand it back, and try it
again. Some of the mottling is so unique and distinctive that, in the end, I
ended up cutting masks for it (around the 19 on the starboard side). The problem
is that the mottling has a very soft edge that requires that the paint be
applied very thinly, almost transparently. This means repeated applications to
get the right color density. The first shot isn't so bad; it's trying to make
the follow-on squiggles go exactly the same place that gets tricky.
The squiggle
mottling on the fuselage took me four tries to get it the way I wanted it.
Paint, check it against the references (I'm learning), sand it back, and try it
again. Some of the mottling is so unique and distinctive that, in the end, I
ended up cutting masks for it (around the 19 on the starboard side). The problem
is that the mottling has a very soft edge that requires that the paint be
applied very thinly, almost transparently. This means repeated applications to
get the right color density. The first shot isn't so bad; it's trying to make
the follow-on squiggles go exactly the same place that gets tricky.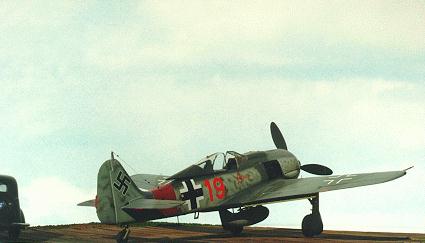 As I
mentioned earlier, this kit and Red 1 were my first attempt to use Future as a
gloss coat. I had such an infuriating time with it that, after numerous
attempts, I gave up. I ended up stripping the upper surface of the wing down to
the plastic. This was by far the biggest problem area. I even managed to do this
without damaging the paint on the fuselage (I did not want to repaint that
fuselage again!) or the lower surface of the wing, all of which had decals
applied by this point The upper surface of the wing was repainted, gloss coated
and new decals were applied.
As I
mentioned earlier, this kit and Red 1 were my first attempt to use Future as a
gloss coat. I had such an infuriating time with it that, after numerous
attempts, I gave up. I ended up stripping the upper surface of the wing down to
the plastic. This was by far the biggest problem area. I even managed to do this
without damaging the paint on the fuselage (I did not want to repaint that
fuselage again!) or the lower surface of the wing, all of which had decals
applied by this point The upper surface of the wing was repainted, gloss coated
and new decals were applied.