 Home
| What's New |
Features |
Gallery |
Reviews |
Reference |
Forum |
Search
Home
| What's New |
Features |
Gallery |
Reviews |
Reference |
Forum |
Search
|
|
|
Sturmjäger
Part 3 by Mike Millette
In this concluding part of his "Sturmjager" series, Mike builds Hasegawa's re-boxing of Dragon/DML's 1/48 scale Focke-Wulf Fw 190A-8
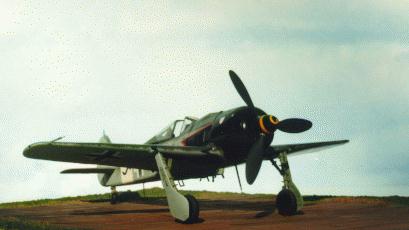
Black 8 was the mount of renowned pilot, Willi Maximowitz. His score of 25 victories included 15 four-engine bombers. His aircraft, Black 8, must have been rather challenging to fly. As an A-8/R8 version of the hard working Fw 190, not only did it carry the extra armor, common to many of the Sturmjagers, it also carried the full complement of machine guns and cannon. All this extra weight made this Fw 190 (not an outstanding performer at high altitude anyway) a very sluggish aircraft to fly when combating the highflying bombers and fighters.
Now before anybody runs out and buys one of these kits thinking they will get a nice inexpensive Sturmjager kit, let me just say that this appears to have been a packaging error. I have talked to a couple of people who have this kit in their collections and no one has seen another A-5 Special packaged this way. A shame really, but it did make building this kit much easier than it could have been. The upper cowling was sourced from another A-8 kit which will become an A-6 Sturmjager at some point.
Having inadvertently added armor to this kit, I now had to decide on another aircraft to model. That wasn't too hard. The JG3 aircraft with their jaunty, gloss black noses and stylish eagle wings make a compelling choice. Out came my decal box and the decision was made for me. Black 8. Aeromaster has created decals for this aircraft on two different sheets, both of them differ somewhat. Sheet 48-061 has a white-trimmed black 8 (correct), a small eagle wing (around the exhaust area) and shows the spinner as being red with a yellow stripe. Sheet 48-231 has a white-trimmed red 8, a larger (correct) eagle wing and shows a black spinner with a yellow stripe (correct).
Having now completed (or so I thought) my three Sturmjagers I took some pictures and sent them to Jerry Crandall in thanks for his help on this project. In my letter, I commented that something about Black 8 just didn't look right. My reference photos seemed to suggest that the wing root was darker (maybe black) than camouflage colors the decal instructions said they should it should be. It also appeared that the red trim actually ended at the aft tip of the wing root similar to many other IV JG3 aircraft, but I couldn't be sure. Jerry confirmed that the wing root should actually be black, as I had suspected, and that it looked like the red trim might, possibly, go all the way back, but he couldn't really say for certain (this is the Luftwaffe after all).
But that's not the end of the story. Sometime during the preparation of this article I was at home working on
another kit. Since my girlfriend wasn't home I popped one of the Chronos
Luftwaffe videos (#2) into the VCR. I wasn't really paying too close attention,
being focused on the project at hand, but when they started talking about the
Sturmjagers I looked I still maintain that in those forward quarter photos, the wing roots look like they are trimmed in red all the way to the trailing edge, but who knows. Could Black 8 also have had a mid life paint scheme change?
The antenna was the same invisible thread/stretched sprue combination as used on the other two. The clear wing tip navigation lights were painted in Tamiya Clear Red and Clear Green. Weathering was fairly minimal on these three kits, and as such, it is almost invisible in the photos. I have been experimenting with various weathering techniques and intend to apply them (conservatively) to future projects. All these pictures were shot in my back yard on a little "Luftwaffe Wood Hardstand" base from Just Plane Stuff. The background is a poster board with a cloudscape print that I found at Target for $.89 or thereabouts. The Ford staff car is a 1/43 die-cast toy I found at a local hobby store. It's not perfectly scale, but close enough to make an interesting addition.
In some ways, I wish I had known that Eagle Cals #8 was going to be released when I started this. I would have waited for them. This sheet covers four other aircraft from IV/JG3 and would have saved me a lot of false starts. They are also some of the most thoroughly researched decals available. Then again, as my girlfriend so often says to me "That'd be too easy. Where's the fun in that?" And that's what it's all about after all, isn't it? My objective with these three kits was to explore some interesting paint schemes. As frustrating as that was at times, the journey was quite rewarding. The definitive "Luftwaffe paint scheme reference" continues to be an elusive target and I'm not sure if it's slowing down or speeding up. The alternatives are to live with the chance that if you build it they will come up with something better, or, leave you kits in the box until the "definitive reference" does come along. I'll build my kits now thank you.
Personal Correspondence with Jerry Crandall, July & September, 1998 I would just like to say that without Jerry's help I'm not sure what these kits would have ended up looking like. He was kind enough to answer an awful lot of questions with very detailed answers where he had them and knowledgeable speculation where firm answers were unavailable. He is an enthusiast's enthusiast! · Planes of the Luftwaffe Fighter Aces Vol. 1 & 2 *1985 & 1995 by Bernd Barbas · Luftwaffe Fighter Aircraft in Profile *1997 by Claes Sundin & Christer Bergstrom · The Official Monogram Painting Guide to German Aircraft 1935-1945 *1980 · Kenneth A. Merrick & Thomas H. Hitchcock · Focke-Wulf Fw 190 A/F/G *1993 Model Art · Aero Detail #6, Focke-Wulf Fw 190A/F *1998 by Shigeru Nohara · Die Deutschen Luftwaffe No 2, Jager, Day Fighters 1942-1945 (video) * 1998 VAF/Chronos Films · Fw 190A-8 Aircraft Handbook, issued 1944, *1973 Valkyrie Publications · Focke Wulf Jadfflugzeug, Fw 190 A, Fw 190 "Dora", Ta 152 H *1998 by Peter Rodeike · Focke Wulf Fw 190 in Combat *1998 by Alfred Price · Aircraft & Legend Focke-Wulf Fw 190 & Ta 152 *1988 Heinz J. Nowarra
Model, Images and Article Copyright
© 1999 by Mike Millette Back to HyperScale Main Page Back to Features Page |

 As I
mentioned in Part II, and quite by accident, this kit was the easiest of the 3
Sturmjagers to build. In trying to decide which kit to use as a basis for a
Sturmjager project, I went through my unbuilt Fw 190 kits to see which would
make a good basis for a Sturmjager project. I would not normally have considered
an A-5 as a good basis for and A-8 project, but I remembered that John Beaman
posted some comments to the HyperScale Discussion Group. I don't have the exact
post, but the essence of it was that this kit was actually an A-8 with a few A-5
parts. When I opened the box and looked at the parts I was very pleasantly
surprised to discover that not only was it an A-8 but also the lower wing was
exactly what I needed, complete with 30mm outer wing cannon!
As I
mentioned in Part II, and quite by accident, this kit was the easiest of the 3
Sturmjagers to build. In trying to decide which kit to use as a basis for a
Sturmjager project, I went through my unbuilt Fw 190 kits to see which would
make a good basis for a Sturmjager project. I would not normally have considered
an A-5 as a good basis for and A-8 project, but I remembered that John Beaman
posted some comments to the HyperScale Discussion Group. I don't have the exact
post, but the essence of it was that this kit was actually an A-8 with a few A-5
parts. When I opened the box and looked at the parts I was very pleasantly
surprised to discover that not only was it an A-8 but also the lower wing was
exactly what I needed, complete with 30mm outer wing cannon!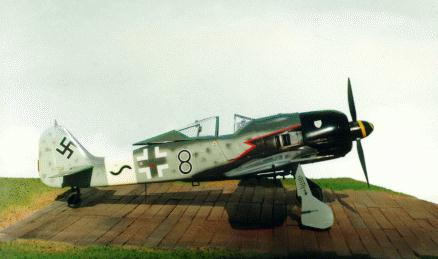 This section
should probably be titled "Evolution of a Paint Job" as the paint
scheme on my model kept changing as new reference material became available. I
started out painting the kit as described in the instructions of sheet 48-231
using the mid war grays, RLM 74/75/76. The one exception to this was the
tactical number. Somewhere along the line, I forget where now, one of my
references indicated that Black 8 actually had a red border. My primary
reference for this aircraft is a sequence of pictures that show this aircraft
from the forward quarter. These have been published in a number of different
books and magazines, but unfortunately do not show much of the fuselage side
detail. Since I did not have red-bordered "8"s on any of the decal
sheets that I had, I picked up a sheet of generic Luftwaffe Fighter numbers
(48-047). I applied the rest of the decals over a coat of Clear Gloss enamel and
this, then, became Black 8, version 1.
This section
should probably be titled "Evolution of a Paint Job" as the paint
scheme on my model kept changing as new reference material became available. I
started out painting the kit as described in the instructions of sheet 48-231
using the mid war grays, RLM 74/75/76. The one exception to this was the
tactical number. Somewhere along the line, I forget where now, one of my
references indicated that Black 8 actually had a red border. My primary
reference for this aircraft is a sequence of pictures that show this aircraft
from the forward quarter. These have been published in a number of different
books and magazines, but unfortunately do not show much of the fuselage side
detail. Since I did not have red-bordered "8"s on any of the decal
sheets that I had, I picked up a sheet of generic Luftwaffe Fighter numbers
(48-047). I applied the rest of the decals over a coat of Clear Gloss enamel and
this, then, became Black 8, version 1. 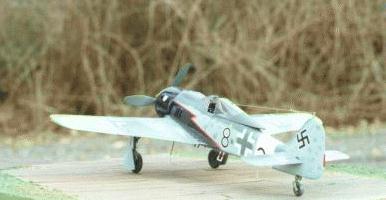 At about
the same time I came across a picture of this aircraft that was shot from a
slightly different angle and shows what looks like the bottom of the
"8" trimmed in white and not red. Fortunately I had not applied an
overcoat yet. Off came the red trimmed black "8" decal, to be replaced
by the white trimmed one on Aeromaster's 48-61 sheet. The exhaust area was
carefully masked using Post-It notes and the thin red stripe was sourced from a
sheet of railroad trim decals. At this point I was pretty confidant that Black 8
was looking the way it should so I added antenna lines and called
"Victory!". Black 8, version 2 was done.
At about
the same time I came across a picture of this aircraft that was shot from a
slightly different angle and shows what looks like the bottom of the
"8" trimmed in white and not red. Fortunately I had not applied an
overcoat yet. Off came the red trimmed black "8" decal, to be replaced
by the white trimmed one on Aeromaster's 48-61 sheet. The exhaust area was
carefully masked using Post-It notes and the thin red stripe was sourced from a
sheet of railroad trim decals. At this point I was pretty confidant that Black 8
was looking the way it should so I added antenna lines and called
"Victory!". Black 8, version 2 was done. 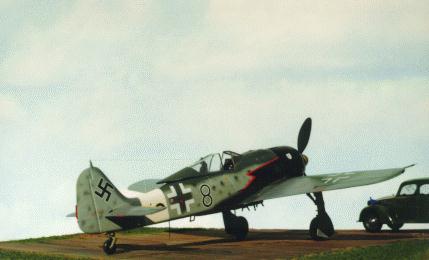 up
and there it was, a beautiful rear quarter view of Black 8......... As happy as
I was to finally see a shot of the fuselage from this angle, I was horrified
(well OK, maybe not horrified) to see that while the wing root was painted
black, the eagle wing with its red trim strip did, in fact, end about half way
down the wing root (as in the decal from 48-231), not all the way at the
trailing edge! Fortunately, the extra black paint and red trim decal came off
relatively easily and I managed not to damage anything else. Ta-Da! Black 8,
version 3... the final version... I hope.
up
and there it was, a beautiful rear quarter view of Black 8......... As happy as
I was to finally see a shot of the fuselage from this angle, I was horrified
(well OK, maybe not horrified) to see that while the wing root was painted
black, the eagle wing with its red trim strip did, in fact, end about half way
down the wing root (as in the decal from 48-231), not all the way at the
trailing edge! Fortunately, the extra black paint and red trim decal came off
relatively easily and I managed not to damage anything else. Ta-Da! Black 8,
version 3... the final version... I hope.