|
Douglas
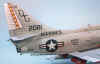
A-4E Skyhawk
by David W.
Aungst
|
|
Douglas A-4E Skyhawk |
I have completed three 1/48 scale Monogram Skyhawks over the years. My final
effort was a conversion of their A-4E/F into an A-4M (some readers might have
seen the article in FSM some years ago). I have several other Monogram Skyhawk
kits that have sat for almost a decade in varying states of completion.
While the Monogram kit is not a bad kit, even by today's standards, it is
showing its age. The molds are getting older and the fit of the kit in recent
releases has not been as good as what it once was. The kit I built for this
posting is Hasegawa's completely new tooled model of the A-4 Skyhawk. This model
goes a long way toward filling the gap that the Monogram kit has been starting
to leave open. I received this Hasegawa A-4 Skyhawk kit for Christmas. I started
to build it the next day.
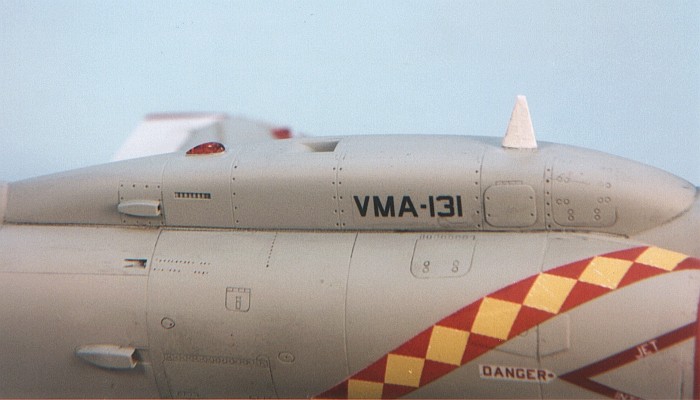
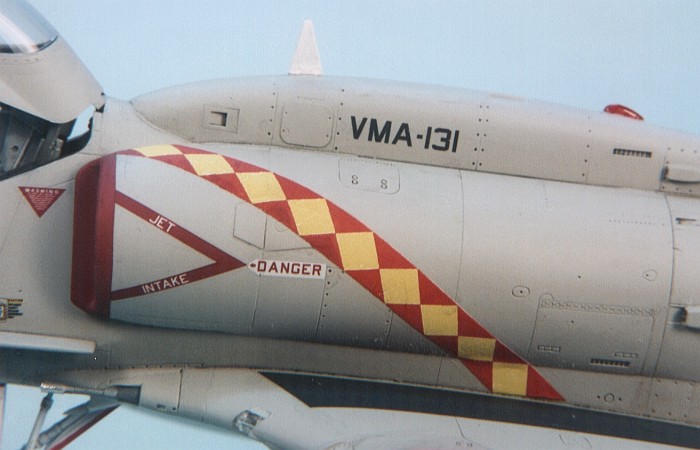
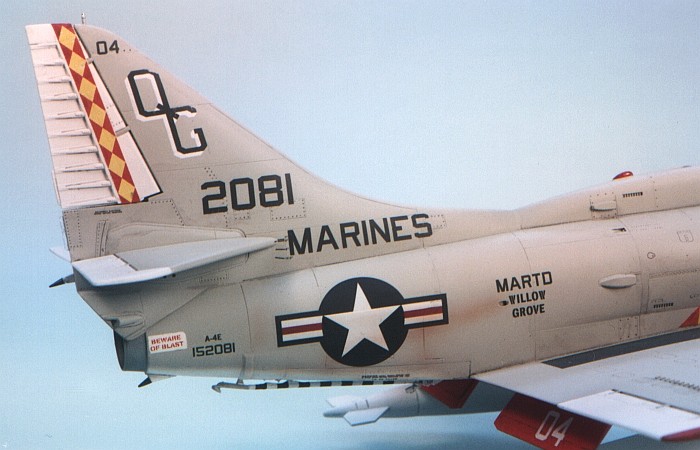
While I like the kit provided markings for VA-22 "Fighting Redcocks",
I wanted to do something a little different. VMA-131 Diamondbacks flew A-4
Skyhawks from NAS Willow Grove (near my home) for many years. Starting with the
A-4C, they transitioned into the A-4E and later into the A-4M. The A-4E years
were the high point for colorful markings in the unit. The red and yellow
trimmed version of the Diamondbacks markings was the "ultimate Skyhawk"
that I fell in love with as a kid.
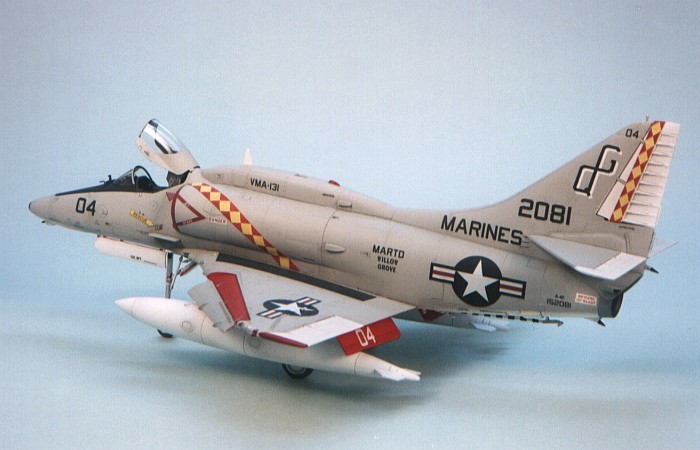
When I started to build this simply gorgeous Hasegawa A-4E/F kit, it was
natural for me to want to build a red and yellow trimmed aircraft from the
Diamondbacks.
Hasegawa's
1/48 Scale Skyhawk |
There just is not enough space to write all the good things about the new
Hasegawa Skyhawk kit. The moldings are crisp and clean. The engineering of the
kit allows you to build the model in one of several configurations starting with
the first A-4E aircraft and ending with the later A-4F, prior to the
introduction of the new-engined A-4F "Super Fox" Skyhawk. The
following list provides some description of the attributes of the kit.
-
The kit has finely engraved scribing
throughout. Notable exceptions to this are the external fuel tanks. I do not
know why Hasegawa opted to leave these with raised scribing while the rest
of the kit is engraved.
-
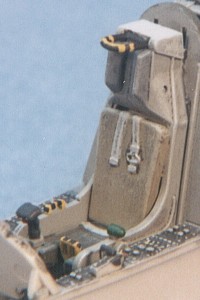
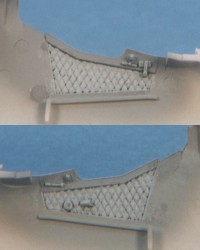
The cockpit has nicely tooled, raised details
for the instrument panels. The cockpit side walls have molded into them the
quilted lining that covered these areas on the real aircraft. The ejection
seat is a bit simplistic, but is more than acceptable as provided in the
kit. As a test, I tried to fit a True Details resin seat into the cockpit
and found it would not fit. Either the True Details seat is a little
oversized, or the Hasegawa cockpit is a bit undersized. As the True Details
seat does fit multiple other kits, including other Hasegawa kits like the
A-7 and F-15, I think the issue is that the cockpit is undersized. This will
present problems to the after-market industry when they go about creating
resin details to fit the kit cockpit.
-
Looking at the inside surfaces of the fuselage
pieces, there is a small ridge in the location of the natural break point
where the tail separates from the airframe on the real aircraft. This ridge
shows that Hasegawa has intentions of changing the forward fuselage to
release other Skyhawk versions. See the last point of this list, below, to
read about all the versions I can find implications to in the kit.
-
Hasegawa provides intake ducting back to a
representation of the engine face. They also provide a correct length of
tail pipe at the engine exhaust.
-
The fuselage can be built with or without the
large avionics hump. A unique locator setup allows the hump to be positively
aligned and secured during construction. The fit of the avionics hump to the
fuselage is nearly perfect. I only needed a slight amount of super glue to
fill a small seam on the forward left side. If not using the avionics hump,
the forward vertical tail extension is provided and fits equally as well as
the avionics hump does.
-
The wing slats can be positioned extended or
retracted. Without any retraining straps, the slats are normally extended on
the ground as they are simple gravity powered mechanisms. The Blue Angels
are the only exception to this as they had their slats bolted closed to
ensure they would not extend at the wrong moment and cause an accident while
flying close formation.
-
The wing flaps can be positioned extended or
retracted. If building an A-4F, provisions are included to show the upper
wing spoilers that are found above the wing flaps. Molded to the inside of
the flaps are small cylinders, set into squared depressions. If building an
A-4E Skyhawk, these should be cut off and the squared depressions filled.
The cylinders are the actuators for the upper wing spoilers. The spoilers
are present only on the later Skyhawks, starting with the A-4F.
-
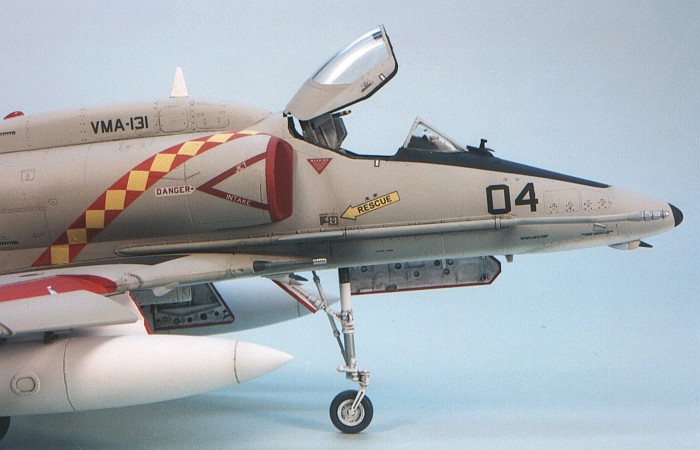
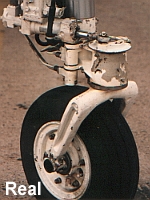 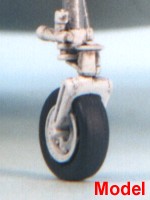 The
landing gear is quite well detailed. The nose strut has alternate pieces for
building an aircraft with or without nose wheel steering. One picky point on
the landing gear is that Hasegawa chose to mold the nose wheel as part of
the nose landing gear strut. This is an unfortunate choice by them that has
been loudly complained about in all the "in the box" reviews I
have read. One reviewer on ARC knocked off 20% from his review score over
this minuscule detail. That reviewer needs to get a life. I am here to say
that while I would prefer a separate wheel, a carefully painted strut really
looks just fine with this solid nose wheel molding. The nose wheel fork on
the real aircraft is a very tight fit around the nose wheel. The gap in
scale would be quite small if it were provided accurately. Painted
appropriately, the completed model is not detracted from in any way by the
solid nose wheel molding. Check out my pictures, here, for a visual account
of the nose wheel and its details on both the real aircraft and the model. The
landing gear is quite well detailed. The nose strut has alternate pieces for
building an aircraft with or without nose wheel steering. One picky point on
the landing gear is that Hasegawa chose to mold the nose wheel as part of
the nose landing gear strut. This is an unfortunate choice by them that has
been loudly complained about in all the "in the box" reviews I
have read. One reviewer on ARC knocked off 20% from his review score over
this minuscule detail. That reviewer needs to get a life. I am here to say
that while I would prefer a separate wheel, a carefully painted strut really
looks just fine with this solid nose wheel molding. The nose wheel fork on
the real aircraft is a very tight fit around the nose wheel. The gap in
scale would be quite small if it were provided accurately. Painted
appropriately, the completed model is not detracted from in any way by the
solid nose wheel molding. Check out my pictures, here, for a visual account
of the nose wheel and its details on both the real aircraft and the model.
-
The wheel wells are well appointed with lots of
molded in details. The bridle hooks for catapult launches are included in
the main wheel wells.
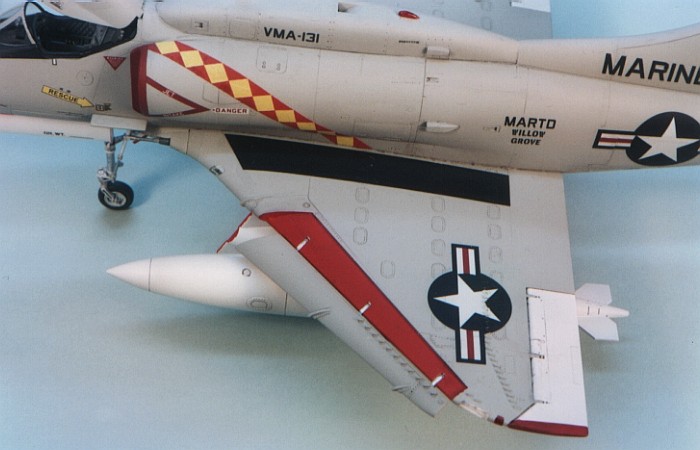
-
All five external weapons pylons are provided
with sway bracing, but external stores are limited to two fuel tanks and
Sidewinder launch rails without any weapons. Hasegawa obviously expects us
modelers to have a ready supply of weapons in our spare parts drawer. Or,
they expect us to purchase their weapons sets. While I like the weapons set
concept, it would not be that hard for Hasegawa to include some appropriate
weapons in the basic kit. The Sidewinder launch rails are good things,
though, as they include the correct pylon adapters to mount the rails. These
missile rails are very prominent on many aggressor Skyhawks. The fuel tanks
are also well done with options to build them with or without their tail
fins.
-
The best part of the kit is all the pieces that
Hasegawa tells you to ignore. In these extra pieces can be found the
evidence that Hasegawa is planning other versions of the Skyhawk.
-
One parts tree is present in duplicate to
provide pieces that you need two of, like fuel tanks and weapons pylons.
On this tree are found the cockpit control stick(s). Why else would you
need two control sticks other than to provide for a two seated aircraft?
This just screams TA-4x. Maybe even OA-4M, I hope...
-
The squared tail top and parabrake housing
of the A-4H or TA-4H are already present in the kit.
-
The large, wide blade antennas found on New
Zealand aircraft are already in the kit. Say hello to the A-4K or
TA-4K.
-
Another funky antenna that is already found
in the kit is the large blade antenna found on the A-4S. This introduces
other potential aircraft as the A-4S is based on the earlier A-4B.
HobbyCraft better watch out!
-
More fuel on the fire for A-4B/C comes in
the form of how Hasegawa molded the in-flight refueling probe. They
molded three separate locator pins to the probe and instruct you to
remove the first two to build this A-4E/F. The other two pins would
allow for shorter probes as found on the shorter nosed A-4B/C. The story
just keeps getting better.
-
The minimally extended exhaust pipe of the
J57-P408 powered A-4s is already in the kit. This provides for the A-4F
"Super Fox" flown by the Blue Angels and most all US Aggressor
squadrons. All that is needed are the bulged engine intakes, but the
intakes are singled out to a parts tree of their own, so swapping in a
new tree is more than possible. These options are also a good starts
toward making an A-4M/N or A-4KU or TA-4KU.
-
The large "shark fin" antenna
found on Israeli A-4Ns is already in the kit with a flashed over
mounting hole in the center section of the avionics hump.
-
In addition to the already mentioned
indications of a potential A-4M, there are gates visible in the molds
around the main landing gear doors. This hints at a possible replacement
of these doors in future releases. The only Skyhawk to have a different
main wheel well door is the A-4M "Super Mike" variant, of
which the final Skyhawk (BuNo 160264) was one.
-
There are probably other model kit versions on
the drawing board, too, as I found flashed-over locator holes all around the
airframe that the current instruction sheet made no mention about. Only time
will tell what all the versions are that Hasegawa is able to milk out of the
molds they have created. I can't wait...
The model is built strictly out-of-the-box. I wanted to see the model as
Hasegawa intended it before I went out and start doing updates and surgery to
the kit. The only change I made to the stock kit was to substitute my own custom
printed decals for the unit markings. Even with this substitution, I still used
Hasegawa's decals for the aircraft data markings.
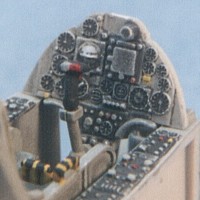
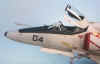
| Cockpit
I started the model with building the cockpit. For those not wanting to
paint the instrument panels, decals are also provided. I've never been
satisfied by decaled instrument panels, so I painted mine.
I over-coated the entire cockpit in Dark Gull Gray (F.S.36231), then
painted the instrument panels in Interior Black. A little detail painting
to pick off the details of the cockpit created a very respectable cockpit,
right out of the box. I even maintained the kit provided ejection seat. |
|
|
Fuselage
 Before
the fuselage could be assembled, I also needed to paint the engine intake
ducting and the engine exhaust pipe. I painted the intake duct Gloss White
with a Steel metalizer engine face. I painted the tail pipe in Burned Iron
with an Engine Exhaust metalizer engine turbine. Before
the fuselage could be assembled, I also needed to paint the engine intake
ducting and the engine exhaust pipe. I painted the intake duct Gloss White
with a Steel metalizer engine face. I painted the tail pipe in Burned Iron
with an Engine Exhaust metalizer engine turbine.
The fuselage assembled easily although I did need to use a thin coat of
super glue to fill some voids.
I assembled the engine intakes, did some minor filling of the seams
inside them, painted them Gloss White inside, and attached them to the
fuselage. No filler was needed on the external seams. Then, I cut free and
cleaned up all the "tiny bits of plastic" that detail the
fuselage and attached them.
One of these "tiny bits of plastic" is the in-flight
refueling probe. Hasegawa provides two probes in the kit -- the long
straight probes found on most all versions as they were delivered from
Douglas (or McDonnell Douglas) and the shorter, bent probe found on the
later versions and refitted to many older aircraft. Happily for me,
documentation pictures of the aircraft I wanted to build showed it had the
bent probe, so I chose to use that one on this model.
The final fuselage assembly involved the avionics hump. This is a big
trouble spot in the Monogram kit. Hasegawa took more care with the hump
assembly and it builds easily with left and right sides. A separate piece
is included to provide the engine bleed air duct in the top of the
avionics hump. A trough in the top of the fuselage helps align the hump.
The shape of the hump conforms well to the top of the fuselage. I only
needed a little super glue filler on the left side above the engine
intake. With care, I filled the void, and it required no sanding. |
Wings and Tail
Surfaces
The next step was to assemble the wings. Like the fuselage, these build up
very easily. No filler was required. Then the critical wing-to-fuselage joining
was made. This is another trouble spot in the Monogram Skyhawk kit. Hasegawa is
still not perfect, but a little tinkering and dry fitting closed the joint so
that no filling was required.
I inserted and glued the horizontal tails, which also needed a minor
adjustment to level them, and was ready to start painting the outside of the
model. I assembled the wing pylons and fuel tanks and placed them aside to be
painted and attached after the model was decaled
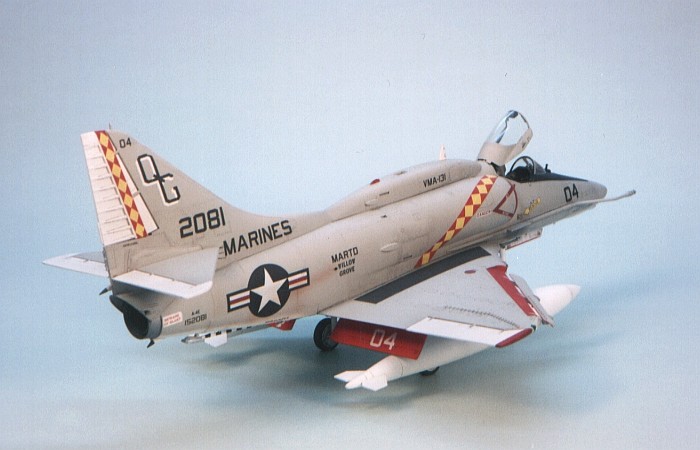
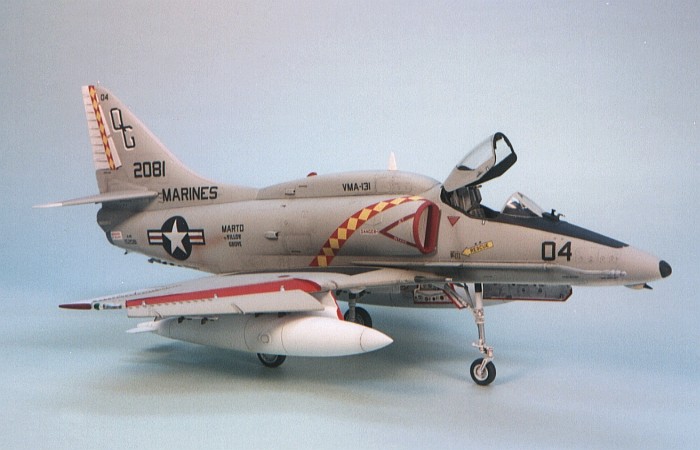
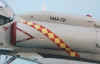
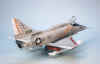
I used all Testors Model Master paints and Metalizers on this model. The
model is finished in the standard camouflage of Light Gull Gray (F.S.36440) with
a Gloss White bottom. I first painted the entire bottom in Gloss White, along
with the upper flight control surfaces. Then, I masked off the flight controls
and painted the Gull Gray topside color. Hasegawa provides decals for the red
engine intake lips. While I prefer painting these, I chose to use the decals and
had no trouble with them fitting and conforming over the intake lips. I also
masked and painted the engine exhaust area in Steel metalizer.
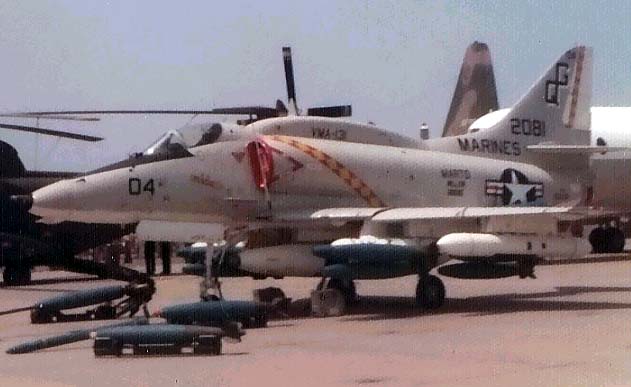
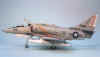
 As
I mentioned above, I wanted to build a model of the Skyhawk, the one I
fell in love with years ago as a kid. My father and I would drive on
Saturday mornings to the local air base and watch the Skyhawks of VMA-131
Diamondbacks line up to have their safety pins pulled before taking off. I
still remember seeing the red and yellow trimmed aircraft. No manufacture
makes decals of VMA-131 Skyhawks, so I needed to create my own. My
memories plus a couple pictures I took at air shows in the middle 1970s
provided me the documentation I needed to create decals for this model. As
I mentioned above, I wanted to build a model of the Skyhawk, the one I
fell in love with years ago as a kid. My father and I would drive on
Saturday mornings to the local air base and watch the Skyhawks of VMA-131
Diamondbacks line up to have their safety pins pulled before taking off. I
still remember seeing the red and yellow trimmed aircraft. No manufacture
makes decals of VMA-131 Skyhawks, so I needed to create my own. My
memories plus a couple pictures I took at air shows in the middle 1970s
provided me the documentation I needed to create decals for this model.
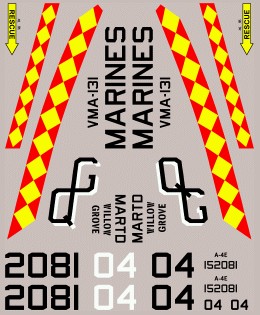
I create the Diamondbacks unit markings in MS Paint on my PC. I then
printed the markings on my ALPS MD-5000 printer to obtain the decals. The
image to the right shows my original artwork for the decals (reduced in
size to save space). I used Hasegawa's kit decals for the aircraft data.
For a setting solution, I used Solv-a-set on all decals. The Hasegawa
decals responded quite well to this solution.
The Diamondbacks aircraft never got that dirty, so I kept it light for
weathering. I used my typical style of thinned down enamel paint washes
and air brush shading. I finished the weathering with some dry brushing to
pop out the surface details. For a more complete discussion of what I do
to weather my models, see my posting on "Weathering Aircraft". |
Great kit!
Go buy one and build it. I spent only three weeks building this model. That
was rather fast for me, a testament to the good engineering that Hasegawa put
into the molds for this model and to my enthusiasm for wanting a Skyhawk sitting
on my display shelves.
With all the great, colorful markings and endless aggressor camouflages that
adorned the Skyhawk over its long career, this is sure to be a popular model
that will show up regularly on the show tables of various model meets.
Additional
Images and Project Summary |
Click the thumbnails below to
view images full-sized.
Click the "Back" arrow on your browser to return to this page.
|

|
Project Statistics |
Completion Date: |
12
January 2001 |
Total Building Time: |
37.7 |
Research
|
0.5 |
Construction: |
12.8 |
Painting
(incl. time to design and print custom
decals): |
16.7 |
Decals /
Markings:
|
7.7 |
Extra Detailing / Conversion: |
0.0 |
|
Models, Description and Images Copyright ©
2000 by David Aungst
Page Created 17 January, 2001
Last Updated 26 July, 2007
Back to HyperScale Main Page
Back to Features Index
|
 Home
| What's New |
Features |
Gallery |
Reviews |
Reference |
Forum |
Search
Home
| What's New |
Features |
Gallery |
Reviews |
Reference |
Forum |
Search