Home
| What's New |
Features |
Gallery |
Reviews |
Reference |
Forum |
Search
Home
| What's New |
Features |
Gallery |
Reviews |
Reference |
Forum |
Search
|
|
|
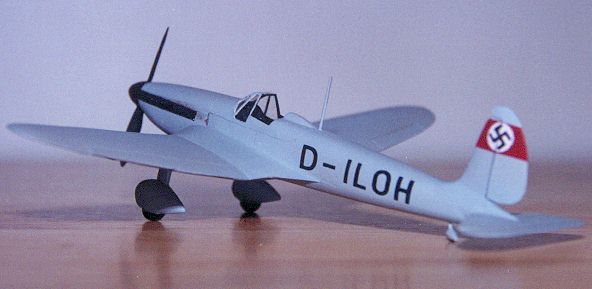
Arado
Ar 80 V-2
Warren scratchbuilds a 1/72 scale model of this graceful aircraft from wood and aluminium
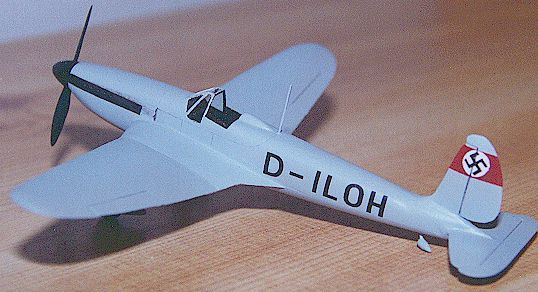
In 1934 several aircraft manufacturers, including Arado, were issued with the criteria for a new single seat all metal monoplane fighter. Having little experience with all metal aircraft, Arado's resulting contender consisted of light alloy upper surfaces with fabric undersurfaces and metal strips riveted to the formers in the fuselage. Assuming the drag from fixed undercarriage would more than compensate the added weight of retraction mechanisms they employed a gull wing to minimize the leg size. Unfortunately, due to a miscalculation, it weighed substantially more than anticipated and trials proved disappointing. The first prototype was destroyed when it crashed after losing control in a low-level maneuver and the completion of the second (D-ILOH) was rushed. It was therefore fitted with a retrograde engine (the Kestrel V). In combination with the earlier problems, the new aircraft could manage a top speed of little more than 250m.p.h. A subsequent prototype was built but the trials provided no reason to continue development. The model portrayed is the second prototype "D-ILOH", which I suspect was a contender against the Messerschmitt Bf109 Prototype for the all-new Luftwaffe front line fighter.
What prompted me to choose this aircraft as a modeling project? SIMPLICITY!!
With fixed undercarriage and a fairly straightforward fuselage and wings the sleek little Arado seemed like the most suitable Luftwaffe aircraft to build totally from scratch. With access to plenty of Jelutung (Gel-u-ton) and scaled up plans from "Aircraft of the Third Reich" by William Green I set about experimenting.
Testing the PrinciplesI experimented with scratchbuilding techniques by making a Mosquito wing to scale. This became very complicated around the nacelle/leading edge join so the wing became a test bed for a simpler project. It was valuable, however, because it allowed me to establish a method of cutting acrylic templates from plans and tracing this over a suitably cut thickness of Jelutung. I found that I could carve three dimensionally by using multiple cross-sections to give me a "footprint" of the Mossie wing.
I carved a rod for the engine nacelle based on the front view. I then used a template of the side and top view that allowed me to carve the nacelle about 95% accurately. The complications arose when trying to cut the engine/wing join. Hoping I could avoid using filler I first tried "well thought out" precision cuts but the more thinking I applied, the more confusing it became! The wing and nacelle taper and curve along so many axes that in the end I made a fairing between the two from filler.
Scratchbuilding a 1/72 Scale Arado Ar 80 V-2 Now it was time to apply the lessons I had learnt.
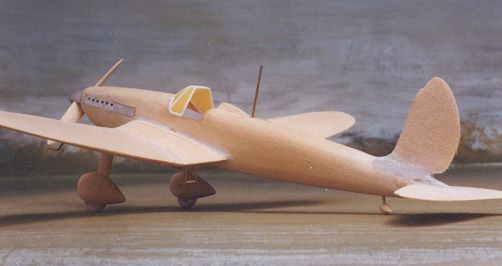
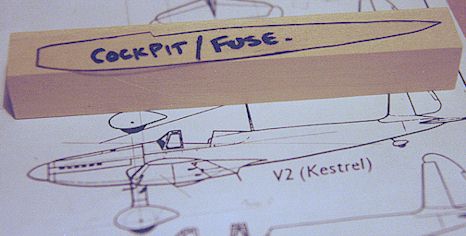
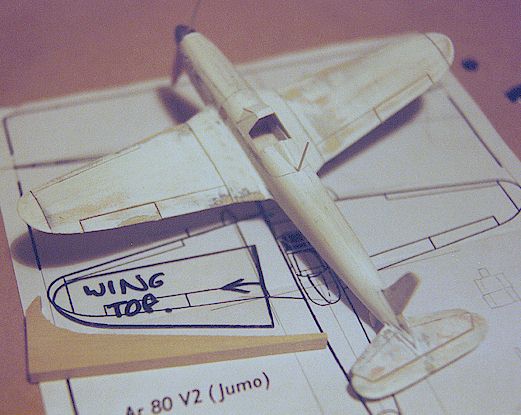
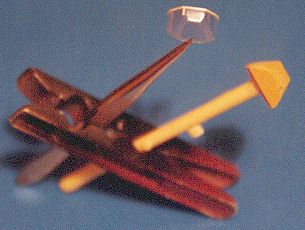
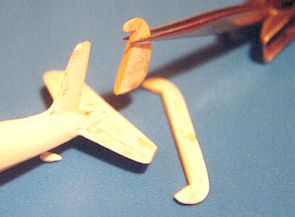
The Arado's fuselage began as a long thin rectangular block of timber. The extremities of its side view were traced for the width of the block and cut using a band saw. The same process was applied for the top view. The remaining shape is difficult to describe but is basically a bendy, curvy pyramid. Using a few cross-sectional guides down the length of the fuselage I could carve the right shape. The wings were made by tracing top view templates over sheets cut to the thickest part of the wing then grinding them down to match the taper. Because the wings "gull" (stuka style) four parts had to be made with the correct mitre on each. Cockpit and exhaust ports were carved out of the timber in big chunks. Aluminium from a Coke can was glued in the drilled out exhaust holes.
Now that I had no hesitation about using filler, wheels, fairings, headrests, etc were all made as subassemblies and glued and filled. The canopy was plunge moulded over the discarded chunk of wood and attached with PVA. Although everything was scratch built (including the coke can seat) the propeller hub is stolen from a Spitfire Mk. I (they looked pretty close). I was concerned that this part might otherwise not look right without the benefit of a lathe.
I sealed the timber with dope and coated it with plenty of Testors primer to compensate for its porous nature. I have since found Feast Watson makes a product called "Sanding Sealer" which works much better. After the primer it was filled even more and primed again. After plenty of sanding I applied few cotes of some closely matched RLM63 Light Grey in gloss.
After applying modified black Letraset radio codes to the fuselage I gave the aircraft a final coat of Tamiya satin (flattened a bit extra). Not much weathering was necessary as the model represents a prototype aircraft still under testing, but enough to represent exhaust and grass stains plus some as a result of being left out in the sun and rain.
I like to jump around between modelling subjects from out of the box, to heavily modified, to scratchbuilt. I thought it was time to try scratchbuilding in a different medium. Different to me anyway! I'm sure that plenty of you made models out of timber for centuries before the invention of plastic!! Timber is far less forgiving, and more difficult to use than plastic. It seems to work to good effect for moulds and jigs but as far as finished surfaces go it's very difficult to master. I have also only tried a small percentage of the timbers around but this experience has taught me enough not to be in any hurry to build a scratchbuilt model again! P.S. Oh, and it makes good bases too.
Click on the thumbnails to view
the images full-sized.
Model, Images and Article
Copyright © 1999 by Warren Meyer Back to HyperScale Main Page Back to Features Page |